Are you wondering where your screenshots end up after you capture them? Understanding where screenshots are saved and how to manage them can significantly enhance your productivity and save you time, especially when you’re aiming to manage your finances efficiently. At savewhere.net, we’re committed to helping you master these digital skills, empowering you to save time and money. Let’s dive into the specifics of screenshot locations and management tips to optimize your workflow, enabling you to focus on your financial goals and savings strategies.
1. Understanding Default Screenshot Locations on Different Operating Systems
Knowing the default location where your screenshots are saved is the first step in effectively managing them. Each operating system has its own standard location, but these can often be customized to suit your needs. Here’s a breakdown to help you pinpoint where your screenshots are likely hiding.
1.1. Windows Operating System
The default location for screenshots on Windows depends on how you take them.
- Using the Print Screen (PrtScn) Key: When you press the Print Screen key, Windows copies an image of your entire screen to the clipboard. To save it as a file, you’ll need to open an image editing program like Paint, paste (Ctrl+V), and then save the image. By default, Paint will usually save files to the “Pictures” folder or the last location you saved an image to.
- Using Windows Key + Print Screen: Pressing the Windows key and Print Screen simultaneously will automatically save a full-screen screenshot as a PNG file in the “Screenshots” folder, which is located inside your “Pictures” folder.
- Using Alt + Print Screen: This captures only the active window. Like the standard Print Screen, you’ll need to paste it into an image editor to save it.
- Using the Snipping Tool or Snip & Sketch: These tools allow you to capture a portion of your screen. You can save the captured image to any location you choose. The default save location is usually the “Pictures” folder.
1.2. macOS Operating System
macOS offers a more consistent approach to saving screenshots.
-
Default Location: By default, screenshots on macOS are saved directly to the Desktop. The files are named “Screenshot [year-month-day at hour.minute.second].png”.
-
Keyboard Shortcuts:
Cmd + Shift + 3: Captures the entire screen.Cmd + Shift + 4: Allows you to select a specific area to capture.Cmd + Shift + 5: Opens the screenshot toolbar, providing additional options such as recording the screen.
-
Screenshot App: Introduced in macOS Mojave, the Screenshot app (accessed via
Cmd + Shift + 5) provides options to change the default save location.
1.3. iOS (iPhone/iPad) Operating System
Screenshots on iOS devices are straightforward.
-
Saving Location: Screenshots are automatically saved to the “Photos” app, specifically in the “Camera Roll” or “Recents” album.
-
Taking a Screenshot:
- With a Home Button: Press the Home button and the Power button simultaneously.
- Without a Home Button: Press the Volume Up button and the Power button simultaneously.
-
Managing Screenshots: From the “Photos” app, you can organize your screenshots into albums, share them, or delete them as needed.
1.4. Android Operating System
The location of screenshots on Android devices can vary slightly depending on the manufacturer and Android version.
-
Common Locations:
- “Pictures/Screenshots” folder in the internal storage.
- “DCIM/Screenshots” folder in the internal storage.
-
Taking a Screenshot: Typically, you can take a screenshot by pressing the Power button and the Volume Down button simultaneously. Some devices may also support taking screenshots via gestures.
-
Accessing Screenshots: You can usually access screenshots through the “Gallery” app or a file manager app.
2. How to Change the Default Screenshot Location
Customizing where your screenshots are saved can help you keep your files organized and easily accessible. Here’s how to change the default screenshot location on different operating systems.
2.1. Changing Screenshot Location on Windows
2.1.1. Using Registry Editor
Warning: Modifying the Registry can cause serious problems if not done correctly. Back up your Registry before proceeding.
- Open Registry Editor: Press
Windows Key + R, typeregedit, and press Enter. - Navigate to the Correct Path: Go to
HKEY_CURRENT_USERSoftwareMicrosoftWindowsCurrentVersionExplorerUser Shell Folders. - Modify the Screenshots Path:
- Find the
{B7BEDE81-D94E-468B-A781-942B8DCE5723}key. - Double-click it to modify.
- Enter the new path where you want to save screenshots (e.g.,
D:MyScreenshots).
- Find the
- Restart Explorer: Open Task Manager (Ctrl+Shift+Esc), find “Windows Explorer,” right-click, and select “Restart.”
2.1.2. Using PowerShell
-
Open PowerShell as Administrator: Right-click the Start button and select “PowerShell (Admin)” or “Terminal (Admin).”
-
Run the Following Command:
New-Item -ItemType Directory -Path "D:MyScreenshots" # Create the new directory if it doesn't exist -
Restart Explorer: Open Task Manager (Ctrl+Shift+Esc), find “Windows Explorer,” right-click, and select “Restart.”
2.1.3. Changing Save Location for Snipping Tool/Snip & Sketch
The Snipping Tool and Snip & Sketch don’t have a default save location setting. Instead, you choose the save location each time you save a snip. To streamline this:
- Always Save to the Same Folder: Create a dedicated folder (e.g., “Screenshots”) and save your snips there consistently.
- Pin the Folder to Quick Access: In File Explorer, right-click the folder and select “Pin to Quick access” for easy access when saving.
2.2. Changing Screenshot Location on macOS
2.2.1. Using Terminal
-
Open Terminal: Go to “Applications” > “Utilities” > “Terminal.”
-
Enter the Following Command:
defaults write com.apple.screencapture location /path/to/your/new/folder
killall SystemUIServer
Replace
/path/to/your/new/folderwith the actual path to the folder you want to use (e.g.,/Users/YourUsername/Documents/Screenshots). -
Verify the Change: Take a new screenshot to confirm it saves to the new location.
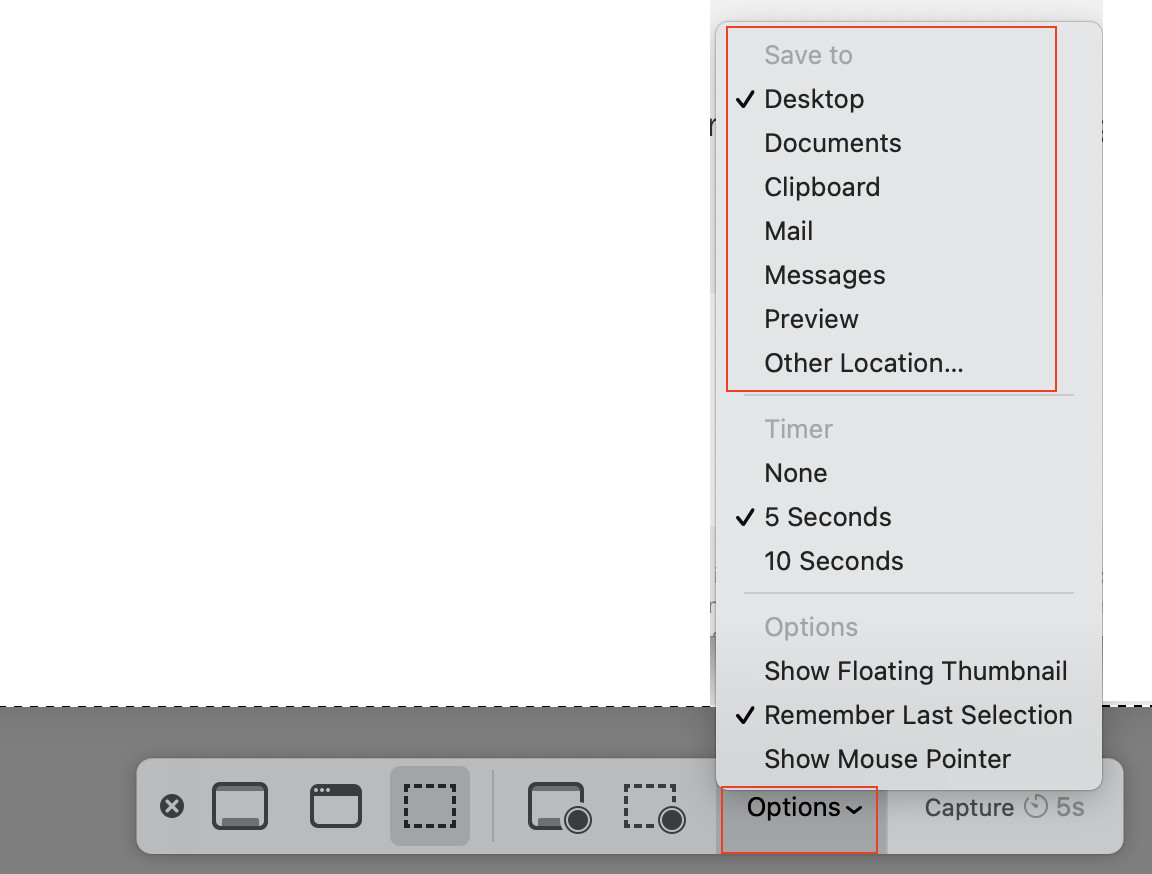
2.2.2. Using the Screenshot App (Cmd + Shift + 5)
- Open the Screenshot App: Press
Cmd + Shift + 5. - Choose Options: In the toolbar that appears, click “Options.”
- Select New Location: Choose “Other Location” and select your desired folder.
2.3. Changing Screenshot Location on Android
Android’s screenshot location is typically fixed, but you can manage screenshots by using file management apps or cloud storage options.
2.3.1. Using File Management Apps
- Download a File Manager: Install a file manager app like “Files by Google” from the Google Play Store.
- Move Screenshots:
- Open the file manager and navigate to the default screenshot location (e.g., “Pictures/Screenshots”).
- Select the screenshots you want to move.
- Choose “Move” and select a new folder.
2.3.2. Using Cloud Storage Apps
- Install a Cloud Storage App: Install a cloud storage app like Google Photos, Dropbox, or OneDrive.
- Configure Auto-Upload:
- Open the app and go to settings.
- Enable auto-upload for the “Screenshots” folder. Your screenshots will automatically be backed up and accessible from any device.
2.4. Automating Screenshot Management
To streamline screenshot management, consider using automation tools and scripts.
2.4.1. Windows: Using Batch Scripts
-
Create a New Text File: Open Notepad and enter the following script:
@echo off
REM Batch script to move screenshots to a specific folder

set "source_folder=%USERPROFILE%PicturesScreenshots"
set "dest_folder=D:Screenshots"

if not exist "%dest_folder%" mkdir "%dest_folder%"

move "%source_folder%*.png" "%dest_folder%"

echo Screenshots moved to %dest_folder%
pause
Modify the
dest_foldervariable to your desired destination. -
Save the File: Save the file with a
.batextension (e.g.,move_screenshots.bat). -
Create a Scheduled Task:
- Open Task Scheduler.
- Create a new Basic Task.
- Set the trigger (e.g., daily or when you log on).
- Set the action to “Start a program” and browse to your
.batfile.
2.4.2. macOS: Using Automator
- Open Automator: Go to “Applications” > “Automator.”
- Create a New Folder Action:
- Choose “Folder Action” as the type of document.
- Select the “Desktop” as the folder to watch.
- Add Actions:
- Add the “Find Finder Items” action and set the search criteria to find files with “Screenshot” in the name.
- Add the “Move Finder Items” action and select your destination folder.
- Save the Workflow: Give your workflow a name and save it.
3. Best Practices for Organizing Screenshots
Effective organization of screenshots can save time and reduce frustration. Here are some best practices to help you keep your screenshots in order.
3.1. Consistent Naming Conventions
Adopt a consistent naming convention to make it easier to find specific screenshots.
- Date and Time: Include the date and time in the filename (e.g.,
2024-07-24_15-30_Screenshot.png). - Descriptive Names: Use descriptive names that reflect the content of the screenshot (e.g.,
Website_Homepage_Screenshot.png). - Keywords: Incorporate relevant keywords to improve searchability (e.g.,
BudgetApp_TransactionPage_Screenshot.png).
3.2. Creating a Logical Folder Structure
Organize screenshots into a logical folder structure based on project, topic, or date.
- By Project: Create separate folders for each project (e.g., “WebsiteRedesign,” “MarketingCampaign”).
- By Topic: Group screenshots by topic (e.g., “Finance,” “Travel,” “Recipes”).
- By Date: Use a date-based structure with folders for each month or year (e.g., “2024-07,” “2024”).
3.3. Tagging and Metadata
Use tagging and metadata to add additional information to your screenshots.
- Windows: Right-click the file, select “Properties,” and go to the “Details” tab to add tags, comments, and other metadata.
- macOS: Select the file in Finder, press
Cmd + Ito open the “Get Info” window, and add tags in the “Tags” field. - Third-Party Apps: Use dedicated tagging apps like “TagSpaces” or “Eagle” for more advanced metadata management.
3.4. Regular Cleaning and Archiving
Regularly review and clean out your screenshot folders to remove unnecessary files.
- Delete Unnecessary Screenshots: Delete screenshots that are no longer needed to free up storage space and reduce clutter.
- Archive Old Screenshots: Move old or infrequently accessed screenshots to an archive folder or external drive.
- Cloud Backup: Back up your screenshot folders to a cloud storage service like Google Drive, Dropbox, or OneDrive for safekeeping.
4. Advanced Screenshot Techniques
Beyond basic screenshotting, several advanced techniques can enhance your productivity and capture more complex information.
4.1. Scrolling Screenshots
Capturing an entire webpage or document that extends beyond the visible screen area can be achieved using scrolling screenshots.
4.1.1. Windows
- Using Third-Party Tools: Use tools like “PicPick,” “ShareX,” or “Greenshot,” which offer built-in scrolling capture features.
- Web Browser Extensions: Install browser extensions like “Full Page Screen Capture” for Chrome or “Nimbus Screenshot & Screen Video Recorder” for Firefox.
4.1.2. macOS
- Using Third-Party Tools: Similar to Windows, use tools like “Snagit” or “CleanShot X” for scrolling capture.
- Built-In Support in Safari: Some websites may support scrolling screenshots directly in Safari using the
Cmd + Shift + 5screenshot toolbar.
4.1.3. Mobile (iOS and Android)
- Built-In Features: Some devices, like Samsung phones, offer built-in scrolling screenshot features. After taking a screenshot, a “Scroll capture” option appears, allowing you to capture more of the screen.
- Third-Party Apps: Use apps like “LongShot” for Android or “Tailor” for iOS to stitch multiple screenshots together into a single scrolling image.
4.2. Delayed Screenshots
Sometimes, you need to capture a screenshot of something that appears only briefly, such as a menu or animation. Delayed screenshots can help.
4.2.1. Windows
- Using the Snipping Tool: The Snipping Tool has a “Delay” option that allows you to set a delay of up to 5 seconds before capturing the screen.
- Using Third-Party Tools: Tools like “Greenshot” and “ShareX” also offer delayed capture options.
4.2.2. macOS
-
Using the Screenshot App: Open the Screenshot app (
Cmd + Shift + 5) and use the “Timer” option to set a delay of up to 10 seconds. -
Using Terminal: Use the
screencapturecommand with the-Toption to specify a delay in seconds:screencapture -T 5 ~/Desktop/delayed_screenshot.pngThis command will take a screenshot after a 5-second delay and save it to the Desktop.
4.3. Annotating Screenshots
Adding annotations to screenshots can help highlight important information and provide context.
4.3.1. Built-In Tools
- Windows: Use Snip & Sketch, which opens automatically after taking a screenshot with
Windows Key + Shift + S. It provides tools for drawing, highlighting, and adding text. - macOS: The Screenshot app (
Cmd + Shift + 5) provides basic annotation tools after capturing a screenshot. You can also use the “Preview” app for more advanced annotation features. - iOS: After taking a screenshot, it opens in a preview mode with markup tools for drawing, highlighting, and adding text.
4.3.2. Third-Party Tools
- Snagit: A powerful screenshot and screen recording tool with extensive annotation features.
- Skitch: A free annotation tool by Evernote for adding arrows, text, shapes, and more.
5. Integrating Screenshots into Your Workflow
Screenshots can be a valuable asset in various workflows, from documentation and collaboration to presentations and tutorials.
5.1. Documentation and Tutorials
Screenshots are essential for creating clear and effective documentation and tutorials.
- Step-by-Step Guides: Use screenshots to illustrate each step in a process, making it easier for users to follow along.
- Software Documentation: Include screenshots of software interfaces to explain features and functions.
- Troubleshooting Guides: Use annotated screenshots to highlight specific issues and solutions.
5.2. Collaboration and Communication
Screenshots can facilitate collaboration and communication by providing visual context.
- Feedback and Reviews: Use annotated screenshots to provide feedback on designs, documents, and websites.
- Bug Reporting: Include screenshots in bug reports to clearly illustrate the issue.
- Remote Support: Guide users through troubleshooting steps by sharing screenshots.
5.3. Presentations and Visual Aids
Screenshots can enhance presentations and visual aids by adding visual interest and clarity.
- Illustrating Concepts: Use screenshots to illustrate abstract concepts and ideas.
- Highlighting Data: Annotate screenshots to highlight key data points and insights.
- Engaging Visuals: Incorporate screenshots into slides to make your presentation more engaging.
5.4. Optimizing Savings with Visual Records
For those focused on saving money, screenshots can be invaluable for tracking and optimizing your financial habits.
- Price Tracking: Capture screenshots of product prices over time to identify the best deals.
- Receipt Management: Take screenshots of digital receipts to keep a visual record of your purchases.
- Budgeting and Expense Tracking: Use screenshots of budgeting apps and expense reports to monitor your financial progress.
6. Common Issues and Troubleshooting
Even with the best practices in place, you might encounter issues with screenshots. Here are some common problems and how to troubleshoot them.
6.1. Screenshots Not Saving
Problem: Screenshots are not being saved to the default location or any location at all.
Solutions:
- Check Default Save Location: Ensure the default save location is correctly configured in your operating system settings or screenshot tool.
- Verify Permissions: Make sure you have the necessary permissions to write to the save location. Try saving to a different location to test if it’s a permissions issue.
- Restart Your Computer: Sometimes a simple restart can resolve temporary glitches that prevent screenshots from saving.
- Check Storage Space: Ensure you have enough free storage space on your hard drive or SSD.
- Update Drivers: Update your graphics drivers, as outdated drivers can sometimes cause issues with screen capture functionality.
- Disable Conflicting Software: Some third-party software, like screen recording tools or cloud storage apps, may interfere with screenshot functionality. Try disabling these temporarily to see if the issue resolves.
6.2. Screenshots Saving in the Wrong Format
Problem: Screenshots are being saved in an unexpected file format (e.g., JPEG instead of PNG).
Solutions:
-
Check Screenshot Tool Settings: Most screenshot tools allow you to specify the file format for saved images. Check the settings of your tool to ensure the correct format is selected.
-
macOS Terminal Command: On macOS, you can use the Terminal command to set the default screenshot format:
defaults write com.apple.screencapture type png
killall SystemUIServer
Replace png with jpg, tiff, or other supported formats as needed.
-
Windows Registry Editor: In Windows, you can modify the default screenshot format in the Registry Editor, though this is less common and more complex.
6.3. Screenshot Quality Issues
Problem: Screenshots appear blurry, pixelated, or otherwise low-quality.
Solutions:
- Use PNG Format: PNG is a lossless format that preserves image quality better than JPEG. Always use PNG for screenshots to avoid compression artifacts.
- Capture at Native Resolution: Ensure your screen resolution is set to the native resolution of your monitor. Capturing screenshots at a lower resolution and then scaling them up can result in quality loss.
- Disable Display Scaling: If you are using display scaling (e.g., 125% or 150% zoom), try setting it back to 100% to see if it improves screenshot quality.
- Adjust Screenshot Tool Settings: Some screenshot tools allow you to adjust the quality settings for saved images. Make sure these settings are set to the highest quality.
6.4. Screenshot Tool Not Working
Problem: Your screenshot tool is not launching, capturing the screen, or functioning correctly.
Solutions:
- Restart the Tool: Close the screenshot tool completely and relaunch it.
- Update the Tool: Check for updates to the screenshot tool and install the latest version.
- Reinstall the Tool: If updating doesn’t work, try uninstalling and reinstalling the screenshot tool.
- Check Compatibility: Ensure the screenshot tool is compatible with your operating system version.
- Run as Administrator: Right-click the screenshot tool’s executable file and select “Run as administrator” to ensure it has the necessary permissions.
- Check for Conflicting Software: Some software, especially security tools, may interfere with screenshot tools. Try disabling these temporarily to see if the issue resolves.
6.5. Keyboard Shortcuts Not Working
Problem: The default keyboard shortcuts for taking screenshots (e.g., PrtScn, Cmd + Shift + 3) are not working.
Solutions:
- Check Keyboard Functionality: Ensure the keys themselves are functioning correctly. Test other keyboard shortcuts or try the keys in a different application.
- Check for Conflicting Shortcuts: Some software may override the default screenshot shortcuts. Check the settings of other applications to see if any are using the same shortcuts.
- macOS Keyboard Settings: On macOS, go to System Preferences > Keyboard > Shortcuts > Screenshots to ensure the default shortcuts are enabled.
- Windows Registry Editor: In Windows, you can modify the screenshot shortcuts in the Registry Editor, but this is an advanced solution and should be done with caution.
7. How Screenshots Can Aid in Saving Money
Screenshots are useful for more than just capturing funny memes or important work documents. They can be a powerful tool for saving money, too. Here’s how.
7.1. Tracking Price Changes
One of the most effective ways to save money is by tracking price changes on items you want to buy. Prices on e-commerce sites can fluctuate wildly, and knowing when to strike can save you a significant amount.
- Documenting Prices: Take screenshots of product pages on different dates. Over time, you’ll build a visual history of price fluctuations.
- Comparison Shopping: Capture screenshots of the same product on different websites to quickly compare prices without having to navigate back and forth.
- Identifying Trends: Review your collection of screenshots to identify patterns. For instance, some items might consistently drop in price on certain days or during specific sales events.
7.2. Monitoring Expenses
Keeping a close eye on your expenses is crucial for effective budgeting. Screenshots can help you maintain a visual record of your spending habits.
- Online Transactions: Take screenshots of your online banking transactions or credit card statements. Highlight areas where you can cut back.
- Receipts and Invoices: If you receive digital receipts or invoices, capture them immediately. Store them in a dedicated folder for easy access during budgeting sessions.
- Subscription Services: Keep screenshots of your subscription service agreements, noting renewal dates and amounts. This helps you remember when to cancel services you no longer need.
7.3. Claiming Rebates and Discounts
Many rebates and discounts require proof of purchase, which can sometimes get lost in the shuffle. Screenshots can provide a handy backup.
- Online Purchases: Capture the confirmation page after making an online purchase. This includes the order number, purchase date, and total amount paid.
- Promotional Codes: Take screenshots of promotional codes or discounts you find online. This ensures you have a visual reminder when you’re ready to make a purchase.
- Rebate Forms: If you fill out a rebate form online, take a screenshot of the completed form before submitting it. This provides a record of the information you provided.
7.4. Documenting Warranties and Guarantees
Warranties and guarantees can save you money on repairs or replacements, but only if you can prove you’re covered.
- Product Pages: Capture screenshots of product pages that include warranty information. Highlight the terms and conditions for quick reference.
- Warranty Certificates: If you receive a digital warranty certificate, take a screenshot and store it with your other product documentation.
- Customer Service Interactions: If you discuss warranty coverage with customer service representatives online, take screenshots of the conversation for future reference.
7.5. Tracking Savings Goals
Visualizing your progress towards savings goals can be a powerful motivator. Screenshots can help you track your journey.
- Savings Account Balances: Capture screenshots of your savings account balances over time. Seeing the numbers increase can be highly encouraging.
- Investment Portfolios: Take regular screenshots of your investment portfolio to monitor its growth.
- Debt Reduction: If you’re working to pay off debt, capture screenshots of your debt balances as you make progress.
8. Tools and Software for Enhanced Screenshot Management
While built-in screenshot tools are sufficient for basic tasks, several third-party tools offer advanced features for enhanced screenshot management.
8.1. Windows-Based Tools
- Snagit: A comprehensive screenshot and screen recording tool with advanced editing and annotation capabilities.
- ShareX: A free and open-source tool with a wide range of capture methods, editing options, and destination choices.
- PicPick: A full-featured tool for image capture, editing, and sharing, suitable for both personal and professional use.
- Greenshot: A lightweight and easy-to-use tool with annotation features and support for various output formats.
8.2. macOS-Based Tools
- CleanShot X: A versatile screenshot tool with scrolling capture, annotation, and cloud storage integration.
- Snagit: Also available for macOS, offering the same powerful features as the Windows version.
- Skitch: A free annotation tool by Evernote for adding arrows, text, shapes, and more.
8.3. Cross-Platform Tools
- Lightshot: A simple and intuitive tool with quick editing and sharing options, available for both Windows and macOS.
- Awesome Screenshot: A browser extension for Chrome and Firefox with capture, annotation, and sharing features.
8.4. Mobile Apps
- LongShot (Android): An app for capturing scrolling screenshots on Android devices.
- Tailor (iOS): An app for stitching multiple screenshots together into a single scrolling image on iOS devices.
9. The Impact of Cloud Storage on Screenshot Accessibility
Cloud storage services play a pivotal role in enhancing the accessibility and management of screenshots across multiple devices.
9.1. Seamless Synchronization
Cloud storage services like Google Drive, Dropbox, and OneDrive enable seamless synchronization of screenshots across all your devices. Any screenshot you take on your computer or mobile device can be automatically uploaded to the cloud and made available on other devices. This ensures that you always have access to your screenshots, regardless of where you are.
9.2. Automated Backup
Cloud storage services offer automated backup capabilities, protecting your screenshots from data loss due to hardware failures, accidental deletions, or other unforeseen events. By configuring your cloud storage service to automatically back up your screenshot folders, you can rest assured that your valuable images are safe and secure.
9.3. Enhanced Collaboration
Cloud storage services facilitate collaboration by allowing you to easily share screenshots with others. You can create shared folders or generate shareable links to provide access to specific screenshots or entire collections of screenshots. This makes it easy to collaborate with colleagues, friends, or family members on projects that involve visual information.
9.4. Centralized Management
Cloud storage services provide a centralized location for managing all your screenshots. You can organize your screenshots into folders, add tags or metadata, and search for specific screenshots using keywords or filters. This makes it easy to keep your screenshots organized and accessible, even if you have thousands of them.
9.5. Access from Anywhere
Cloud storage services allow you to access your screenshots from anywhere in the world, as long as you have an internet connection. You can use the cloud storage service’s website or mobile app to view, download, and share your screenshots from any device. This makes it easy to stay productive and connected, even when you’re on the go.
10. Save Money Today with Savewhere.net!
Mastering the art of screenshot management is more than just a tech skill; it’s a valuable tool for financial savviness. By knowing where your screenshots are saved, how to organize them, and how to use them for tasks like price tracking and expense monitoring, you can make informed decisions that save you money.
At savewhere.net, we’re dedicated to providing you with the tips, tricks, and resources you need to manage your finances effectively. Whether you’re looking for ways to cut costs, track your spending, or save for the future, we’ve got you covered.
Ready to take control of your financial future?
- Visit savewhere.net today to explore our collection of money-saving tips and resources.
- Sign up for our newsletter to receive exclusive deals and insights delivered straight to your inbox.
- Join our community forum to connect with other savvy savers and share your own tips and tricks.
Don’t wait – start saving money today with savewhere.net!
Address: 100 Peachtree St NW, Atlanta, GA 30303, United States
Phone: +1 (404) 656-2000
Website: savewhere.net
 macOS screenshot shortcut
FAQ: Where Are Screenshots Saved?
1. Where do screenshots go on Windows 10?
Screenshots taken using the Windows key + PrtScn shortcut are automatically saved in the “Screenshots” folder inside your “Pictures” folder. If you just press PrtScn, the screenshot is copied to your clipboard and needs to be pasted into an image editor like Paint to be saved.
2. How do I change the default screenshot location on Windows 10?
You can change the default screenshot location by using Registry Editor or PowerShell. In Registry Editor, navigate to HKEY_CURRENT_USERSoftwareMicrosoftWindowsCurrentVersionExplorerUser Shell Folders and modify the {B7BEDE81-D94E-468B-A781-942B8DCE5723} key. Alternatively, use the PowerShell command [Environment]::SetEnvironmentVariable("ScreenshotLocation", "D:MyScreenshots", "User").
3. Where are screenshots saved on a Mac?
By default, screenshots on macOS are saved directly to the Desktop. The files are named “Screenshot [year-month-day at hour.minute.second].png”.
4. Can I change where screenshots are saved on a Mac?
Yes, you can change the default screenshot location on a Mac. You can do this using the Terminal app by entering the command defaults write com.apple.screencapture location /path/to/your/new/folder and then running killall SystemUIServer. Alternatively, you can use the Screenshot app (accessed via Cmd + Shift + 5) and choose “Options” to select a new location.
5. Where do screenshots go on an iPhone?
Screenshots taken on an iPhone are automatically saved to the “Photos” app, specifically in the “Camera Roll” or “Recents” album.
6. How do I find screenshots on my Android phone?
The location of screenshots on Android devices can vary, but they are commonly found in the “Pictures/Screenshots” folder or the “DCIM/Screenshots” folder in the internal storage. You can access them through the “Gallery” app or a file manager app.
7. How can screenshots help me save money?
Screenshots can help you save money by tracking price changes, monitoring expenses, claiming rebates and discounts, documenting warranties and guarantees, and tracking savings goals. They provide a visual record that can help you make informed financial decisions.
8. What are some good tools for managing screenshots?
Some good tools for managing screenshots include Snagit, ShareX, PicPick, Greenshot (for Windows), CleanShot X, Skitch (for macOS), and LongShot, Tailor (for mobile). Cloud storage services like Google Drive, Dropbox, and OneDrive can also help with screenshot management.
9. How do I take a scrolling screenshot?
To take a scrolling screenshot, you can use third-party tools like PicPick, ShareX, or Greenshot (for Windows), Snagit or CleanShot X (for macOS), or apps like LongShot (for Android) and Tailor (for iOS). Some devices and browsers also have built-in scrolling capture features.
10. How do I take a delayed screenshot?
To take a delayed screenshot, you can use the Snipping Tool (Windows), the Screenshot app (Cmd + Shift + 5 on macOS), or third-party tools like Greenshot and ShareX. These tools allow you to set a delay before capturing the screen, giving you time to prepare the screen content.