Saving Google Docs as PDFs on your iPad can vastly improve your document management and financial planning. At savewhere.net, we provide simple methods to convert your documents, ensuring easy access and offline use, which helps you maintain control over your finances and important records. Discover these easy document-saving tips, manage your files effectively, and enhance your financial literacy.
1. What Is The Easiest Way To Save A Google Doc As A PDF On An iPad?
The easiest way to save a Google Doc as a PDF on an iPad is to use the Google Docs app’s built-in “Share & Export” feature. This allows for quick conversion and saving.
Here’s a detailed, step-by-step guide to ensure you can efficiently save your Google Docs as PDFs on your iPad, perfect for managing financial documents and saving important information offline.
-
Open the Google Docs App: Ensure you have the Google Docs app installed on your iPad. If not, download it from the App Store.
-
Select the Document: Launch the app and open the Google Doc you wish to save as a PDF.
-
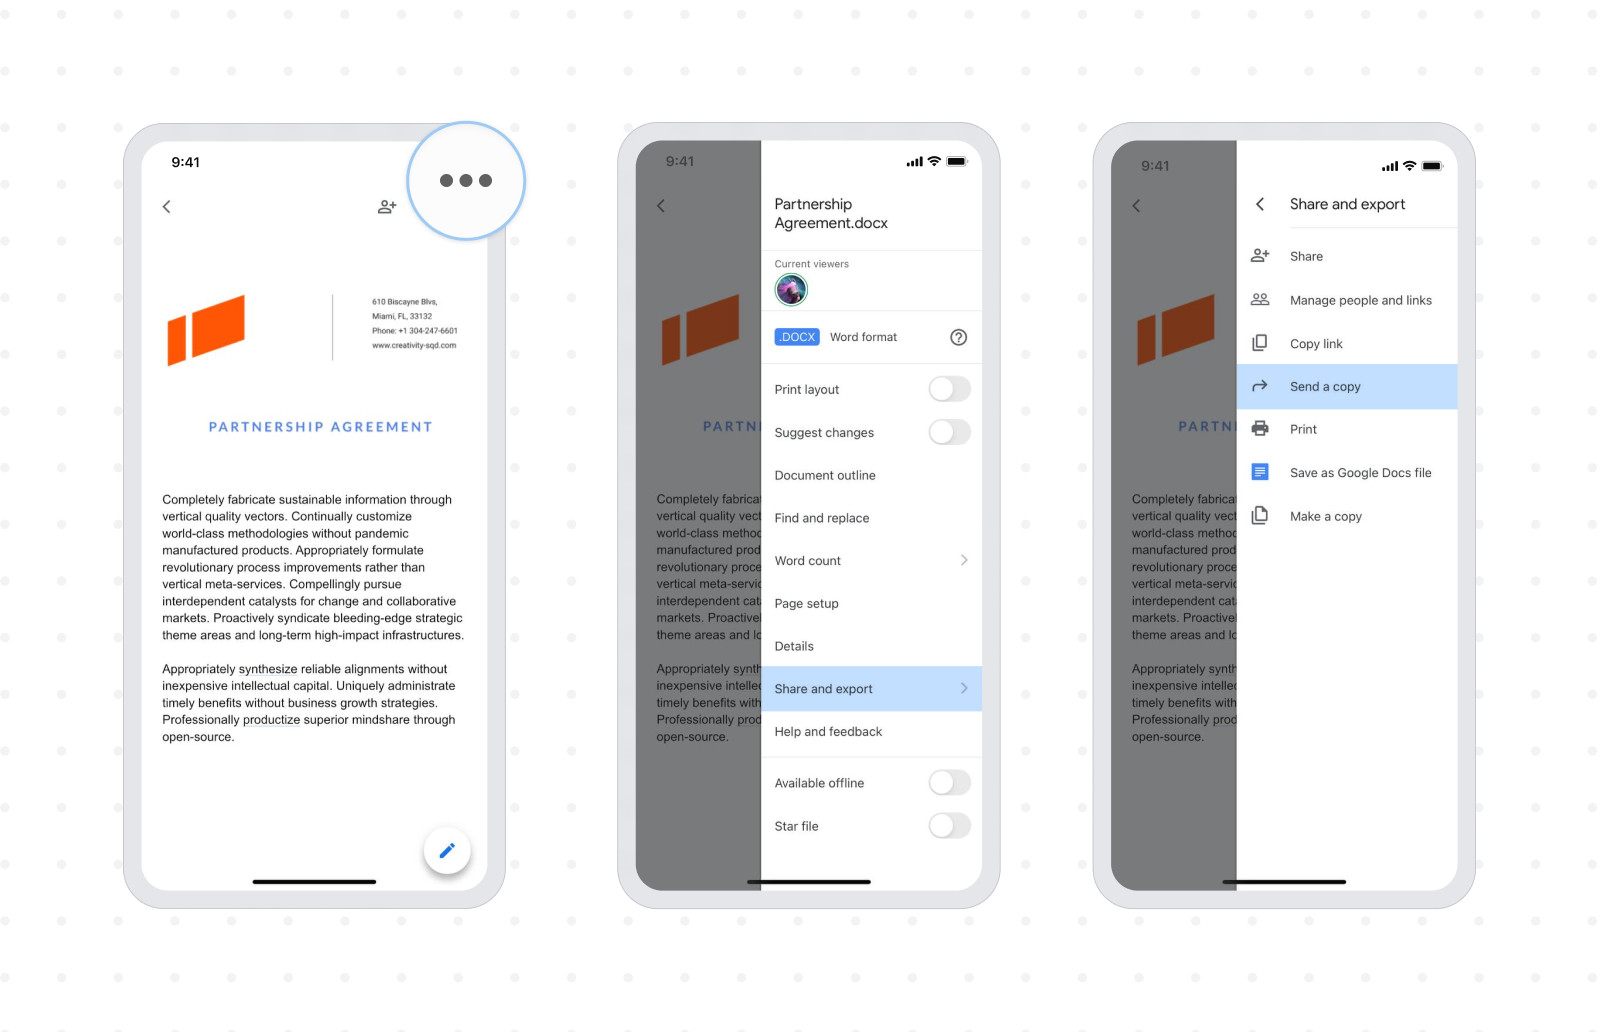
Access the Options Menu: Tap the three dots located in the top right corner of the screen. This will open a drop-down menu with various options.
-
Choose Share & Export: In the menu, select “Share & export.” This option leads to further actions related to sharing and exporting your document.
-
Select Send a Copy: Within the Share & Export menu, tap on “Send a copy.” This prepares the document for conversion and export.
-
Choose PDF Format: You will be prompted to choose the format for the copy. Select “PDF” as the desired format.
-
Confirm and Export: After selecting PDF, tap “OK.” The Google Docs app will then process your document and convert it into a PDF file.
-
Save to Files or Another App: A share sheet will appear, offering various options for saving or sharing the PDF. You can choose to “Save to Files” to store the PDF directly on your iPad, or select another app like “PDF Expert” (available for free on the App Store) for further editing and management.
By following these steps, you can quickly and easily save any Google Doc as a PDF on your iPad, making it simple to manage and share your documents, even without an internet connection. This is especially useful for saving financial plans, budget documents, and other important records that you might want to access offline.
2. Why Should I Save My Google Docs As PDFs On My iPad?
Saving Google Docs as PDFs on your iPad offers benefits like offline accessibility, universal compatibility, and enhanced document security, making it a practical choice for managing important documents.
- Offline Accessibility: One of the most significant advantages of saving Google Docs as PDFs is the ability to access your documents offline. Once a document is saved as a PDF on your iPad, you no longer need an internet connection to view it. This is particularly useful when traveling, in areas with poor connectivity, or when you simply want to ensure you always have access to your important information.
- Universal Compatibility: PDF is a universally accepted file format that can be opened on virtually any device, regardless of the operating system or software installed. This ensures that anyone you share the document with will be able to view it without compatibility issues. This is especially important when sharing financial documents or other critical information with individuals who may use different types of devices or software.
- Enhanced Document Security: PDFs can be password-protected and encrypted, adding an extra layer of security to your sensitive information. This feature is crucial for protecting financial records, personal documents, and other confidential data from unauthorized access. Saving your Google Docs as password-protected PDFs on your iPad helps ensure that your information remains secure.
- Preservation of Formatting: When you save a Google Doc as a PDF, the original formatting, fonts, and layout are preserved. This ensures that the document looks exactly as intended, regardless of the device on which it is viewed. This is particularly important for documents that rely on specific formatting for clarity or professional presentation.
- Easy Sharing and Printing: PDFs are easy to share via email, messaging apps, or cloud storage services. They are also optimized for printing, ensuring that the printed document matches the on-screen version. This makes PDFs ideal for distributing documents to multiple recipients or for creating hard copies for record-keeping purposes.
- Archival Purposes: Saving Google Docs as PDFs is an excellent way to archive important documents. The PDF format ensures that the document will remain accessible and readable for years to come, regardless of changes in software or technology. This is particularly useful for storing financial statements, tax returns, and other long-term records.
Saving Google Docs as PDFs on your iPad offers a range of benefits, including offline accessibility, universal compatibility, enhanced security, and preservation of formatting. Whether you’re managing financial documents, sharing information with others, or archiving important records, saving your Google Docs as PDFs is a practical and reliable solution. This approach helps you maintain control over your documents and ensures that they remain accessible and secure whenever you need them.
3. How Can I Annotate A PDF After Saving It From Google Docs On My iPad?
After saving a Google Doc as a PDF on your iPad, you can annotate it using apps like PDF Expert or Adobe Acrobat Reader, which offer a range of tools for highlighting, adding notes, and signing documents.
Here’s how to annotate a PDF after saving it from Google Docs on your iPad, enabling you to add notes, highlights, and signatures as needed.
-
Choose an Annotation App: There are several apps available on the App Store that allow you to annotate PDFs. Some popular options include PDF Expert, Adobe Acrobat Reader, and Apple Books. For this guide, we will use PDF Expert, which is available for free and offers a comprehensive set of annotation tools.
-
Open the PDF in the Annotation App: Locate the PDF file you saved from Google Docs on your iPad. Tap on the file to open it. If PDF Expert is not your default PDF viewer, you may need to select “Open in PDF Expert” from the share sheet.
-
Select the Annotation Tool: Once the PDF is open in PDF Expert, you will see a toolbar with various annotation tools. These tools may include:
- Highlight: To highlight text.
- Underline: To underline text.
- Notes: To add sticky notes.
- Text Box: To add text directly onto the PDF.
- Drawing: To draw freehand shapes or lines.
- Signature: To add your signature.
-
Annotate the PDF:
- Highlighting: Select the highlight tool, then tap and drag across the text you want to highlight. You can usually change the color of the highlight as well.
- Adding Notes: Select the notes tool, then tap where you want to place the note. A text box will appear where you can type your note.
- Adding Text: Select the text box tool, tap where you want to add text, and start typing. You can usually adjust the font, size, and color of the text.
- Drawing: Select the drawing tool and use your finger or an Apple Pencil to draw on the PDF. You can adjust the thickness and color of the line.
- Adding Signature: Select the signature tool. If you have previously saved your signature in the app, you can select it. Otherwise, you can create a new signature by drawing it on the screen. Once created, tap where you want to place the signature on the PDF.
-
Save Your Annotations: After you have finished annotating the PDF, make sure to save your changes. In PDF Expert, tap the “Done” button, and the app will automatically save your annotations.
By following these steps, you can easily annotate any PDF saved from Google Docs on your iPad. Whether you need to highlight important information, add notes for future reference, or sign a document, annotation apps like PDF Expert provide the tools you need to customize and enhance your PDFs. This is particularly useful for managing and reviewing financial documents, contracts, and other important records.
4. Can I Edit The PDF After Converting It From A Google Doc On My iPad?
Yes, you can edit a PDF after converting it from a Google Doc on your iPad using apps like PDF Expert, which allows you to modify text, add images, and rearrange pages directly within the PDF file.
To edit a PDF after converting it from a Google Doc on your iPad, follow these detailed steps:
-
Choose a PDF Editing App: While you can view PDFs on almost any device, editing them requires a dedicated PDF editing app. Popular choices include PDF Expert, Adobe Acrobat Reader, and Foxit PDF Editor. For this guide, we will focus on using PDF Expert, which is well-regarded for its user-friendly interface and robust editing capabilities.
-
Open the PDF in the Editing App: Locate the PDF file you created from the Google Doc on your iPad. Tap the file to open it. If PDF Expert is not your default PDF viewer, you may need to select “Open in PDF Expert” from the share sheet.
-
Access the Editing Tools: Once the PDF is open in PDF Expert, you will find a toolbar with various editing tools. These tools allow you to modify the PDF in different ways:
- Text Editing: To change existing text or add new text.
- Image Editing: To insert, replace, or resize images.
- Link Editing: To add, modify, or remove hyperlinks.
- Page Editing: To rearrange, delete, or insert pages.
- Annotation Tools: To highlight, underline, or add notes (as discussed in the previous answer).
-
Edit the PDF:
- Text Editing: Select the text editing tool, then tap on the text you want to modify. A text box will appear, allowing you to type in new text or edit the existing text. You can usually adjust the font, size, and color of the text as well.
- Image Editing: Select the image editing tool, then tap on the image you want to modify. You can move, resize, replace, or delete the image. To insert a new image, look for an “Insert Image” option in the toolbar or menu.
- Link Editing: Select the link editing tool, then tap on the link you want to modify. You can change the URL, remove the link, or add a new link by selecting the text you want to link and choosing the “Add Link” option.
- Page Editing: Select the page editing tool, which usually opens a thumbnail view of all the pages in the PDF. You can then drag and drop pages to rearrange them, delete pages by selecting them and choosing the “Delete” option, or insert new pages from another PDF or a blank page.
-
Save Your Changes: After you have finished editing the PDF, make sure to save your changes. In PDF Expert, tap the “Done” button, and the app will automatically save your edits. You may also want to create a backup copy of the original PDF before making any changes, just in case you need to revert to the original version.
By following these steps, you can easily edit any PDF converted from a Google Doc on your iPad. PDF editing apps like PDF Expert provide a range of tools that allow you to modify text, images, links, and pages directly within the PDF file. This is particularly useful for updating financial reports, contracts, and other important documents as needed.
5. What Are The Best Apps For Managing And Saving PDFs On An iPad?
The best apps for managing and saving PDFs on an iPad include PDF Expert, Adobe Acrobat Reader, and Apple Books, each offering unique features for organizing, annotating, and securing your documents.
-
PDF Expert:
- Overview: PDF Expert is a comprehensive PDF editor for iOS devices, known for its fast performance and wide range of features. It allows you to view, annotate, edit, sign, and manage PDF documents with ease.
- Key Features:
- Editing: Modify text, images, and links directly within the PDF.
- Annotation: Highlight, underline, add notes, and draw on PDFs.
- Signing: Create and add digital signatures to documents.
- File Management: Organize PDFs with folders, tags, and search.
- Cloud Integration: Sync PDFs across devices with iCloud, Dropbox, Google Drive, and more.
- Pros: User-friendly interface, robust editing tools, excellent performance.
- Cons: Some advanced features require a paid subscription.
-
Adobe Acrobat Reader:
- Overview: Adobe Acrobat Reader is a widely used PDF viewer and editor developed by Adobe, the creators of the PDF format. It offers a range of tools for viewing, annotating, and managing PDFs on your iPad.
- Key Features:
- Viewing: Open and view PDF files with various viewing options.
- Annotation: Add comments, highlights, and drawings to PDFs.
- Signing: Fill and sign PDF forms and documents.
- Cloud Storage: Access and store PDFs in Adobe Document Cloud.
- Integration: Seamlessly integrates with other Adobe products and services.
- Pros: Trusted brand, reliable performance, wide range of features.
- Cons: Some advanced features require a paid subscription to Adobe Acrobat Pro DC.
-
Apple Books:
- Overview: Apple Books is the built-in e-reader app on iOS devices, which also supports PDF files. While it is primarily designed for reading books, it offers basic PDF viewing and annotation capabilities.
- Key Features:
- Viewing: Open and view PDF files with a clean and intuitive interface.
- Annotation: Add highlights, notes, and bookmarks to PDFs.
- Organization: Organize PDFs into collections and sync them across devices with iCloud.
- Search: Search for specific text within PDF documents.
- Pros: Pre-installed on iOS devices, simple and easy to use, free.
- Cons: Limited editing and advanced features compared to dedicated PDF editors.
These apps provide a range of features to help you manage and save PDFs on your iPad effectively. Whether you need to edit, annotate, sign, or simply organize your PDF documents, there is an app that can meet your needs.
6. How Do I Reduce The File Size Of A PDF Saved From Google Docs On My IPad?
You can reduce the file size of a PDF saved from Google Docs on your iPad by using online compression tools or apps like PDF Expert, which offer compression options to make your files smaller and easier to share.
Here are the methods to reduce the file size of a PDF saved from Google Docs on your iPad, along with detailed steps:
-
Use Online PDF Compression Tools
- Overview: Online PDF compression tools are web-based services that allow you to reduce the file size of your PDFs without installing any software. These tools typically use compression algorithms to remove unnecessary data and optimize the PDF for smaller file sizes.
- Steps:
- Choose an Online PDF Compression Tool: There are many free online PDF compression tools available, such as Smallpdf, iLovePDF, and PDF2Go.
- Upload Your PDF: Go to the website of the PDF compression tool you have chosen. Look for an “Upload” or “Select File” button and tap it to select the PDF file from your iPad.
- Choose Compression Level: Some tools allow you to choose the compression level. A higher compression level will result in a smaller file size but may also reduce the quality of the PDF. If given the option, start with a moderate compression level.
- Compress the PDF: Tap the “Compress” or “Start” button to begin the compression process. The tool will then process your PDF and reduce its file size.
- Download the Compressed PDF: Once the compression is complete, you will be given a link to download the compressed PDF file. Tap the “Download” button to save the smaller PDF to your iPad.
-
Use PDF Expert
-
Overview: PDF Expert is a powerful PDF editor for iOS devices that includes a PDF compression feature. This feature allows you to reduce the file size of your PDFs directly within the app.
-
Steps:
- Open the PDF in PDF Expert: Locate the PDF file you saved from Google Docs on your iPad and open it in PDF Expert.
- Access the Compress Feature: Tap the three dots located in the top right corner of the screen to open the options menu.
- Select “Reduce File Size”: In the menu, look for an option like “Reduce File Size” or “Compress.” Tap this option to open the compression settings.
- Choose Compression Settings: PDF Expert may offer different compression settings, such as “High,” “Medium,” and “Low.” Choose the setting that best balances file size and quality.
- Compress the PDF: Tap the “Compress” button to begin the compression process. PDF Expert will then reduce the file size of your PDF.
- Save the Compressed PDF: Once the compression is complete, PDF Expert will save the compressed PDF as a new file or overwrite the original file, depending on your settings.
-
-
Tips for Reducing PDF File Size:
- Remove Unnecessary Images: Images often contribute to large PDF file sizes. If possible, remove any unnecessary images from the PDF before compressing it.
- Optimize Images: If you need to include images, optimize them for web use by reducing their resolution and file size before inserting them into the Google Doc.
- Remove Unnecessary Fonts: Embedding fonts can also increase PDF file size. If possible, use standard fonts that are commonly available on most devices.
- Flatten Layers: If your PDF contains layers (e.g., from annotations or form fields), flatten the layers to reduce file size.
By following these methods, you can effectively reduce the file size of PDFs saved from Google Docs on your iPad.
7. Can I Password Protect A PDF Saved From Google Docs On My IPad?
Yes, you can password protect a PDF saved from Google Docs on your iPad using apps like PDF Expert or Adobe Acrobat Reader, which offer encryption features to secure your sensitive documents.
Here are the steps on how to password protect a PDF saved from Google Docs on your iPad, along with additional information to ensure your documents are secure:
-
Using PDF Expert
-
Overview: PDF Expert is a comprehensive PDF editor for iOS that includes a robust password protection feature. This allows you to encrypt your PDFs and require a password to open them.
-
Steps:
- Open the PDF in PDF Expert: Locate the PDF file you saved from Google Docs on your iPad and open it in PDF Expert.
- Access the Password Protection Feature: Tap the three dots located in the top right corner of the screen to open the options menu.
- Select “Password Protect”: In the menu, look for an option like “Password Protect” or “Encrypt.” Tap this option to open the password settings.
- Set a Password: You will be prompted to enter a password for the PDF. Choose a strong password that is difficult to guess but easy for you to remember. Consider using a combination of upper and lower case letters, numbers, and symbols.
- Confirm the Password: You may be asked to confirm the password by entering it again. This ensures that you have typed the password correctly.
- Apply Password Protection: Tap the “Apply” or “Protect” button to encrypt the PDF with the password. PDF Expert will then encrypt the PDF, requiring a password to open it.
- Save the Protected PDF: Once the password protection is applied, PDF Expert will save the protected PDF as a new file or overwrite the original file, depending on your settings.
-
-
Using Adobe Acrobat Reader
-
Overview: Adobe Acrobat Reader is another popular PDF viewer and editor that offers password protection features. While the basic version of Acrobat Reader has limited editing capabilities, it does allow you to password protect PDFs with a subscription to Adobe Acrobat Pro DC.
-
Steps:
- Subscribe to Adobe Acrobat Pro DC: To access the password protection feature, you need to have a subscription to Adobe Acrobat Pro DC. You can subscribe through the Adobe Acrobat Reader app.
- Open the PDF in Adobe Acrobat Reader: Locate the PDF file you saved from Google Docs on your iPad and open it in Adobe Acrobat Reader.
- Access the Password Protection Feature: Tap the “More” icon (usually three dots or lines) to open the options menu.
- Select “Protect PDF”: In the menu, look for an option like “Protect PDF” or “Encrypt.” Tap this option to open the password settings.
- Set a Password: You will be prompted to enter a password for the PDF. Choose a strong password that is difficult to guess but easy for you to remember.
- Apply Password Protection: Tap the “Apply” or “Protect” button to encrypt the PDF with the password. Adobe Acrobat Reader will then encrypt the PDF, requiring a password to open it.
- Save the Protected PDF: Once the password protection is applied, Adobe Acrobat Reader will save the protected PDF as a new file or overwrite the original file, depending on your settings.
-
By following these steps, you can easily password protect any PDF saved from Google Docs on your iPad, ensuring that only authorized individuals can access your sensitive information.
8. How Can I Organize My Saved PDFs On My IPad For Easy Access?
You can organize your saved PDFs on your iPad using the Files app, creating folders and tags to categorize documents for easy access and efficient management.
Here are the detailed steps on how to organize your saved PDFs on your iPad for easy access:
-
Using the Files App:
-
Overview: The Files app is a built-in file management app on iOS devices that allows you to access and organize files stored on your iPad, in iCloud Drive, and in other cloud storage services.
-
Steps:
- Open the Files App: Locate the Files app icon on your iPad and tap it to open.
- Navigate to Your PDFs: Use the Browse tab to navigate to the location where your PDFs are stored. This could be “On My iPad,” “iCloud Drive,” or another cloud storage service like Dropbox or Google Drive.
- Create Folders:
- To create a new folder, tap the folder icon (usually located at the top of the screen).
- Give the folder a descriptive name that reflects the type of PDFs you will store in it (e.g., “Financial Records,” “Contracts,” “Personal Documents”).
- Tap “Done” to create the folder.
- Move PDFs into Folders:
- Tap the “Select” button (usually located at the top right corner of the screen).
- Select the PDFs you want to move by tapping on them.
- Tap the “Move” button (usually located at the bottom of the screen).
- Choose the folder you want to move the PDFs to and tap “Move.”
- Use Tags:
- In the Files app, you can also use tags to categorize your PDFs.
- To add a tag, long-press on a PDF file.
- Tap “Tags” from the options that appear.
- Choose an existing tag or create a new tag by tapping “New Tag.”
- Give the tag a descriptive name (e.g., “Important,” “Urgent,” “Confidential”) and choose a color for the tag.
- Tap “Done” to add the tag to the PDF.
- Search for PDFs:
- Use the search bar in the Files app to quickly find PDFs by name, tag, or other criteria.
- Tap the search bar and enter your search term. The Files app will display a list of PDFs that match your search.
-
By following these steps, you can effectively organize your saved PDFs on your iPad for easy access. Whether you choose to use folders, tags, or a combination of both, these strategies will help you keep your PDFs organized and accessible whenever you need them.
9. What Are The Privacy Implications Of Saving Google Docs As PDFs On My IPad?
Saving Google Docs as PDFs on your iPad can improve privacy by keeping documents offline and reducing reliance on cloud storage, but you should secure the device and the PDFs themselves to prevent unauthorized access.
-
Offline Storage:
- Benefit: When you save Google Docs as PDFs on your iPad, you can access them offline without needing an internet connection. This reduces the risk of unauthorized access via cloud services.
- Consideration: Ensure your iPad is password-protected and has appropriate security settings to prevent unauthorized access to your device.
-
Data Encryption:
- Benefit: Saving PDFs allows you to encrypt them with password protection, adding an extra layer of security.
- Consideration: Use strong, unique passwords for your PDFs. Avoid using easily guessable information like birthdays or common words.
-
App Permissions:
- Benefit: Using dedicated PDF apps like PDF Expert or Adobe Acrobat Reader can provide more control over your documents.
- Consideration: Review the permissions granted to these apps to ensure they are not accessing more data than necessary. Be cautious about apps that request unnecessary permissions.
-
Backup and Sync:
- Benefit: Saving PDFs gives you control over backup processes, allowing you to choose secure methods.
- Consideration: If you sync your PDFs to cloud services like iCloud or Google Drive, ensure these services have strong security measures, including encryption and two-factor authentication.
-
Data Disposal:
- Benefit: Managing PDFs on your iPad allows you to securely delete or dispose of sensitive documents when they are no longer needed.
- Consideration: When deleting PDFs, ensure they are completely removed from your device and any cloud storage services. Use secure deletion methods if necessary.
By understanding and addressing these privacy implications, you can confidently save and manage your Google Docs as PDFs on your iPad, ensuring your sensitive information remains protected.
10. Where Can I Find More Tips And Resources For Managing My Finances On My IPad?
You can find more tips and resources for managing your finances on your iPad at savewhere.net, which offers a wealth of information on budgeting, saving, and financial planning tailored for mobile users.
At savewhere.net, we understand the importance of having access to reliable and practical financial advice, especially when you’re on the go. Our website is dedicated to providing you with a wide array of resources to help you manage your finances effectively using your iPad. Here’s what you can expect to find:
-
Budgeting Tips and Templates:
- Detailed Guides: Learn how to create a budget that suits your lifestyle and financial goals. Our guides cover everything from tracking your income and expenses to setting realistic savings targets.
- iPad-Friendly Templates: Download free budgeting templates optimized for use on your iPad. These templates are designed to work seamlessly with apps like Numbers (Apple’s spreadsheet app) or Google Sheets, making it easy to input and analyze your financial data.
-
Saving Strategies:
- Practical Advice: Discover actionable tips and strategies for saving money in various aspects of your life, from grocery shopping and dining out to travel and entertainment.
- Automation Tools: Learn how to automate your savings using apps that round up your purchases and deposit the spare change into a savings account.
-
Investment Insights:
- Beginner’s Guides: Get started with investing using our beginner-friendly guides. Learn about different investment options, such as stocks, bonds, mutual funds, and ETFs, and how to choose the right investments for your risk tolerance and financial goals.
- Investment Apps: Explore mobile apps that allow you to invest directly from your iPad, with features like commission-free trading and automated portfolio management.
-
Debt Management:
- Debt Reduction Strategies: Learn how to create a debt repayment plan and strategies for paying off high-interest debt, such as credit card balances and personal loans.
- Debt Consolidation: Discover how debt consolidation loans can simplify your finances by combining multiple debts into a single, manageable payment.
-
Financial Planning:
- Goal Setting: Set clear financial goals, such as buying a home, saving for retirement, or funding your children’s education.
- Retirement Planning: Learn how to estimate your retirement needs and create a savings plan that will help you achieve your retirement goals.
- Estate Planning: Understand the basics of estate planning and how to create a will, trust, or other estate planning documents to protect your assets and ensure your wishes are carried out.
-
Financial Literacy Resources:
- Articles and Guides: Access a wealth of articles, guides, and tutorials on various financial topics, from understanding credit scores to managing taxes.
- Glossary of Terms: Refer to our glossary of financial terms to understand common financial jargon and concepts.
-
Community Support:
- Forums and Discussion Boards: Connect with other iPad users who are managing their finances and share tips, ask questions, and get support.
- Success Stories: Read inspiring success stories of individuals who have achieved their financial goals using the strategies and resources available on savewhere.net.
We are committed to providing you with the information and tools you need to take control of your finances and achieve your financial goals. Visit savewhere.net today to start your journey towards financial success!
FAQ About Saving Google Docs as PDFs on iPad
1. Can I save a Google Doc as a PDF on my iPad without an internet connection?
No, you need an internet connection to initially export the Google Doc to a PDF. However, once saved as a PDF on your iPad, you can access it offline.
2. Is it free to save Google Docs as PDFs on my iPad?
Yes, using the built-in features of Google Docs and the Files app on your iPad to save documents as PDFs is completely free.
3. Will saving a Google Doc as a PDF change the formatting?
Saving as a PDF generally preserves the original formatting, ensuring the document looks the same as it does in Google Docs.
4. What apps can I use to edit PDFs on my iPad after saving them from Google Docs?
Popular apps for editing PDFs on iPad include PDF Expert and Adobe Acrobat Reader.
5. How do I password protect a PDF on my iPad?
You can password protect a PDF using apps like PDF Expert or Adobe Acrobat Reader, which offer encryption features.
6. Can I reduce the file size of a PDF on my iPad?
Yes, you can reduce the file size using online compression tools or apps like PDF Expert.
7. How do I organize my PDFs on my iPad?
Use the Files app to create folders and tags to categorize and manage your PDFs efficiently.
8. What are the privacy implications of saving Google Docs as PDFs on my iPad?
Saving PDFs offline enhances privacy, but you should secure your device and encrypt sensitive PDFs.
9. Can I convert a PDF back to a Google Doc on my iPad?
Yes, you can convert a PDF back to a Google Doc using Google Drive’s OCR (Optical Character Recognition) feature.
10. Where can I find more tips for managing finances on my iPad?
Visit savewhere.net for tips on budgeting, saving, and financial planning tailored for iPad users.
At savewhere.net, we’re dedicated to providing you with the insights and tools you need to manage your finances effectively. We encourage you to explore our website, discover valuable savings tips, and connect with a community of like-minded individuals. Whether you’re looking to create a budget, save for a specific goal, or simply improve your financial literacy, we’re here to support you every step of the way.
Visit savewhere.net today at 100 Peachtree St NW, Atlanta, GA 30303, United States, or call us at +1 (404) 656-2000 to learn more and take control of your financial future. Start saving smarter with savewhere.net today!
 Google Docs to PDF