
Saving files in PDF format is crucial for ensuring they remain unchanged while being easily shared and printed, so savewhere.net is here to guide you. Are you looking for simple, effective ways to create PDF documents? We’ll explore different methods to help you manage your files efficiently and protect your important information. Let’s dive into the world of digital document management.
1. What Is PDF And Why Should You Save Files As PDF?
PDF, or Portable Document Format, is a versatile file format created by Adobe in the early 1990s. It’s designed to present and exchange documents reliably, independent of software, hardware, or operating systems. This means a PDF file will look the same no matter where you open it, whether it’s on a Mac, a PC, a smartphone, or a tablet.
1.1. Preserving Formatting
One of the primary reasons to save files as PDFs is to preserve their formatting. Unlike other document formats that can shift fonts, images, and layouts when opened on different systems, PDFs maintain the original design. This is particularly important for documents like resumes, contracts, and reports where visual consistency is crucial. According to Adobe, PDF ensures that your documents appear exactly as intended, regardless of the viewing device or software.
1.2. Ensuring Compatibility
PDFs are universally compatible. Virtually every device and operating system can open a PDF file, often without needing additional software. This broad compatibility makes PDFs ideal for sharing documents with a wide audience, ensuring that everyone can access the information without compatibility issues.
1.3. Enhancing Security
PDFs offer various security features to protect sensitive information. You can add passwords to restrict who can open, print, or edit the document. Digital signatures can also be applied to verify the authenticity and integrity of the PDF, ensuring that the document hasn’t been altered since it was signed. This makes PDFs a secure choice for sharing confidential documents, such as legal agreements and financial statements.
1.4. Reducing File Size
PDFs can be optimized to reduce file size without sacrificing quality. This is particularly useful for documents with high-resolution images or complex graphics. Smaller file sizes make it easier to share documents via email or upload them to websites, saving bandwidth and storage space.
1.5. Archiving Documents
PDF/A is a specific PDF standard designed for long-term archiving. It ensures that the document will be accessible and readable in the future by embedding all necessary fonts and resources within the file. This makes PDF/A an excellent choice for preserving important documents like historical records, legal archives, and research papers.
1.6. Streamlining Workflows
PDFs can streamline document workflows by enabling features like fillable forms and annotations. Fillable forms allow users to enter information directly into the PDF, making it easy to collect data and process applications. Annotations, such as comments, highlights, and stamps, facilitate collaboration and feedback on documents.
1.7. Supporting Accessibility
PDFs can be made accessible to people with disabilities by adding tags that provide structural information to screen readers. These tags help users navigate the document and understand the content. Accessible PDFs comply with accessibility standards like WCAG (Web Content Accessibility Guidelines), ensuring that everyone can access the information.
1.8. Common Uses of PDF Files
- Business Reports: Ensuring consistent formatting across different platforms.
- Legal Documents: Securely sharing contracts and agreements.
- Academic Papers: Preserving the layout and citations.
- E-books: Providing a standardized reading experience.
- Resumes: Maintaining a professional appearance for job applications.
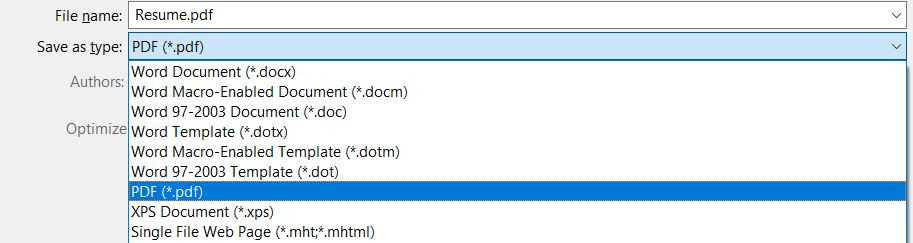 Save As PDF screenshot showing the file menu
2. How to Save a File as PDF on Windows?
Saving a file as a PDF on Windows is a straightforward process. Here’s a step-by-step guide to help you convert your documents into PDF format.
2.1. Using the “Save As” Option
This method is the most common and works across various applications like Microsoft Word, Excel, and PowerPoint.
-
Step 1: Open the Document
Start by opening the file you want to save as a PDF. This could be a Word document, an Excel spreadsheet, or any other type of file.
-
Step 2: Click the “File” Tab
In the application, click on the “File” tab, usually located in the top-left corner of the window.
-
Step 3: Select “Save As”
From the dropdown menu, choose “Save As”. This option allows you to save a copy of your file in a different format.
-
Step 4: Choose a File Name and Location
In the “Save As” dialog box, enter a name for your PDF file. Then, select the folder where you want to save the file.
-
Step 5: Select “PDF” as the File Type
Click on the dropdown menu labeled “Save as type” (or a similar label). From the list of available file formats, select “PDF (*.pdf)”.
-
Step 6: Adjust Options (Optional)
Before saving, you might see an “Options” button. Clicking this allows you to customize settings like page range, image quality, and security features. This step is optional but can be useful for specific needs.
-
Step 7: Click “Save”
Finally, click the “Save” button to convert your file to PDF format. The application will create a PDF version of your document in the selected folder.
2.2. Using the “Print to PDF” Option
Another method to save a file as a PDF on Windows is by using the “Print to PDF” option. This method is useful when the “Save As” option is not available or when you want to create a PDF from applications that don’t directly support PDF saving.
-
Step 1: Open the Document
Open the file you wish to convert to PDF. This method works with almost any application that supports printing.
-
Step 2: Click the “File” Tab and Select “Print”
Go to the “File” tab and select “Print”. This will open the print dialog box.
-
Step 3: Choose “Microsoft Print to PDF” as the Printer
In the print dialog box, find the printer selection dropdown menu. Choose “Microsoft Print to PDF” from the list of available printers. This is a virtual printer that comes standard with Windows 10 and later versions.
-
Step 4: Adjust Print Settings (Optional)
Before printing, you can adjust print settings like page orientation, paper size, and margins. These settings will affect the layout of the PDF file.
-
Step 5: Click “Print”
Click the “Print” button. Instead of printing a physical copy, Windows will prompt you to choose a location to save the PDF file.
-
Step 6: Choose a File Name and Location
In the “Save As” dialog box, enter a name for your PDF file and select the folder where you want to save it.
-
Step 7: Click “Save”
Click the “Save” button to create the PDF file. Windows will convert the document to PDF format and save it in the specified location.
2.3. Using Third-Party PDF Converters
If you need more advanced features or specific conversion options, you can use third-party PDF converters. These tools often offer additional functionalities like merging PDFs, editing PDFs, and adding security features.
-
Step 1: Choose a PDF Converter
Research and choose a PDF converter that suits your needs. Some popular options include Adobe Acrobat, Nitro PDF, and Smallpdf. Many of these tools offer free trials or basic free versions.
-
Step 2: Install the PDF Converter
Download and install the PDF converter on your Windows computer. Follow the installation instructions provided by the software.
-
Step 3: Open the Document
Open the file you want to convert using the PDF converter. This can usually be done by right-clicking the file and selecting “Open with” followed by the name of the PDF converter.
-
Step 4: Convert to PDF
The PDF converter will typically have a “Convert to PDF” option. Select this option to start the conversion process.
-
Step 5: Adjust Conversion Settings (Optional)
Before converting, you can adjust various settings such as compression level, security options, and OCR (Optical Character Recognition) settings. These settings can help you optimize the PDF file for your specific needs.
-
Step 6: Save the PDF File
Choose a name and location for the PDF file and click “Save”. The PDF converter will create the PDF file and save it in the specified location.
2.4. Additional Tips for Saving PDFs on Windows
- Optimize for Web: When saving a PDF for online use, choose the “Optimize for Web” option. This reduces the file size, making it faster to load on websites.
- Secure Your PDFs: Add passwords and restrictions to protect sensitive information.
- Use OCR: If you are scanning a document to PDF, use OCR to make the text searchable and selectable.
- Keep Software Updated: Ensure your PDF software is up to date to benefit from the latest features and security updates.
2.5. Benefits of Saving as PDF on Windows
- Compatibility: PDFs can be opened on any device, regardless of the operating system.
- Preservation of Formatting: Ensures your document looks the same on all devices.
- Security: Offers options to password protect and secure your documents.
- File Size Reduction: Allows you to compress files for easier sharing.
- Archiving: PDF/A format ensures long-term accessibility of your documents.
3. How to Save a File as PDF on Mac?
Saving a file as a PDF on a Mac is a straightforward process, thanks to macOS’s built-in PDF support. Here’s how you can easily convert your documents into PDF format using various methods.
3.1. Using the “Print” Dialog
The most common and convenient way to save a file as a PDF on a Mac is through the “Print” dialog. This method works with virtually any application that supports printing.
-
Step 1: Open the Document
Begin by opening the file you wish to save as a PDF. This could be a document in Pages, a spreadsheet in Numbers, a presentation in Keynote, or any other type of file.
-
Step 2: Go to “File” and Select “Print”
In the application’s menu bar, click on “File” and then select “Print” from the dropdown menu. Alternatively, you can use the keyboard shortcut
Command + Pto open the print dialog. -
Step 3: Click the “PDF” Button
In the print dialog, look for the “PDF” button, typically located in the bottom-left corner of the window.
-
Step 4: Choose “Save as PDF”
Click the “PDF” button to reveal a dropdown menu. From this menu, select “Save as PDF”. This will open a save dialog box where you can specify the name and location for your PDF file.
-
Step 5: Name and Save the PDF
In the save dialog box, enter a name for your PDF file in the “Save As” field. Then, choose the folder where you want to save the file using the “Where” dropdown menu.
-
Step 6: Add Metadata (Optional)
Before saving, you can add metadata to your PDF, such as the title, author, subject, and keywords. This can be useful for organizing and searching for your PDFs later. To add metadata, click the “Options” button in the save dialog box.
-
Step 7: Click “Save”
Finally, click the “Save” button to convert your file to PDF format. macOS will create a PDF version of your document in the specified location.
3.2. Using the “Export” Option
Some applications, like Pages, Numbers, and Keynote, offer an “Export” option that allows you to directly save your file as a PDF.
-
Step 1: Open the Document
Open the file you wish to save as a PDF in the relevant application (e.g., Pages for a document, Numbers for a spreadsheet).
-
Step 2: Go to “File” and Select “Export To”
In the application’s menu bar, click on “File”, then hover over “Export To” in the dropdown menu.
-
Step 3: Choose “PDF”
From the “Export To” submenu, select “PDF”. This will open a dialog box with PDF export options.
-
Step 4: Customize PDF Options (Optional)
In the export dialog box, you can customize various PDF options, such as image quality, encryption, and accessibility features. Adjust these settings to suit your needs.
-
Step 5: Click “Next”
After setting your desired options, click the “Next” button.
-
Step 6: Name and Save the PDF
Enter a name for your PDF file in the “Save As” field and choose the folder where you want to save the file using the “Where” dropdown menu.
-
Step 7: Click “Export”
Click the “Export” button to create the PDF file. The application will convert the document to PDF format and save it in the specified location.
3.3. Using Preview
Preview, macOS’s built-in image and PDF viewer, can also be used to save files as PDFs. This is particularly useful for converting image files to PDF.
-
Step 1: Open the File in Preview
Open the file you wish to convert to PDF using Preview. You can do this by right-clicking the file in Finder, selecting “Open With”, and then choosing “Preview”.
-
Step 2: Go to “File” and Select “Print”
In Preview’s menu bar, click on “File” and then select “Print” from the dropdown menu.
-
Step 3: Click the “PDF” Button
In the print dialog, click the “PDF” button in the bottom-left corner.
-
Step 4: Choose “Save as PDF”
From the dropdown menu, select “Save as PDF”.
-
Step 5: Name and Save the PDF
Enter a name for your PDF file in the “Save As” field and choose the folder where you want to save the file using the “Where” dropdown menu.
-
Step 6: Click “Save”
Click the “Save” button to create the PDF file. Preview will convert the file to PDF format and save it in the specified location.
3.4. Additional Tips for Saving PDFs on Mac
- Use Quartz Filters: macOS includes Quartz filters that allow you to apply effects to your PDFs, such as reducing file size or converting colors.
- Add Password Protection: To protect sensitive information, you can add password protection to your PDFs using the “Security Options” in the save dialog.
- Optimize for Web: When saving a PDF for online use, choose the “Optimize for Web” option to reduce the file size.
- Use Automator: For repetitive tasks, you can create an Automator workflow to automatically convert files to PDF.
3.5. Benefits of Saving as PDF on Mac
- Built-in Support: macOS offers excellent built-in support for creating PDFs, making it easy and convenient.
- Compatibility: PDFs can be opened on any device, regardless of the operating system.
- Preservation of Formatting: Ensures your document looks the same on all devices.
- Security: Offers options to password protect and secure your documents.
- File Size Reduction: Allows you to compress files for easier sharing.
- Integration: Seamless integration with macOS applications and features.
4. How to Save a File as PDF on Mobile (iOS and Android)?
Saving files as PDFs on mobile devices (iOS and Android) is increasingly important for on-the-go productivity. Here’s how to do it on both platforms:
4.1. Saving as PDF on iOS (iPhone and iPad)
iOS provides several ways to save files as PDFs, making it convenient to create and share documents directly from your iPhone or iPad.
4.1.1. Using the “Print” Option
The “Print” option is a versatile method for saving various types of files as PDFs on iOS.
-
Step 1: Open the Document
Start by opening the file you want to save as a PDF. This could be a document in Pages, a spreadsheet in Numbers, an email, a webpage, or any other type of file.
-
Step 2: Tap the “Share” Icon
Look for the “Share” icon, which typically looks like a square with an arrow pointing upwards. Tap the icon to open the share sheet.
-
Step 3: Scroll Down and Tap “Print”
In the share sheet, scroll down until you find the “Print” option. Tap “Print” to open the print options.
-
Step 4: Use the Pinch-to-Zoom Gesture on the Document Preview
In the print options, you’ll see a preview of the document. Use the pinch-to-zoom gesture (place two fingers on the screen and move them apart) on the document preview. This will open the document in a PDF format.
-
Step 5: Tap the “Share” Icon Again
Once the document is opened as a PDF, tap the “Share” icon again.
-
Step 6: Choose Where to Save or Share the PDF
In the share sheet, you can choose to save the PDF to “Files”, email it, save it to cloud storage like iCloud Drive or Google Drive, or share it via messaging apps. Select the desired option and follow the prompts to save or share your PDF.
4.1.2. Using the “Markup” Feature
The “Markup” feature in iOS is another handy way to save files as PDFs, especially when you want to annotate or edit the document before saving it.
-
Step 1: Open the Document
Open the file you want to save as a PDF. This method works well with images, webpages, and documents.
-
Step 2: Take a Screenshot
Take a screenshot of the document by pressing the side button (or top button on older devices) and the volume up button simultaneously.
-
Step 3: Tap the Screenshot Preview
A preview of the screenshot will appear in the bottom-left corner of the screen. Tap the preview to open the screenshot in Markup mode.
-
Step 4: Annotate the Document (Optional)
In Markup mode, you can use various tools to annotate the document, such as drawing, highlighting, adding text, and signing.
-
Step 5: Tap “Done”
After making any desired annotations, tap “Done” in the top-left corner of the screen.
-
Step 6: Choose Where to Save the PDF
You’ll be presented with options to save the PDF to “Photos” or “Files”. If you choose “Files”, you can select a specific folder in iCloud Drive or another cloud storage service. Select the desired option and tap “Save”.
4.1.3. Using Third-Party Apps
Several third-party apps on the App Store allow you to save files as PDFs, often with additional features like editing, merging, and converting.
-
Step 1: Download a PDF Converter App
Visit the App Store and download a PDF converter app. Some popular options include Adobe Acrobat Reader, PDF Expert, and Smallpdf.
-
Step 2: Open the File in the App
Open the file you want to convert to PDF using the PDF converter app. This can usually be done by tapping the “Share” icon in the original app and selecting the PDF converter app from the share sheet.
-
Step 3: Convert to PDF
In the PDF converter app, follow the instructions to convert the file to PDF format. This usually involves tapping a “Convert” or “Save as PDF” button.
-
Step 4: Save the PDF
Choose a location to save the PDF file. This could be in the app’s own storage, iCloud Drive, or another cloud storage service.
4.1.4. Tips for Saving PDFs on iOS
- Use iCloud Drive: Save your PDFs to iCloud Drive for easy access across all your Apple devices.
- Organize Your Files: Create folders in the “Files” app to keep your PDFs organized.
- Annotate Documents: Use the Markup feature to add notes and highlights to your PDFs.
- Compress PDFs: Use third-party apps to compress large PDF files for easier sharing.
4.2. Saving as PDF on Android
Android also offers multiple ways to save files as PDFs, making it simple to manage documents on your smartphone or tablet.
4.2.1. Using the “Print” Option
The “Print” option is a common method for saving files as PDFs on Android devices.
-
Step 1: Open the Document
Open the file you want to save as a PDF. This could be a document in Google Docs, an email, a webpage, or any other type of file.
-
Step 2: Tap the “Menu” Icon
Look for the “Menu” icon, which usually appears as three dots in the top-right corner of the screen. Tap the icon to open the menu.
-
Step 3: Select “Print”
In the menu, select “Print”. This will open the print options.
-
Step 4: Select “Save as PDF” as the Printer
In the print options, tap the dropdown menu that lists the available printers. Choose “Save as PDF” from the list. If you don’t see this option, you may need to install a PDF printer app from the Google Play Store.
-
Step 5: Adjust Print Settings (Optional)
Before saving, you can adjust print settings like page size, orientation, and color. These settings will affect the layout of the PDF file.
-
Step 6: Tap the “Save” Icon
Tap the “Save” icon, which usually looks like a PDF symbol or a floppy disk. This will open a dialog box where you can choose the name and location for your PDF file.
-
Step 7: Choose a Name and Location
Enter a name for your PDF file and select the folder where you want to save the file. You can save it to your device’s internal storage or to a cloud storage service like Google Drive.
-
Step 8: Tap “Save”
Tap the “Save” button to create the PDF file. Android will convert the document to PDF format and save it in the specified location.
4.2.2. Using Google Drive
Google Drive offers a built-in feature to save files as PDFs, making it easy to manage your documents in the cloud.
-
Step 1: Open the Document
Open the file you want to save as a PDF. This could be a document in Google Docs, a spreadsheet in Google Sheets, or any other type of file that can be opened in Google Drive.
-
Step 2: Tap the “Menu” Icon
Look for the “Menu” icon, which usually appears as three dots in the top-right corner of the screen. Tap the icon to open the menu.
-
Step 3: Select “Share & Export”
In the menu, select “Share & Export”.
-
Step 4: Select “Save as PDF”
In the “Share & Export” options, select “Save as PDF”. This will convert the file to PDF format and save it to your Google Drive.
-
Step 5: Choose a Location
Choose the folder in your Google Drive where you want to save the PDF file.
-
Step 6: Tap “Save”
Tap the “Save” button to save the PDF file to your Google Drive.
4.2.3. Using Third-Party Apps
Several third-party apps on the Google Play Store allow you to save files as PDFs, often with additional features like editing, merging, and converting.
-
Step 1: Download a PDF Converter App
Visit the Google Play Store and download a PDF converter app. Some popular options include Adobe Acrobat Reader, Microsoft Word, and Smallpdf.
-
Step 2: Open the File in the App
Open the file you want to convert to PDF using the PDF converter app. This can usually be done by tapping the “Share” icon in the original app and selecting the PDF converter app from the share sheet.
-
Step 3: Convert to PDF
In the PDF converter app, follow the instructions to convert the file to PDF format. This usually involves tapping a “Convert” or “Save as PDF” button.
-
Step 4: Save the PDF
Choose a location to save the PDF file. This could be in the app’s own storage, your device’s internal storage, or a cloud storage service like Google Drive.
4.2.4. Tips for Saving PDFs on Android
- Use Google Drive: Save your PDFs to Google Drive for easy access across all your Android devices and computers.
- Organize Your Files: Create folders in Google Drive or your device’s file manager to keep your PDFs organized.
- Annotate Documents: Use apps like Adobe Acrobat Reader to add notes and highlights to your PDFs.
- Compress PDFs: Use third-party apps to compress large PDF files for easier sharing.
4.3. Benefits of Saving as PDF on Mobile
- Portability: Access your PDFs from anywhere, anytime, on your mobile devices.
- Compatibility: PDFs can be opened on any device, regardless of the operating system.
- Preservation of Formatting: Ensures your document looks the same on all devices.
- Sharing: Easily share PDFs via email, messaging apps, and cloud storage services.
- Annotation: Annotate and edit PDFs directly on your mobile device using various apps.
5. Using Online Tools to Save Files as PDF
Online tools provide a convenient way to save files as PDFs without the need for software installation. These tools are accessible from any device with an internet connection, making them ideal for quick conversions on the go.
5.1. Overview of Popular Online PDF Converters
Several online PDF converters are available, each offering a range of features and capabilities. Here are some of the most popular options:
-
Smallpdf:
Smallpdf is a comprehensive online PDF tool that offers a variety of functions, including converting, merging, splitting, and editing PDFs. It has a user-friendly interface and supports various file formats.
-
iLovePDF:
iLovePDF is another popular online PDF converter that provides a wide range of tools for managing PDF files. It offers features like merging, splitting, compressing, and converting PDFs, as well as tools for unlocking and protecting PDFs.
-
PDF2Go:
PDF2Go is a versatile online PDF converter that supports various file formats and offers features like OCR (Optical Character Recognition) for converting scanned documents into editable PDFs.
-
Zamzar:
Zamzar is a well-established online file conversion tool that supports a wide range of file formats, including PDF. It offers a simple and straightforward interface for converting files quickly and easily.
-
Online2PDF:
Online2PDF is a powerful online PDF converter that allows you to convert multiple files at once and offers advanced options for customizing the conversion process.
5.2. Step-by-Step Guide to Using Online PDF Converters
The process of using online PDF converters is generally straightforward and similar across different platforms. Here’s a step-by-step guide:
-
Step 1: Choose an Online PDF Converter
Select an online PDF converter from the list above or find one that suits your specific needs.
-
Step 2: Visit the Website
Open your web browser and go to the website of the online PDF converter.
-
Step 3: Upload Your File
Look for an “Upload” or “Choose File” button on the website. Click the button and select the file you want to convert to PDF from your computer or device.
-
Step 4: Select Conversion Options (Optional)
Some online PDF converters offer options for customizing the conversion process, such as selecting the output quality, page size, and orientation. Adjust these settings as needed.
-
Step 5: Start the Conversion
Click the “Convert” or “Start” button to begin the conversion process. The online PDF converter will upload your file to its servers and convert it to PDF format.
-
Step 6: Download the PDF File
Once the conversion is complete, the online PDF converter will provide a link to download the PDF file. Click the link to download the PDF to your computer or device.
5.3. Tips for Choosing and Using Online PDF Converters
-
Check Security and Privacy Policies:
Before using an online PDF converter, review its security and privacy policies to ensure that your files are protected. Look for converters that use encryption and delete files from their servers after conversion.
-
Consider File Size Limits:
Be aware of any file size limits imposed by the online PDF converter. Some converters may restrict the size of files that can be converted for free.
-
Test with Sample Files:
Before converting important files, test the online PDF converter with sample files to ensure that the conversion quality meets your expectations.
-
Use a Secure Internet Connection:
When using online PDF converters, use a secure internet connection to protect your files from interception.
-
Avoid Sensitive Information:
Avoid converting files that contain sensitive information, such as financial data or personal identification numbers, using online PDF converters.
5.4. Advantages of Using Online PDF Converters
-
Convenience:
Online PDF converters are accessible from any device with an internet connection, making them ideal for quick conversions on the go.
-
No Software Installation:
Online PDF converters eliminate the need for software installation, saving storage space on your computer or device.
-
Cost-Effective:
Many online PDF converters offer free basic conversion services, making them a cost-effective option for occasional use.
-
Versatility:
Online PDF converters support a wide range of file formats, allowing you to convert various types of documents to PDF.
5.5. Disadvantages of Using Online PDF Converters
-
Security Risks:
Uploading files to online PDF converters may pose security risks, as your files could be intercepted or stored on the converter’s servers.
-
File Size Limits:
Online PDF converters may impose file size limits, restricting the size of files that can be converted for free.
-
Internet Dependence:
Online PDF converters require an internet connection, which may not be available in all locations.
-
Conversion Quality:
The conversion quality of online PDF converters may vary, and some converters may produce lower-quality PDFs than others.
6. Advanced PDF Saving Techniques
For users who need more control over their PDF creation process, advanced techniques offer a range of options for customizing and optimizing PDF files.
6.1. Optimizing PDF for Web Use
Optimizing PDFs for web use is crucial for ensuring that they load quickly and display correctly in web browsers. Here are some techniques for optimizing PDFs for the web:
-
Reduce File Size:
Compress images and remove unnecessary elements from the PDF to reduce the file size. Use the “Optimize for Web” option in PDF software to automatically reduce the file size.
-
Use Linearization:
Linearization, also known as “fast web view,” allows the PDF to be displayed in a web browser before the entire file has been downloaded. This improves the user experience by allowing users to start reading the PDF more quickly.
-
Optimize Images:
Compress images to reduce their file size without sacrificing quality. Use image editing software to optimize images before including them in the PDF.
-
Remove Unnecessary Elements:
Remove unnecessary elements from the PDF, such as comments, annotations, and embedded fonts, to reduce the file size.
-
Use Vector Graphics:
Use vector graphics instead of raster images whenever possible. Vector graphics are resolution-independent and can be scaled without losing quality, resulting in smaller file sizes.
6.2. Adding Security Features
Adding security features to PDFs is essential for protecting sensitive information and preventing unauthorized access. Here are some security features that can be added to PDFs:
-
Password Protection:
Require a password to open the PDF. This prevents unauthorized users from viewing the contents of the PDF.
-
Permissions Restrictions:
Restrict certain actions, such as printing, copying, and editing, to authorized users. This prevents unauthorized users from making changes to the PDF or copying its contents.
-
Digital Signatures:
Add a digital signature to the PDF to verify the authenticity and integrity of the document. Digital signatures provide assurance that the PDF has not been altered since it was signed.
-
Encryption:
Encrypt the PDF to protect its contents from unauthorized access. Encryption scrambles the data in the PDF, making it unreadable without the correct decryption key.
-
Watermarks:
Add a watermark to the PDF to identify it as confidential or proprietary. Watermarks can help prevent unauthorized distribution or use of the PDF.
6.3. Using OCR (Optical Character Recognition)
OCR (Optical Character Recognition) is a technology that allows you to convert scanned documents and images into editable text. This is particularly useful for working with PDFs that contain scanned text or images.
-
Scan the Document:
Scan the document using a scanner or mobile device.
-
Open the PDF in OCR Software:
Open the PDF in OCR software, such as Adobe Acrobat or Abbyy FineReader.
-
Run OCR:
Run the OCR function to convert the scanned text into editable text.
-
Review and Correct the Text:
Review the converted text and correct any errors. OCR is not always perfect, so it’s important to review the text carefully.
-
Save the PDF:
Save the PDF with the editable text.
6.4. Creating PDF Forms
Creating PDF forms allows you to collect data from users in a structured and standardized format. Here are the steps for creating PDF forms:
-
Create the Form Layout:
Create the layout of the form using PDF software.
-
Add Form Fields:
Add form fields to the PDF, such as text fields, check boxes, radio buttons, and drop-down menus.
-
Set Form Field Properties:
Set the properties of the form fields, such as the field name, data type, and validation rules.
-
Test the Form:
Test the form to ensure that it functions correctly.
-
Distribute the Form:
Distribute the form to users via email or on a website.
6.5. Merging and Splitting PDFs
Merging and splitting PDFs are useful for organizing and managing PDF files.
-
Merging PDFs:
Merging PDFs allows you to combine multiple PDF files into a single PDF file. This is useful for creating a single document from multiple sources.
-
Splitting PDFs:
Splitting PDFs allows you to divide a single PDF file into multiple PDF files. This is useful for extracting specific pages from a PDF file.
6.6. Working with PDF Portfolios
PDF portfolios allow you to combine multiple files, including PDFs, Word documents, Excel spreadsheets, and images, into a single PDF package.
-
Create a PDF Portfolio:
Create a PDF portfolio using PDF software.
-
Add Files to the Portfolio:
Add files to the portfolio by dragging and dropping them into the portfolio window.
-
Organize the Files:
Organize the files in the portfolio by arranging them in folders and subfolders.
-
Customize the Portfolio:
Customize the portfolio by adding a cover page, table of contents, and navigation elements.
6.7. Using Batch Processing
Batch processing allows you to perform the same operation on multiple PDF files at once. This is useful for automating repetitive tasks, such as converting, optimizing, and securing PDF files.
-
Select the Files:
Select the PDF files you want to process.