
Saving music to Google Drive offers a convenient way to access your favorite tunes from any device, anywhere. At savewhere.net, we understand the importance of easy access and secure storage for your digital assets. This guide provides a comprehensive overview of how to upload and manage your music on Google Drive, helping you optimize your digital life and safeguard your precious music collection. Learn efficient strategies to upload, organize, and enjoy your music across various platforms, all while keeping your financial well-being in mind.
1. Understanding Google Drive and Its Benefits for Music Storage
What is Google Drive and Why Use It for Music?
Google Drive is a cloud-based storage solution that allows you to store and access files from any device with an internet connection. Using Google Drive for music offers several benefits:
- Accessibility: Access your music from any device, whether it’s your phone, tablet, or computer.
- Backup: Protect your music library from loss due to device failure or theft.
- Sharing: Easily share your favorite tracks or playlists with friends and family.
- Cost-Effective: Google Drive offers 15 GB of free storage, which is often sufficient for many music enthusiasts.
How Much Music Can I Store on Google Drive?
With the free 15 GB of storage, you can store a significant amount of music. The exact number depends on the file size and format of your music files. Here’s an estimate:
- MP3 (128kbps): Approximately 4,000 songs.
- MP3 (320kbps): Approximately 1,600 songs.
- FLAC (Lossless): Approximately 400 songs.
If you need more space, Google Drive offers affordable subscription plans for additional storage. This can be a smart financial move, as it allows you to protect your valuable music assets affordably.
Google Drive Storage Plans and Pricing
| Storage | Price (USD/Month) | Features |
|---|---|---|
| 15 GB (Free) | Free | Basic storage for Gmail, Drive, and Photos |
| 100 GB | $1.99 | Expanded storage, additional features |
| 200 GB | $2.99 | More storage, family sharing |
| 2 TB | $9.99 | Large storage capacity, ideal for extensive music libraries and other files |
| Additional Plans | Varies | Options for even larger storage needs, catering to professionals and businesses with substantial data needs |
2. Uploading Music to Google Drive: Step-by-Step Guides
How to Upload Music to Google Drive Using the Web Interface
The web interface is a straightforward way to upload music to Google Drive. Follow these steps:
Step 1: Open your web browser and go to the Google Drive website (https://drive.google.com). Sign in with your Google account credentials.
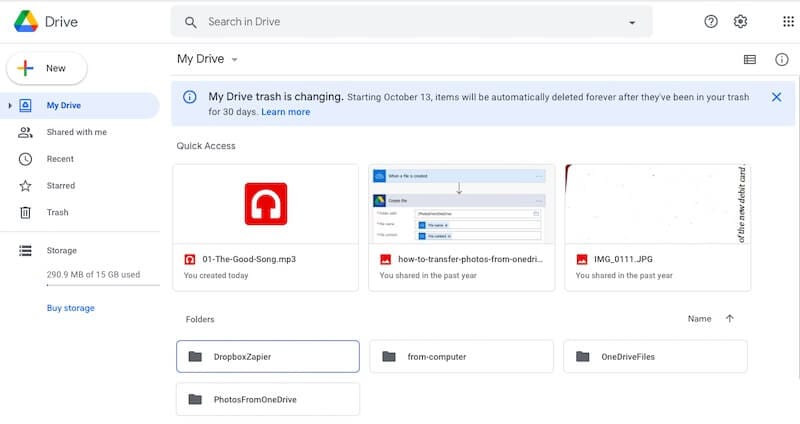 Google Drive Web Interface
Step 2: Once you are in Google Drive, you have two main options for uploading music:
- Drag-and-Drop: Simply drag your music files or folders from your computer into the Google Drive interface.
- Upload Button: Click the “New” button (usually a “+” sign) in the top-left corner, then select “File upload” or “Folder upload.”
 Google Drive Upload Button
Step 3: Select the music files or folders you want to upload from your computer. Click “Open” to start the upload process.
Step 4: Google Drive will begin uploading your music. You can monitor the progress in the bottom-right corner of the screen.
How to Upload Music to Google Drive on Android Devices
Uploading music from your Android device is equally simple:
Step 1: Open the Google Drive app on your Android device. If you don’t have it, download it from the Google Play Store.
Step 2: Tap the “+” button (usually located in the bottom-right corner) and select “Upload.”
Step 3: Navigate to the location of your music files on your device’s storage. This could be in your “Downloads” folder or another location where you’ve saved your music.
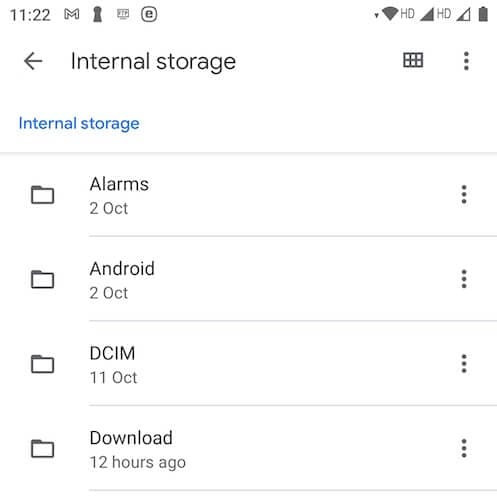 Android File Manager
Step 4: Select the music files you want to upload. The upload will start automatically.
How to Upload Music to Google Drive on iPhones and iPads
For iOS devices, the process is slightly different but still easy to follow:
Step 1: Download and install the Google Drive app from the App Store.
Step 2: Open the Google Drive app and sign in with your Google account.
Step 3: Tap the “+” button and select “Upload.”
Step 4: You might need to grant Google Drive access to your device’s media library. Follow the prompts to allow access.
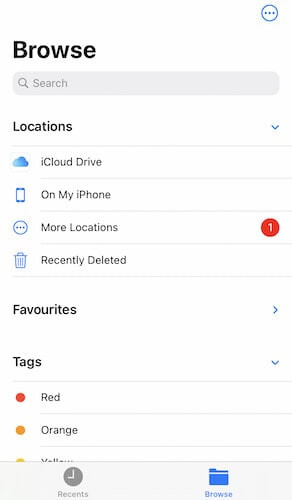 iOS Files App
Step 5: Select the music files you want to upload from your iPhone or iPad.
Optimizing Upload Settings for Faster Transfers
To ensure faster uploads, consider these tips:
- Check Your Internet Connection: A stable and fast internet connection is crucial for quick uploads.
- Close Unnecessary Apps: Close other apps that may be consuming bandwidth.
- Upload in Batches: Instead of uploading many small files individually, try compressing them into a ZIP file and uploading the ZIP file.
- Use Wi-Fi: When possible, use a Wi-Fi connection instead of mobile data.
- Google Drive Settings: Adjust Google Drive settings to optimize bandwidth usage.
- Go to Google Drive settings (gear icon).
- Under “General,” adjust “Offline” settings to minimize background syncing if you are not actively using offline access.
3. Organizing Your Music Library in Google Drive
Creating Folders and Subfolders
Organizing your music library is essential for easy navigation and playback. Here’s how to create folders:
Step 1: In Google Drive, click the “New” button (the “+” sign) and select “Folder.”
Step 2: Give your folder a descriptive name, such as “Rock,” “Classical,” or “Jazz.”
Step 3: To create subfolders, open the main folder and repeat the process. For example, within the “Rock” folder, you might create subfolders for individual artists or albums.
Naming Conventions for Music Files
Consistent naming conventions make it easier to find and manage your music. Consider using the following format:
Artist - Album - Track Number - Song Title.mp3
For example:
The Beatles - Abbey Road - 01 - Come Together.mp3
Using Metadata to Organize Your Music
Metadata includes information such as artist, album, track title, and genre embedded within the music file itself. Here’s how to edit metadata:
Windows:
Step 1: Right-click the music file and select “Properties.”
Step 2: Go to the “Details” tab.
Step 3: Edit the metadata fields as needed.
Mac:
Step 1: Select the music file in Finder.
Step 2: Press Command + I to open the “Get Info” window.
Step 3: Edit the metadata fields under the “Name & Extension” and “Comments” sections.
Third-Party Tools:
- Mp3tag (Windows): A powerful and free metadata editor.
- Yate (Mac): A comprehensive metadata editor for macOS.
Syncing Music Across Devices
Google Drive automatically syncs your files across all devices logged in to your Google account. Ensure that syncing is enabled:
Step 1: Open the Google Drive app on your computer.
Step 2: Check that the app is running and syncing files. Look for the Google Drive icon in your system tray (Windows) or menu bar (Mac).
Step 3: If syncing is paused, click the icon and select “Resume syncing.”
4. Playing Music Directly from Google Drive
Using Google Drive’s Built-In Audio Player
Google Drive has a basic built-in audio player that allows you to play music directly from the platform.
Step 1: Locate the music file you want to play in Google Drive.
Step 2: Double-click the file to open it.
Step 3: The audio player will appear, allowing you to play, pause, skip, and adjust the volume.
Third-Party Apps for Enhanced Playback
While Google Drive’s built-in player is convenient, third-party apps offer more advanced features:
- CloudBeats: A music player specifically designed for cloud storage services like Google Drive. It offers features like offline playback, playlist management, and support for various audio formats.
- Evermusic: Another excellent option for playing music from Google Drive, with features such as equalizer settings, gapless playback, and Chromecast support.
- BeatSync: Allows you to create playlists and sync them across multiple cloud services, including Google Drive.
Streaming Music to Other Devices
You can stream music from Google Drive to other devices using Chromecast or Bluetooth.
Chromecast:
Step 1: Ensure your Chromecast device is set up and connected to the same Wi-Fi network as your device.
Step 2: Open the Google Drive app or a third-party music player that supports Chromecast.
Step 3: Look for the Chromecast icon (usually a cast icon) and tap it.
Step 4: Select your Chromecast device from the list.
Bluetooth:
Step 1: Enable Bluetooth on both your device and the receiving device (e.g., a Bluetooth speaker).
Step 2: Pair the devices.
Step 3: Play music from Google Drive, and it will stream to the Bluetooth device.
5. Sharing Music from Google Drive
Sharing Individual Songs or Albums
Sharing music from Google Drive is easy:
Step 1: Right-click the music file or folder you want to share.
Step 2: Select “Share.”
Step 3: Enter the email addresses of the people you want to share with.
Step 4: Choose the permission level: “Viewer” (can only listen) or “Editor” (can also download and share).
Step 5: Click “Send.”
Creating Shareable Links
You can also create a shareable link that anyone can use to access your music:
Step 1: Right-click the music file or folder.
Step 2: Select “Share.”
Step 3: Click “Change to anyone with the link.”
Step 4: Choose the permission level: “Viewer” or “Editor.”
Step 5: Copy the link and share it via email, social media, or any other method.
Managing Permissions and Access
It’s important to manage permissions to control who can access your music:
Step 1: Right-click the shared file or folder.
Step 2: Select “Share.”
Step 3: Click the dropdown menu next to each person’s name to change their permission level or remove them from the list.
Sharing Music Publicly vs. Privately
- Public Sharing: Use shareable links with “Viewer” permission for sharing music with a wide audience. Be cautious about sharing copyrighted material publicly.
- Private Sharing: Share directly with specific individuals using their email addresses. This is ideal for sharing music with friends and family.
6. Security and Privacy Considerations
Understanding Google Drive’s Security Measures
Google Drive employs several security measures to protect your data:
- Encryption: Data is encrypted both in transit and at rest.
- Two-Factor Authentication: Enable two-factor authentication for added security.
- Data Centers: Google’s data centers have robust physical security measures.
Protecting Your Music Files from Unauthorized Access
- Strong Passwords: Use a strong, unique password for your Google account.
- Two-Factor Authentication: Enable two-factor authentication for an extra layer of security.
- Regularly Review Permissions: Periodically review the sharing permissions on your music files and folders.
- Be Cautious with Shareable Links: Avoid sharing links publicly unless necessary, and always use “Viewer” permission.
Backup Strategies to Safeguard Your Music Library
- Multiple Backups: In addition to Google Drive, consider backing up your music library to another cloud storage service or an external hard drive.
- Regular Backups: Schedule regular backups to ensure you always have the latest version of your music library.
- Offline Storage: Keep a copy of your music on a local device for offline access and as an additional backup.
7. Troubleshooting Common Issues
Addressing Upload Errors
If you encounter upload errors:
- Check Internet Connection: Ensure you have a stable internet connection.
- Clear Browser Cache: Clear your browser’s cache and cookies.
- Try a Different Browser: Try uploading from a different web browser.
- File Size Limits: Ensure your files are within Google Drive’s file size limits (up to 5 TB per file).
- Google Drive Status: Check the Google Drive status page to see if there are any known issues.
Resolving Playback Problems
If you experience playback problems:
- Check File Format: Ensure the music file format is supported by Google Drive’s built-in player or your chosen third-party app.
- Update Apps: Keep your Google Drive app and third-party music players up to date.
- Clear App Cache: Clear the cache and data for the Google Drive app or your music player.
- Try a Different Player: Try playing the music file with a different music player.
Dealing with Syncing Issues
If you have syncing issues:
- Check Google Drive App Status: Ensure the Google Drive app is running and syncing.
- Restart the App: Restart the Google Drive app.
- Check Storage Space: Ensure you have enough storage space in your Google Drive account.
- Reinstall the App: Reinstall the Google Drive app.
Contacting Google Drive Support for Assistance
If you can’t resolve the issue on your own, contact Google Drive support for assistance:
Step 1: Go to the Google Drive Help Center (https://support.google.com/drive/?hl=en).
Step 2: Search for your issue or browse the help topics.
Step 3: If you can’t find a solution, contact Google Drive support via email or chat.
8. Third-Party Tools to Enhance Your Google Drive Music Experience
Wondershare InClowdz: A Comprehensive Cloud Management Solution
Wondershare InClowdz is a third-party tool designed to manage multiple cloud accounts, including Google Drive. It offers features such as cloud migration, synchronization, and management, making it an excellent tool for music enthusiasts with multiple cloud storage accounts.
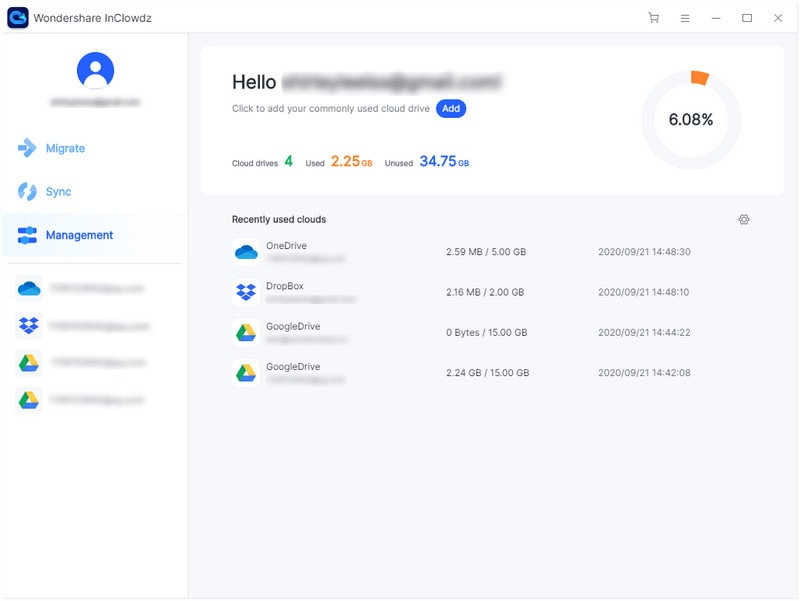 InClowdz Interface
Key Features:
- Cloud Migration: Transfer music files from one cloud service to another.
- Cloud Sync: Keep your music library synchronized across multiple cloud accounts.
- Cloud Management: Manage all your cloud accounts in one place.
How to Use Wondershare InClowdz:
Step 1: Create a Wondershare account and download InClowdz.
Step 2: Add your Google Drive account and any other cloud accounts you want to manage.
Step 3: Use the “Migrate” or “Sync” modules to transfer or synchronize your music files.
Other Useful Tools and Apps
- CloudBeats: A music player specifically designed for cloud storage services like Google Drive. It offers features like offline playback, playlist management, and support for various audio formats.
- Evermusic: Another excellent option for playing music from Google Drive, with features such as equalizer settings, gapless playback, and Chromecast support.
- BeatSync: Allows you to create playlists and sync them across multiple cloud services, including Google Drive.
- Air Explorer: A file manager that supports multiple cloud services, allowing you to easily manage and transfer music files.
9. Maximizing Your Google Drive Storage
Compressing Music Files
Compressing music files can save significant storage space:
- MP3: Use a lower bitrate (e.g., 128kbps or 192kbps) for acceptable quality with smaller file sizes.
- AAC: A more efficient codec than MP3, offering better quality at the same bitrate.
- ZIP: Compress entire folders of music into ZIP files for efficient storage and transfer.
Deleting Duplicate Files
Duplicate music files can quickly consume storage space. Use duplicate file finder tools to identify and delete duplicates:
- Duplicate File Finder (Windows): A free tool for finding and removing duplicate files.
- Gemini 2 (Mac): A smart duplicate finder with a user-friendly interface.
- Google Drive’s Built-In Search: Use Google Drive’s search feature to look for duplicate file names.
Regularly Reviewing and Purging Unnecessary Files
Make it a habit to regularly review your Google Drive and delete files you no longer need:
- Sort by Size: Sort your files by size to identify large files that are consuming the most storage space.
- Delete Old Backups: Delete old backups of your music library that are no longer needed.
- Empty Trash: Empty your Google Drive trash to permanently delete files and free up storage space.
10. Legal and Ethical Considerations
Understanding Copyright Laws and Music Sharing
It’s crucial to understand copyright laws when sharing music:
- Copyright Protection: Music is protected by copyright laws, which grant exclusive rights to the copyright holder (usually the artist or record label).
- Unauthorized Sharing: Sharing copyrighted music without permission is illegal and can result in legal consequences.
- Fair Use: There are exceptions to copyright laws, such as fair use, which allows limited use of copyrighted material for purposes such as criticism, commentary, news reporting, teaching, scholarship, and research.
Respecting Artists’ Rights
- Purchase Music Legally: Support artists by purchasing their music from legitimate sources.
- Stream from Authorized Services: Use authorized streaming services like Spotify, Apple Music, and Amazon Music.
- Obtain Permission: If you want to share copyrighted music, obtain permission from the copyright holder.
Using Music Responsibly
- Personal Use: Use Google Drive to store and access your music for personal use.
- Avoid Public Sharing: Avoid sharing copyrighted music publicly without permission.
- Educate Others: Educate others about copyright laws and the importance of respecting artists’ rights.
FAQ: How to Save Music to Google Drive
1. How Do I Save Music To Google Drive from my computer?
You can save music to Google Drive from your computer by visiting the Google Drive website, signing in, and either dragging and dropping your music files or using the “New” button to upload them.
2. What is the easiest way to upload music to Google Drive on Android?
The easiest way to upload music to Google Drive on Android is by opening the Google Drive app, tapping the “+” button, selecting “Upload,” and choosing the music files from your device’s storage.
3. Can I save music to Google Drive from my iPhone?
Yes, you can save music to Google Drive from your iPhone by downloading the Google Drive app, signing in, tapping the “+” button, selecting “Upload,” and choosing the music files from your device.
4. How much music can I save to Google Drive for free?
You can save a substantial amount of music to Google Drive for free, depending on the file format and bitrate. The free 15 GB of storage typically allows for thousands of songs in MP3 format or hundreds in lossless formats like FLAC.
5. Is it safe to save music to Google Drive?
Yes, it is generally safe to save music to Google Drive, as Google employs strong security measures, including encryption and two-factor authentication. However, it’s important to use a strong password, enable two-factor authentication, and regularly review sharing permissions to protect your files.
6. How do I play music directly from Google Drive?
You can play music directly from Google Drive using its built-in audio player by double-clicking the music file. For enhanced playback features, consider using third-party apps like CloudBeats or Evermusic.
7. What are the best third-party tools to enhance my Google Drive music experience?
Some of the best third-party tools to enhance your Google Drive music experience include Wondershare InClowdz, CloudBeats, Evermusic, BeatSync, and Air Explorer.
8. How do I share music from Google Drive with my friends?
You can share music from Google Drive with your friends by right-clicking the music file or folder, selecting “Share,” entering their email addresses, choosing the permission level, and clicking “Send.”
9. How can I manage the permissions and access to my shared music files in Google Drive?
You can manage permissions and access to your shared music files in Google Drive by right-clicking the shared file or folder, selecting “Share,” and adjusting the permission levels or removing people from the list.
10. What should I do if I encounter issues uploading or playing music in Google Drive?
If you encounter issues uploading or playing music in Google Drive, check your internet connection, clear your browser or app cache, try a different browser or player, and contact Google Drive support if necessary.
Conclusion
Saving music to Google Drive is a fantastic way to ensure your favorite songs are always within reach. By following this comprehensive guide from savewhere.net, you can easily upload, organize, and enjoy your music across all your devices. Remember to take advantage of third-party tools to enhance your experience and always respect copyright laws and artists’ rights.
Ready to take control of your music library and save money on storage solutions? Visit savewhere.net today to discover more tips, tricks, and resources for managing your digital life efficiently! Plus, connect with a community of like-minded individuals in the USA who are passionate about saving money and optimizing their lifestyles.
