
Saving your address book in Outlook is crucial for safeguarding your valuable contact information. This article, brought to you by savewhere.net, will guide you through the process, ensuring you never lose those essential connections. Learn how to export and import your contacts effectively, and discover tips for managing your address book like a pro.
1. Why Should You Save Your Address Book in Outlook?
The importance of saving your address book in Outlook comes down to protecting and managing your contact information effectively. Here are some key reasons why it’s essential:
- Data Backup and Recovery: Saving your address book creates a backup of your contacts. This backup can be a lifesaver if your Outlook data becomes corrupted, accidentally deleted, or lost due to a computer malfunction. Think of it as an insurance policy for your professional and personal network.
- Seamless Migration: When you upgrade to a new computer or switch to a different email client, having your contacts saved in a transferable format allows for a smooth transition. You won’t have to manually re-enter each contact, saving you considerable time and effort.
- Enhanced Security: Exporting your contacts provides an extra layer of security. If your email account is compromised, you’ll still have a copy of your contacts, preventing potential loss of valuable information.
- Efficient Sharing: Saving your address book in a standard format like CSV makes it easy to share your contacts with others or import them into different applications. This is particularly useful for businesses and teams that need to maintain a shared contact list.
- Organization and Management: Regularly saving and organizing your address book helps you keep your contacts up-to-date and accurate. This ensures that you always have the correct information at your fingertips, improving communication and productivity.
According to a study by the U.S. Bureau of Labor Statistics, the average person changes jobs 12 times in their career. Saving your Outlook address book becomes invaluable for maintaining your network across these transitions.
2. What Are the Different Methods to Save Your Outlook Address Book?
There are several effective methods to save your Outlook address book, each with its own advantages. Here’s a breakdown of the most common approaches:
- Exporting to a CSV File: This is the most versatile method. A CSV (Comma Separated Values) file is a plain text file that can be opened and edited in various programs like Excel, Google Sheets, and other email clients. It’s an excellent way to create a backup of your contacts that can be easily imported into other systems.
- Exporting to a PST File: A PST (Personal Storage Table) file is a proprietary format used by Outlook to store email messages, contacts, calendar items, and other data. Exporting to a PST file creates a complete backup of your Outlook data, including your address book. This is useful for transferring your entire Outlook profile to another computer.
- Using Outlook.com’s Export Feature: If you use Outlook.com (the web-based version), you can export your contacts directly from the web interface. This method typically saves your contacts as a CSV file, which you can then download to your computer.
- Syncing with a Cloud Service: Services like Microsoft Exchange, Google Contacts, and iCloud allow you to sync your Outlook contacts with the cloud. This ensures that your contacts are automatically backed up and accessible from any device.
- Manual Backup: Although less efficient, you can manually copy and paste contact information into a document or spreadsheet. This method is suitable for backing up a small number of contacts but is not practical for large address books.
Choosing the right method depends on your specific needs. For simple backups and easy transferability, CSV is often the best choice. For complete Outlook data backups, PST files are more suitable.
3. How Do I Export Contacts from Outlook to a CSV File?
Exporting contacts from Outlook to a CSV file is a straightforward process that ensures your contact information is saved in a universally compatible format. Here’s how to do it:
For New Outlook:
-
Open New Outlook: Launch the new Outlook application on your computer.
-
Navigate to People: On the side panel, select the “People” icon. If you don’t see it, click “More apps” and then “People.” To keep it easily accessible, right-click “People” and select “Pin.”
-
Manage Contacts: In the ribbon, click on “Manage contacts” and choose “Export contacts.”
-
Select Folder and Export: In the dropdown menu under “Contacts from this folder,” choose the folder you want to export (e.g., “All contacts”) and then click “Export.”
-
Save the File: The exported CSV file will be saved to your “Downloads” folder.
For Classic Outlook:
-
Open Classic Outlook: If classic Outlook isn’t already open, go to “Start” and type “Outlook.” Right-click “Outlook (classic)” to open it.
-
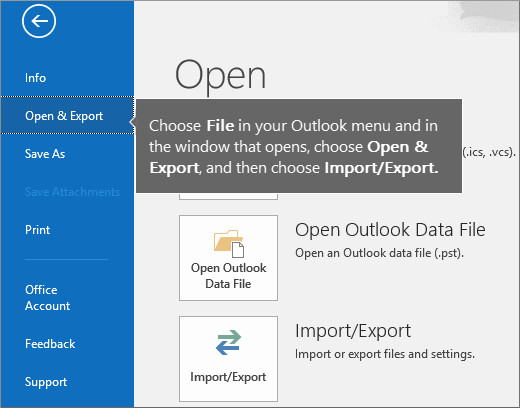
Go to File: In classic Outlook, select “File” > “Open & Export” > “Import/Export.”
-
Choose Export to a File: Select “Export to a file” > “Next.”
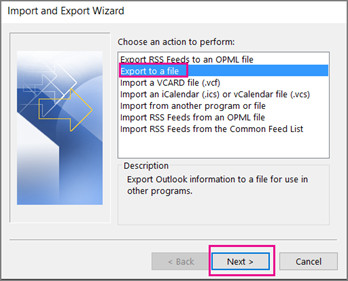 Choose Export to a file.
 -
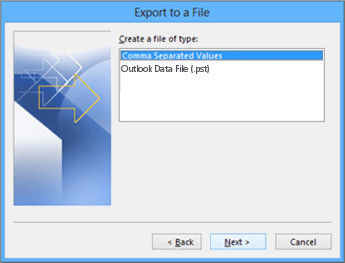
Select Comma Separated Values: Choose “Comma Separated Values” > “Next.”
-
Select Contacts Folder: In the “Select folder to export from” box, scroll to the top if needed and select the “Contacts (This computer only)” folder under your account. Then select “Next.”
-
Browse and Name the File: Click “Browse” to choose where to save the CSV file, name it, and select “OK.”
-
Confirm and Finish: Confirm the save location and file name, then click “Next.” Choose “Finish” to start exporting your contacts.
-
Verify the File: Locate the new CSV file on your computer and open it with Excel to ensure your contacts are there.
For Outlook on the Web or Outlook.com:
- Open Outlook on the Web: Go to Outlook.com and sign in to your account.
- Navigate to People: Click the “People” icon in the navigation bar.
- Manage Contacts: Select “Manage contacts” > “Export contacts” from the ribbon.
- Choose Contacts and Export: Choose “All contacts” or another option from the dropdown.
- Export the File: Click “Export.” The CSV file will be saved to your default downloads folder.
By following these steps, you can easily export your contacts from Outlook to a CSV file, creating a backup and making them available for import into other applications or email services.
4. How Do I Import Contacts into Outlook from a CSV File?
Importing contacts into Outlook from a CSV file is a simple way to add or restore your contact list. Here’s a step-by-step guide:
For New Outlook:
-
Open New Outlook: Launch the new Outlook application.
-
Go to People: In the navigation bar, select “People.” If it’s not visible, click “More apps” and then “People.” Pin it to the left navigation bar for easy access by right-clicking and selecting “Pin.”
-
Manage Contacts: From the ribbon, choose “Manage contacts” > “Import contacts.”
-
Browse and Select File: Click “Browse,” locate your CSV file, and select “Open.”
-
Import: Click “Import.”
For Classic Outlook:
-
Open Classic Outlook: Launch classic Outlook.
-
Go to File: At the top of your Outlook ribbon, choose “File.” If there’s no “File” option, you may be using an older version.
-
Import/Export: Choose “Open & Export” > “Import/Export.” This opens the Import/Export Wizard.
 To create your Outlook pst file, choose File, choose Open and Export, and then Import/Export
 -
Import from Another Program or File: Select “Import from another program or file” and click “Next.”
-
Choose Comma Separated Values: Select “Comma Separated Values” and click “Next.”
 Outlook Export Wizard – Choose CSV file
 -
Browse to Your File: In the “Import a File” box, browse to your contacts file and double-click to select it.
-
Handle Duplicate Contacts: Choose one of the following options:
- Replace duplicates with items imported: Discards existing Outlook contact info and uses the info from your CSV file.
- Allow duplicates to be created: Creates duplicate contacts, one with the original Outlook info and one with the imported info.
- Do not import duplicate items: Keeps the existing Outlook contact info and discards the info from your CSV file.
-
Click Next: Proceed to the next step.
-
Select a Destination Folder: In the “Select a destination folder” box, scroll to the top and select the “Contacts” folder. If you have multiple email accounts, choose the “Contacts” folder under the desired email account and click “Next.”
 When you import Google Gmail contacts into your Office 365 mailbox, select Contacts as the destination
 -
Finish: Click “Finish.” Outlook begins importing your contacts immediately. The Import Progress box will close when it’s done.
-
View Your Contacts: At the bottom of Outlook, click the “People” icon to see your imported contacts.
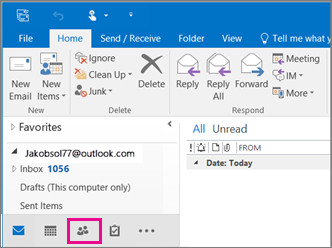 Choose the People icon at the bottom of the page.
For Outlook on the Web or Outlook.com:
- Open Outlook on the Web: Go to Outlook.com and sign in.
- Go to People: Select the “People” icon in the navigation bar.
- Manage Contacts: Choose “Manage contacts” > “Import contacts” from the ribbon.
- Browse and Select File: Click “Browse,” choose your CSV file, and select “Open.”
- Import: Click “Import.”
By following these steps, you can efficiently import your contacts into Outlook from a CSV file, ensuring your address book is up-to-date and complete.
5. What Is UTF-8 Encoding and Why Is It Important?
UTF-8 encoding is a character encoding standard that allows computers to represent text in virtually all written languages. It’s crucial for ensuring that all characters in your contact information, including those not found in the English alphabet, are correctly displayed and recognized when importing or exporting CSV files.
Here’s why UTF-8 encoding is important:
- Support for Multiple Languages: UTF-8 can represent characters from various languages, including Greek, Cyrillic, Arabic, and Japanese. This ensures that contacts with names or information in these languages are accurately stored and displayed.
- Data Integrity: Without UTF-8 encoding, special characters or characters from non-English alphabets may not be correctly interpreted, leading to garbled or missing data. This can result in loss of important contact information.
- Compatibility: UTF-8 is widely supported across different operating systems, applications, and email clients. Using UTF-8 encoding ensures that your CSV files can be opened and read correctly on different platforms.
- Preventing Errors: When importing contacts from a CSV file without UTF-8 encoding, Outlook may not recognize and display all text correctly. This can lead to errors and require you to manually correct the contact information.
How to Convert Your CSV File to UTF-8 Using Microsoft Excel:
- Open a New Workbook: In Excel, create a new blank document (workbook).
- Import from Text/CSV: From the “Data” menu, select “From Text/CSV.” Browse to your exported CSV file (you may need to select “Text Files (*.csv)” to see it). Select “Import.”
- Choose the Correct Encoding: In the dialog box, under “File Origin,” choose the encoding that makes the characters in the text appear correctly (e.g., “Cyrillic Windows 1251”), then select “Load.”
- Verify Characters: Check that characters are displayed correctly in Excel.
- Save As CSV UTF-8: Select “File” > “Save As.” Enter a name for your file, and select “CSV UTF-8 (Comma delimited) (*.csv)” as your file type.
- Save: Click “Save.”
By ensuring your CSV files are encoded in UTF-8, you can avoid common issues with character display and maintain the integrity of your contact information.
6. How Do I Manage Duplicate Contacts After Importing?
After importing contacts into Outlook, you may find yourself with duplicate entries. Managing these duplicates is essential to keep your address book clean and organized. Here’s how to handle duplicate contacts in Outlook:
- During Import: When importing a CSV file, Outlook provides options for handling duplicates:
- Replace duplicates with items imported: This option replaces existing contact information with the data from the CSV file. Use this if you are sure the imported data is more accurate.
- Allow duplicates to be created: This creates new entries for each contact, even if they already exist. You can then manually merge or delete the duplicates.
- Do not import duplicate items: This option skips importing any contact that already exists in your Outlook address book.
- Manual Review and Merge: After importing, manually review your contacts to identify duplicates.
Steps to Manually Merge Contacts in Outlook:
- Open the People Pane: In Outlook, click the “People” icon at the bottom of the screen to open the Contacts view.
- Identify Duplicate Contacts: Sort your contacts by name or other relevant fields to easily spot duplicates.
- Open a Contact: Double-click on one of the duplicate contacts to open it.
- Merge Contacts: In the contact window, click “Contact” > “Merge Contacts.”
- Choose Contacts to Merge: A dialog box will appear, showing possible duplicate contacts. Select the contacts you want to merge and click “OK.”
- Review and Save: Review the merged contact information to ensure accuracy. Make any necessary edits and click “Save & Close.”
- Using Outlook’s Clean Up Tool: Outlook has a built-in tool that can help identify and remove duplicate contacts.
- Go to File: Click on “File” in the Outlook ribbon.
- Info: Select “Info” in the left pane.
- Clean Up Tools: Click “Clean Up Tools” and choose “Clean Up Contacts.”
- Select Contacts Folder: Choose the “Contacts” folder you want to clean up and click “Clean Up.”
By using these methods, you can effectively manage duplicate contacts in Outlook, ensuring your address book remains accurate and well-organized.
7. What Are the Best Practices for Maintaining an Organized Outlook Address Book?
Maintaining an organized Outlook address book is key to efficient communication and productivity. Here are some best practices to help you keep your contacts in order:
- Regularly Update Contact Information: Make it a habit to update contact information as soon as you receive changes. This includes email addresses, phone numbers, job titles, and mailing addresses.
- Use Categories and Groups:
- Categories: Assign categories to your contacts to group them by type (e.g., “Business,” “Personal,” “Client,” “Vendor”). This allows you to easily filter and find contacts based on their category.
- Groups (Distribution Lists): Create distribution lists for frequently contacted groups of people, such as teams or project members. This simplifies sending emails to multiple recipients.
- Utilize the Notes Field: Use the “Notes” field to add additional information about your contacts, such as their interests, hobbies, or specific details about your interactions with them. This can help you personalize your communication and build stronger relationships.
- Standardize Naming Conventions: Follow a consistent naming convention for your contacts. For example, always enter names as “Last Name, First Name” or “First Name Last Name.” This makes it easier to sort and search for contacts.
- Regularly Back Up Your Contacts: Export your contacts to a CSV file or PST file on a regular basis to create a backup. This ensures that you can restore your contacts if something goes wrong.
- Delete Obsolete Contacts: Periodically review your contact list and delete any contacts that are no longer relevant or accurate. This helps keep your address book clean and manageable.
- Sync with Mobile Devices: If you use Outlook on your mobile devices, ensure that your contacts are properly synced. This allows you to access your contacts from anywhere and keeps your information consistent across all devices.
- Review and Merge Duplicates: As mentioned earlier, regularly check for and merge duplicate contacts to avoid confusion and maintain accuracy.
By implementing these best practices, you can maintain an organized and efficient Outlook address book, improving your communication and productivity.
8. How Can I Use Outlook Categories and Groups to Organize My Contacts?
Using categories and groups in Outlook is an excellent way to organize your contacts, making it easier to find and communicate with specific people or groups. Here’s how to leverage these features effectively:
Categories:
- Creating Categories:
- Open a Contact: Double-click on a contact to open it.
- Categorize: In the contact window, click “Categorize” in the ribbon.
- All Categories: Select “All Categories” to open the color categories dialog box.
- New: Click “New” to create a new category.
- Name and Color: Enter a name for the category (e.g., “Business,” “Personal,” “Client”) and choose a color to visually distinguish it.
- Save: Click “OK” to save the category.
- Assigning Categories:
- Open a Contact: Double-click on a contact to open it.
- Categorize: Click “Categorize” in the ribbon.
- Select Category: Choose the category you want to assign to the contact.
- Save: Click “Save & Close” to save the changes.
- Filtering by Category:
- Open People: Go to the “People” view in Outlook.
- View: Click “View” in the ribbon.
- Change View: Select “List” or another view that displays contacts in a list format.
- Filter: Click “View Settings” > “Filter.”
- Categories Tab: Go to the “Categories” tab and select the category you want to filter by.
- Apply: Click “OK” to apply the filter.
Groups (Distribution Lists):
- Creating a Group:
- Open People: Go to the “People” view in Outlook.
- New Contact Group: Click “New Contact Group” in the ribbon.
- Name the Group: Enter a name for the group (e.g., “Marketing Team,” “Project Alpha”).
- Add Members: Click “Add Members” and choose from “From Outlook Contacts,” “From Address Book,” or “New Email Contact.”
- Select Members: Select the contacts you want to add to the group and click “OK.”
- Save & Close: Click “Save & Close” to save the group.
- Using a Group:
- New Email: Create a new email in Outlook.
- To Field: In the “To” field, start typing the name of the group.
- Select Group: Select the group from the suggested names.
- Send Email: The email will be sent to all members of the group.
By effectively using categories and groups, you can significantly improve the organization of your Outlook contacts, making it easier to manage and communicate with your network.
9. What Are Some Common Problems Encountered While Saving or Importing Contacts and How to Troubleshoot Them?
While saving or importing contacts in Outlook, you may encounter some common issues. Here’s a guide to troubleshooting these problems:
- Incorrect CSV Format:
- Problem: Contacts are not imported correctly, or some fields are missing.
- Solution: Ensure that your CSV file is properly formatted. The first row should contain headers that match the Outlook contact fields (e.g., “First Name,” “Last Name,” “Email Address”). Use a comma as the delimiter between fields.
- UTF-8 Encoding Issues:
- Problem: Special characters or characters from non-English alphabets are not displayed correctly.
- Solution: Save your CSV file with UTF-8 encoding. Follow the steps mentioned earlier to convert your CSV file to UTF-8 using Microsoft Excel.
- Duplicate Contacts:
- Problem: After importing, you have duplicate entries in your contact list.
- Solution: Use Outlook’s duplicate detection and merge tools to identify and remove or merge duplicate contacts.
- Missing Contacts After Import:
- Problem: Some contacts from the CSV file are not imported into Outlook.
- Solution: Check the CSV file for any errors or inconsistencies. Ensure that all required fields are present and correctly formatted. Also, verify that the CSV file does not exceed the size limit for importing.
- Outlook Not Responding During Import:
- Problem: Outlook freezes or becomes unresponsive during the import process.
- Solution: Close any unnecessary applications to free up system resources. Break the CSV file into smaller files and import them separately. Restart Outlook and try again.
- Permissions Issues:
- Problem: You do not have the necessary permissions to import contacts.
- Solution: Ensure that you have the appropriate permissions to modify contacts in Outlook. Contact your IT administrator if you are unsure.
- Corrupted Outlook Profile:
- Problem: Recurring issues with importing or exporting contacts may indicate a corrupted Outlook profile.
- Solution: Create a new Outlook profile and try importing your contacts into the new profile. To create a new profile, go to “Control Panel” > “Mail” > “Show Profiles” > “Add.”
- File Size Limits:
- Problem: The CSV file is too large to import.
- Solution: Split the CSV file into smaller files and import them in batches.
By addressing these common problems and following the troubleshooting steps, you can ensure a smooth and successful experience when saving or importing contacts in Outlook.
10. How Can Savewhere.net Help Me Manage My Contacts and Save Money?
Savewhere.net offers a range of resources and tools to help you manage your contacts effectively and save money in various aspects of your life. Here’s how Savewhere.net can assist you:
- Comprehensive Guides and Tutorials: Savewhere.net provides detailed guides and tutorials on managing your Outlook contacts, including exporting, importing, organizing, and troubleshooting common issues. These resources are designed to help you optimize your contact management processes.
- Tips for Saving Money on Software and Services: Savewhere.net offers tips and recommendations for finding discounts and deals on software and services that can help you manage your contacts more efficiently. This includes CRM software, email marketing tools, and productivity apps.
- Budgeting and Financial Planning Tools: Savewhere.net provides tools and resources to help you create a budget, track your expenses, and plan your finances. This can help you save money by identifying areas where you can cut back on spending.
- Deals and Discounts on Everyday Expenses: Savewhere.net helps you find deals and discounts on everyday expenses such as groceries, dining, travel, and entertainment. By taking advantage of these savings, you can free up more money to invest in your personal and professional development.
- Community Support: Savewhere.net has a community forum where you can connect with other users, share tips and advice, and get answers to your questions about contact management and saving money.
- Financial Literacy Resources: Savewhere.net offers resources to improve your financial literacy, helping you make informed decisions about your money. This includes articles, guides, and courses on topics such as investing, retirement planning, and debt management.
- Personalized Recommendations: Savewhere.net provides personalized recommendations based on your specific needs and goals. This can help you find the right tools and resources to manage your contacts and save money effectively.
By leveraging the resources and tools available on Savewhere.net, you can not only manage your contacts more efficiently but also improve your overall financial well-being.
Managing your contacts effectively and saving money go hand in hand. By using the right strategies and resources, you can improve your productivity, build stronger relationships, and achieve your financial goals. Visit savewhere.net today to explore the wealth of information and tools available to help you take control of your contacts and your finances.
Address: 100 Peachtree St NW, Atlanta, GA 30303, United States
Phone: +1 (404) 656-2000
Website: savewhere.net
FAQ: How to Save Address Book in Outlook
- How do I export my contacts from Outlook to a CSV file?
- To export contacts from Outlook to a CSV file, go to File > Open & Export > Import/Export > Export to a file > Comma Separated Values. Select the Contacts folder and choose a location to save the file.
- What is a CSV file and why is it useful for saving contacts?
- A CSV (Comma Separated Values) file is a plain text file that stores data in a table format. It’s useful for saving contacts because it’s widely compatible with various applications and email clients, making it easy to transfer your contact information.
- How do I import contacts from a CSV file into Outlook?
- To import contacts from a CSV file into Outlook, go to File > Open & Export > Import/Export > Import from another program or file > Comma Separated Values. Browse to your CSV file and follow the prompts to map the fields and import your contacts.
- What is UTF-8 encoding and why is it important when exporting contacts?
- UTF-8 encoding is a character encoding standard that supports characters from various languages. It’s important when exporting contacts to ensure that all characters, including those not in the English alphabet, are displayed correctly.
- How can I convert my CSV file to UTF-8 encoding using Microsoft Excel?
- To convert your CSV file to UTF-8 encoding in Excel, open the CSV file, go to File > Save As, and select “CSV UTF-8 (Comma delimited)” as the file type.
- How do I manage duplicate contacts after importing them into Outlook?
- After importing contacts, use Outlook’s built-in duplicate detection tool to identify and merge or remove duplicate entries. You can also manually review your contacts and merge duplicates.
- Can I export my contacts to a PST file instead of a CSV file?
- Yes, you can export your contacts to a PST (Personal Storage Table) file by going to File > Open & Export > Import/Export > Export to a file > Outlook Data File (.pst). This creates a backup of your entire Outlook profile, including contacts, emails, and calendar items.
- How do I create a contact group (distribution list) in Outlook?
- To create a contact group in Outlook, go to the People view, click New Contact Group, enter a name for the group, add members from your contacts, and save the group.
- How often should I back up my Outlook contacts?
- It’s a good practice to back up your Outlook contacts regularly, such as monthly or quarterly, to ensure that you have a recent copy of your contact information in case of data loss or corruption.
- What should I do if I encounter errors while importing or exporting contacts in Outlook?
- If you encounter errors, ensure that your CSV file is properly formatted, saved with UTF-8 encoding, and that you have the necessary permissions to modify contacts in Outlook. Check for any corrupted files or profile issues, and try again after restarting Outlook.