Saving screenshots on Windows doesn’t have to be a hassle; it can be quick and easy. At savewhere.net, we help you discover straightforward methods to capture and save your screen, ensuring you never miss an important moment. Learn valuable screen capture techniques today.
1. Understanding the Basics of Screenshots on Windows
Want to grab what’s on your screen? Let’s look at how to screenshot on Windows. This skill is super useful and helps with everything from saving funny memes to keeping important work stuff.
1.1. What is a Screenshot?
A screenshot, also known as a screen capture or screen grab, is a digital image of what is displayed on your computer screen at a particular moment.
1.2. Why Take Screenshots?
There are many reasons why you might want to take a screenshot.
- Capturing Information: Screenshots are useful for quickly capturing information that might otherwise be difficult to copy or save.
- Troubleshooting: They can be used to document error messages or issues you’re having with software.
- Sharing: Screenshots are an easy way to share what you’re seeing on your screen with others, whether it’s a funny image, a news article, or a design concept.
- Creating Tutorials: Screenshots are invaluable for creating visual guides and tutorials.
- Proof of Record: To keep a record of something, such as a social media post that might be deleted later.
1.3. Basic Methods to Take a Screenshot on Windows
Windows offers several built-in methods for taking screenshots, each with its own advantages.
- Print Screen (PrtScn) Key: Pressing the “Print Screen” key captures the entire screen and copies it to the clipboard. You’ll then need to paste it into an image editing program (like Paint) to save it.
- Windows Key + Print Screen: Pressing the Windows key and the Print Screen key together captures the entire screen and automatically saves it as a file in the “Screenshots” folder within your “Pictures” library.
- Alt + Print Screen: Pressing Alt and Print Screen captures only the active window and copies it to the clipboard. Again, you’ll need to paste it into an image editing program to save it.
- Shift + Windows Key + S: This opens the Snipping Tool, which allows you to select a specific area of the screen to capture. The screenshot is copied to the clipboard.
 The Windows logo key and the PrtScn key on the keyboard
Greenshot Output Settings Screenshot
1.4. Where Do Screenshots Go?
By default, screenshots taken using the Windows Key + Print Screen shortcut are saved to the “Screenshots” folder inside your “Pictures” library. Screenshots captured using the Print Screen, Alt + Print Screen, or Shift + Windows Key + S methods are copied to the clipboard and need to be pasted into an image editing program to be saved.
2. Step-by-Step Guide: How to Save Screenshots on Windows
Saving screenshots on Windows is easier than you think. We’ll walk you through the step-by-step process to capture and save your screen efficiently.
2.1. Using the Print Screen (PrtScn) Key
The Print Screen key is the most basic way to take a screenshot on Windows.
- Press the Print Screen Key: Locate the “PrtScn” key on your keyboard (it might be labeled differently depending on your keyboard). Press it to capture your entire screen.
- Open an Image Editing Program: Open an image editing program like Paint, which comes standard with Windows.
- Paste the Screenshot: In Paint, press Ctrl + V to paste the screenshot from your clipboard.
- Save the Screenshot: Go to File > Save As and choose your desired file format (JPEG, PNG, etc.) and location to save the screenshot.
2.2. Using Windows Key + Print Screen
This method automatically saves your screenshot as a file.
- Press Windows Key + Print Screen: Simultaneously press the Windows key and the Print Screen key. The screen will briefly dim, indicating that a screenshot has been taken.
- Locate the Screenshot: Open the “Pictures” library and find the “Screenshots” folder. Your screenshot will be saved there with a name like “Screenshot (1).png”.
2.3. Using Alt + Print Screen
This method captures only the active window.
- Select the Active Window: Make sure the window you want to capture is active (i.e., it’s the one you’re currently working on).
- Press Alt + Print Screen: Press the Alt key and the Print Screen key together. This captures the active window and copies it to the clipboard.
- Open an Image Editing Program: Open an image editing program like Paint.
- Paste the Screenshot: In Paint, press Ctrl + V to paste the screenshot from your clipboard.
- Save the Screenshot: Go to File > Save As and choose your desired file format and location to save the screenshot.
2.4. Using Shift + Windows Key + S (Snipping Tool)
The Snipping Tool allows you to capture a specific area of your screen.
- Press Shift + Windows Key + S: Press these keys together to activate the Snipping Tool. The screen will dim and your cursor will turn into a crosshair.
- Select the Area to Capture: Click and drag your mouse to select the area of the screen you want to capture.
- Screenshot is Copied to Clipboard: Once you release the mouse button, the screenshot is copied to the clipboard.
- Open an Image Editing Program: Open an image editing program like Paint.
- Paste the Screenshot: In Paint, press Ctrl + V to paste the screenshot from your clipboard.
- Save the Screenshot: Go to File > Save As and choose your desired file format and location to save the screenshot.
2.5. Using the Snipping Tool App
The Snipping Tool is a dedicated app for taking screenshots, offering more features than the basic methods.
-
Open the Snipping Tool: Search for “Snipping Tool” in the Start menu and open the app.
-
Choose a Snip Type: In the Snipping Tool, click the “Mode” dropdown to choose the type of snip you want to take:
- Free-form Snip: Draw a free-form shape around an object.
- Rectangular Snip: Drag the cursor around an object to form a rectangle.
- Window Snip: Select a window to capture.
- Full-screen Snip: Capture the entire screen.
-
Take the Screenshot: Click “New” to start the snip. Follow the instructions based on the snip type you chose.
-
Edit the Screenshot (Optional): The Snipping Tool offers basic editing features like a pen and highlighter.
-
Save the Screenshot: Click the “Save” icon (a floppy disk) to save the screenshot to your desired location.
3. Advanced Screenshot Techniques on Windows
Want to step up your screenshot game? Discover advanced techniques like using the Game Bar, command-line tools, and third-party apps for more control and functionality.
3.1. Using the Game Bar
The Game Bar is designed for capturing gameplay, but it can also be used to take screenshots of any application.
- Open the Game Bar: Press Windows Key + G to open the Game Bar.
- Take a Screenshot: Click the “Screenshot” button (camera icon) or press Windows Key + Alt + Print Screen to take a screenshot.
- Locate the Screenshot: The screenshot will be saved in the “Captures” folder within your “Videos” library.
3.2. Using Command-Line Tools
For more advanced users, command-line tools like nircmd can be used to automate screenshots.
-
Download NirCmd: Download NirCmd from the official website.
-
Extract the Files: Extract the contents of the ZIP file to a folder.
-
Open Command Prompt: Open Command Prompt as an administrator.
-
Navigate to the NirCmd Folder: Use the
cdcommand to navigate to the folder where you extracted NirCmd. -
Take a Screenshot: Use the following command to take a screenshot and save it as a PNG file:
nircmd.exe savescreenshot "C:pathtoscreenshot.png"Replace
"C:pathtoscreenshot.png"with your desired file path and name.
3.3. Third-Party Screenshot Tools
Third-party screenshot tools offer a wide range of features and customization options. Here are a few popular options:
- Greenshot: A free, open-source screenshot tool with annotation and editing features.
- ShareX: A powerful screenshot and screen recording tool with advanced features.
- Snagit: A commercial screenshot tool with advanced editing and sharing capabilities.
3.3.1. Greenshot
Greenshot is a popular, free, and open-source screenshot tool for Windows and macOS. It offers a variety of features that make it a great alternative to the built-in Windows screenshot tools.
Key Features of Greenshot:
- Capture Specific Regions: Easily select and capture a specific region of your screen.
- Capture Full Screen: Capture the entire screen with a single click.
- Capture Active Window: Capture the currently active window.
- Scrolling Capture: Capture entire scrolling web pages.
- Annotation and Editing: Add annotations, highlights, and obfuscations to your screenshots.
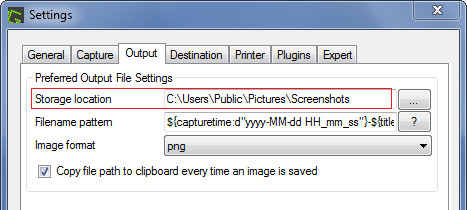
- Automatic Saving: Configure Greenshot to automatically save screenshots to a specific folder with a custom naming scheme.
- Upload to Imgur: Directly upload screenshots to Imgur.
How to Use Greenshot:
- Download and Install Greenshot: Download Greenshot from the official website and install it on your computer.
- Configure Greenshot: Right-click the Greenshot icon in the system tray and select “Preferences” to configure the tool’s settings.
- Take a Screenshot: Use the keyboard shortcuts or right-click the Greenshot icon in the system tray to take a screenshot.
- Edit and Save: Use the Greenshot editor to annotate and edit your screenshot, then save it to your desired location.
3.3.2. ShareX
ShareX is a free and open-source screenshot and screen recording tool for Windows. It offers a wide range of features and customization options, making it a powerful tool for advanced users.
Key Features of ShareX:
- Capture Specific Regions: Easily select and capture a specific region of your screen.
- Capture Full Screen: Capture the entire screen with a single click.
- Capture Active Window: Capture the currently active window.
- Scrolling Capture: Capture entire scrolling web pages.
- Annotation and Editing: Add annotations, highlights, and obfuscations to your screenshots.
- Automatic Saving: Configure ShareX to automatically save screenshots to a specific folder with a custom naming scheme.
- Upload to Multiple Destinations: Upload screenshots to a wide range of destinations, including Imgur, Dropbox, Google Drive, and more.
- Screen Recording: Record your screen as a video or GIF.
- Workflow Automation: Automate tasks with custom workflows.
How to Use ShareX:
- Download and Install ShareX: Download ShareX from the official website and install it on your computer.
- Configure ShareX: Configure ShareX to automatically save screenshots to a specific folder with a custom naming scheme.
- Take a Screenshot: Use the keyboard shortcuts or right-click the ShareX icon in the system tray to take a screenshot.
- Edit and Save: Use the ShareX editor to annotate and edit your screenshot, then save it to your desired location.
3.3.3. Snagit
Snagit is a commercial screenshot and screen recording tool developed by TechSmith. It offers a wide range of features and customization options, making it a popular choice for professionals and businesses.
Key Features of Snagit:
- Capture Specific Regions: Easily select and capture a specific region of your screen.
- Capture Full Screen: Capture the entire screen with a single click.
- Capture Active Window: Capture the currently active window.
- Scrolling Capture: Capture entire scrolling web pages.
- Annotation and Editing: Add annotations, highlights, and obfuscations to your screenshots.
- Automatic Saving: Configure Snagit to automatically save screenshots to a specific folder with a custom naming scheme.
- Screen Recording: Record your screen as a video.
- Advanced Editing Tools: Use advanced editing tools to enhance your screenshots.
- Templates: Create screenshots from templates.
- Sharing: Share screenshots to a variety of destinations, including email, social media, and more.
How to Use Snagit:
- Download and Install Snagit: Download Snagit from the official website and install it on your computer. You will need to purchase a license to use the full version of Snagit.
- Configure Snagit: Configure Snagit to automatically save screenshots to a specific folder with a custom naming scheme.
- Take a Screenshot: Use the keyboard shortcuts or click the Snagit icon in the system tray to take a screenshot.
- Edit and Save: Use the Snagit editor to annotate and edit your screenshot, then save it to your desired location.
4. Customizing Screenshot Settings for Efficiency
Making a few tweaks to your screenshot settings can save you time and effort. Learn how to customize file formats, saving locations, and keyboard shortcuts.
4.1. Changing the Default Save Location
If you prefer your screenshots to be saved in a different location than the default “Screenshots” folder, you can change it by following these steps:
- Open File Explorer: Open File Explorer and navigate to the “Pictures” library.
- Right-Click the Screenshots Folder: Right-click the “Screenshots” folder and select “Properties”.
- Go to the Location Tab: In the Properties window, go to the “Location” tab.
- Change the Location: Click the “Move” button and choose a new location for your screenshots folder.
- Apply the Changes: Click “Apply” and then “OK” to save the changes.
4.2. Changing the File Format
Windows saves screenshots as PNG files by default. If you prefer a different file format (like JPEG or GIF), you’ll need to use an image editing program to change the file format when saving your screenshots.
- Take a Screenshot: Use any of the methods described above to take a screenshot.
- Open an Image Editing Program: Open an image editing program like Paint.
- Paste the Screenshot: In Paint, press Ctrl + V to paste the screenshot from your clipboard.
- Save the Screenshot: Go to File > Save As and choose your desired file format (JPEG, GIF, etc.) and location to save the screenshot.
4.3. Customizing Keyboard Shortcuts
Some third-party screenshot tools allow you to customize keyboard shortcuts for taking screenshots. Refer to the documentation for your chosen screenshot tool for instructions on how to customize keyboard shortcuts.
5. Troubleshooting Common Screenshot Issues
Encountering problems with screenshots? Find solutions for common issues like the Print Screen key not working, screenshots not saving, or the Snipping Tool not functioning correctly.
5.1. Print Screen Key Not Working
If the Print Screen key is not working, there are several possible causes:
- Keyboard Issues: Make sure the Print Screen key is not damaged or malfunctioning.
- Conflicting Programs: Some programs may interfere with the Print Screen key. Close any unnecessary programs and try again.
- Driver Issues: Update your keyboard drivers to the latest version.
- Function Lock: On some keyboards, the Print Screen key may be combined with the Function (Fn) key. Make sure the Function Lock is not enabled.
5.2. Screenshots Not Saving
If your screenshots are not saving automatically, make sure you are using the Windows Key + Print Screen shortcut. If you are using the Print Screen key alone, you need to paste the screenshot into an image editing program and save it manually. Also, check the default save location (“Screenshots” folder in the “Pictures” library) to make sure the screenshots are not being saved there.
5.3. Snipping Tool Not Functioning Correctly
If the Snipping Tool is not functioning correctly, try the following:
- Restart the Snipping Tool: Close the Snipping Tool and reopen it.
- Restart Your Computer: Restart your computer to resolve any temporary issues.
- Check for Updates: Make sure you have the latest updates for Windows installed.
- Run the System File Checker: Run the System File Checker tool to repair corrupted system files.
6. Best Practices for Taking and Managing Screenshots
Follow these best practices to ensure you capture clear, organized, and easily accessible screenshots.
6.1. Organizing Screenshots
To keep your screenshots organized, create a clear folder structure and use descriptive file names.
- Create Folders: Create folders for different projects, topics, or dates.
- Use Descriptive File Names: Use file names that clearly describe the content of the screenshot.
- Add Dates: Include dates in your file names to easily track when the screenshots were taken.
6.2. Editing and Annotating Screenshots
Use image editing tools to enhance your screenshots and add annotations to highlight important information.
- Crop Unnecessary Areas: Crop out any unnecessary areas of the screenshot to focus on the key information.
- Add Annotations: Use annotations like arrows, text, and highlights to draw attention to specific elements.
- Obfuscate Sensitive Information: Use obfuscation tools to blur or black out sensitive information like passwords or personal details.
6.3. Choosing the Right File Format
Choose the right file format for your screenshots based on their content and intended use.
- PNG: Use PNG for screenshots with text, graphics, and sharp lines. PNG is a lossless format, meaning it preserves the quality of the image.
- JPEG: Use JPEG for screenshots with photographs and complex images. JPEG is a lossy format, meaning it compresses the image and may reduce its quality.
- GIF: Use GIF for animated screenshots or simple graphics with limited colors.
7. How to take a screenshot on Windows and save it directly to a file?
To directly save a screenshot to a file on Windows, press the Windows key + Print Screen keys simultaneously. This captures the entire screen and saves it as a PNG file in the “Screenshots” folder within your “Pictures” library.
7.1. The beauty of instant saving
This method is great because it skips the step of needing to paste the screenshot into an image editor. According to Microsoft, this shortcut was designed to improve workflow efficiency for Windows users, especially those who frequently need to capture and share their screens.
7.2. Quick Steps
- Ensure the content you want to capture is visible on your screen.
- Press the Windows key and the Print Screen key at the same time. The screen will briefly dim, indicating that the screenshot has been taken.
- Navigate to your “Pictures” library and open the “Screenshots” folder to find your saved image.
8. What is the quickest way to screenshot on Windows?
The quickest way to screenshot on Windows is by using the Windows key + Shift + S shortcut. This opens the Snipping Tool, allowing you to quickly select a specific area of your screen to capture. The screenshot is then copied to your clipboard.
8.1. Why this is so fast
This method is fast because it lets you choose exactly what part of your screen you want to capture without needing to crop later. This is especially useful when you only need a small portion of the screen.
8.2. Steps to follow
- Press Windows key + Shift + S at the same time. The screen will dim and your cursor will change to a crosshair.
- Click and drag your mouse to select the area you want to capture.
- The screenshot is automatically copied to your clipboard. You can then paste it into any application, such as an image editor or a document.
9. How do I take a screenshot of only one window?
To take a screenshot of only one window on Windows, use the Alt + Print Screen shortcut. This captures the active window and copies it to your clipboard.
9.1. Focusing on what matters
This method is ideal when you want to capture a specific application window without including the entire screen. It’s particularly useful for sharing application-specific content.
9.2. Simple instructions
- Make sure the window you want to capture is active by clicking on it.
- Press the Alt key and the Print Screen key simultaneously.
- Open an image editor (like Paint) and press Ctrl + V to paste the screenshot.
- Save the screenshot to your desired location.
10. Is there a delay screenshot option on Windows?
Yes, Windows offers a delay screenshot option through the Snipping Tool and Snip & Sketch. This allows you to capture screenshots after a specified delay, giving you time to set up the screen exactly as you want it.
10.1. Capturing timed events
This feature is essential for capturing actions that occur after a delay, such as drop-down menus or pop-up notifications.
10.2. How to use delayed screenshots
- Open the Snipping Tool or Snip & Sketch from the Start menu.
- Click on “New” and select the delay option from the dropdown menu (e.g., “Snip in 3 seconds” or “Snip in 5 seconds”).
- Set up the screen as desired before the delay expires. The screenshot will be captured automatically after the set time.
- The screenshot will open in the Snipping Tool or Snip & Sketch, where you can edit and save it.
11. Can I annotate screenshots directly after capturing them on Windows?
Yes, you can annotate screenshots directly after capturing them on Windows using the Snip & Sketch tool. This tool automatically opens after you take a screenshot using Windows key + Shift + S, allowing you to add annotations immediately.
11.1. Instant editing
This feature saves time by eliminating the need to open a separate image editor. You can quickly add notes, highlights, and drawings to your screenshots.
11.2. Steps to annotate immediately
- Press Windows key + Shift + S to capture a screenshot.
- The Snip & Sketch tool will automatically open with your screenshot.
- Use the available pens, highlighters, and erasers to annotate the screenshot.
- Click the save icon to save the annotated screenshot to your desired location.
12. How do I screenshot on a Windows tablet?
Taking a screenshot on a Windows tablet is similar to a desktop, but you can also use hardware buttons. Press the Windows button + Volume Down button simultaneously. The screen will briefly dim, and the screenshot will be saved to the “Screenshots” folder in your “Pictures” library.
12.1. Tablet-friendly methods
This method is designed for tablets without a physical keyboard. It mimics the functionality of the Windows key + Print Screen shortcut on a desktop.
12.2. Simple steps for tablets
- Ensure the content you want to capture is visible on your screen.
- Press and hold the Windows button and the Volume Down button at the same time.
- The screen will briefly dim, indicating that the screenshot has been taken.
- Navigate to your “Pictures” library and open the “Screenshots” folder to find your saved image.
13. What file format are Windows screenshots saved in by default?
Windows screenshots are saved in PNG (Portable Network Graphics) format by default. This format is ideal for screenshots because it preserves image quality and is well-suited for images with text, graphics, and sharp lines.
13.1. Why PNG is preferred
PNG is a lossless format, meaning it doesn’t lose quality when the image is compressed. This makes it perfect for screenshots that need to retain their clarity and detail. According to image format experts, PNG is the best choice for screenshots due to its ability to maintain high image quality.
13.2. Advantages of PNG
- Lossless compression: Preserves image quality.
- Good for text and graphics: Retains sharpness and detail.
- Widely supported: Compatible with most image viewers and editors.
14. How can I change the default screenshot file format on Windows?
You cannot directly change the default screenshot file format on Windows through built-in settings. However, you can use third-party tools or manually save the screenshot in a different format using an image editor.
14.1. Why it’s not a default option
Windows does not offer a built-in option to change the default screenshot format because PNG is considered the optimal format for most screenshot purposes. However, users who prefer other formats can use alternative methods.
14.2. Methods to save in different formats
- Use an Image Editor: After taking a screenshot, paste it into an image editor like Paint, GIMP, or Photoshop, and then save it in your desired format (JPEG, GIF, etc.).
- Use Third-Party Tools: Some third-party screenshot tools allow you to customize the default file format. For example, Greenshot and ShareX offer options to save screenshots in various formats.
15. What are some of the best free screenshot tools for Windows?
There are several excellent free screenshot tools available for Windows, each offering unique features and capabilities. Some of the best include Greenshot, ShareX, and the built-in Snip & Sketch tool.
15.1. Top free options
These tools provide more advanced features than the basic Print Screen function, such as annotation, editing, and customizable settings.
15.2. Recommended tools
- Greenshot: A lightweight and easy-to-use tool with annotation and automatic saving options.
- ShareX: A powerful tool with a wide range of features, including screen recording and customizable workflows.
- Snip & Sketch: The built-in Windows tool that offers basic annotation and quick capturing capabilities.
16. How do I take a scrolling screenshot on Windows?
To take a scrolling screenshot on Windows, you typically need to use a third-party tool or a browser extension. Windows does not have a built-in feature for capturing entire scrolling windows.
16.1. Limitations of built-in features
The built-in screenshot tools in Windows can only capture what is currently visible on the screen. To capture content that extends beyond the visible area, you need additional software.
16.2. Tools for scrolling screenshots
- Greenshot: This tool can capture scrolling web pages in some browsers.
- ShareX: Offers a scrolling capture mode that can capture entire web pages or documents.
- Awesome Screenshot (Chrome Extension): A browser extension that allows you to capture full web pages.
17. Is it possible to take a screenshot without using the Print Screen key?
Yes, it is possible to take a screenshot without using the Print Screen key on Windows. You can use the Snipping Tool, Snip & Sketch, the Game Bar, or third-party screenshot tools.
17.1. Alternative methods
These alternative methods provide flexibility and additional features for capturing screenshots, making it easier to capture and annotate images.
17.2. Ways to screenshot without Print Screen
- Snipping Tool: Open the Snipping Tool from the Start menu and use the “New” button to capture a screenshot.
- Snip & Sketch: Press Windows key + Shift + S to open Snip & Sketch and capture a screenshot.
- Game Bar: Press Windows key + G to open the Game Bar and click the screenshot button.
- Third-Party Tools: Use tools like Greenshot or ShareX to capture screenshots with customizable settings.
18. How do I set up a custom keyboard shortcut for taking screenshots?
Setting up a custom keyboard shortcut for taking screenshots on Windows typically requires using a third-party tool, as Windows does not offer a built-in option for customizing screenshot shortcuts.
18.1. Limitations of default settings
Windows provides default shortcuts like Windows key + Print Screen and Windows key + Shift + S, but these cannot be changed without using additional software.
18.2. Steps to customize shortcuts
- Choose a Third-Party Tool: Download and install a screenshot tool that allows custom keyboard shortcuts, such as ShareX.
- Configure the Shortcut: Open the settings of the chosen tool and look for the option to customize keyboard shortcuts.
- Assign a New Shortcut: Assign a new keyboard shortcut to the screenshot function. Make sure the shortcut does not conflict with other existing shortcuts.
- Save the Settings: Save the changes and test the new shortcut to ensure it works correctly.
19. Can I take screenshots of videos on Windows?
Yes, you can take screenshots of videos on Windows. The easiest way is to pause the video at the desired frame and then use one of the standard screenshot methods, such as the Print Screen key or the Snipping Tool.
19.1. Capturing video frames
Taking screenshots of videos is useful for capturing specific moments or creating thumbnails.
19.2. Methods to screenshot videos
- Print Screen Key: Pause the video, press the Print Screen key, and then paste the screenshot into an image editor to save it.
- Snipping Tool: Pause the video and use the Snipping Tool to select and capture the desired frame.
- Game Bar: If the video is playing in a media player, you can use the Game Bar (Windows key + G) to take a screenshot.
- Third-Party Tools: Some media players, like VLC, have built-in screenshot functions that allow you to capture frames directly.
20. What should I do if my screenshots are too large?
If your screenshots are too large, you can reduce their file size by using an image editor to compress or resize them. This is particularly useful for sharing screenshots online or via email.
20.1. Optimizing file size
Reducing the file size of screenshots can save storage space and make them easier to share.
20.2. Steps to reduce screenshot size
- Open the Screenshot in an Image Editor: Use an image editor like Paint, GIMP, or Photoshop to open the screenshot.
- Resize the Image: Reduce the dimensions of the image. For example, reduce a 1920×1080 image to 1280×720.
- Compress the Image: Save the image in a compressed format like JPEG. Adjust the compression settings to find a balance between file size and image quality.
- Save the Reduced Screenshot: Save the resized and compressed screenshot to your desired location.
21. Need More Ways to Save?
Now that you know How To Save A Screenshot On Windows, why not explore other ways to save money? Visit savewhere.net for more tips, deals, and resources to help you manage your finances effectively. From saving on groceries to finding the best deals on travel, savewhere.net has everything you need to start saving today!
Ready to take control of your financial future? Head over to savewhere.net now and discover a world of savings opportunities! Don’t miss out on the chance to save money and live a more financially secure life. Visit savewhere.net today! Our address is 100 Peachtree St NW, Atlanta, GA 30303, United States, and our phone number is +1 (404) 656-2000.
FAQ: Everything You Need to Know About Saving Screenshots on Windows
Q1: How do I save a screenshot on Windows quickly?
Press the Windows key + Print Screen keys simultaneously to save a screenshot directly to the “Screenshots” folder in your “Pictures” library. This is the quickest built-in method.
Q2: What is the fastest way to take a screenshot of a specific area on Windows?
Use the Windows key + Shift + S shortcut to open the Snipping Tool, allowing you to quickly select and capture a specific area of your screen, which is then copied to your clipboard.
Q3: How can I capture only one window in a screenshot on Windows?
Press Alt + Print Screen to capture only the active window. This captures the window you are currently working on and copies it to your clipboard.
Q4: Does Windows have a delay screenshot option?
Yes, Windows offers a delay screenshot option through the Snipping Tool and Snip & Sketch. You can set a delay of a few seconds before the screenshot is taken, giving you time to set up the screen.
Q5: Can I edit screenshots immediately after capturing them on Windows?
Yes, using the Snip & Sketch tool, which opens automatically after you take a screenshot with Windows key + Shift + S, allows you to annotate screenshots immediately.
Q6: How do I take a screenshot on a Windows tablet without a keyboard?
Press and hold the Windows button and the Volume Down button at the same time. The screen will dim, and the screenshot will be saved to your “Screenshots” folder.
Q7: What file format are screenshots saved in by default on Windows?
Windows saves screenshots in PNG (Portable Network Graphics) format by default, which preserves image quality and is ideal for screenshots with text and graphics.
Q8: Can I change the default screenshot file format on Windows?
No, you cannot directly change the default file format in Windows settings. However, you can use an image editor to save the screenshot in a different format after capturing it.
Q9: What are some good free screenshot tools for Windows?
Some of the best free screenshot tools include Greenshot, ShareX, and the built-in Snip & Sketch tool, each offering unique features and capabilities.
Q10: How can I capture a scrolling screenshot on Windows?
To capture a scrolling screenshot, you typically need to use a third-party tool like Greenshot or ShareX, or a browser extension like Awesome Screenshot, as Windows does not have a built-in scrolling screenshot feature.