How Do I Save Voicemails On My Iphone? Saving voicemails on your iPhone is a great way to preserve important messages. At savewhere.net, we’ll guide you through the simple steps to archiving these precious moments, ensuring you never miss a crucial piece of information, while providing tips on budget-friendly solutions and expense management for your financial wellness.
1. Understanding Visual Voicemail on Your iPhone
Visual Voicemail is a feature that allows you to see a list of your voicemails, play them in any order, and manage them directly from your iPhone’s Phone app. This eliminates the need to dial in to a voicemail system.
Key Features of Visual Voicemail:
- Easy Access: View and listen to voicemails in any order.
- Convenience: No need to dial a number to check your messages.
- Management: Delete, save, and share voicemails with ease.
- Transcription: Some carriers offer voicemail-to-text transcription.
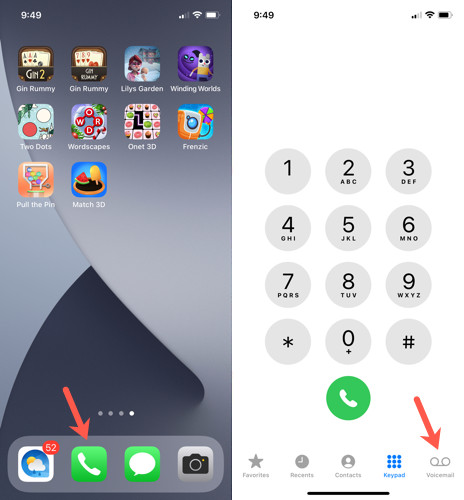 Phone app, Voicemail tab
1.1. Is Visual Voicemail Available on Your Carrier?
Not all carriers support Visual Voicemail. Before you proceed, ensure that your carrier offers this feature. To check, open your Phone app and look for the “Voicemail” tab in the bottom right corner. If you see a list of voicemails, your carrier supports Visual Voicemail. If not, you may need to contact your carrier to enable it or use alternative methods discussed later.
1.2. Setting Up Visual Voicemail
If Visual Voicemail is available, setting it up is usually straightforward:
- Open the Phone App: Tap the Phone icon on your iPhone.
- Go to Voicemail: Select the “Voicemail” tab at the bottom right.
- Set Up Now: If you haven’t already, tap “Set Up Now.”
- Create a Password: Follow the prompts to create a voicemail password. This is crucial for security.
- Record a Greeting: You can choose the default greeting or record a personalized one.
1.3. Visual Voicemail and Data Usage
Visual Voicemail uses data to download and display your messages. Keep this in mind if you have a limited data plan. You can connect to Wi-Fi to minimize data usage when checking your voicemails. According to a report by the U.S. Bureau of Economic Analysis (BEA), managing data usage is a key factor in maintaining a budget-friendly lifestyle.
2. Step-by-Step Guide: Saving Voicemails with Visual Voicemail
Saving voicemails using Visual Voicemail is simple. Here’s how you do it:
2.1. Accessing Your Voicemails
- Open the Phone App: Tap the Phone icon on your iPhone.
- Go to Voicemail: Select the “Voicemail” tab at the bottom right.
- Select a Voicemail: Tap the voicemail you want to save.
2.2. Sharing the Voicemail
- Tap the Share Button: In the voicemail screen, look for the share icon (a box with an arrow pointing upwards) in the top right corner.
- Choose a Saving Option: A share sheet will appear with various options.
2.3. Saving to Files
- Select “Save to Files”: This option allows you to save the voicemail directly to your iPhone or iCloud Drive.
- Choose a Location: Pick a folder where you want to store the voicemail. You can create a new folder specifically for voicemails.
- Tap “Save”: The voicemail will be saved as an audio file in the chosen location.
2.4. Saving to Cloud Storage
- Select “Save to Files”: As before, this opens the file-saving options.
- Choose iCloud Drive or Google Drive: Select your preferred cloud storage service.
- Select a Folder: Pick a folder in your cloud storage where you want to save the voicemail.
- Tap “Save”: The voicemail will be uploaded to your cloud storage, ensuring it’s backed up and accessible from other devices.
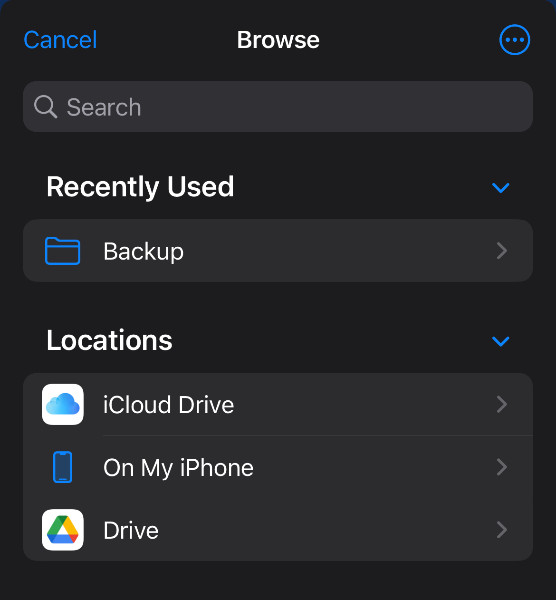 Storage location options in iOS Files app
2.5. Using AirDrop to Transfer to Mac or iPad
- Tap the Share Button: Access the share sheet as described above.
- Select AirDrop: Look for the AirDrop icon and tap it.
- Choose Your Device: Select your Mac or iPad from the list of available devices. Ensure that AirDrop is enabled on the receiving device and set to receive from “Contacts Only” or “Everyone.”
- Accept the File: On your Mac or iPad, accept the incoming file. It will be saved to your Downloads folder.
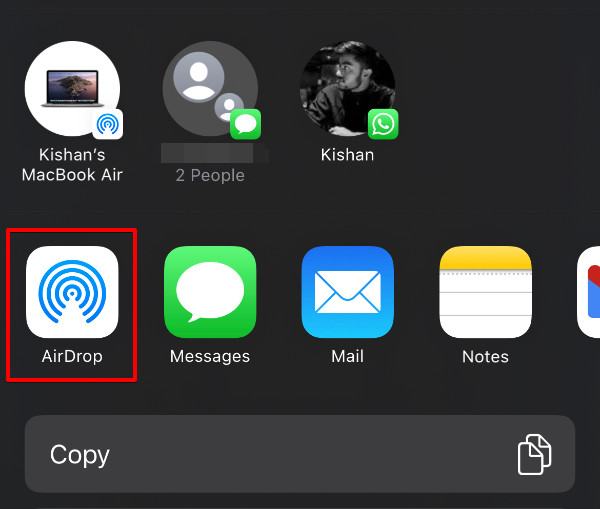 Tap the AirDrop button.
2.6. Playback and Management
Once saved, you can play the voicemail files using any audio player on your iPhone, iPad, or Mac. You can also rename the files to better organize them. For example, you might name a file “John_Doe_Important_Message.m4a.” Regular maintenance, like organizing and renaming files, is part of effective financial management in the digital age.
3. Saving Voicemails Without Visual Voicemail
If your carrier doesn’t support Visual Voicemail, don’t worry. There are alternative methods to save your voicemails.
3.1. Using Screen Recording
Screen Recording is a built-in iOS feature that allows you to record your screen and audio simultaneously. This can be a useful workaround for saving voicemails.
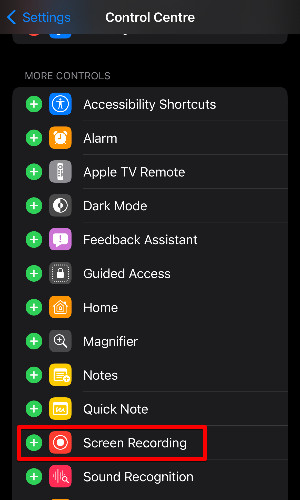
3.1.1. Enabling Screen Recording
- Open Settings: Tap the Settings icon on your iPhone.
- Go to Control Center: Scroll down and select “Control Center.”
- Add Screen Recording: Under “More Controls,” find “Screen Recording” and tap the green “+” icon to add it to your Control Center.
3.1.2. Recording the Voicemail
- Access Control Center: Swipe down from the top right corner of your screen (or up from the bottom on older iPhones) to open Control Center.
- Start Screen Recording: Tap the Screen Recording icon (a circle inside a larger circle). A countdown will begin.
- Enable Microphone: Press and hold the Screen Recording icon to bring up additional options. Make sure the microphone is turned on.
- Go to Phone App: Exit Control Center and open the Phone app.
- Play the Voicemail: Dial your voicemail and play the message through the speaker.
- Stop Screen Recording: Once the voicemail has finished playing, tap the red status bar at the top of your screen and select “Stop” to end the recording.
3.1.3. Accessing the Recording
The screen recording will be saved to the Photos app. You can then trim the video to isolate the voicemail audio.
3.2. Third-Party Apps
Several third-party apps can help you save voicemails, even without Visual Voicemail. These apps often provide additional features like transcription and cloud storage integration.
3.2.1. Google Voice
Google Voice offers a free voicemail service with transcription and the ability to save voicemails as audio files.
- Download Google Voice: Install the Google Voice app from the App Store.
- Set Up Google Voice: Follow the instructions to set up your Google Voice account.
- Forward Voicemails: Configure your iPhone to forward unanswered calls to your Google Voice number.
- Access Voicemails: Open the Google Voice app to access your voicemails. You can listen to them, read the transcriptions, and save the audio files.
3.2.2. Other Voicemail Apps
Other voicemail apps like YouMail and HulloMail offer similar features. Research and choose the app that best fits your needs. These apps often come with a subscription fee, so consider your budget when making a decision.
3.3. Connecting iPhone to Computer
- Connect Your iPhone: Use a Lightning cable to connect your iPhone to your computer.
- Trust This Computer: If prompted, tap “Trust This Computer” on your iPhone.
- Open iTunes (or Finder on macOS Catalina and later): Launch iTunes on Windows or macOS Mojave and earlier. On macOS Catalina and later, open Finder.
- Access Your iPhone: In iTunes, click the iPhone icon near the top left. In Finder, your iPhone will appear in the sidebar under “Locations.”
- Back Up Your iPhone: Create a backup of your iPhone to your computer. This will include your voicemails.
- Locate Voicemail Files: The voicemail files are stored in the backup. You may need third-party software to extract the voicemail files from the backup.
- Extract Voicemails: Use a backup extractor tool to find and extract the voicemail files. These files can then be saved to your computer.
4. Managing and Backing Up Your Saved Voicemails
Once you’ve saved your voicemails, it’s essential to manage and back them up to ensure they are safe and accessible.
4.1. Organizing Your Voicemail Files
- Create Folders: Organize your voicemails by creating folders for different categories, such as “Family,” “Work,” or “Important.”
- Rename Files: Rename your voicemail files with descriptive names that include the sender, date, and a brief description of the message. This will make it easier to find specific voicemails later.
- Use Naming Conventions: Establish a consistent naming convention to keep your files organized.
4.2. Backing Up Your Voicemails
- Cloud Storage: Regularly back up your voicemail files to a cloud storage service like iCloud Drive, Google Drive, or Dropbox. This ensures that your voicemails are safe even if you lose or damage your iPhone.
- External Hard Drive: Copy your voicemail files to an external hard drive for an additional layer of backup.
- Multiple Backups: It’s a good idea to have multiple backups in different locations to protect against data loss.
 Screen Recording toggle highlighed in the Control Center settings
4.3. Archiving Old Voicemails
- Review Regularly: Periodically review your saved voicemails and delete any that are no longer needed.
- Archive Important Voicemails: Move important voicemails to a separate archive folder to keep them safe while decluttering your main voicemail collection.
- Consider Transcription: For important voicemails, consider getting them transcribed. This will make it easier to search and reference the content of the messages.
5. Troubleshooting Common Issues
Saving voicemails can sometimes present challenges. Here are some common issues and how to troubleshoot them.
5.1. Visual Voicemail Not Working
- Check Carrier Support: Ensure that your carrier supports Visual Voicemail. Contact your carrier if you’re unsure.
- Restart Your iPhone: Sometimes, a simple restart can resolve issues with Visual Voicemail.
- Reset Network Settings: Go to Settings > General > Reset > Reset Network Settings. This can resolve network-related issues that may be affecting Visual Voicemail.
- Update Carrier Settings: Go to Settings > General > About. If there’s an update available for your carrier settings, you’ll be prompted to install it.
5.2. Screen Recording Issues
- Microphone Not Working: Make sure the microphone is enabled in the Screen Recording settings. Press and hold the Screen Recording icon in Control Center to check the microphone status.
- No Audio in Recording: Ensure that you’re playing the voicemail through the speaker while recording.
- Recording Stops Unexpectedly: Check your iPhone’s storage space. If you’re running low on storage, the recording may stop prematurely.
5.3. Issues with Third-Party Apps
- App Not Saving Voicemails: Check the app’s settings and permissions to ensure it has access to your voicemail.
- App Crashing: Try restarting the app or reinstalling it.
- Compatibility Issues: Make sure the app is compatible with your version of iOS.
6. Tips for Saving Storage Space
Saving voicemails can take up storage space on your iPhone and in your cloud storage. Here are some tips for managing storage space.
6.1. Compressing Audio Files
- Use Compression Tools: Use audio compression tools to reduce the file size of your voicemail recordings without significantly affecting the audio quality.
- Convert to Lower Bitrate: Convert the audio files to a lower bitrate to reduce their size.
6.2. Deleting Unnecessary Voicemails
- Review Regularly: Periodically review your saved voicemails and delete any that are no longer needed.
- Set a Schedule: Set a regular schedule for reviewing and deleting old voicemails.
6.3. Using Cloud Storage Efficiently
- Optimize Storage Settings: Configure your cloud storage settings to optimize storage usage. For example, you can choose to only upload voicemail files over Wi-Fi.
- Regularly Clean Up: Regularly clean up your cloud storage to remove any unnecessary files.
7. Legal Considerations
Before saving and sharing voicemails, it’s important to be aware of the legal considerations.
7.1. Privacy Laws
- Consent: Obtain consent from the person who left the voicemail before sharing it with others.
- Privacy Regulations: Be aware of privacy regulations in your jurisdiction that may restrict the sharing of personal information.
7.2. Recording Laws
- One-Party Consent: In some jurisdictions, only one party needs to consent to the recording of a phone call.
- Two-Party Consent: In other jurisdictions, all parties must consent to the recording of a phone call.
- Check Local Laws: Check the recording laws in your jurisdiction before recording any phone calls or voicemails.
7.3. Ethical Considerations
- Respect Privacy: Respect the privacy of others when saving and sharing voicemails.
- Avoid Misrepresentation: Do not misrepresent the content of voicemails or use them in a way that could harm someone’s reputation.
8. Enhancing Financial Management with Voicemail Organization
Organizing your voicemails can indirectly contribute to better financial management by ensuring you don’t miss important financial communications.
8.1. Tracking Financial Information
- Record Financial Details: If you receive important financial information via voicemail, such as account numbers or transaction details, save the voicemail and transcribe it for your records.
- Follow Up on Voicemails: Use saved voicemails as reminders to follow up on important financial matters.
8.2. Managing Financial Communications
- Organize Financial Voicemails: Create a dedicated folder for voicemails related to your finances.
- Set Reminders: Set reminders to review your financial voicemails regularly and take any necessary actions.
8.3. Accessing Financial Advice
- Save Advice: If you receive financial advice via voicemail, save the message for future reference.
- Review Regularly: Review the advice regularly to ensure you’re on track with your financial goals.
9. Additional Tips and Tricks
Here are some additional tips and tricks for saving and managing voicemails on your iPhone.
9.1. Using Siri Shortcuts
- Create Shortcuts: Create Siri Shortcuts to quickly access and save voicemails.
- Automate Tasks: Automate tasks such as saving voicemails to a specific folder or sending them to a cloud storage service.
9.2. Exploring Accessibility Features
- Voice Control: Use Voice Control to navigate your iPhone and save voicemails using voice commands.
- Dictation: Use dictation to transcribe voicemails and save the transcriptions for your records.
9.3. Staying Updated
- Follow Tech Blogs: Follow tech blogs and forums to stay updated on the latest tips and tricks for saving and managing voicemails on your iPhone.
- Join Online Communities: Join online communities to share your experiences and learn from others.
10. Savewhere.net: Your Resource for Financial Savings
At savewhere.net, we are dedicated to providing you with the best tips, tricks, and resources for saving money and managing your finances effectively. We offer a wide range of articles, guides, and tools to help you achieve your financial goals.
10.1. Explore Savewhere.net for More Savings Tips
Visit savewhere.net to discover more ways to save money on your everyday expenses. From budgeting tips to discount alerts, we have everything you need to make the most of your money.
10.2. Connect with Our Community
Join our community of like-minded individuals who are passionate about saving money and achieving financial freedom. Share your tips, ask questions, and connect with others who are on the same journey.
10.3. Contact Us
Do you have any questions or feedback? We’d love to hear from you. Contact us at [Address: 100 Peachtree St NW, Atlanta, GA 30303, United States. Phone: +1 (404) 656-2000. Website: savewhere.net.] and let us know how we can help you save more money.
FAQ: How to Save Voicemails on Your iPhone
Q1: How do I access Visual Voicemail on my iPhone?
Open the Phone app and tap the “Voicemail” tab in the bottom right corner. If you see a list of voicemails, Visual Voicemail is enabled.
Q2: What if my carrier doesn’t support Visual Voicemail?
You can use screen recording or third-party apps like Google Voice to save voicemails.
Q3: How do I save a voicemail using Visual Voicemail?
Select the voicemail, tap the share button, and choose “Save to Files” to save it to your iPhone or cloud storage.
Q4: Can I save voicemails to iCloud Drive?
Yes, when saving to files, you can choose iCloud Drive as the destination.
Q5: How do I use screen recording to save a voicemail?
Enable screen recording in Control Center, play the voicemail through the speaker, and stop the recording when finished. The recording will be saved to your Photos app.
Q6: Are there any legal considerations when saving voicemails?
Be aware of privacy laws and recording laws in your jurisdiction. Obtain consent before sharing voicemails.
Q7: How can I manage storage space when saving voicemails?
Compress audio files, delete unnecessary voicemails, and use cloud storage efficiently.
Q8: Can I transfer voicemails to my computer?
Yes, you can use AirDrop to transfer voicemails to your Mac or connect your iPhone to your computer and extract the voicemail files from a backup.
Q9: What are some good third-party apps for saving voicemails?
Google Voice, YouMail, and HulloMail are popular options.
Q10: How can savewhere.net help me save money?
savewhere.net provides tips, tricks, and resources for saving money on everyday expenses and managing your finances effectively.
Saving voicemails on your iPhone is essential for preserving important communications. Whether you’re using Visual Voicemail or alternative methods, following the steps outlined in this guide will ensure that you never lose a crucial message. Remember to organize and back up your voicemails regularly, and be mindful of the legal and ethical considerations involved. For more tips on saving money and smart spending, visit savewhere.net and join our community today. Stay tuned for more insights on personal finance and budgeting strategies to help you achieve financial success.