
Saving an MS Word file as a PDF is a common task, but do you know the most efficient ways to do it across different platforms and devices? At savewhere.net, we’ll guide you through the process, ensuring you can easily create PDFs for better document sharing and preservation.
1. Why Save a Word File as PDF?
Converting a Word document to PDF offers several advantages, making it a valuable skill for anyone working with digital documents.
- Preserves Formatting: PDFs ensure your document looks the same regardless of the device or operating system it’s viewed on.
- Enhances Security: You can add password protection and restrict editing, safeguarding sensitive information.
- Reduces File Size: PDFs often have smaller file sizes compared to Word documents, making them easier to share via email or online platforms.
- Universal Compatibility: PDFs can be opened on virtually any device with a PDF reader, eliminating compatibility issues.
- Archival Purposes: PDF/A format ensures long-term preservation of your document, making it ideal for archival purposes.
- Professional Appearance: PDFs provide a polished and professional look, making them suitable for sharing resumes, reports, and other important documents.
These benefits make saving Word files as PDFs a practical choice for various personal and professional needs.
2. How to Save an MS Word File as PDF on Windows
Saving a Word file as a PDF on Windows is straightforward. Here’s how you can do it:
- Open the Word Document: Launch Microsoft Word and open the document you want to save as a PDF.
- Go to the File Menu: Click on the “File” tab located in the top-left corner of the Word window.
- Select Save As: In the File menu, click on “Save As.” This opens the Save As dialog box.
- Choose a Save Location: Select the folder where you want to save the PDF file.
- Select PDF as the File Type: In the Save As dialog box, find the “Save as type” dropdown menu. Click on it and choose “PDF (*.pdf)” from the list of available file formats.
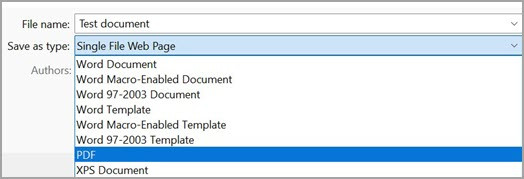 Selecting PDF as the file type in MS Word's Save As dialog box
- Adjust Options (Optional):
- Standard: Suitable for online publishing and printing, maintaining high print quality.
- Minimum Size: Optimizes for file size, ideal for online sharing where print quality is less critical.
- Click Save: After selecting the PDF format and adjusting options, click the “Save” button. Word will convert your document to PDF and save it in the location you specified.
2.1. Using the Export Function
Another method to save a Word file as a PDF in Windows is by using the Export function:
-
Open Your Document: Open the Word document you wish to convert.
-
Go to the File Menu: Click on the “File” tab.
-
Select Export: In the File menu, click on “Export.”
-
Create PDF/XPS Document: Click on the “Create PDF/XPS Document” option.
-
Name Your File: Enter a name for your PDF file in the File Name field.
-
Choose Save Location: Select where you want to save the PDF.
-
Options: Click the “Options” button to adjust settings like page range and inclusion of non-printing information.
-
Publish: Click “Publish” to save your Word document as a PDF.
2.2. Additional PDF Options in Word
When saving a Word file as a PDF, several options can enhance the functionality and accessibility of the PDF.
- Page Range: Choose to save all pages, the current page, or a custom range of pages. This is useful for creating PDFs of specific sections of a document.
- Document Showing Markup: Include tracked changes and comments in the PDF, which is beneficial for collaborative editing processes.
- Create Bookmarks Using: Automatically generate bookmarks in the PDF based on headings or Word bookmarks, improving navigation for readers.
- Document Properties: Include document properties like title, author, and subject in the PDF metadata.
- Document Structure Tags for Accessibility: Add tags to the PDF structure, making it easier for screen readers and assistive technologies to interpret the document. This improves accessibility for users with disabilities.
- ISO 19005-1 Compliant (PDF/A): Save the PDF in PDF/A format, an archival standard that ensures the document will look the same when opened on different computers in the future. This is crucial for long-term preservation of documents.
- Bitmap Text When Fonts May Not Be Embedded: Convert text to bitmap images if fonts cannot be embedded. This ensures the PDF displays correctly even if the viewer does not have the original fonts installed.
- Encrypt the Document with a Password: Add password protection to restrict access to the PDF, ensuring only authorized users can open it.
By utilizing these options, you can create PDFs that are tailored to your specific needs, whether it’s for collaboration, accessibility, or long-term archiving.
3. How to Save an MS Word File as PDF on Mac
Saving a Word file as a PDF on a Mac is very similar to the process on Windows.
-
Open the Word Document: Open your document in Microsoft Word for Mac.
-
Go to the File Menu: Click on “File” in the top menu bar.
-
Select Save As: Choose “Save As” from the dropdown menu.
-
Choose File Format: In the Save As dialog box, find the “File Format” dropdown menu at the bottom.
-
Select PDF: Select “PDF” from the list of available formats.
-
Name and Save: Give your file a name, choose a location, and click “Export.”
3.1. Addressing Hyperlink Issues on Mac
When saving a Word document as a PDF on a Mac, you might encounter issues with hyperlinks not converting correctly, particularly when using the “Best for printing” option. This is a known issue in Word for Mac. To avoid this, consider the following:
- Use the “Best for electronic distribution” option: This setting generally handles hyperlinks more reliably than the “Best for printing” option.
- Manually verify hyperlinks: After saving the PDF, open it and check each hyperlink to ensure it directs to the correct URL.
- Update Microsoft Word: Ensure you are using the latest version of Word for Mac, as updates often include fixes for known issues.
- Convert Hyperlinks to Plain Text (If Appropriate): If hyperlinks are not crucial, consider converting them to plain text before saving as a PDF. This will avoid any conversion issues.
4. How to Save an MS Word File as PDF Online (Word for Web)
You can also save a Word file as a PDF using the online version of Word (Word for Web).
- Open the Document: Open your document in Word for Web.
- Go to File > Print: Click on “File,” then select “Print.”
- Select Print: Click on “Print” again.
- Choose Save as PDF: In the print dialog, select “Save as PDF” from the Printer dropdown menu.
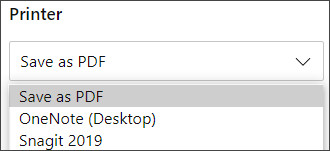 Choosing Save as PDF option in Word for Web
- Name and Save: Choose a name and location for your PDF, then click “Save.”
4.1. Limitations of Word for Web
While Word for Web is convenient, it has limitations:
- Basic PDF Conversion: It generates a basic PDF, preserving layout and format.
- Limited Options: Lacks advanced options like adding bookmarks.
- Desktop App for More Control: For more control, use the desktop app by selecting “Open in Desktop App.”
5. How to Save Other Microsoft Office Files as PDF
Besides Word, other Microsoft Office applications like Excel, PowerPoint, OneNote, Project, Publisher, and Visio also allow you to save files as PDFs.
5.1. Excel
- Open the Excel File: Open the Excel workbook you want to save as a PDF.
- Go to File > Save As: Click on “File,” then select “Save As.”
- Choose a Save Location: Select the folder where you want to save the PDF file.
- Select PDF as the File Type: In the Save As dialog box, find the “Save as type” dropdown menu. Click on it and choose “PDF (*.pdf).”
- Adjust Options (Optional):
- Standard: Suitable for high print quality.
- Minimum Size: Optimizes for file size.
- Click Save: After selecting the PDF format and adjusting options, click the “Save” button.
5.2. PowerPoint
- Open the PowerPoint Presentation: Open the PowerPoint presentation you want to save as a PDF.
- Go to File > Save As: Click on “File,” then select “Save As.”
- Choose a Save Location: Select the folder where you want to save the PDF file.
- Select PDF as the File Type: In the Save As dialog box, find the “Save as type” dropdown menu. Click on it and choose “PDF (*.pdf).”
- Adjust Options (Optional):
- Standard: Suitable for high print quality.
- Minimum Size: Optimizes for file size.
- Click Save: After selecting the PDF format and adjusting options, click the “Save” button.
5.3. OneNote
- Open the OneNote Notebook: Open the OneNote notebook you want to save as a PDF.
- Go to File > Export: Click on “File,” then select “Export.”
- Select Export Current: Choose what part of the notebook you want to save as PDF.
- Select PDF: Under “Select Format,” choose “PDF (*.pdf),” and then select “Export.”
- Name and Save: In the “Save As” dialog box, enter a name for the notebook and select “Save.”
5.4. Project
- Open the Project File: Open the Project file you want to save as a PDF.
- Go to File > Save As: Click on “File,” then select “Save As.”
- Choose a Save Location: Select the folder where you want to save the PDF file.
- Select PDF as the File Type: In the “Save as type” list, select “PDF Files (*.pdf)” or “XPS Files (*.xps),” and then choose “Save.”
- Document Export Options: In the “Document Export Options” dialog box, select a “Publish Range,” whether to “Include Non-printing Information,” and “ISO 19500-1 compliance” (PDF only).
5.5. Publisher
- Open the Publisher File: Open the Publisher file you want to save as a PDF.
- Go to File > Save As: Click on “File,” then select “Save As.”
- Choose a Save Location: Select the folder where you want to save the PDF file.
- Select PDF as the File Type: In the “Save as type” list, select “PDF (*.pdf).”
- Change Optimization (Optional): If you want to change how the document is optimized, select “Change.”
- Save: Select “Save.”
5.6. Visio
- Open the Visio File: Open the Visio file you want to save as a PDF.
- Go to File > Save As: Click on “File,” then select “Save As.”
- Choose a Save Location: Select the folder where you want to save the PDF file.
- Select PDF as the File Type: In the “Save as type” list, select “PDF (*.pdf).”
- Adjust Options (Optional): If you want the file to open in the selected format after saving, select the “Automatically view file after saving” check box.
- Save: Select “Save.”
6. Saving MS Word Files as PDF on Mobile Devices (iOS)
Saving Word files as PDFs on iOS devices is straightforward using the Microsoft Office app.
- Open the Word Document: Open the document in the Microsoft Word app on your iOS device.
- Tap the File Button: Tap the “File” button at the top left of the screen.
- Choose Export: In the File menu, choose “Export.”
- Select PDF: Choose “PDF” as the export format.
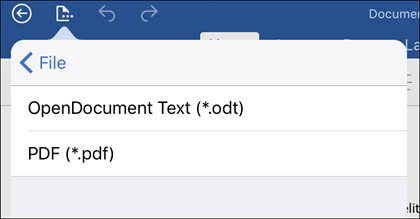 Exporting a Word document to PDF on iOS
- Save: Your document will be saved as a PDF to your chosen location on your device or cloud storage.
This process is consistent across other Microsoft Office apps on iOS, such as Excel and PowerPoint, making it easy to create PDFs on the go.
7. Troubleshooting Common Issues
While saving Word files as PDFs is generally straightforward, you may encounter some issues. Here are common problems and their solutions:
- Formatting Issues:
- Problem: Layout changes or missing elements in the PDF.
- Solution: Ensure all fonts are embedded in the document. When saving, choose the “Standard” option for high print quality.
- Hyperlinks Not Working:
- Problem: Hyperlinks don’t function in the PDF.
- Solution: Verify hyperlinks after saving. In Word for Mac, use “Best for electronic distribution” instead of “Best for printing.”
- File Size Too Large:
- Problem: The PDF file size is excessively large.
- Solution: Choose the “Minimum size” option when saving. Compress images within the Word document before saving as PDF.
- Password Protection Issues:
- Problem: Forgetting the password for an encrypted PDF.
- Solution: Unfortunately, if you forget the password, you cannot access the PDF. Keep passwords in a secure location.
- Accessibility Issues:
- Problem: The PDF is not accessible to screen readers.
- Solution: When saving, select “Document structure tags for accessibility” to add tags that make the document easier for screen readers to interpret.
- Font Substitution:
- Problem: The PDF displays different fonts than the original document.
- Solution: Ensure fonts are embedded in the document. Select “Bitmap text when fonts may not be embedded” to convert text to bitmap images if fonts cannot be embedded.
- Conversion Errors:
- Problem: Errors occur during the conversion process.
- Solution: Save the Word document in “.docx” format before converting to PDF. Close other applications while converting.
Addressing these issues can ensure a smooth and successful conversion of your Word files to PDF.
8. How to Reduce PDF File Size
Reducing PDF file size is important for easier sharing and storage. Here are several effective methods:
-
Use the “Minimum Size” Option: When saving as PDF, select the “Minimum size” option in Word. This optimizes the file for online distribution by reducing image quality.
-
Compress Images: Before saving, compress images within the Word document. Go to “Format Picture” > “Compress Pictures” and choose a lower resolution.
-
Remove Unnecessary Elements: Delete any unnecessary images, graphics, or formatting elements that contribute to file size.
-
Optimize PDF Using Online Tools: Use online PDF compression tools like Smallpdf or iLovePDF to further reduce file size without significant quality loss.
-
Print to PDF with Reduced Quality: Use a PDF printer (like Microsoft Print to PDF) and adjust the print quality settings to reduce the output size.
-
Remove Embedded Fonts: If embedding fonts is not essential, remove them during the PDF creation process. However, this might affect the document’s appearance if the viewer doesn’t have the original fonts installed.
-
Resample Images: Use image editing software like Adobe Photoshop to resample images to a lower resolution before inserting them into the Word document.
-
Use PDF Optimizer: If you have Adobe Acrobat, use the PDF Optimizer tool to reduce file size by removing redundant data, compressing images, and optimizing fonts.
By implementing these strategies, you can significantly reduce the file size of your PDFs, making them easier to share and manage.
9. Accessibility Considerations for PDFs
Creating accessible PDFs is crucial for ensuring that people with disabilities can access and use your documents. Here are key considerations:
- Use Document Structure Tags: When saving as PDF, select the “Document structure tags for accessibility” option. This adds tags that define the document’s structure, making it easier for screen readers to interpret.
- Provide Alternative Text for Images: Add alternative text (alt text) to all images and graphics. Alt text describes the image’s content, allowing screen reader users to understand the image.
- Ensure Proper Heading Structure: Use headings (H1, H2, H3, etc.) to organize the content logically. This helps screen reader users navigate the document more efficiently.
- Use Proper Table Structure: Ensure tables have proper row and column headers. This helps screen reader users understand the table’s content and relationships.
- Set Document Language: Specify the document’s language in the PDF properties. This helps screen readers use the correct pronunciation.
- Provide Bookmarks: Create bookmarks to allow users to quickly navigate to different sections of the document.
- Ensure Sufficient Color Contrast: Use sufficient color contrast between text and background to make the document readable for people with low vision.
- Avoid Using Images of Text: Use actual text instead of images of text whenever possible. This allows screen readers to read the text.
- Test with Assistive Technology: Test the PDF with screen readers and other assistive technologies to ensure it is accessible.
- Use Accessible Fonts: Choose fonts that are easy to read and are compatible with screen readers.
By following these guidelines, you can create PDFs that are accessible to everyone, regardless of their abilities.
10. Security Options for PDFs
Securing your PDFs is essential when sharing sensitive information. Here are the security options available when saving a Word file as a PDF:
- Password Protection:
- Open Password: Restrict access so only people with the password can open the PDF.
- Permissions Password: Set a password to restrict printing, editing, and copying content from the PDF.
- Encryption:
- Choose Encryption Level: Select an encryption level (e.g., 128-bit AES) to protect the PDF content.
- Restrict Printing:
- Disable Printing: Prevent users from printing the PDF.
- Restrict Editing:
- Disable Editing: Prevent users from modifying the PDF content.
- Restrict Copying:
- Disable Copying: Prevent users from copying text and images from the PDF.
- Digital Signatures:
- Add Digital Signature: Add a digital signature to verify the authenticity and integrity of the PDF.
- Certificates:
- Use Certificates: Use digital certificates to control access to the PDF.
- Watermarks:
- Add Watermark: Add a watermark to indicate the document’s confidential or proprietary nature.
To implement these security options in Microsoft Word, follow these steps:
- Go to “File” > “Save As.”
- Choose “PDF” as the file type.
- Click on “Options.”
- Select “Encrypt the document with a password” to set an open password.
- Use a PDF editor like Adobe Acrobat to set permissions passwords and other security features.
By utilizing these security options, you can protect your sensitive information and control how others interact with your PDFs.
11. PDF/A Compliance for Archiving
PDF/A is an ISO-standardized version of the PDF file format designed for the long-term archiving and preservation of electronic documents. Ensuring PDF/A compliance is crucial for organizations and individuals who need to preserve documents for extended periods.
11.1. Key Features of PDF/A
- Self-Contained: PDF/A files must be self-contained, meaning all necessary resources (fonts, images, etc.) are embedded within the file.
- Device Independent: PDF/A files should render the same way regardless of the device or software used to view them.
- No External Dependencies: PDF/A files cannot rely on external resources like linked files or fonts that are not embedded.
- Metadata Included: PDF/A files must include metadata describing the document’s content, creation date, and other relevant information.
- No Encryption: PDF/A files cannot be encrypted to ensure they remain accessible over time.
- No Audio or Video: PDF/A files cannot contain audio or video content to ensure they remain static and unchanging.
11.2. How to Create PDF/A Compliant Files
- Microsoft Word:
- When saving as PDF, select the “ISO 19005-1 compliant (PDF/A)” option.
- Ensure all fonts are embedded in the document.
- Add metadata to the document properties (title, author, subject, etc.).
- Remove any audio or video content.
- Adobe Acrobat:
- Use the “Preflight” tool to analyze and convert PDFs to PDF/A format.
- Embed all fonts and remove any non-compliant elements.
- Add metadata using the “Document Properties” dialog.
11.3. Benefits of PDF/A Compliance
- Long-Term Preservation: Ensures documents remain accessible and render correctly over extended periods.
- Legal Admissibility: PDF/A files are often required for legal and regulatory compliance due to their archival properties.
- Interoperability: PDF/A files can be opened and viewed on any PDF/A compliant viewer, ensuring broad accessibility.
- Data Integrity: PDF/A files maintain the integrity of the original document, preventing alterations or corruption over time.
By adhering to PDF/A standards, you can ensure that your documents remain accessible, reliable, and legally compliant for years to come.
12. Using Third-Party PDF Converters
While Microsoft Office has built-in PDF conversion features, third-party PDF converters offer additional functionality and flexibility. Here are some popular options:
- Adobe Acrobat: A comprehensive PDF solution with advanced features like editing, signing, and OCR.
- Smallpdf: An online tool for compressing, converting, and editing PDFs.
- iLovePDF: Another online tool offering a range of PDF conversion and editing features.
- Nitro PDF: A desktop PDF editor with features similar to Adobe Acrobat.
- PDFelement: A user-friendly PDF editor with a range of features for creating, editing, and converting PDFs.
12.1. Benefits of Third-Party Converters
- Advanced Features: Offer features beyond basic PDF conversion, such as OCR (Optical Character Recognition) and advanced editing tools.
- Batch Conversion: Allow you to convert multiple files to PDF at once, saving time and effort.
- Customization Options: Provide more customization options for PDF output, such as adjusting image quality and compression levels.
- Integration with Other Tools: Integrate with other applications and services, streamlining your workflow.
- Cross-Platform Compatibility: Many third-party converters are available for Windows, Mac, and mobile devices, providing flexibility across platforms.
12.2. How to Choose a PDF Converter
- Identify Your Needs: Determine what features you need (e.g., OCR, editing, batch conversion) and choose a converter that meets those needs.
- Consider Your Budget: Some PDF converters are free, while others require a subscription or one-time purchase. Choose a converter that fits your budget.
- Read Reviews: Read reviews from other users to get an idea of the converter’s performance and reliability.
- Try Free Trials: Many PDF converters offer free trials. Take advantage of these trials to test the converter before committing to a purchase.
By carefully evaluating your needs and considering the available options, you can choose a third-party PDF converter that enhances your productivity and simplifies your workflow.
13. Legal and Ethical Considerations
When saving and sharing documents as PDFs, it’s important to consider legal and ethical implications to avoid potential issues.
- Copyright:
- Respect Copyright Laws: Ensure you have the right to convert and share copyrighted material. Obtain permission from the copyright holder if necessary.
- Avoid Infringement: Do not distribute PDFs containing copyrighted content without proper authorization.
- Privacy:
- Protect Personal Information: Be mindful of personal information contained in PDFs. Redact sensitive data before sharing if necessary.
- Comply with Privacy Regulations: Adhere to privacy regulations like GDPR and CCPA when handling personal data in PDFs.
- Accessibility:
- Create Accessible PDFs: Ensure PDFs are accessible to people with disabilities by following accessibility guidelines.
- Provide Alternative Formats: Offer alternative formats (e.g., HTML) for users who cannot access PDFs.
- Security:
- Protect Sensitive Information: Use password protection and encryption to secure PDFs containing sensitive information.
- Prevent Unauthorized Access: Implement measures to prevent unauthorized access to PDFs stored online or shared via email.
- Authenticity:
- Maintain Document Integrity: Ensure PDFs are authentic and have not been altered without authorization.
- Use Digital Signatures: Use digital signatures to verify the authenticity and integrity of PDFs.
- Data Retention:
- Comply with Data Retention Policies: Adhere to data retention policies when storing PDFs containing sensitive information.
- Securely Dispose of PDFs: Securely dispose of PDFs when they are no longer needed to prevent unauthorized access to the data they contain.
- Licensing:
- Comply with Software Licensing Agreements: Ensure you comply with the licensing agreements for PDF software and tools.
- Use Licensed Fonts: Use fonts that are properly licensed for embedding in PDFs.
By considering these legal and ethical aspects, you can ensure that you are creating and sharing PDFs responsibly and ethically.
14. Staying Updated with Microsoft Office Updates
Keeping your Microsoft Office software updated is crucial for accessing the latest features, security patches, and bug fixes related to PDF conversion. Here’s why it’s important and how to stay updated:
- Access to New Features: Updates often include improvements to the PDF conversion process, such as enhanced accessibility options and better handling of complex layouts.
- Security Enhancements: Updates address security vulnerabilities, protecting your documents from malware and unauthorized access.
- Bug Fixes: Updates resolve issues that may cause errors or inconsistencies during PDF conversion.
- Compatibility: Updates ensure compatibility with the latest operating systems and devices, preventing conversion problems.
14.1. How to Update Microsoft Office
-
Microsoft 365:
- Open any Office application (e.g., Word, Excel).
- Go to “File” > “Account.”
- Under “Product Information,” click on “Update Options” and select “Update Now.”
-
Standalone Office Versions:
- Open any Office application.
- Go to “File” > “Account” or “Help.”
- Look for an “Update Options” or “Check for Updates” button and follow the prompts.
-
Automatic Updates:
- Enable automatic updates to ensure you always have the latest version of Office.
- In Windows, go to “Settings” > “Update & Security” > “Windows Update” and ensure updates for other Microsoft products are enabled.
-
Mac Users:
- Open any Office application.
- Go to “Help” > “Check for Updates.”
- Follow the prompts to install any available updates.
By staying updated with the latest Microsoft Office releases, you can ensure a smooth and reliable PDF conversion experience, as well as benefit from improved security and performance.
15. Frequently Asked Questions (FAQs)
- How do I save a Word document as a PDF?
- Open the document in Microsoft Word, click “File,” select “Save As,” choose “PDF” as the file type, and click “Save.”
- Can I save a Word file as a PDF for free?
- Yes, Microsoft Word has a built-in feature to save files as PDFs for free.
- How do I reduce the file size of a PDF?
- Choose the “Minimum size” option when saving as PDF, compress images in the Word document, or use online PDF compression tools.
- How do I password protect a PDF?
- When saving as PDF, click on “Options” and select “Encrypt the document with a password.”
- How do I create an accessible PDF?
- Select “Document structure tags for accessibility” when saving as PDF, provide alternative text for images, and ensure proper heading structure.
- What is PDF/A compliance?
- PDF/A is an ISO-standardized version of the PDF file format designed for long-term archiving and preservation of electronic documents.
- How do I convert multiple Word files to PDF at once?
- Use a third-party PDF converter that supports batch conversion.
- Why are hyperlinks not working in my PDF?
- Verify hyperlinks after saving. In Word for Mac, use “Best for electronic distribution” instead of “Best for printing.”
- How do I update Microsoft Office?
- Open any Office application, go to “File” > “Account,” click on “Update Options,” and select “Update Now.”
- What are the legal considerations when saving and sharing PDFs?
- Respect copyright laws, protect personal information, ensure accessibility, and secure sensitive information.
Saving MS Word files as PDFs is a fundamental skill for document management, collaboration, and preservation. Whether you are using Windows, Mac, or online platforms, the steps are straightforward and offer various options for customization and security. By following the tips and guidelines provided by savewhere.net, you can ensure your documents are easily shared, universally accessible, and professionally presented.
For more tips and resources on saving money and managing your finances effectively, visit savewhere.net today!
Address: 100 Peachtree St NW, Atlanta, GA 30303, United States.
Phone: +1 (404) 656-2000.
Website: savewhere.net.
Ready to take control of your financial future? Explore savewhere.net now and discover a world of savings and smart financial management!