Saving a file from iMovie can feel like unlocking a treasure chest of memories. Are you wondering how to preserve your video creations from iMovie for posterity or sharing? At savewhere.net, we’re dedicated to helping you navigate the ins and outs of digital life, ensuring your precious moments are not lost in the digital ether. Let’s explore how to save your iMovie projects and share your stories effectively. Ready to become an iMovie export expert? Let’s dive in to understand video resolution, cloud storage, and file formats.
1. What Are The Ways To Save iMovie Files On An iPhone Or iPad?
Yes, saving iMovie files on your iPhone or iPad is definitely possible. Here’s how:
- Send via Email or Text: You can directly share your movie through email or text message.
- Export to Another Device: Save your movie to watch on another device.
- Share on the Web: Upload your masterpiece to various online platforms.
1.1 How Can I Send My iMovie Via Email Or Text Message?
Sending your iMovie via email or text message is a breeze. Here’s a step-by-step guide:
- Open iMovie: From the Projects browser, select the movie you wish to share. If you’re currently editing, tap “Done” in the upper-left corner.
- Tap the Share Button: Look for the Share button and tap it.
- Choose Your Method: Select either “Messages” or “Mail”.
- Compose and Send: Complete the message or email, then tap “Send”.
File Size Considerations
If your movie is too large, reduce the file size by canceling your current message, returning to the share screen, tapping “Options,” and selecting a lower resolution. This ensures your video can be sent without issues. According to Apple Support, lowering the resolution is a practical way to manage large video files.
1.2 How Do I Export My iMovie To Watch On Another Device?
Want to enjoy your iMovie creations on another Apple device? Here’s how:
-
Open iMovie: Go to the Projects browser and tap the movie you want to share. If you’re editing, tap “Done.”
-
Tap the Share Button: Find and tap the Share button.
-
Adjust Options: To change the resolution or format, tap “Options” and then “Done” once you’ve made your selections.
-
Choose Your Export Method:
- AirDrop: Tap “AirDrop” and select the profile picture of the recipient. You can also use AirDrop between your own Apple devices.
- Save to Photos: Tap “Save Video” to export the movie to your Photos library. If you have iCloud Photos enabled, the video will be accessible from all your Apple devices logged into the same iCloud account.
- Save to Files: Tap “Save to Files,” choose a location (like iCloud Drive or a folder on your device), and tap “Save.” You can also save to third-party storage services enabled in the Files app.
1.3 What Is The Process To Share My iMovie On The Web?
Sharing your iMovie on the web is simple. First, save your movie to the Photos library, then upload it to your desired platform:
- Open iMovie: In the Projects browser, tap the project you want to share and then tap the Share button.
- Adjust Resolution: Tap “Options” under the movie title to change the resolution. 1080p is ideal for web sharing, offering a balance between quality and file size.
- Save to Photos: Tap “Save Video” to save your movie to the Photos library.
- Upload to the Web: Open apps like YouTube or Facebook, or visit the website of the service you want to use, and upload your video.
Resolution Tips
Lower resolutions like 720p HD create smaller files, making uploads faster. This is particularly useful for platforms with file size restrictions.
2. What Are The Steps To Share Or Export iMovie Projects On A Mac?
Absolutely, sharing or exporting iMovie projects on a Mac is very doable. Here’s how you can do it:
- Email: Send your movie via email.
- Photos Library: Add the movie to your Photos library.
- Web Sharing: Prepare your movie for sharing on the web.
2.1 How Can I Send My iMovie Via Email On A Mac?
Sending your iMovie via email is straightforward:
- Open iMovie: From the Projects browser, select the iMovie project you want to send. Click the More button, then choose “Share Project.” If you’re editing, click the Share button.
- Select Email: Click “Email.”
- Click Share: Click “Share.”
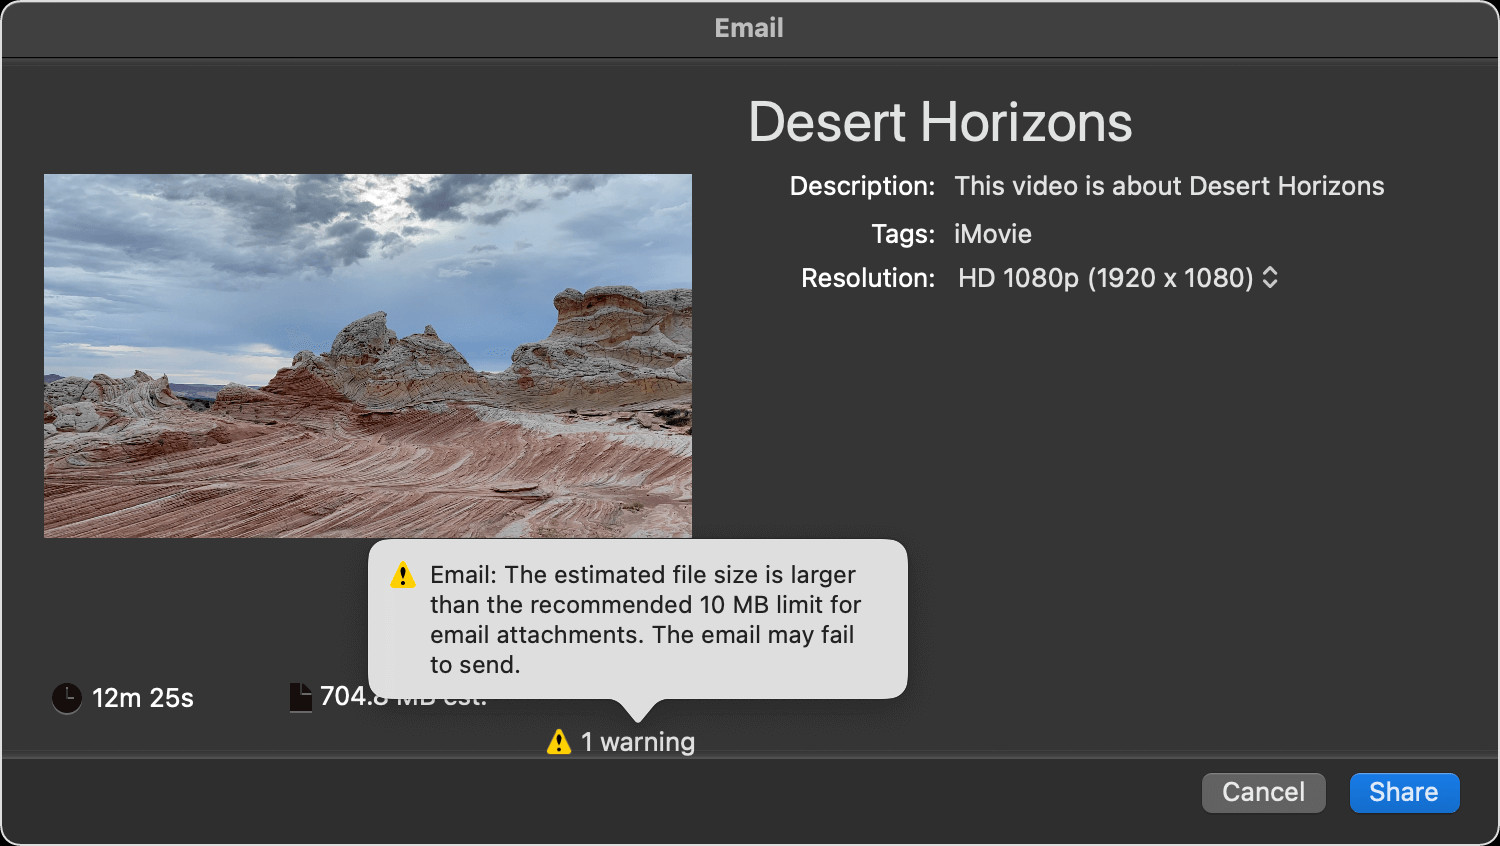
- Address File Size: If your movie file exceeds the recommended limit (usually 10 MB), a warning will appear. Click the Resolution pop-up menu and choose a resolution that reduces the file size.
- Complete and Send: Once iMovie finishes exporting, you’ll receive a notification. Complete the email and click “Send.”
Understanding Resolution
According to Apple Support, choosing a lower resolution helps reduce file size, making it easier to send via email.
 macos-imovie-10-2-share-email-warning
2.2 How Do I Add The Movie To My Photos Library?
Adding your movie to your Photos library allows you to store it in iCloud Drive or another location:
- Open iMovie: From the Projects browser, select the iMovie project. Click the More button, then choose “Share Project.” If you’re editing, click the Share button.
- Select File: Click “File.”
- Adjust Resolution: Click the Resolution pop-up menu and choose a size for your video. The default resolution is based on the content of your movie. Lower resolutions create smaller files for faster web uploads, while higher resolutions are better for viewing on Macs or HDTVs via Apple TV.
- Save and Add: Choose a location to save the video file, then click “Save.” Drag the exported movie file into the Photos app to add it to your photo library. With iCloud Photos enabled, the video will be accessible from all your Apple devices signed into the same iCloud account.
2.3 How Can I Share My Movie On The Web From My Mac?
iMovie offers optimized settings for sharing to YouTube and Facebook:
- Open iMovie: With your project open, click the Share button.
- Select Platform: Click “YouTube & Facebook.”
- Save and Upload: Choose a location to save the video file, then click “Save.” In a web browser, visit the website where you want to share your video and upload the file.
2.4 How Can I Optimize Video Settings For Different Platforms?
Understanding video settings is crucial for optimal sharing. Here’s a breakdown:
- Resolution: Higher resolutions (like 1080p or 4K) are great for viewing on large screens but result in larger file sizes. Lower resolutions (720p or 480p) are better for faster uploads and smaller storage footprints.
- File Format: iMovie typically exports videos in .mp4 format, which is widely compatible. However, you can adjust this in the export settings if needed.
- Frame Rate: The frame rate (frames per second or fps) affects the smoothness of the video. Common frame rates include 24fps (cinematic look), 30fps (standard video), and 60fps (smooth motion).
- Bit Rate: Bit rate determines the amount of data used per second of video. Higher bit rates result in better quality but larger file sizes.
According to the Consumer Technology Association, understanding these settings helps ensure your video looks its best on any platform.
3. What Are The Different File Formats Available When Saving An iMovie Project?
When saving an iMovie project, you have several file format options, each suited for different purposes:
- MP4: This is the most common and versatile format, widely supported across devices and platforms.
- MOV: Apple’s native format, often used for higher-quality video.
- ProRes: A high-quality format for professional editing, resulting in larger file sizes.
- H.264: A codec used within MP4 and MOV files, balancing quality and file size.
Choosing the right format depends on your intended use. For general sharing, MP4 with H.264 is an excellent choice. For professional editing, ProRes offers superior quality.
4. How Does Video Resolution Impact File Size And Quality In iMovie?
Video resolution significantly affects both file size and video quality in iMovie:
- Higher Resolution (4K, 1080p): Provides sharper, more detailed images but results in larger file sizes. Ideal for viewing on large screens and professional use.
- Lower Resolution (720p, 480p): Reduces file size, making it easier to share and store, but sacrifices some image quality. Suitable for online sharing and smaller screens.
As noted by the Digital Cinema Society, balancing resolution and file size is crucial for optimal viewing experiences.
5. What Are The Best Cloud Storage Options For Saving iMovie Projects?
Cloud storage is invaluable for safeguarding your iMovie projects. Here are some top options:
- iCloud Drive: Seamlessly integrated with Apple devices, offering easy access and syncing.
- Google Drive: Provides ample storage and collaboration features.
- Dropbox: Known for its reliability and file-sharing capabilities.
- Microsoft OneDrive: Integrated with Windows and offers robust storage solutions.
Each service offers different storage capacities and pricing plans, so choose one that aligns with your needs.
6. How Can I Reduce The File Size Of My iMovie Project Without Sacrificing Too Much Quality?
Reducing file size without significant quality loss is an art. Here are some tips:
- Lower Resolution: Reduce the resolution from 4K to 1080p or 720p.
- Adjust Bit Rate: Lower the bit rate while exporting.
- Optimize Codec: Use the H.264 codec for a good balance of quality and size.
- Trim Unnecessary Footage: Cut out any extra footage that doesn’t add value.
According to video editing experts at PremiumBeat, these adjustments can significantly reduce file size while maintaining acceptable quality.
7. What Are The Common Issues Encountered While Saving iMovie Projects And How To Troubleshoot Them?
Encountering issues while saving iMovie projects can be frustrating. Here are common problems and solutions:
- Insufficient Storage: Ensure you have enough storage space on your device or in the cloud.
- Software Glitches: Restart iMovie or your device.
- Corrupted Project: Try duplicating the project and saving the copy.
- Compatibility Issues: Make sure your iMovie version is up to date.
If problems persist, consult Apple Support or online forums for specific solutions.
8. How Can I Transfer iMovie Projects Between Different Apple Devices?
Transferring iMovie projects between Apple devices is seamless:
- AirDrop: Quickly transfer projects between nearby devices.
- iCloud Drive: Store projects in iCloud Drive and access them on any device logged into your account.
- External Storage: Save the project to an external drive and transfer it manually.
AirDrop is ideal for quick transfers, while iCloud Drive offers continuous syncing across devices.
9. What Are Some Creative Ways To Use Saved iMovie Projects?
Once you’ve saved your iMovie projects, the creative possibilities are endless:
- Share on Social Media: Upload your videos to platforms like YouTube, Facebook, and Instagram.
- Create a Portfolio: Showcase your video editing skills to potential clients.
- Preserve Memories: Create personal movies for family and friends.
- Educational Content: Produce tutorials and educational videos.
According to content creation experts at HubSpot, video is a powerful medium for communication and storytelling.
10. What Are The Privacy Settings I Should Consider When Sharing My iMovie Projects Online?
Privacy is paramount when sharing iMovie projects online. Consider these settings:
- YouTube: Choose between Public, Private, and Unlisted options.
- Facebook: Adjust audience settings to control who can view your video.
- Vimeo: Offers advanced privacy options, including password protection.
- General Tips: Avoid sharing personal information in your videos and be mindful of copyright laws.
The Electronic Frontier Foundation (EFF) recommends reviewing privacy settings regularly to protect your content and personal data.
11. How To Save iMovie on iPhone?
Saving an iMovie project on your iPhone is a simple process, ensuring your creative work is securely stored and ready for sharing. Here’s how you can do it:
- Finalize Your Project:
- Open iMovie on your iPhone and ensure your project is complete and ready to be saved.
- Review all edits, transitions, and audio to confirm everything is as you want it.
- Access the Share Menu:
- Once your project is finalized, tap the “Done” button in the upper-left corner to return to the Projects browser.
- Locate the project you want to save and tap on it.
- Tap the Share button, which looks like a square with an upward-pointing arrow.
- Choose Your Saving Option:
- After tapping the Share button, you will see several options for saving or sharing your project. Here are the most common options:
- Save Video: This option saves the movie directly to your iPhone’s Photos app.
- AirDrop: Allows you to share the movie with nearby Apple devices.
- iCloud Drive: Saves the movie to your iCloud Drive, making it accessible on all your Apple devices.
- Save to Files: This option lets you save the movie to a specific folder on your device or to a third-party cloud storage service.
- After tapping the Share button, you will see several options for saving or sharing your project. Here are the most common options:
- Adjust Export Settings:
- Before saving, you can adjust the export settings to optimize the file size and quality:
- Resolution: Tap “Options” under the movie title to choose a resolution. Higher resolutions (like 1080p or 4K) provide better quality but result in larger file sizes. Lower resolutions (like 720p or 540p) reduce file size but may decrease quality.
- Quality: Adjust the quality setting to balance file size and visual fidelity.
- Compression: Choose the compression setting that best suits your needs. H.264 is a widely compatible option.
- Once you have adjusted the settings, tap “Done”.
- Before saving, you can adjust the export settings to optimize the file size and quality:
- Save the Video:
- Save to Photos:
- Tap the “Save Video” option.
- iMovie will export the movie to your Photos app. The time it takes depends on the movie’s length and resolution.
- Once saved, you can find the movie in your Photos app under the “Recents” or “Videos” album.
- Save to iCloud Drive or Files:
- Tap the “Save to Files” option.
- Choose the location where you want to save the movie (e.g., iCloud Drive, a folder on your iPhone).
- Tap “Save” in the upper-right corner.
- The movie will be saved to the chosen location, and you can access it through the Files app.
- Save to Photos:
- Verify the Saved Video:
- After saving the movie, verify that it has been saved correctly:
- Photos App: Open the Photos app and check the “Recents” or “Videos” album to ensure the movie is there.
- Files App: Open the Files app, navigate to the location where you saved the movie, and ensure the file is present and playable.
- After saving the movie, verify that it has been saved correctly:
Additional Tips for Saving iMovie Projects on iPhone
- Free Up Storage: Ensure your iPhone has enough storage space before saving. Delete unnecessary files, apps, or photos to make room.
- Use Wi-Fi: Connect to a stable Wi-Fi network to speed up the saving process, especially for large files.
- Keep iMovie Updated: Ensure you have the latest version of iMovie installed to avoid potential bugs and compatibility issues.
By following these steps, you can efficiently save your iMovie projects on your iPhone, ensuring your creative work is safely stored and easily accessible.
12. How To Save iMovie on Mac?
Saving an iMovie project on your Mac involves a few different options, depending on what you want to do with the final product. Here’s a comprehensive guide to help you save your iMovie projects effectively:
- Finalize Your Project:
- Open iMovie on your Mac and ensure your project is complete and ready to be saved.
- Review all edits, transitions, and audio to confirm everything is as you want it.
- Access the Share Menu:
- Once your project is finalized, click the Share button in the upper-right corner of the iMovie window. It looks like a square with an upward-pointing arrow.
- Alternatively, you can go to File > Share in the menu bar.
- Choose Your Saving Option:
- After clicking the Share button, you will see several options for saving or sharing your project. Here are the most common options:
- File: This option allows you to save the movie as a file on your Mac.
- YouTube & Facebook: Optimized settings for direct upload to these platforms.
- Email: Share the movie via email.
- Photos: Add the movie to your Photos library.
- After clicking the Share button, you will see several options for saving or sharing your project. Here are the most common options:
- Save as a File:
- Select the File option.
- Adjust Export Settings:
- Title: Enter a title for your movie.
- Description: Add a description (optional).
- Tags: Add tags for easier searching (optional).
- Format: Choose between “Video and Audio” or “Audio Only.”
- Resolution: Select the resolution. Higher resolutions (like 1080p or 4K) provide better quality but result in larger file sizes. Lower resolutions (like 720p) reduce file size.
- Quality: Choose the quality setting. “High” is a good balance, but you can choose “Best (ProRes)” for the highest quality (larger file size).
- Compress: Select the compression setting. “Better Quality” is generally recommended.
- Save the File:
- Choose the location where you want to save the movie.
- Click Next.
- Enter a file name and choose the save location.
- Click Save.
- iMovie will export the movie to the chosen location. The time it takes depends on the movie’s length and resolution.
- Share to YouTube & Facebook:
- Select the YouTube & Facebook option.
- Sign In:
- Sign in to your YouTube or Facebook account if you haven’t already.
- Adjust Settings:
- Title: Enter a title for your movie.
- Description: Add a description.
- Tags: Add tags for easier searching.
- Category: Choose a category for your video.
- Privacy: Set the privacy settings (Public, Unlisted, Private).
- Resolution: Choose the resolution.
- Share the Video:
- Click Share.
- iMovie will upload the movie to your chosen platform.
- Add to Photos Library:
- Select the Photos option.
- Adjust Settings:
- Title: Enter a title for your movie.
- Description: Add a description (optional).
- Tags: Add tags for easier searching (optional).
- Resolution: Select the resolution.
- Add to Photos:
- Click Share.
- iMovie will add the movie to your Photos library.
- Share via Email:
- Select the Email option.
- Adjust Settings:
- iMovie will create a new email with your movie attached.
- If the file is too large, iMovie will offer to reduce the size.
- Send the Email:
- Enter the recipient’s email address.
- Add a subject and message.
- Click Send.
Additional Tips for Saving iMovie Projects on Mac
- Free Up Storage: Ensure your Mac has enough storage space before saving. Delete unnecessary files, apps, or photos to make room.
- Use a Fast Connection: Connect to a stable and fast network (Ethernet or Wi-Fi) to speed up the saving and uploading process, especially for large files.
- Keep iMovie Updated: Ensure you have the latest version of iMovie installed to avoid potential bugs and compatibility issues.
- Consider External Drives: For large projects, consider saving to an external drive to free up space on your Mac’s internal storage.
By following these steps, you can efficiently save your iMovie projects on your Mac, ensuring your creative work is safely stored and easily shared.
13. What Are The Best Video Editing Tips For iMovie?
To make the most of iMovie and create stunning videos, here are some essential video editing tips:
- Organize Your Media:
- Import and Sort: Import all your video clips, audio files, and images into iMovie and organize them into separate folders or events. This will help you quickly find the assets you need.
- Use Keyboard Shortcuts:
- Learn Shortcuts: Familiarize yourself with iMovie’s keyboard shortcuts to speed up your editing process. Some useful shortcuts include:
- Spacebar: Play/Pause
- Command + B: Cut Clip
- Command + Z: Undo
- Learn Shortcuts: Familiarize yourself with iMovie’s keyboard shortcuts to speed up your editing process. Some useful shortcuts include:
- Stabilize Shaky Footage:
- Enable Stabilization: If you have shaky footage, use iMovie’s stabilization feature to smooth it out. Select the clip, click the Stabilization button (the shaky camera icon), and check the Stabilize Shaky Video box.
- Enhance Audio Quality:
- Adjust Audio Levels: Use the audio controls to adjust the volume of your clips. Ensure that the audio is clear and consistent throughout the video.
- Reduce Background Noise: Use the noise reduction feature to minimize background noise in your audio. Select the clip, click the Audio button, and check the Reduce Background Noise box.
- Use Transitions Sparingly:
- Subtle Transitions: Use transitions to smoothly connect your clips, but avoid overusing them. Subtle transitions like cross dissolves and fades are generally more effective than flashy ones.
- Add Text and Titles:
- Clear and Concise: Use text and titles to provide context and information, but keep them clear and concise. Choose fonts and colors that are easy to read and complement your video.
- Correct Color:
- Use Color Correction Tools: Use iMovie’s color correction tools to adjust the brightness, contrast, saturation, and color temperature of your clips. Aim for a consistent look throughout your video.
- Add Music and Sound Effects:
- Set the Mood: Use music and sound effects to enhance the mood and impact of your video. Choose audio that complements your visuals and supports your storytelling.
- Trim and Cut Precisely:
- Use Precision Editor: Use iMovie’s precision editor to make precise cuts and trims. This allows you to fine-tune your edits and remove any unwanted footage.
- Use Ken Burns Effect:
- Add Dynamic Interest: Use the Ken Burns effect (panning and zooming) to add dynamic interest to your photos. Select the photo, click the Cropping button, and choose the Ken Burns option.
- Export with Optimal Settings:
- Choose the Right Settings: When exporting your video, choose the optimal settings for your intended platform. Consider resolution, frame rate, and file format to balance quality and file size.
- Preview and Revise:
- Watch Critically: After editing, preview your video from start to finish and watch it critically. Look for any mistakes or areas that could be improved, and revise accordingly.
Additional Tips
- Tell a Story: Think about the story you want to tell and use your edits to bring it to life.
- Keep it Concise: Shorter videos tend to hold viewers’ attention better, so aim to keep your videos concise and to the point.
- Get Inspired: Watch videos from other creators to get inspired and learn new techniques.
- Practice Regularly: The more you practice, the better you will become at video editing.
By following these video editing tips, you can create high-quality, engaging videos using iMovie.
FAQ: Saving iMovie Projects
1. Can I save an iMovie project directly to an external hard drive?
Yes, you can save an iMovie project to an external hard drive. When you export the project, choose the external drive as the save location.
2. What’s the best resolution for saving iMovie projects for YouTube?
1080p is generally considered the best resolution for YouTube, balancing quality and file size.
3. How do I save an iMovie project to iCloud so I can access it on other devices?
Save the project to your Photos library with iCloud Photos enabled, or save it directly to iCloud Drive through the “Save to Files” option.
4. Why is my iMovie file so large, and how can I make it smaller?
Large file sizes are often due to high resolution and bit rates. Reduce these settings during export to decrease file size.
5. Can I save an iMovie project as an MP3 audio file?
Yes, during export, choose the “Audio Only” option and select MP3 as the file format.
6. What should I do if iMovie crashes while saving a project?
Restart iMovie and your device. If the issue persists, try duplicating the project and saving the copy.
7. How do I share an iMovie project with someone who doesn’t have iMovie?
Export the project as an MP4 file and share it via email or a cloud storage service.
8. Is there a way to save an iMovie project without losing quality?
Choose a high resolution and quality setting during export, such as 4K and “Best (ProRes).” Note that this will result in a larger file size.
9. How do I update iMovie to the latest version?
Update iMovie through the App Store on your device.
10. What are the best video editing apps similar to iMovie?
Similar apps include Adobe Premiere Rush, FilmoraGo, and LumaFusion, each offering various features and capabilities.
Conclusion
Saving and sharing your iMovie projects is essential for preserving and showcasing your creative work. By understanding the different saving options, file formats, and optimization techniques, you can ensure your videos look their best on any platform. For more tips and resources on managing your digital life and saving money, visit savewhere.net. Discover how to make the most of your memories and manage your digital world effectively.
Ready to take your iMovie skills to the next level? Explore more tips, tricks, and resources at savewhere.net. Discover exclusive deals, expert advice, and a community of like-minded creators. Don’t just save your movies—save your money too with savewhere.net!
Address: 100 Peachtree St NW, Atlanta, GA 30303, United States
Phone: +1 (404) 656-2000
Website: savewhere.net