
Are you running out of storage space on your Android phone and looking for a reliable solution? Learn how to save pictures to your SD card with ease and free up valuable space, brought to you by savewhere.net. We’ll explore various methods, from direct transfers to using your PC, ensuring you find the perfect fit for your needs, offering financial flexibility with these simple tips. Discover the best way to manage your photos, optimize your device’s performance, and explore file management and external storage options.
1. Why Save Pictures to Your SD Card?
Is saving pictures to an SD card really worth it? Absolutely. Many people use their smartphones as their primary cameras these days and quickly fill up the available storage, making saving pictures to an SD card very important. Let’s dive into why this is a smart move, especially if you’re aiming to save money and manage your digital life more efficiently.
1.1 Free Up Phone Storage
One of the most compelling reasons to save photos to an SD card is to free up space on your phone. When your phone’s internal storage is full, it can slow down performance and prevent you from installing new apps or downloading important files. According to tech experts, moving large media files like photos and videos to an SD card can significantly improve your device’s speed and responsiveness.
1.2 Create Backups
Consider your SD card a safety net for your precious memories. Saving pictures to an SD card acts as a backup. If something happens to your phone, such as damage or loss, your photos are safely stored on the SD card. It’s a simple step that can save you a lot of heartache and potential financial loss.
1.3 Easy Transfer to Other Devices
Transferring photos from your phone to a computer or another device can sometimes be a hassle. However, saving them to an SD card simplifies this process. You can easily remove the SD card and insert it into a computer, tablet, or another phone to quickly access your photos. This convenience is particularly useful if you frequently share photos with others or need to work with them on different devices.
1.4 Cost-Effective Storage Expansion
Investing in an SD card is a cost-effective way to expand your phone’s storage capacity. Instead of buying a new phone with more internal storage, which can be expensive, you can simply purchase an SD card for a fraction of the cost. This is especially beneficial for budget-conscious individuals and families looking to save money.
1.5 Portability
SD cards are small and portable, making them easy to carry around. You can have multiple SD cards for different purposes, such as one for personal photos, one for work-related documents, and one for travel photos. This allows you to keep your files organized and easily accessible wherever you go.
 SD Card Portability
2. How To Save New Pictures Directly To Your SD Card
Are you tired of constantly transferring photos from your phone to your SD card? Do you wish there was a way to automatically save new pictures directly to your SD card? Here’s how you can set up your Android device to do just that, ensuring you maximize your storage space and keep your phone running smoothly.
2.1 Open Your Camera App
First things first, launch the camera app on your Android phone. This is where you’ll be making the necessary changes to save your new photos directly to your SD card.
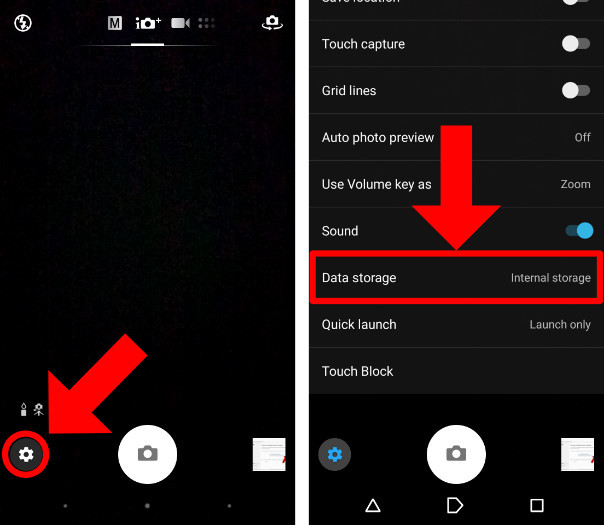
2.2 Access Camera Settings
Once you have the camera app open, look for the settings menu. It’s usually represented by a gear icon. Tap on it to open the settings. The location and appearance of the settings icon may vary depending on your phone model and the camera app you’re using.
2.3 Find Storage Options
Within the camera settings, search for an option related to storage. It might be labeled as “Storage location”, “Save photos to”, or something similar. Scroll through the settings menu until you find the appropriate option.
2.4 Choose SD Card as Default Storage
Now that you’ve found the storage option, tap on it. A list of available storage locations should appear. Select “SD card” from the list. By choosing this option, you’re telling your camera app to automatically save all new photos and videos directly to your SD card.
2.5 Confirm Changes
After selecting the SD card as your default storage, make sure to confirm the changes. There might be a “Save” or “OK” button you need to tap to finalize the settings. Once you’ve confirmed, your camera app will start saving new pictures directly to your SD card.
2.6 Test Your New Settings
To ensure everything is working correctly, take a test photo and check where it’s saved. Open your phone’s file manager app and navigate to the SD card. You should find the new photo you just took in the designated folder for camera photos. If you see the photo there, congratulations you have successfully set your camera to save directly to the SD card.
2.7 What If There is No Option?
Not all Android phones offer the option to directly save photos to the SD card through the camera settings. If you can’t find this setting, don’t worry. There are alternative methods. You can use third-party camera apps that allow you to choose the storage location.
3. Manually Transfer Pictures to SD Card
Want to move your existing photos to your SD card? Here is your guide on how to manually transfer pictures to your SD card:
3.1 Open Your File Manager App
The first step is to open the file manager app on your Android phone. This app allows you to access and manage all the files stored on your device, including photos, videos, documents, and more. Most Android phones come with a pre-installed file manager app, such as “Files” by Google, “Samsung My Files,” or a similar app from other manufacturers. If you don’t have a file manager app, you can download one from the Google Play Store.
3.2 Navigate to Internal Storage
Once you have the file manager app open, you need to navigate to your phone’s internal storage, where your photos are currently stored. Look for an option like “Internal Storage”, “Phone Storage,” or “Device Storage.” Tap on it to access the files and folders stored on your phone’s internal memory.
3.3 Locate the DCIM Folder
Inside the internal storage, you’ll find various folders. The one you’re looking for is the DCIM folder, which stands for “Digital Camera Images.” This is where your phone typically saves the photos and videos taken with the camera. Open the DCIM folder to see its contents.
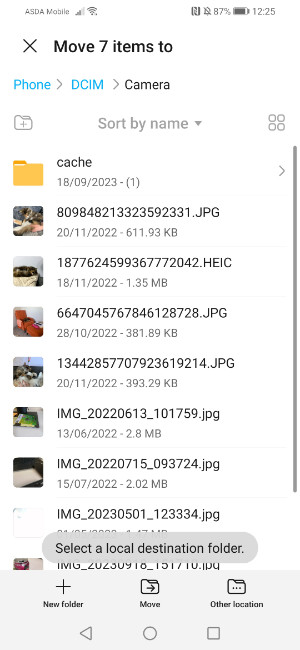
3.4 Select the Photos You Want to Transfer
Inside the DCIM folder, you’ll find one or more subfolders, such as “Camera” for photos taken with the default camera app, “Screenshots” for screen captures, and possibly other folders created by different apps. Open the folder containing the photos you want to transfer to your SD card. Select the photos you want to move. You can usually do this by long-pressing on a photo until a checkmark appears, then tapping on the other photos you want to select.
3.5 Choose the “Move” or “Copy” Option
After selecting the photos, look for an option to either “Move” or “Copy” the files. The exact wording and location of this option may vary depending on your file manager app, but it’s usually found in the menu (three dots) or as an icon at the bottom or top of the screen.
Move: This option transfers the selected photos from your internal storage to the SD card, deleting them from their original location. Use this if you want to free up space on your phone.
Copy: This option duplicates the selected photos, creating a copy on your SD card while leaving the original photos in your internal storage. Use this if you want to back up your photos without deleting them from your phone.
3.6 Navigate to Your SD Card
After choosing either “Move” or “Copy,” your file manager app will ask you to select a destination folder. Navigate back to the main screen of the file manager and look for your SD card. It might be labeled as “SD Card,” “External Storage,” or something similar. Tap on it to access the contents of your SD card.
3.7 Choose a Destination Folder on Your SD Card
Inside your SD card, you can either choose an existing folder or create a new one to store your photos. If you want to keep your photos organized, create a new folder with a descriptive name, such as “Photos,” “Vacation,” or “Family.” To create a new folder, look for an option like “New Folder” or “Create Folder” in the menu.
3.8 Paste or Move the Photos
Once you’ve selected or created the destination folder on your SD card, look for an option to “Paste” or “Move” the photos. This will either copy or move the selected photos from your internal storage to the SD card, depending on whether you chose “Copy” or “Move” in step 5.
3.9 Verify the Transfer
After the transfer is complete, it’s a good idea to verify that the photos have been successfully moved or copied to your SD card. Navigate to the destination folder on your SD card and make sure that all the selected photos are there.
3.10 Delete the Originals (If You Chose “Move”)
If you chose the “Move” option in step 5, the original photos in your internal storage should have been automatically deleted after the transfer. However, it’s always a good idea to double-check and make sure they’re gone. This will free up space on your phone and prevent duplicate photos from cluttering your gallery.
 SD Card Transfer Verification
4. Using a Computer to Transfer Photos to SD Card
Looking for an alternative method to transfer your photos to an SD card? Using a computer can be a straightforward and efficient way to manage your files, especially if you have a large number of photos to move. Here’s a simple guide on how to do it.
4.1 Connect Your Android Phone to Your Computer
First, you’ll need to connect your Android phone to your computer using a USB cable. Most Android phones use a USB-C cable, but older models might use a Micro-USB cable. Plug one end of the cable into your phone and the other end into a USB port on your computer.
4.2 Unlock Your Phone and Choose Transfer Mode
Once your phone is connected, you may need to unlock it and choose the transfer mode. On your phone’s screen, you might see a notification asking you to select what type of USB connection you want. Choose “File Transfer” or “MTP” (Media Transfer Protocol). This allows your computer to access your phone’s files.
4.3 Open File Explorer (Windows) or Finder (Mac)
On your computer, open the file manager. If you’re using Windows, this is called File Explorer. If you’re using a Mac, it’s called Finder. This is where you’ll be able to see and manage the files on your computer and connected devices.
4.4 Locate Your Phone in File Explorer or Finder
In File Explorer (Windows), look for your phone under “This PC” or “Devices and drives.” In Finder (Mac), it should appear in the sidebar under “Locations.” Click on your phone’s name to access its internal storage.
4.5 Navigate to the DCIM Folder
Inside your phone’s storage, you’ll find various folders. The one you’re looking for is the DCIM folder, which stands for “Digital Camera Images.” This is where your phone typically saves the photos and videos taken with the camera. Open the DCIM folder to see its contents.
4.6 Connect Your SD Card to Your Computer
If your computer has an SD card slot, you can insert the SD card directly into the slot. If not, you’ll need an SD card reader, which is a small device that plugs into a USB port and allows you to read and write data to the SD card. Insert the SD card into the SD card reader, then plug the reader into a USB port on your computer.
4.7 Locate Your SD Card in File Explorer or Finder
Once your SD card is connected, it should appear as a separate drive in File Explorer (Windows) or Finder (Mac). Look for it under “This PC” or “Devices and drives” in File Explorer, or in the sidebar under “Locations” in Finder.
4.8 Copy Photos from Your Phone to Your SD Card
Now, you’re ready to copy the photos from your phone to your SD card. Open the DCIM folder on your phone and select the photos you want to transfer. You can select multiple photos by holding down the Ctrl key (Windows) or the Command key (Mac) while clicking on each photo. Once you’ve selected all the photos, right-click on them and choose “Copy.”
4.9 Paste Photos into Your SD Card
Navigate to your SD card in File Explorer or Finder and open the folder where you want to store the photos. If you want to keep your photos organized, you can create a new folder with a descriptive name, such as “Photos,” “Vacation,” or “Family.” To create a new folder, right-click in the folder and choose “New” > “Folder” (Windows) or “New Folder” (Mac).
4.10 Eject Your Phone and SD Card
After the transfer is complete, it’s important to safely eject your phone and SD card from your computer. In Windows, right-click on your phone’s name in File Explorer and choose “Eject.” Do the same for your SD card. On a Mac, drag the icons for your phone and SD card to the Trash Can (which turns into an Eject icon) in the Dock.
4.11 Disconnect Your Phone and SD Card Reader
Once you’ve safely ejected your phone and SD card, you can disconnect the USB cable from your phone and computer. Also, remove the SD card reader from the USB port.
 Transfer Photos via PC
5. Understanding SD Card Types and Sizes
Choosing the right SD card is essential for ensuring compatibility, performance, and sufficient storage for your photos and other files. Let’s take a closer look at the different types and sizes of SD cards available, so you can make an informed decision.
5.1 SD Card Types
SD (Secure Digital) cards come in several types, each with its own specifications and capabilities:
Standard SD (SDSC)
These are the oldest type of SD cards, with a storage capacity of up to 2GB. While they are compatible with most devices, their limited storage makes them unsuitable for modern use.
SDHC (Secure Digital High Capacity)
SDHC cards can store between 2GB and 32GB of data. They are a popular choice for many digital cameras and other devices.
SDXC (Secure Digital Extended Capacity)
SDXC cards offer storage capacities ranging from 32GB to 2TB. They are ideal for high-resolution photos and 4K videos.
SDUC (Secure Digital Ultra Capacity)
SDUC cards are the newest type of SD cards, with storage capacities of up to 128TB. They are designed for future applications that require massive storage.
5.2 SD Card Sizes
SD cards come in three standard sizes:
Standard SD
These are the full-size SD cards, typically used in digital cameras, laptops, and other devices with a full-size SD card slot.
MiniSD
MiniSD cards are smaller than standard SD cards, but they are not as common as they used to be. They are typically used in older mobile phones and other portable devices.
MicroSD
MicroSD cards are the smallest type of SD cards, and they are widely used in smartphones, tablets, and other compact devices. They can be used in devices with a full-size SD card slot with an adapter.
5.3 Speed Classes
SD cards also have speed classes, which indicate the minimum write speed of the card. The speed class is important for recording videos and taking burst photos, as it determines how quickly the card can save data.
Speed Class
The original speed class ratings, indicated by a number inside a “C” symbol (e.g., Class 2, Class 4, Class 6, Class 10). The number represents the minimum write speed in megabytes per second (MB/s).
UHS Speed Class
UHS (Ultra High Speed) speed class ratings, indicated by a number inside a “U” symbol (e.g., U1, U3). U1 guarantees a minimum write speed of 10MB/s, while U3 guarantees 30MB/s.
Video Speed Class
Video speed class ratings, indicated by a “V” symbol followed by a number (e.g., V6, V10, V30, V60, V90). These classes are designed for recording high-resolution videos, such as 4K and 8K. The number represents the minimum write speed in MB/s.
5.4 Choosing the Right SD Card
When choosing an SD card, consider the following factors:
Compatibility
Make sure the SD card is compatible with your device. Check the device’s manual or specifications to see what type and size of SD card it supports.
Storage Capacity
Choose a storage capacity that meets your needs. If you take a lot of high-resolution photos or videos, you’ll need a larger capacity card.
Speed Class
Select a speed class that is appropriate for your intended use. For recording videos, choose a card with a UHS Speed Class or Video Speed Class rating.
Brand
Choose a reputable brand that is known for producing high-quality and reliable SD cards.
6. Troubleshooting SD Card Issues
Even with the best SD cards and careful handling, you might encounter issues from time to time. Here are some common problems and how to troubleshoot them:
6.1 SD Card Not Recognized
If your phone or computer doesn’t recognize the SD card, try the following:
Check the Connection
Make sure the SD card is properly inserted into the slot. If you’re using an SD card reader, ensure it’s securely connected to your computer.
Clean the Contacts
Dust or debris on the SD card’s contacts can prevent it from being recognized. Gently clean the contacts with a soft, dry cloth.
Try a Different Device
Insert the SD card into another phone or computer to see if it’s recognized. This will help you determine whether the problem is with the SD card or the device.
Update Drivers
If you’re using an SD card reader, make sure you have the latest drivers installed on your computer. You can usually find the drivers on the manufacturer’s website.
6.2 SD Card is Full
When your SD card is full, you won’t be able to save any more photos or videos. Here’s what you can do:
Transfer Files
Move some of the files from your SD card to your computer or another storage device to free up space.
Delete Unnecessary Files
Delete any photos or videos that you no longer need.
Upgrade to a Larger SD Card
If you consistently run out of space, consider upgrading to an SD card with a larger storage capacity.
6.3 SD Card is Write-Protected
If your SD card is write-protected, you won’t be able to save any new files or delete existing ones. Here’s how to remove the write protection:
Check the Lock Switch
Some SD cards have a small lock switch on the side. Make sure the switch is in the unlocked position.
Format the SD Card
If the lock switch is not the issue, you may need to format the SD card. Formatting will erase all the data on the card, so make sure to back up any important files first.
6.4 SD Card Errors
If you encounter errors when trying to access or transfer files from your SD card, try the following:
Run Error Checking
On Windows, you can run the built-in error checking tool to scan for and fix errors on the SD card. Right-click on the SD card in File Explorer, choose “Properties,” then go to the “Tools” tab and click “Check.”
Use Data Recovery Software
If you’ve accidentally deleted files or the SD card has become corrupted, you can try using data recovery software to recover your files.
 SD Card Reader Connection
7. Optimizing Your Android for SD Card Use
To get the most out of your SD card, here are some tips on how to optimize your Android device for SD card use:
7.1 Set Default Save Locations
Configure your camera, apps, and other settings to save files directly to your SD card by default. This will help you avoid filling up your phone’s internal storage.
7.2 Move Apps to SD Card
Some apps can be moved to the SD card to free up space on your phone’s internal storage. To do this, go to “Settings” > “Apps,” select the app you want to move, and tap “Move to SD card.”
7.3 Use Cloud Storage
Consider using cloud storage services like Google Drive, Dropbox, or OneDrive to store your photos, videos, and other files. This will not only free up space on your phone and SD card but also provide a backup of your files in case something happens to your device.
7.4 Clear Cache and Junk Files
Regularly clear your phone’s cache and junk files to improve performance and free up storage space. You can use a cleaning app or the built-in storage management tool to do this.
7.5 Optimize Photos
Use a photo optimization app to compress your photos without significantly reducing their quality. This will help you save storage space on your SD card.
8. Benefits of Using Savewhere.net
Looking for more ways to save money and manage your finances effectively? Savewhere.net is your go-to resource for tips, tricks, and resources to help you achieve your financial goals. Here are some of the benefits of using our platform:
8.1 Expert Advice
We provide expert advice on a wide range of financial topics, including budgeting, saving, investing, and more. Our team of financial professionals is dedicated to providing you with accurate and up-to-date information to help you make informed decisions.
8.2 Practical Tips
We offer practical tips and strategies that you can implement right away to start saving money and improving your financial situation. Whether you’re looking to cut expenses, increase your income, or plan for retirement, we have the resources you need to succeed.
8.3 Community Support
Connect with other like-minded individuals in our community forum, where you can share tips, ask questions, and get support. Our community is a great place to learn from others and stay motivated on your financial journey.
8.4 Comprehensive Resources
Access a wide range of resources, including articles, guides, tools, and calculators, to help you manage your finances more effectively. Our resources are designed to be easy to use and understand, so you can quickly find the information you need.
8.5 Updated Information
We stay up-to-date on the latest financial news, trends, and regulations to ensure that you have the most current information available. Our team is constantly researching and updating our content to provide you with the best possible resources.
9. Conclusion
Saving pictures to your SD card is a simple yet effective way to manage your phone’s storage, protect your precious memories, and save money on costly upgrades. Whether you choose to save new photos directly to your SD card, manually transfer existing photos, or use a computer to manage your files, the key is to find a method that works best for you and your lifestyle. Also remember to consider savewhere.net for expert advice and comprehensive resources.
By following the tips and strategies outlined in this guide, you can optimize your Android device for SD card use, troubleshoot common issues, and make the most of your storage space. So go ahead, start saving those photos to your SD card and enjoy the peace of mind that comes with knowing your memories are safe and secure.
10. Frequently Asked Questions (FAQs)
Here are some common questions about saving pictures to your SD card:
10.1 Can I move apps to my SD card?
Yes, some apps can be moved to your SD card to free up space on your phone’s internal storage. To do this, go to “Settings” > “Apps,” select the app you want to move, and tap “Move to SD card.”
10.2 How do I set my camera to save photos directly to my SD card?
Open your camera app, go to settings, find the storage option, and select “SD card” as the default storage location.
10.3 What do I do if my SD card is not recognized?
Check the connection, clean the contacts, try a different device, and update drivers.
10.4 How do I choose the right SD card for my phone?
Consider compatibility, storage capacity, speed class, and brand.
10.5 What is the DCIM folder?
DCIM stands for “Digital Camera Images” and is where your phone typically saves photos and videos taken with the camera.
10.6 How do I transfer photos from my Android to my computer?
Connect your Android phone to your computer using a USB cable, choose “File Transfer” or “MTP” mode, open File Explorer (Windows) or Finder (Mac), locate your phone, and copy the photos to your computer.
10.7 What is the difference between “Move” and “Copy” when transferring files?
“Move” transfers the selected photos from your internal storage to the SD card, deleting them from their original location. “Copy” duplicates the selected photos, creating a copy on your SD card while leaving the original photos in your internal storage.
10.8 How do I format my SD card?
Connect your SD card to your computer, right-click on the SD card in File Explorer (Windows) or Finder (Mac), choose “Format,” and follow the instructions.
10.9 Can I use an SD card reader to transfer photos?
Yes, you can use an SD card reader to transfer photos from your Android phone to your computer or another device.
10.10 How do I back up my photos to the cloud?
Use cloud storage services like Google Drive, Dropbox, or OneDrive to store your photos, videos, and other files.