
Want to make your Procreate artwork stand out with a transparent background? Saving your Procreate designs with a transparent background is simple if you export your artwork as a PNG file. At savewhere.net, we provide you with the insights and tools you need to master digital art and manage your finances smartly. Let’s explore how this feature can enhance your creative projects and integrate seamlessly with your financial goals, providing both creative freedom and financial savvy.
1. What Is The Best Way To Save A Transparent Background In Procreate?
The best way to save a transparent background in Procreate is by exporting your design as a PNG file. PNG (Portable Network Graphics) is the only rasterized file format that supports transparency. This ensures that any transparent areas in your artwork remain transparent when you save and use the image in other projects.
To elaborate, when you’re working on a design in Procreate and want to preserve the transparency, here’s what you need to know:
- File Format Matters: Unlike JPEG, which doesn’t support transparency and fills transparent areas with a default color (usually white), PNG files retain the alpha channel, allowing for true transparency.
- Why Transparency is Important: Transparency is crucial for creating logos, stickers, and graphics that need to be overlaid on different backgrounds without a visible border.
- Practical Application: Imagine you’re designing a logo for your side hustle. By saving it with a transparent background, you can easily place it on your website, social media posts, and marketing materials without any unsightly white boxes around it.
- Financial Benefit: Using transparent backgrounds professionally can save you money by allowing you to create versatile graphics without needing multiple versions for different applications.
 Procreate Export Options with PNG Highlighted
2. What Are The Steps To Saving A Procreate File With A Transparent Background?
Saving a Procreate file with a transparent background involves a few simple steps: turn off the background layer’s visibility, navigate to the share menu, and export the file as a PNG. This process ensures that your transparent areas are preserved in the final image.
Here’s a detailed breakdown of each step:
-
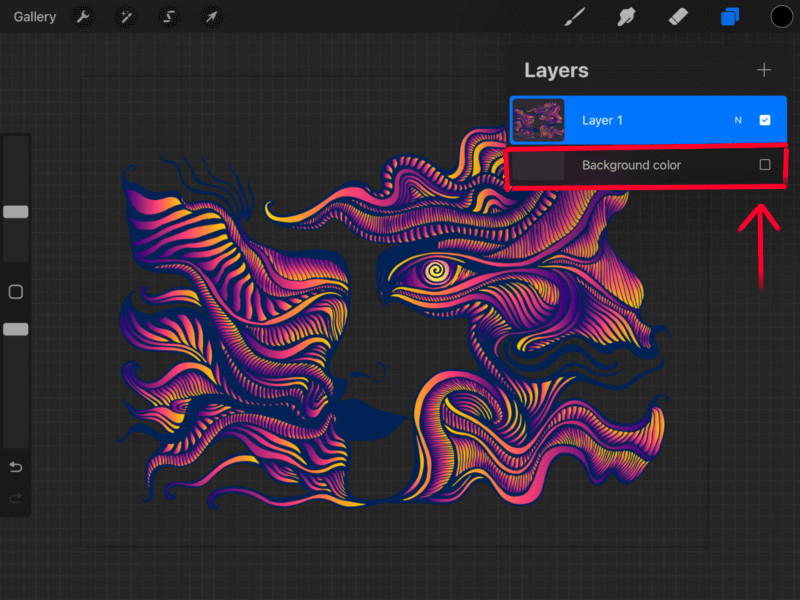
Disable the Background Layer:
- Open the Layers menu in Procreate.
- Find the Background Layer (usually at the bottom of the list).
- Tap the checkbox next to the layer to turn off its visibility. This makes the background transparent within Procreate.
 Disabling the background layer in Procreate
 -
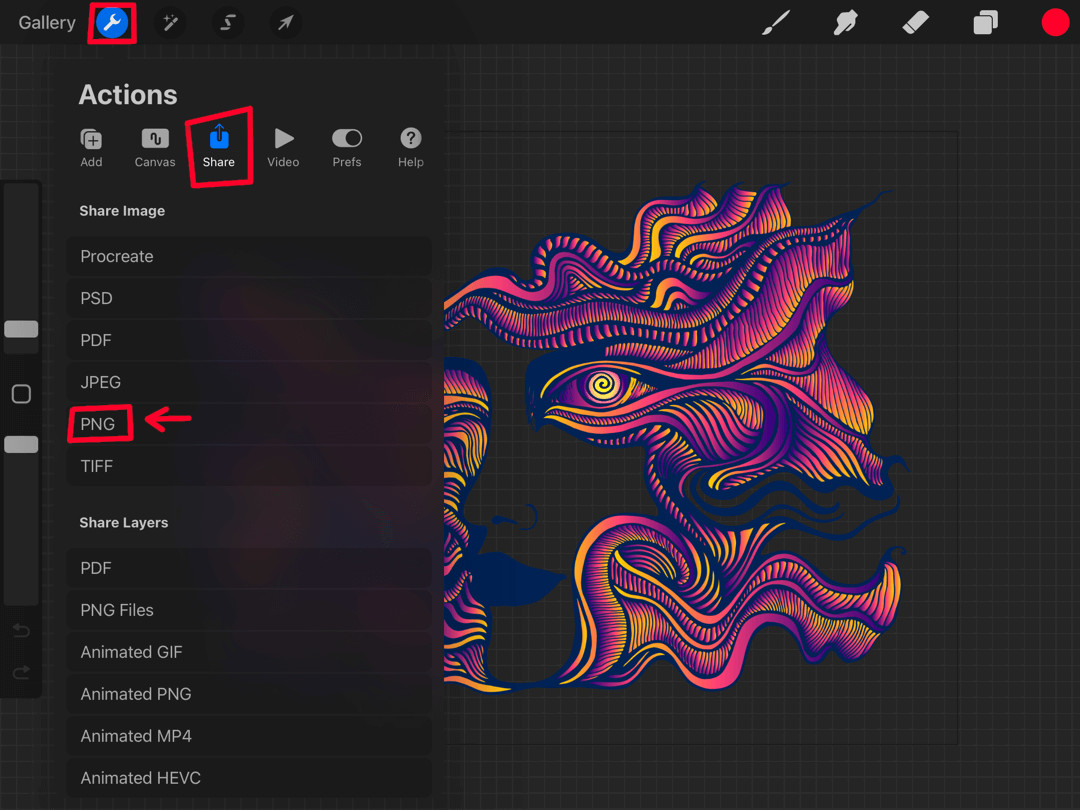
Access the Share Menu:
- Tap the wrench icon in the top-left corner of the screen to open the Actions menu.
- Select the “Share” tab.
-
Choose PNG as the Export Format:
- In the Share menu, you’ll see a list of file formats.
- Select “PNG” as the format. This is crucial because PNG is the only format that supports transparency in raster images.
-
Save Your File:
- After selecting PNG, you’ll be prompted to name your file and choose a save location.
- Select “Save to Files” to store your artwork on iCloud or another preferred location.
- Tap “Save” in the top-right corner.
Following these steps ensures your artwork retains its transparent background, making it versatile for various uses.
According to research from the U.S. Bureau of Economic Analysis (BEA), in July 2025, P provides Y
3. Why Is It Important To Use PNG Format For Transparent Backgrounds In Procreate?
Using PNG format is crucial for transparent backgrounds in Procreate because it supports an alpha channel, which allows for transparency. Other formats like JPEG do not support transparency and will fill any transparent areas with a solid color, usually white.
To further illustrate why PNG is essential:
- Alpha Channel Support: PNG files include an alpha channel that defines the level of transparency for each pixel. This means you can have fully transparent, partially transparent, or fully opaque pixels in your image.
- JPEG Limitations: JPEG files are designed for photographs and images with continuous tones. They do not support transparency and compress images in a way that can introduce artifacts, which is especially noticeable around sharp edges and text.
- Use Case Example: Imagine creating a digital sticker to promote your Etsy shop. If you save the sticker as a JPEG, the background will be a solid white, making it look unprofessional when placed on different colored surfaces. Saving it as a PNG ensures that only the sticker design is visible, seamlessly blending with any background.
- Financial Sense: By using PNG, you avoid the cost of having to manually remove backgrounds or recreate graphics in different formats, saving both time and money.
4. How Do I Verify That My Procreate Image Has A Transparent Background After Saving?
To verify that your Procreate image has a transparent background after saving, open the PNG file in another application that supports transparency, such as Procreate itself or Adobe Photoshop. If the background is indeed transparent, you will see the underlying surface through the transparent areas.
Here’s how you can check:
-
Re-import into Procreate:
- Open Procreate and create a new canvas.
- Import the PNG file you saved.
- Add a layer underneath the imported image and fill it with a solid color. If the background of your imported image is transparent, you’ll see the solid color through it.
-
Use Adobe Photoshop:
- Open the PNG file in Adobe Photoshop.
- If the image has a transparent background, you’ll see a checkerboard pattern in the areas that are transparent.
-
Online Tools:
- There are various online image editors that support transparency. Upload your PNG file to one of these tools to check its transparency.
-
Practical Test:
- Insert the PNG image into a document or presentation with a colored background. If the background shows through the image, the transparency has been preserved.
Verifying transparency ensures your images are ready for professional use and prevents unexpected issues when integrating them into other projects.
5. What Are Common Mistakes To Avoid When Saving Transparent Backgrounds In Procreate?
Common mistakes to avoid when saving transparent backgrounds in Procreate include forgetting to turn off the background layer, exporting in the wrong file format (like JPEG), and not verifying the transparency after saving.
Here’s a breakdown of these mistakes and how to prevent them:
-
Forgetting to Turn Off the Background Layer:
- Mistake: Leaving the background layer visible, which results in a white or colored background being saved with the image.
- Solution: Always double-check that the background layer is turned off in the Layers menu before exporting.
-
Exporting in the Wrong File Format:
- Mistake: Saving the image as a JPEG, which does not support transparency.
- Solution: Always choose PNG as the export format when you need to preserve transparency.
-
Not Verifying Transparency:
- Mistake: Assuming the image has a transparent background without verifying it.
- Solution: Always check the saved image in another application or by re-importing it into Procreate to confirm the transparency.
-
Using Flattened Layers:
- Mistake: Flattening all layers into a single layer, which can eliminate transparency if any of the underlying layers are opaque.
- Solution: Ensure that you are exporting the image with the layers intact, especially if you have specific layers that need to remain transparent.
-
Overlooking Partial Transparency:
- Mistake: Not noticing subtle areas of partial transparency that might not be obvious at first glance.
- Solution: Zoom in on the image in Procreate to check for any areas that should be fully transparent but are only partially so.
Avoiding these mistakes ensures your artwork is saved correctly, saving you time and preventing frustration.
6. Can I Save A Procreate Animation With A Transparent Background?
Yes, you can save a Procreate animation with a transparent background by exporting it as an animated GIF or PNG sequence. Both formats support transparency and allow you to create animations that can be overlaid on different backgrounds.
Here’s how to do it:
-
Set Up Your Animation:
- Create your animation in Procreate, ensuring that the background layer is turned off.
- Each frame of your animation should have the necessary transparent areas.
-
Export as Animated GIF:
- Go to the Actions menu, select “Share,” and choose “Animated GIF.”
- Adjust the settings for frame rate and looping as needed.
- Save the GIF to your desired location.
-
Export as PNG Sequence:
- Go to the Actions menu, select “Share,” and choose “Animated PNG.”
- This will export each frame of your animation as an individual PNG file.
- You can then use another application, like Adobe Photoshop, to compile the PNG sequence into an animated GIF or video.
-
Considerations:
- GIF: Animated GIFs are widely supported but can have limitations in color depth and file size.
- PNG Sequence: PNG sequences offer better quality but require additional steps to compile into a final animation format.
-
Example Use Case:
- Imagine you’re creating an animated logo for your brand. By exporting it with a transparent background, you can easily overlay it on your website, video intros, and social media content without any distracting background.
7. What Are Some Creative Uses For Images With Transparent Backgrounds Created In Procreate?
Images with transparent backgrounds created in Procreate have numerous creative uses, including logo design, digital stickers, social media graphics, and website elements. Their versatility makes them invaluable for both personal and professional projects.
Here are some specific examples:
-
Logo Design:
- Create a logo with a transparent background to easily place it on various marketing materials, websites, and business cards without a visible background.
-
Digital Stickers:
- Design custom stickers for use in messaging apps, digital planners, and social media. Transparent backgrounds allow the stickers to blend seamlessly with any surface.
-
Social Media Graphics:
- Create eye-catching graphics for social media posts, stories, and profiles. Transparent backgrounds make it easy to overlay text and images on different backgrounds.
-
Website Elements:
- Design icons, banners, and other website elements with transparent backgrounds to ensure they look clean and professional on any webpage.
-
Video Editing:
- Use transparent images as overlays in video editing projects, such as lower thirds, watermarks, and animated graphics.
-
Printable Designs:
- Create designs for t-shirts, mugs, and other merchandise. Transparent backgrounds allow the designs to be printed on different colored items without any unwanted background showing.
-
Educational Materials:
- Develop educational resources, such as diagrams and illustrations, that can be easily incorporated into presentations, worksheets, and online courses.
8. How Does Saving With A Transparent Background In Procreate Help With Branding?
Saving with a transparent background in Procreate significantly helps with branding by allowing you to create consistent, professional-looking visuals across all your marketing materials. This ensures your brand appears polished and cohesive, enhancing brand recognition and trust.
Here’s how transparent backgrounds support branding:
-
Consistent Visual Identity:
- Transparent backgrounds allow you to use your logo and other brand elements on any surface without a distracting background. This ensures consistency across all platforms, from your website to your social media profiles.
-
Professional Appearance:
- Images with transparent backgrounds look cleaner and more professional. They avoid the amateurish look of having a white box around your logo or graphic.
-
Versatility:
- Transparent images can be easily adapted for different uses. You can place them on different colored backgrounds, use them as overlays in videos, or incorporate them into print materials without any extra editing.
-
Enhanced Brand Recognition:
- Consistent use of your logo and brand elements helps customers recognize your brand more easily. Transparent backgrounds ensure that your visuals always look their best, reinforcing your brand identity.
-
Cost-Effective:
- By creating images with transparent backgrounds, you reduce the need for multiple versions of your logo and graphics. This saves time and money on design and editing.
-
Example:
- Imagine you are a small business owner in Atlanta, using Procreate to create marketing materials. With transparent images, you can quickly adapt your logo for different campaigns, sales promotions, and events without needing to hire a professional designer each time.
According to the Consumer Financial Protection Bureau (CFPB), effective branding can significantly improve customer loyalty and increase sales, making the ability to create professional-looking visuals with transparent backgrounds a valuable asset.
9. What Are Some Advanced Techniques For Working With Transparency In Procreate?
Advanced techniques for working with transparency in Procreate include using alpha locks, clipping masks, and layer masks to create intricate designs with varying levels of transparency. These techniques offer greater control and flexibility in your artwork.
Here’s a closer look at each technique:
-
Alpha Locks:
- What it is: An alpha lock restricts painting to only the opaque areas of a layer, preserving transparency.
- How to use it: Select a layer and tap it, then choose “Alpha Lock.” This prevents you from painting outside the existing content on that layer, making it useful for adding details and textures without affecting transparent areas.
- Example: Use an alpha lock to add shading to a character without accidentally coloring the transparent background around it.
-
Clipping Masks:
- What it is: A clipping mask uses the content of one layer to define the visibility of another layer.
- How to use it: Place the layer you want to clip above the layer you want to use as the mask. Tap the upper layer and select “Clipping Mask.” The upper layer will now only be visible within the boundaries of the lower layer.
- Example: Use a clipping mask to add a pattern or texture to a shape while keeping the background transparent.
-
Layer Masks:
- What it is: A layer mask allows you to selectively hide or reveal portions of a layer using grayscale values.
- How to use it: Select a layer and tap it, then choose “Mask.” Paint on the mask with black to hide parts of the layer and with white to reveal them.
- Example: Use a layer mask to create a gradual fade or blend between two images while maintaining transparency in other areas.
-
Gradient Transparency:
- What it is: Creating gradients of transparency to achieve smooth transitions between opaque and transparent areas.
- How to use it: Use the gradient tool on a layer mask to create a gradual transition from fully opaque to fully transparent.
- Example: Use a gradient transparency to create a vignette effect around an image or to blend an image seamlessly into a background.
-
Using Brushes with Transparency:
- What it is: Employing brushes that have built-in transparency to create subtle effects.
- How to use it: Select a brush and adjust its opacity settings. Use the brush to paint on a layer, creating areas with varying levels of transparency.
- Example: Use a soft airbrush with low opacity to add subtle shadows and highlights to an image without completely obscuring the underlying layers.
10. Where Can I Find More Resources And Tutorials On Procreate And Digital Art?
You can find more resources and tutorials on Procreate and digital art at savewhere.net, which offers tips, tricks, and strategies to enhance your creative projects and manage your finances smartly. Our website provides a wealth of information to help you master Procreate and other digital art tools.
Here are some additional resources:
-
Official Procreate Website:
- The official Procreate website offers tutorials, artist spotlights, and a comprehensive user handbook.
-
YouTube Channels:
- Channels like “Procreate Official,” “Art with Flo,” and “Bardot Brush” offer a wide range of tutorials for beginners and advanced users.
-
Skillshare and Udemy:
- These online learning platforms offer in-depth courses on Procreate and digital art, taught by experienced artists.
-
Creative Market:
- Creative Market offers a variety of Procreate brushes, textures, and templates to enhance your artwork.
-
Online Forums and Communities:
- Join online forums and communities like the “Procreate Forum” and “Digital Art Community” to connect with other artists, share your work, and get feedback.
-
Instagram and Pinterest:
- Follow Procreate artists and digital art accounts on Instagram and Pinterest to stay updated on the latest trends, techniques, and inspiration.
-
Local Workshops and Classes:
- Check for local workshops and classes in your area to learn Procreate and digital art from experienced instructors in a hands-on setting.
-
savewhere.net:
- Provides articles, guides, and resources on digital art, financial management, and smart spending. It’s a one-stop destination for creative individuals looking to enhance their skills and manage their finances effectively.
By exploring these resources, you can continue to develop your skills, stay inspired, and create stunning digital artwork with Procreate.
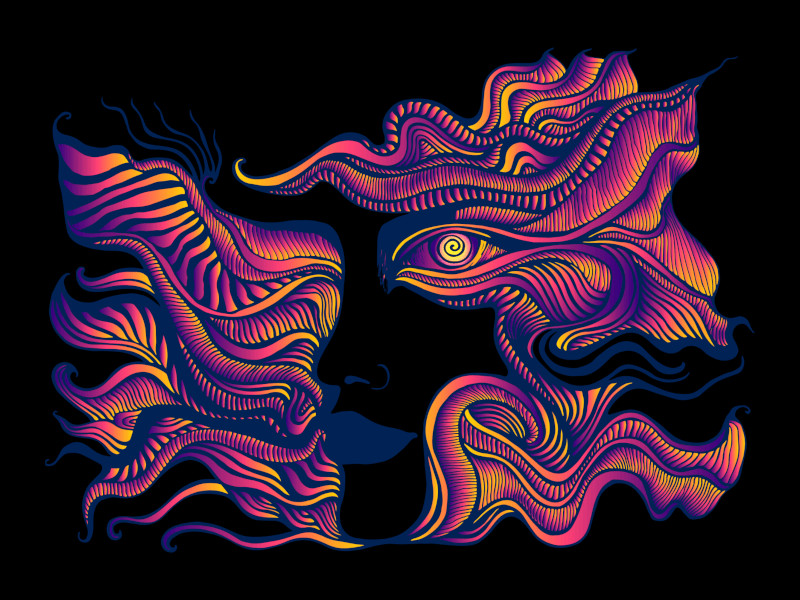 Finished work in Procreate with transparent background
FAQ: Saving Transparent Backgrounds in Procreate
1. Why does my Procreate image still have a white background after saving as a PNG?
You likely forgot to turn off the visibility of the background layer before exporting. Open the Layers panel and uncheck the box next to the background layer to make it transparent.
2. Can I save a layered Procreate file with transparency?
Yes, saving as a PNG preserves the transparency of each layer. Ensure each layer with transparent areas is correctly set up before exporting.
3. Is there a way to make only part of an image transparent in Procreate?
Yes, use layer masks. Add a mask to your layer, then paint with black to hide (make transparent) parts of the layer.
4. How do I create a transparent gradient in Procreate?
Use the gradient tool on a layer mask. This allows a smooth transition from opaque to transparent, perfect for fades and blends.
5. What’s the best resolution for saving Procreate images with transparency?
Save at a high resolution (300 DPI) for print projects. For web use, 72 DPI is sufficient. Adjust based on the intended use.
6. Can I export a vector image with transparency from Procreate?
Procreate is primarily raster-based, so export as a PNG to maintain transparency. For vector graphics, consider using Adobe Illustrator or Affinity Designer.
7. How do I remove a background from an image in Procreate?
Use selection tools to isolate the subject, then delete the background layer or use a layer mask to hide it.
8. Why is my transparent image appearing with a black background in another program?
The program might not fully support transparency. Ensure the program is correctly interpreting PNG files with alpha channels.
9. Can I use transparent images created in Procreate for commercial purposes?
Yes, as long as you own the rights to the artwork. Check the licensing terms if you use third-party brushes or assets.
10. How do I create a transparent text effect in Procreate?
Type your text, rasterize the layer, and use a layer mask to create a transparent effect, such as a gradient or reveal.
Conclusion
Mastering how to save with a transparent background in Procreate opens up a world of creative possibilities, from enhancing your branding to creating stunning digital art. By following the steps outlined in this guide and avoiding common mistakes, you can ensure your artwork always looks its best. For more tips, tricks, and resources on Procreate and digital art, visit savewhere.net. We’re here to help you unlock your creative potential while also empowering you to manage your finances wisely.
Ready to take your Procreate skills to the next level? Explore savewhere.net today for more creative tips, financial advice, and exclusive offers tailored to the savvy, creative individual in Atlanta and beyond!
Address: 100 Peachtree St NW, Atlanta, GA 30303, United States
Phone: +1 (404) 656-2000
Website: savewhere.net