
How To Save Photoshop As Jpeg effectively? Discover different methods for saving your Photoshop files as JPEGs and learn how to optimize image quality and file size for various purposes with savewhere.net.
Are you looking for ways to save your Photoshop files as JPEGs without compromising image quality or ending up with huge file sizes? At savewhere.net, we understand the need for efficient file management, especially when sharing your creations online or with clients. This article will walk you through different methods to save your Photoshop files as JPEGs, providing tips on optimizing image quality and file size for various purposes, all while keeping your budget in mind. Learn about optimizing, file compression, and preserving quality with our savewhere.net guide.
1. Understanding the JPEG Image Format
What are the pros and cons of using JPEG format? JPEG is a widely used image format that balances image quality and file size, making it suitable for various applications.
JPEG, short for Joint Photographic Experts Group, is a popular image format because it can significantly reduce file size through lossy compression. This means that some image data is discarded during the saving process, which can affect the quality if the image is repeatedly saved and edited. However, for most online uses and general sharing, JPEG offers an excellent compromise. According to research from the U.S. Bureau of Economic Analysis (BEA), using JPEG for web images can reduce website loading times, improving user experience and SEO rankings.
1.1. Benefits of JPEG
What makes JPEG a great choice for saving images? JPEG’s compatibility and efficient compression make it ideal for sharing and web use.
- Compatibility: JPEG is supported by almost all image viewers, operating systems, and web browsers.
- File Size: The lossy compression of JPEG results in smaller file sizes, which is great for sharing online and saving storage space.
- Versatility: JPEG is suitable for photos and images with complex colors and gradients.
1.2. Drawbacks of JPEG
What are the limitations of the JPEG format? Lossy compression can degrade image quality with repeated edits.
- Lossy Compression: Each time you save a JPEG, some image data is lost, which can degrade the quality, especially with repeated editing.
- Not Ideal for Graphics with Sharp Lines: JPEG is not the best choice for images with sharp lines, text, or graphics, as the compression can cause artifacts and blurring.
- No Transparency Support: JPEG does not support transparency, so it’s not suitable for images that need to have transparent backgrounds.
2. How to Save Photoshop as JPEG: Step-by-Step Methods
What are the different ways to save your work as a JPEG in Photoshop? Photoshop offers several methods to save files as JPEGs, each with unique advantages.
2.1. Method 1: The “Save As” Technique
How do you use the Save As feature to save a JPEG? The Save As option is the most straightforward method for saving files as JPEGs.
The ‘Save As’ technique is the most direct way to save your Photoshop file as a JPEG. It’s simple and provides essential options for quality control.
-
Open Your File: First, open your image in Photoshop.
-
Navigate to Save As: Go to ‘File’ in the top menu, then select ‘Save As.’
 Save As option Photoshop
 -
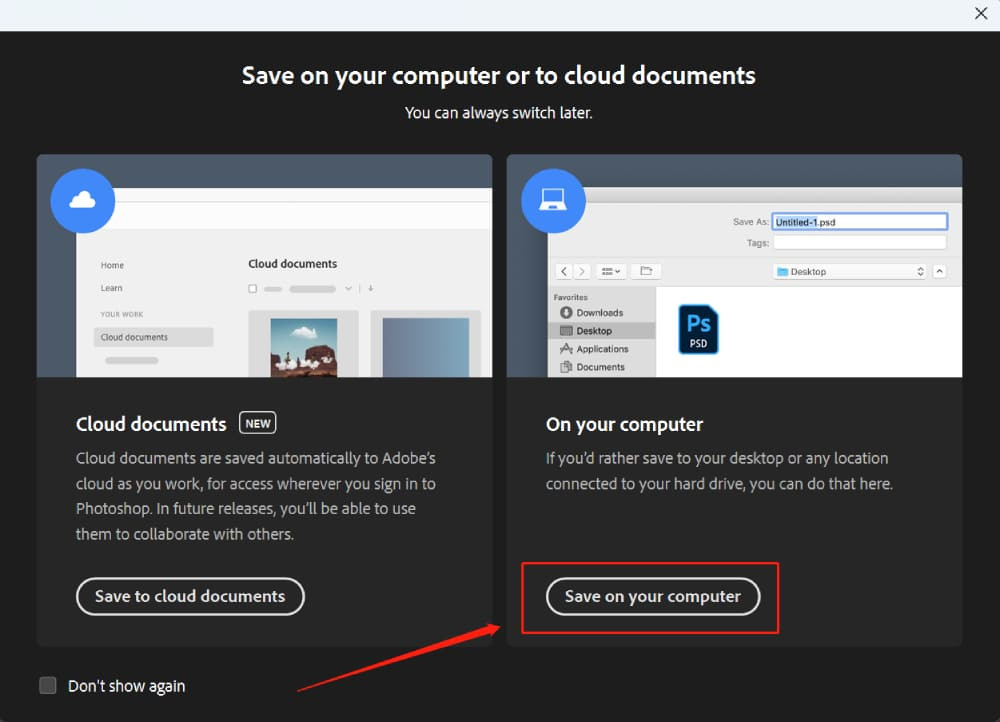
Choose Save Location: A pop-up panel will appear. Select ‘On Your Computer’ to save the file to a local drive.
-
Select JPEG Format: In the dialog box, choose ‘JPEG’ from the ‘Format’ dropdown menu.
Setting Description File Name Enter a descriptive name for your file. Format Choose JPEG from the dropdown menu. Save Location Select the folder where you want to save the file. Consider using a cloud storage solution for backup and accessibility. -
Adjust JPEG Options: After clicking ‘Save,’ a ‘JPEG Options’ box will appear, offering several settings:
- Matte: This option is relevant for images with transparency. Since JPEG doesn’t support transparency, Photoshop fills the transparent areas with a chosen color.
- Image Options (Quality): Use the slider to adjust the quality. Higher quality means larger file sizes. A setting of 8-10 usually provides a good balance.
- Format Options:
- Baseline (“Standard”): Most compatible across devices.
- Baseline Optimized: Smaller file size with the same quality.
- Progressive: Loads in layers, suitable for web use.
- Preview: Check this to see changes in real-time in your workspace.
-
Save: Once satisfied with the settings, click ‘OK’ to save the JPEG file.
2.2. Method 2: The “Export As” Option
Why should you use the Export As option? The Export As feature provides greater control, especially for web graphics.
The ‘Export As’ feature is useful when you need more control over the output, especially for web graphics. It allows you to resize the image, convert to sRGB, and adjust quality.
-
Go to Export As: Navigate to ‘File’ > ‘Export’ > ‘Export As.’
-
Select JPEG Format: In the dialog box, choose ‘JPEG’ as the format.
-
Adjust Settings:
-
Quality: Adjust the quality slider to balance image quality and file size.
-
Width and Height: Resize the image as needed.
Option Description Width Set the width of the image in pixels. Height Set the height of the image in pixels. Canvas Size Adjust the canvas size to add space around the image. This is useful for creating borders or padding. -
Convert to sRGB: Check this option if the image is for web use to ensure accurate color display.
-
-
Export: Click ‘Export’ and choose a location to save the file.
2.3. Method 3: The “Save for Web (Legacy)” Method
What are the benefits of using Save for Web (Legacy)? This method offers advanced control over image optimization for web use.
The ‘Save for Web (Legacy)’ option is an older but still valuable feature that provides precise control over image optimization, making it ideal for web use.
-
Go to Save for Web (Legacy): Select ‘File’ > ‘Export’ > ‘Save for Web (Legacy).’
-
Choose JPEG Format: On the right side of the dialog box, select ‘JPEG.’
-
Adjust Parameters:
-
Preset: Choose from predefined settings or save your own.
-
JPEG Quality: Adjust the quality from 0 to 100.
Parameter Description JPEG Quality Adjust the quality of the JPEG image. A setting of 60-80 provides a good balance between quality and file size. Optimized Enable this for a more optimized form of JPEG that results in smaller file sizes without significant loss in quality. Progressive This JPEG will load in stages when viewed in a web browser. First, a low-quality version of the full image will appear, and then it will gradually increase in quality. Embed Color Profile This option includes the color profile of your image in the file. This can help ensure colors look correct on devices that support color management. -
Optimized: Enable for smaller file sizes.
-
Progressive: Use for staged loading in web browsers.
-
Embed Color Profile: Include the color profile for accurate colors.
-
Blur: Apply a small amount of blur to reduce file size.
-
Convert to sRGB: Convert to sRGB for web use.
-
Metadata: Choose how much metadata to include.
-
Image Size: Adjust dimensions carefully to avoid quality loss.
-
-
Save: Click ‘Save’ to save the optimized JPEG file.
2.4. Method 4: Quick Export as JPEG
How can you quickly export a JPEG with one click? The Quick Export option provides a fast way to save files as JPEGs with minimal adjustments.
The ‘Quick Export as JPEG’ option is a fast, one-click method to save files as JPEGs. By default, Photoshop uses PNG for quick exports, but you can easily change this to JPEG in the preferences.
-
Navigate to Quick Export: Go to ‘File’ > ‘Export’ > ‘Quick Export as XXX.’
-
Change Preferences (if needed): If the default format is not JPEG, change it by going to ‘Edit’ > ‘Preferences’ > ‘Export.’
-
Set Quick Export Format: In the ‘Export’ panel, set the ‘Quick Export Format’ to JPEG.
-
Quick Export: Now, when you select ‘Quick Export as JPEG,’ the file will be saved as a JPEG with the preset settings.
3. Optimizing JPEG Settings for Different Uses
What JPEG settings should you use for different purposes? Optimize your JPEG settings for web, print, and email to achieve the best balance between quality and file size.
3.1. For Web Use
How do you optimize JPEGs for website use? Use lower quality settings and convert to sRGB to ensure fast loading times and accurate color display on websites.
When saving JPEGs for web use, the goal is to balance image quality with file size to ensure fast loading times. Slower loading times can lead to a higher bounce rate, which negatively affects your website’s SEO. According to a study by Google, 53% of mobile site visitors leave a page that takes longer than three seconds to load.
- Quality: Set the quality between 60-70.
- Format Options: Use ‘Baseline Optimized.’
- Convert to sRGB: Ensure this option is checked.
- Metadata: Minimize metadata to reduce file size.
3.2. For Print Use
What JPEG settings are best for printing? Use high-quality settings and embed the color profile to ensure accurate color reproduction in printed materials.
For print, you want the highest possible quality to ensure that the printed image looks sharp and vibrant. Unlike web images, file size is less of a concern here.
- Quality: Set the quality to the maximum (12 in ‘Save As’ or 100 in ‘Save for Web’).
- Format Options: Use ‘Baseline (“Standard”)’ for maximum compatibility.
- Embed Color Profile: Ensure the color profile is embedded to maintain color accuracy.
3.3. For Email Use
How do you optimize JPEGs for email attachments? Reduce file size to ensure easy sending and viewing without compromising too much on quality.
When sending images via email, it’s important to keep the file size small so that the recipient can easily download and view the image. Large attachments can clog inboxes and may be blocked by some email providers.
- Quality: Set the quality between 50-60.
- Image Size: Resize the image to a smaller resolution if necessary.
- Metadata: Remove unnecessary metadata.
4. Common Mistakes to Avoid When Saving as JPEG
What mistakes should you avoid when saving JPEGs? Avoid repeated saving, over-compression, and incorrect color profiles to maintain image quality.
4.1. Repeatedly Saving a JPEG
Why should you avoid repeatedly saving JPEGs? Each save degrades the image quality due to lossy compression.
Each time you save a JPEG, the image undergoes lossy compression, which discards some of the image data. Repeatedly saving a JPEG will lead to cumulative quality degradation, resulting in a blurry or artifact-ridden image.
- Solution: Always work on the original file (PSD) and save a copy as JPEG only when the editing is complete.
4.2. Over-Compressing the Image
What happens when you over-compress a JPEG? Over-compression results in significant quality loss and visible artifacts.
Setting the quality too low to achieve a smaller file size can result in severe quality loss, with visible artifacts and blurring.
- Solution: Always preview the image at different quality settings to find the optimal balance between file size and quality.
4.3. Using the Wrong Color Profile
Why is using the correct color profile important? Incorrect color profiles can lead to inaccurate color reproduction on different devices.
Using the wrong color profile can cause colors to appear different on different devices. This is particularly important for web images, where the sRGB color profile is the standard.
- Solution: Always convert to sRGB for web images and embed the appropriate color profile for print images.
5. Advanced Tips for JPEG Optimization
How can you further optimize JPEGs? Use image optimization tools, adjust resolution, and consider progressive JPEGs for enhanced web performance.
5.1. Using Image Optimization Tools
What are image optimization tools and how do they help? These tools reduce file size without significant quality loss.
Image optimization tools use advanced compression algorithms to reduce file size without significant quality loss. Tools like TinyPNG, ImageOptim, and Kraken.io can further optimize your JPEGs.
- Recommendation: Use these tools as a final step after saving your JPEG from Photoshop.
5.2. Adjusting Image Resolution
How does image resolution affect JPEG quality and file size? Lowering resolution can significantly reduce file size, especially for web images.
Lowering the resolution of an image can significantly reduce its file size, especially for web use. However, be careful not to lower the resolution too much, as this can result in a blurry image.
- Tip: Resize the image in Photoshop before saving as JPEG to maintain control over the final output.
5.3. Using Progressive JPEGs
What are progressive JPEGs and when should you use them? Progressive JPEGs load in stages, improving the perceived loading speed on websites.
Progressive JPEGs load in stages, starting with a low-quality version of the entire image and gradually increasing in quality. This can improve the perceived loading speed on websites, especially for users with slow internet connections.
- Recommendation: Use progressive JPEGs for large images on your website.
6. Real-World Examples of Effective JPEG Usage
How can you apply these JPEG saving techniques in real-world scenarios? Explore practical examples of using JPEGs for various purposes.
6.1. E-commerce Product Images
What JPEG settings should e-commerce businesses use for product images? Optimize for fast loading times and clear product details.
E-commerce businesses need to optimize product images for fast loading times and clear product details. Slow loading times can lead to a higher bounce rate and lower sales.
- Settings:
- Quality: 65-75
- Resolution: Optimize for the specific dimensions required by the e-commerce platform.
- Optimization Tool: Use an image optimization tool to further reduce file size.
6.2. Photography Portfolio Website
How should photographers save JPEGs for their portfolio websites? Prioritize image quality while maintaining reasonable file sizes.
Photographers need to balance image quality with file size to showcase their work effectively. High-quality images are essential, but large file sizes can slow down the website and deter visitors.
- Settings:
- Quality: 80-90
- Progressive: Use progressive JPEGs to improve the perceived loading speed.
- Optimization Tool: Use an image optimization tool to reduce file size without significant quality loss.
6.3. Social Media Sharing
What JPEG settings are optimal for sharing images on social media? Optimize for fast loading and compatibility with different platforms.
Social media platforms often compress images, so it’s important to optimize your JPEGs before uploading to minimize quality loss.
- Settings:
- Quality: 70-80
- Resolution: Optimize for the specific dimensions recommended by the social media platform.
- Convert to sRGB: Ensure the image is converted to sRGB for accurate color display.
7. How TourBox Can Streamline Your Photoshop Workflow
How can TourBox help with saving JPEGs in Photoshop? TourBox simplifies repetitive tasks and automates file export processes.
While this article has walked through various methods of saving JPEG in Photoshop, these steps may seem straightforward, but they involve numerous parameters. Furthermore, when dealing with bulk file exports, the process can become quite cumbersome and time-consuming.
The TourBox is a device that promises infinite possibilities for creators. Paired with its accompanying software, TourBox Console, this handy gadget is an ideal solution for streamlining your workflow.
With TourBox, you can create macro commands that automate repetitive tasks. Imagine consolidating the multitude of steps involved in exporting Photoshop files into JPEGs with a single button click. Or consider the convenience of applying color grading to multiple files at once with just one command.
By automating these routine tasks, TourBox allows creators to focus on what truly matters – the creative process itself. It shifts the emphasis from getting bogged down in the minutiae of operations to spending more time exploring, experimenting, and expressing your creativity.
If you’re looking to enhance your creative workflow in Photoshop, consider giving TourBox a try. With its ability to simplify and automate tasks, it could be the tool that takes your creativity to the next level.
8. Save Money with Savewhere.net
How can savewhere.net help you save money? Savewhere.net offers resources and tips for managing your finances effectively.
At savewhere.net, we are dedicated to providing you with the resources and tips you need to manage your finances effectively. We understand that saving money is a priority, and we offer a variety of tools and information to help you achieve your financial goals.
8.1. Budgeting Tips
What are some effective budgeting strategies? Track your spending, set financial goals, and create a realistic budget.
Effective budgeting is the foundation of financial stability. Here are some essential budgeting tips:
- Track Your Spending: Use budgeting apps or spreadsheets to monitor where your money is going.
- Set Financial Goals: Define your short-term and long-term financial objectives.
- Create a Realistic Budget: Develop a budget that aligns with your income and expenses.
8.2. Finding Deals and Discounts
How can you find the best deals and discounts? Use coupon websites, sign up for newsletters, and take advantage of loyalty programs.
Finding deals and discounts is a great way to save money on everyday purchases. Here are some strategies to help you find the best deals:
- Use Coupon Websites: Explore websites like Coupons.com and RetailMeNot for discounts.
- Sign Up for Newsletters: Subscribe to newsletters from your favorite stores for exclusive offers.
- Take Advantage of Loyalty Programs: Join loyalty programs to earn rewards and discounts.
8.3. Financial Planning Resources
What financial planning resources are available? Explore financial calculators, educational articles, and expert advice.
Access to financial planning resources can help you make informed decisions and achieve your financial goals. Savewhere.net provides a range of resources, including:
- Financial Calculators: Use calculators to estimate your savings, plan for retirement, and more.
- Educational Articles: Read articles on various financial topics, such as investing, debt management, and retirement planning.
- Expert Advice: Connect with financial experts for personalized guidance.
9. Addressing Customer Challenges
What are common challenges people face when saving money? Overspending, lack of budgeting, and inconsistent saving habits are frequent obstacles.
9.1. Difficulty Tracking Expenses
How can you overcome the challenge of tracking expenses? Use budgeting apps or spreadsheets to monitor your spending.
Many people find it challenging to track their expenses accurately. Without a clear understanding of where your money is going, it’s difficult to identify areas where you can save.
- Solution: Use budgeting apps like Mint or YNAB (You Need A Budget) to automatically track your expenses. Alternatively, create a simple spreadsheet to manually record your spending.
9.2. Finding Practical Ways to Cut Costs
What are some practical ways to cut costs without sacrificing quality of life? Identify areas where you can reduce spending, such as dining out and entertainment.
Finding practical ways to cut costs without sacrificing your quality of life requires careful consideration. Here are some strategies to help you reduce your expenses:
- Reduce Dining Out: Cook more meals at home and pack your lunch instead of buying it.
- Lower Entertainment Costs: Look for free or low-cost entertainment options, such as hiking, visiting local parks, or attending community events.
- Negotiate Bills: Contact your service providers to negotiate lower rates for your internet, phone, and insurance.
9.3. Staying Motivated to Save
How can you stay motivated to save money? Set clear financial goals, track your progress, and reward yourself for reaching milestones.
Staying motivated to save money can be challenging, especially when you face unexpected expenses or feel like you’re not making progress. Here are some strategies to help you stay on track:
- Set Clear Financial Goals: Define specific, measurable, achievable, relevant, and time-bound (SMART) goals.
- Track Your Progress: Regularly monitor your savings progress and celebrate your achievements.
- Reward Yourself: Treat yourself occasionally when you reach significant milestones to stay motivated.
10. Frequently Asked Questions (FAQ)
10.1. What is the best quality setting for saving a JPEG in Photoshop?
The best quality setting depends on the intended use. For web, a quality of 60-70 is usually sufficient. For print, use the maximum quality setting.
10.2. Should I use Baseline or Progressive JPEG?
Use Baseline JPEGs for maximum compatibility and Progressive JPEGs for improved loading speed on websites.
10.3. How can I reduce the file size of a JPEG without losing too much quality?
Use image optimization tools, adjust the resolution, and experiment with different quality settings to find the optimal balance.
10.4. Why does my JPEG look different on different devices?
This is often due to color profile differences. Ensure you convert to sRGB for web images and embed the correct color profile for print images.
10.5. Is it better to save as JPEG or PNG?
JPEG is better for photographs and images with complex colors, while PNG is better for graphics with sharp lines, text, or transparency.
10.6. How do I save a Photoshop file as a high-resolution JPEG?
Set the quality to the maximum, ensure the resolution is high enough for your intended use, and embed the color profile.
10.7. Can I recover quality loss from a JPEG?
No, quality loss from JPEG compression is irreversible. Always work on the original file and save a copy as JPEG only when the editing is complete.
10.8. What is the difference between “Save As” and “Export As” in Photoshop?
“Save As” provides basic options for saving files, while “Export As” offers more advanced control, especially for web graphics.
10.9. How do I change the default Quick Export format to JPEG in Photoshop?
Go to “Edit” > “Preferences” > “Export” and set the “Quick Export Format” to JPEG.
10.10. What are the best practices for saving JPEGs for e-commerce?
Optimize for fast loading times, clear product details, and compatibility with the e-commerce platform.
In conclusion, mastering how to save Photoshop files as JPEGs involves understanding different methods, optimizing settings, and avoiding common mistakes. By following the tips and techniques outlined in this guide, you can ensure that your images look their best while maintaining manageable file sizes. Remember to visit savewhere.net for more tips on saving money and managing your finances effectively.
Ready to take control of your savings and achieve your financial goals? Visit savewhere.net today to explore our resources, discover deals, and connect with a community of like-minded individuals. Don’t wait, start saving now and build a brighter financial future with savewhere.net.
Address: 100 Peachtree St NW, Atlanta, GA 30303, United States.
Phone: +1 (404) 656-2000.
Website: savewhere.net.