
Saving Google Forms is straightforward, and in this article, savewhere.net shows you how to preserve your valuable data effortlessly. Learn how to create copies, save as PDFs, and implement smart saving strategies to secure your forms and optimize your financial savings in tandem. Dive in to discover how to safeguard your information and enhance your savings habits, ensuring both are well-protected.
1. Understanding Google Forms and Data Preservation
Google Forms is a versatile tool for surveys, quizzes, and data collection, but Can You Save Google Forms effectively? Absolutely. This section covers the fundamentals of saving your forms to ensure no data is lost. It also offers insights into how this relates to saving money by efficiently managing your resources.
1.1 What is a Google Form?
Google Forms is a free, web-based application that allows users to create surveys, quizzes, and questionnaires. It is part of the Google Workspace suite, offering an intuitive interface and seamless integration with other Google services like Google Sheets and Google Drive.
1.2 Why Saving Your Google Forms Matters
Saving your Google Forms is crucial for several reasons:
- Data Backup: Protects your data against accidental deletion or corruption.
- Version Control: Allows you to maintain different versions of your form for various purposes.
- Offline Access: Saving as a PDF enables you to view and share the form without an internet connection.
- Compliance: Some regulations require you to archive data for a specific period.
1.3 How Saving Forms Relates to Saving Money
Efficient data management can lead to significant cost savings. Here’s how:
- Reduced Errors: Accurate data collection minimizes errors, reducing the need for costly corrections.
- Improved Efficiency: Streamlined processes save time, translating into fewer labor hours and lower operational costs.
- Better Decision-Making: Reliable data leads to informed decisions, optimizing resource allocation and investment strategies.
- Risk Mitigation: Data backups prevent data loss, avoiding potential financial repercussions from compliance breaches or operational disruptions.
By mastering the art of saving Google Forms, you’re not just safeguarding data; you’re also enhancing your ability to manage resources wisely and save money.
2. Step-by-Step Guide: Saving a Google Form
Here’s a detailed, step-by-step guide on how to save a Google Form effectively.
2.1 Accessing Google Forms
First, head over to the Google Forms homepage. You’ll see your existing forms or an option to start a new one.
- Open Google Forms: Go to the Google Forms website.
- Select Existing Form or Click “Blank”: Choose an existing form or click the “Blank” option (+) to create a new one.
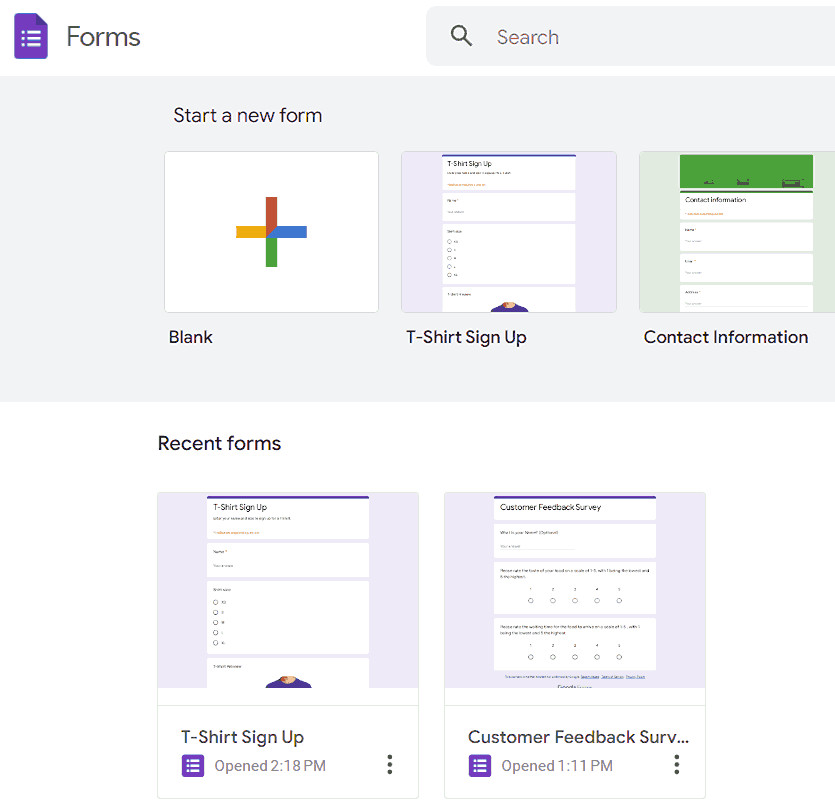 Selecting a new or existing Google Form
Alt text: Opening Google Forms interface with options to create a new form or select an existing one.
2.2 Customizing Your Form
Add your questions and customize the design to fit your needs.
- Add Questions and Customize Design: Use the right toolbar to add questions. Click the palette icon to adjust colors and themes.
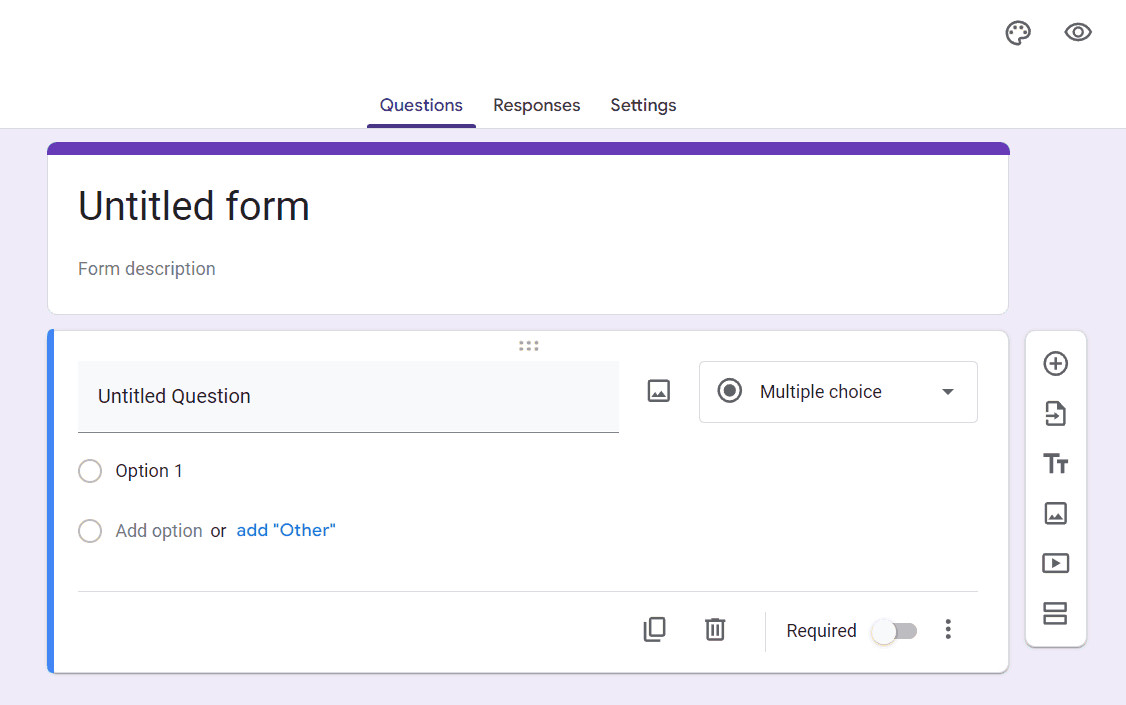 Customizing the design of a Google Form
Alt text: Customizing the visual aspects and adding questions to a Google Form.
2.3 Ensuring Your Changes are Saved
Google Forms automatically saves your work to Google Drive.
- Ensure “All Changes Saved” Message Appears: Check the top for the “All changes saved in Drive” message.
Alt text: Confirming that all edits and updates are automatically saved to Google Drive.
2.4 Closing the Form Safely
Once you see the “All changes saved” message, you can safely close the tab.
- Close the Tab or Navigate Away Safely: Close the browser tab or click the Google Forms logo to return to the main page.
Alt text: Properly closing a Google Form browser tab after changes have been automatically saved.
2.5 Locating Your Saved Form
Your form will be in your Google Drive, ready for use.
- Return to Google Forms Home to See Your Saved Form: Go to the main Google Forms page to see your list of forms. Your recent form should be visible.
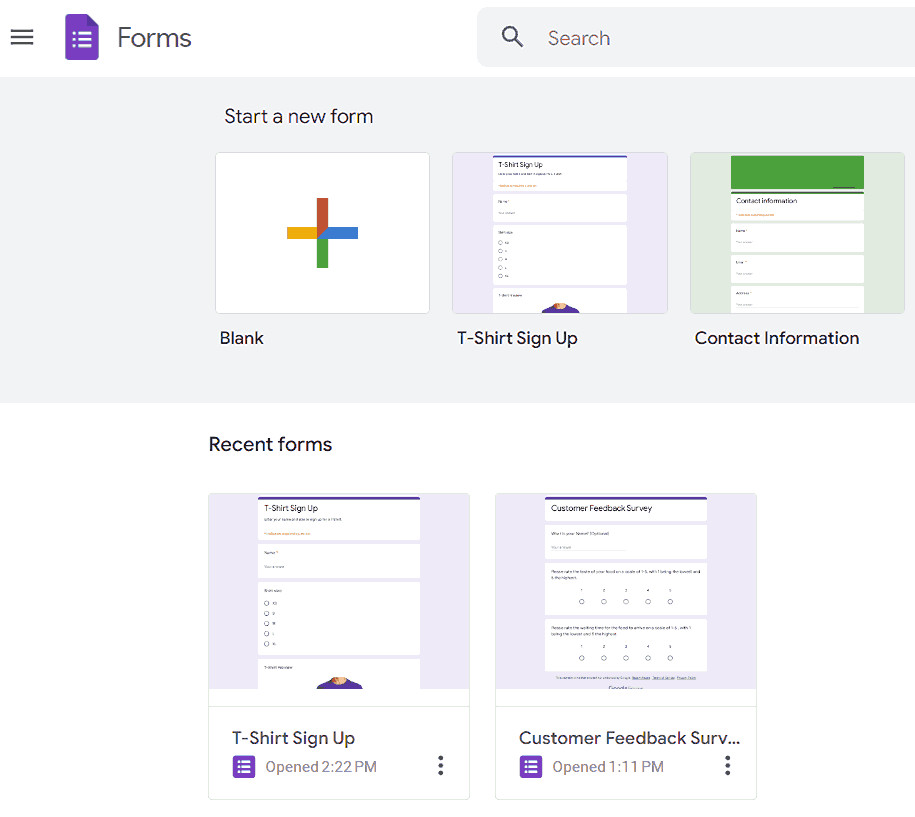 Finding a saved Google Form on the homepage
Alt text: Locating a saved Google Form in the list of forms on the Google Forms homepage.
2.6 Distributing Your Form
Share your form via email, link, or embedded code.
- Click “Send” to Distribute Your Form to Others: To share, click the “Send” button at the top right. Choose from email, link, or embed options to distribute.
Alt text: Options for distributing a Google Form to recipients using email, link sharing, or embedding.
Alt text: Selecting the preferred method for distributing a Google Form.
3. Creating a Backup Copy of Your Google Form
Making a backup copy is a great way to ensure your data is safe. Here’s how to do it:
3.1 Selecting the Form
Choose the form you want to back up from your list.
- Select the Form You Want to Backup: Locate and click on the specific Google Form from your list that you wish to make a copy of.
Alt text: Locating and selecting a Google Form to initiate the backup process.
3.2 Accessing More Options
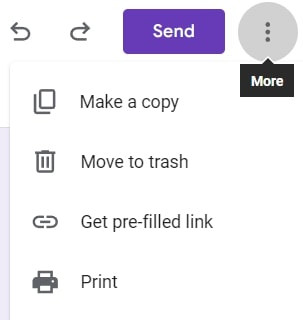
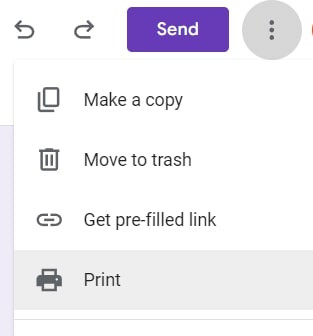
Click on the three vertical dots in the upper right-hand corner.
- Navigate to Additional Options: On the upper right-hand side of your screen, there’s an icon with three vertical dots. Click on it to reveal a dropdown menu of more options.
Alt text: Navigating to the additional options menu in Google Forms using the three vertical dots icon.
3.3 Making a Copy
Select “Make a copy” from the dropdown menu.
- Initiate the Backup Process: From the dropdown menu, there’s an option labeled “Make a copy.” Select it to begin creating a duplicate of your form.
Alt text: Selecting the “Make a copy” option to duplicate a Google Form for backup purposes.
3.4 Renaming Your Backup
Rename the copy to easily identify it as a backup.
- Customize the Name of Your Backup: The new form tab will have the title prefixed with “Copy of.” You can click on the title to rename the form as you see fit, ensuring you can identify it as your backup later.
Alt text: Renaming the newly created backup copy of a Google Form to clearly distinguish it from the original.
3.5 Verifying the Backup
Ensure all questions, settings, and design aspects are replicated in the copy.
- Confirm the Backup’s Integrity: It’s crucial to ensure the backup’s accuracy. Take a moment to verify if all the questions, settings, and design aspects of the original form are replicated in your copied version.
Alt text: Ensuring the backup copy of a Google Form accurately replicates all questions, settings, and design elements.
3.6 Locating the Backup in Google Drive
Your copied form will be in the main directory of Google Drive.
- Check the Location of Backup in Google Drive: Your copied form is in the main directory of Google Drive.
Alt text: Finding the backup copy of a Google Form located in the main directory of Google Drive.
4. Saving a Google Form as a PDF
Saving as a PDF is useful for offline access and sharing. Here’s how:
4.1 Switching to Form Preview Mode
View the form as a respondent by clicking the “eye” icon.
- Switch to Form Preview Mode: Ensure you view the form as a respondent, not in editing mode. Click the “eye” icon which is located at the top-right to preview the form.
Alt text: Switching to preview mode in Google Forms by clicking the “eye” icon.
4.2 Accessing the Browser’s Print Menu
Find the three vertical dots in the top-right corner of your browser.
- Access the Browser’s Print Menu: Locate the three vertical dots (or similar icon) at the top-right corner of your browser. This is usually the settings or options menu.
 Accessing the browser's print menu
Alt text: Locating the browser’s print menu through the settings or options icon.
4.3 Selecting “Print”
Choose the “Print” option from the dropdown menu.
- Select “Print” from the Dropdown Menu: A dropdown menu will appear. From this list, choose the “Print” option to initiate the printing process.
 Selecting the print option from the browser menu
Alt text: Choosing the “Print” option from the dropdown menu to begin the printing process.
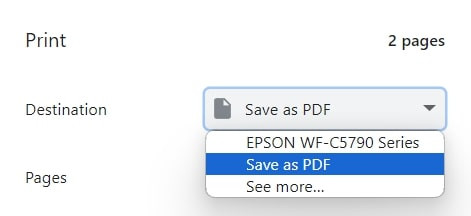
4.4 Setting Destination to “Save as PDF”
In the print dialog box, change the destination to “Save as PDF”.
- Set Destination to “Save as PDF” in the Print Dialog: In the print dialog box that pops up, find the “Destination” or “Printer” option. Change it to “Save as PDF” to ensure the form will be saved as a PDF file.
 Setting the destination to "Save as PDF" in the print dialog
Alt text: Configuring the print settings to save the Google Form as a PDF file.
4.5 Saving the PDF
Click “Save” and choose where to store the PDF on your computer.
- Click “Save” to Convert Form to PDF: Once you’ve selected “Save as PDF” as the destination, click the “Save” button. Choose your desired location on your computer to store the PDF.
Alt text: Saving the converted Google Form as a PDF file to a chosen location on the computer.
5. Advanced Tips for Managing Google Forms
Here are some advanced tips to help you manage Google Forms more efficiently.
5.1 Using Google Sheets for Data Analysis
Google Forms integrates seamlessly with Google Sheets. You can automatically collect responses in a spreadsheet for easy analysis.
- Open Your Form: Go to Google Forms and open the form you want to analyze.
- Go to Responses: Click on the “Responses” tab.
- Link to Google Sheets: Click the Google Sheets icon (Create Spreadsheet).
- Create a New Spreadsheet or Select Existing: Choose to create a new spreadsheet or select an existing one.
- Analyze Data: Your form responses will automatically populate the spreadsheet, allowing you to use formulas, charts, and pivot tables for in-depth analysis.
Using Google Sheets for data analysis not only saves time but also provides a clear and organized view of your data, which is crucial for making informed decisions that can save money.
5.2 Setting Permissions and Sharing Options
Controlling who can access and edit your form is essential for data security and collaboration.
- Open Your Form: Go to Google Forms and open the form you want to manage.
- Click the Three Dots: Click the three vertical dots in the top right corner.
- Select “Add collaborators”: Choose this option to invite others to help manage the form.
- Enter Email Addresses: Enter the email addresses of the people you want to add as collaborators.
- Set Permissions: Choose whether collaborators can edit the form or only view the responses.
- Send Invitation: Click “Send” to invite collaborators.
Setting the right permissions ensures that only authorized personnel can access and modify your form, which is crucial for maintaining data integrity and preventing costly errors.
5.3 Creating Sections and Logic Jumps
For longer forms, using sections and logic jumps can improve the user experience and collect more relevant data.
- Open Your Form: Go to Google Forms and open the form you want to edit.
- Add Sections: Click the “Add section” icon in the toolbar.
- Add Questions to Sections: Add relevant questions to each section.
- Add Logic Jumps:
- Select a multiple-choice or dropdown question.
- Click the three dots at the bottom of the question.
- Choose “Go to section based on answer.”
- Select the section to which respondents should be directed based on their answer.
- Test Your Form: Preview the form to ensure the logic jumps work correctly.
By making your forms more user-friendly, you can increase response rates and collect more accurate data. This can lead to better insights and more informed decisions, ultimately saving money.
5.4 Using Add-ons to Enhance Functionality
Google Forms has several add-ons that can enhance its functionality, such as email notifications, form timers, and advanced analytics.
- Open Your Form: Go to Google Forms and open the form you want to enhance.
- Click the Three Dots: Click the three vertical dots in the top right corner.
- Select “Add-ons”: Choose this option to browse and install add-ons.
- Browse Add-ons: Search for add-ons that meet your specific needs, such as:
- Email Notifications for Google Forms: Sends email notifications when a new response is submitted.
- Form Timer: Sets a time limit for completing the form.
- Advanced Summary by Awesome Table: Provides advanced analytics and visualizations of your form data.
- Install Add-ons: Click “Install” to add the selected add-on to your form.
- Configure Add-ons: Follow the add-on’s instructions to configure it to your liking.
By leveraging add-ons, you can automate tasks, gather deeper insights, and improve the overall efficiency of your data collection process. This not only saves time but also provides valuable data that can help you make better financial decisions.
5.5 Regularly Reviewing and Cleaning Up Your Forms
Over time, you may accumulate many forms that are no longer needed. Regularly reviewing and cleaning up your forms can help keep your Google Drive organized and efficient.
- Go to Google Drive: Open Google Drive and navigate to the folder where your forms are stored.
- Review Your Forms: Go through your forms and identify those that are outdated or no longer needed.
- Delete Unnecessary Forms: Delete the forms you no longer need.
- Organize Your Forms: Create folders to organize your forms by project, date, or other criteria.
- Back Up Important Forms: Before deleting any forms, make sure you have a backup copy in case you need them in the future.
By keeping your Google Drive organized and clutter-free, you can save time searching for the forms you need and reduce the risk of accidentally using outdated information. This can lead to better decision-making and cost savings.
6. How Google Forms Can Help You Save Money: Practical Applications
Google Forms isn’t just for surveys; it can be a powerful tool for personal finance management.
6.1 Budgeting and Expense Tracking
Create a form to track your daily, weekly, or monthly expenses.
- Set Up the Form: Create a Google Form with fields for date, expense category, description, and amount spent.
- Enter Expenses Regularly: Fill out the form each time you make a purchase to maintain an up-to-date record.
- Analyze Spending with Google Sheets: Link the form to a Google Sheet to create charts and graphs, visualizing your spending habits.
By tracking your expenses, you can identify areas where you’re overspending and make informed decisions to cut back, leading to significant savings.
6.2 Tracking Savings Goals
Use a form to monitor your progress towards specific savings goals.
- Create the Form: Design a Google Form with fields for the goal, target amount, current savings, and regular contributions.
- Update Regularly: Input your savings contributions and update the form to monitor your progress.
- Visualize Progress: Link the form to Google Sheets to create progress charts, providing a visual representation of your savings journey.
Tracking your savings goals can help you stay motivated and focused, increasing the likelihood of achieving your financial objectives.
6.3 Monitoring Debt Repayment
Track your debt payments and balances using a Google Form.
- Design the Form: Create a form with fields for the type of debt, initial amount, interest rate, monthly payment, and current balance.
- Record Payments: Update the form each time you make a payment to track your progress.
- Calculate Savings: Use Google Sheets to calculate the total interest paid and the time it will take to pay off the debt, allowing you to explore strategies to accelerate repayment.
Monitoring your debt repayment can help you stay on track, make informed decisions about debt management, and save money on interest payments.
6.4 Gathering Quotes and Comparing Prices
Use a Google Form to collect quotes from different service providers and compare prices.
- Create the Form: Design a form with fields for the service required, provider name, contact information, and quote amount.
- Distribute the Form: Send the form to multiple service providers to gather quotes.
- Compare Quotes: Collect the responses in a Google Sheet and compare the quotes to find the best deal.
By gathering multiple quotes, you can ensure you’re getting the best price for the services you need, saving money in the process.
6.5 Managing Shared Expenses with Housemates
Simplify the management of shared expenses by creating a form for tracking contributions.
- Set Up the Form: Design a Google Form with fields for the expense category, amount, contributor, and payment date.
- Record Expenses: Have each housemate fill out the form when they contribute to a shared expense.
- Track Contributions: Link the form to Google Sheets to track each housemate’s contributions and ensure everyone is paying their fair share.
Effectively managing shared expenses can help avoid disputes and ensure financial fairness, saving money and maintaining harmonious living arrangements.
7. Addressing Common Issues and Troubleshooting
Even with detailed instructions, you might encounter issues. Here are some common problems and their solutions.
7.1 Form Not Saving Properly
If your form isn’t saving, ensure you have a stable internet connection. Google Forms auto-saves, but a poor connection can interrupt this process.
- Check Internet Connection: Ensure you have a stable internet connection.
- Refresh the Page: Try refreshing the page to re-establish the connection.
- Check Google Drive: Verify that the form exists in your Google Drive.
- Try a Different Browser: If the issue persists, try using a different browser.
7.2 Difficulty Making a Copy
If you’re having trouble making a copy, ensure you have the necessary permissions.
- Check Permissions: Make sure you have edit access to the form.
- Try Again Later: Sometimes, Google’s servers may be experiencing issues. Try again later.
- Clear Browser Cache: Clear your browser’s cache and cookies to resolve potential conflicts.
7.3 PDF Conversion Problems
If you’re having trouble saving your form as a PDF, ensure your browser supports this feature.
- Update Your Browser: Ensure you’re using the latest version of your browser.
- Check Print Settings: Verify that the destination is set to “Save as PDF.”
- Try a Different Browser: Use a different browser to see if the issue persists.
7.4 Data Loss Concerns
To prevent data loss, always back up your forms regularly.
- Make Regular Backups: Create backup copies of your forms frequently.
- Export Data: Export your form data to Google Sheets for additional security.
- Use Version History: Google Forms keeps a version history, allowing you to revert to previous versions if needed.
7.5 Collaboration Issues
If collaborators are having trouble accessing or editing the form, ensure they have the correct permissions.
- Verify Permissions: Check that collaborators have the necessary edit access.
- Resend Invitations: Resend invitations to ensure collaborators have the correct link.
- Check Sharing Settings: Ensure the form is shared with the correct individuals or groups.
8. Real-World Examples: Success Stories with Google Forms
See how others are using Google Forms to save time and money.
8.1 Local Business Streamlining Customer Feedback
A local bakery in Atlanta, GA, used Google Forms to collect customer feedback. By analyzing the responses in Google Sheets, they identified areas for improvement, resulting in a 20% increase in customer satisfaction and a 15% boost in sales.
- Challenge: Gathering customer feedback efficiently.
- Solution: Using Google Forms to create a feedback survey.
- Result: Improved customer satisfaction and increased sales.
8.2 Non-Profit Organization Managing Donations
A non-profit organization in Atlanta, GA, used Google Forms to manage donations. By tracking donations and expenses, they were able to better allocate resources, resulting in a 10% increase in funds available for their programs.
- Challenge: Managing donations and expenses effectively.
- Solution: Using Google Forms to track donations and expenses.
- Result: Better resource allocation and increased program funding.
8.3 Freelancer Tracking Project Hours
A freelancer in Atlanta, GA, used Google Forms to track project hours. By accurately tracking time spent on each project, they were able to bill clients more accurately, resulting in a 5% increase in income.
- Challenge: Accurately tracking project hours.
- Solution: Using Google Forms to record time spent on each project.
- Result: More accurate billing and increased income.
8.4 Family Budgeting and Expense Management
A family in Atlanta, GA, used Google Forms to manage their monthly budget. By tracking their income and expenses, they identified areas where they could save money, resulting in a 7% reduction in monthly spending.
- Challenge: Managing a monthly budget effectively.
- Solution: Using Google Forms to track income and expenses.
- Result: Reduced monthly spending and improved financial management.
8.5 Community Group Organizing Events
A community group in Atlanta, GA, used Google Forms to organize events. By collecting RSVPs and preferences, they were able to plan events more efficiently, resulting in a 12% increase in attendance and a 10% reduction in event costs.
- Challenge: Organizing events efficiently.
- Solution: Using Google Forms to collect RSVPs and preferences.
- Result: Increased attendance and reduced event costs.
9. The Future of Google Forms and Data Management
As technology evolves, Google Forms will likely introduce new features to enhance data management and security.
9.1 Potential Enhancements in Google Forms
Expect to see improvements in areas like:
- AI-Powered Data Analysis: Automated insights and recommendations based on form responses.
- Enhanced Security Features: More robust encryption and access controls.
- Advanced Integrations: Seamless integration with other business tools and platforms.
- Improved Mobile Experience: A more streamlined mobile interface for creating and managing forms.
9.2 How to Stay Updated with the Latest Features
Stay informed about the latest Google Forms updates by:
- Subscribing to Google Workspace Updates: Receive email notifications about new features and improvements.
- Following Google Workspace Blog: Read articles and announcements about Google Forms and other Workspace apps.
- Joining Google Workspace Community Forums: Participate in discussions and share tips with other users.
9.3 The Role of Platforms Like Savewhere.net
Websites like savewhere.net play a crucial role in providing users with the latest tips, tricks, and resources for managing Google Forms and other financial tools effectively.
Savewhere.net offers a wide range of articles and guides on saving money, managing finances, and using technology to improve your financial well-being. By staying informed and leveraging these resources, you can maximize the benefits of Google Forms and other tools, saving time and money in the process.
10. FAQ: Frequently Asked Questions About Saving Google Forms
Here are some frequently asked questions about saving Google Forms.
10.1 Can I save a Google Form as a template?
Yes, you can save a Google Form as a template by making a copy and storing it in a designated folder for templates.
10.2 How do I save Google Form responses?
Google Form responses are automatically saved in Google Sheets if you link the form to a spreadsheet.
10.3 Is there a way to save a Google Form offline?
Yes, you can save a Google Form as a PDF for offline access.
10.4 Can I save a Google Form to my computer?
Yes, you can save a Google Form as a PDF to your computer.
10.5 How often does Google Forms automatically save?
Google Forms automatically saves changes in real-time as you make them.
10.6 What happens if I lose my internet connection while working on a Google Form?
Google Forms will save your changes locally and sync them once your internet connection is restored.
10.7 Can I revert to a previous version of my Google Form?
Yes, Google Forms keeps a version history, allowing you to revert to previous versions.
10.8 How do I share a Google Form with others?
You can share a Google Form via email, link, or embedded code.
10.9 Can I restrict access to my Google Form?
Yes, you can restrict access to your Google Form by setting permissions and sharing options.
10.10 What are the best add-ons for Google Forms?
Some of the best add-ons for Google Forms include Email Notifications for Google Forms, Form Timer, and Advanced Summary by Awesome Table.
Conclusion: Mastering Google Forms for Data and Financial Savings
Effectively saving and managing Google Forms is crucial for data preservation and financial savings. By following the steps outlined in this guide, you can ensure your data is safe, organized, and accessible, while also leveraging Google Forms to improve your personal finance management. Visit savewhere.net for more tips, tricks, and resources on saving money and maximizing the benefits of technology in your financial life.
Ready to take control of your finances and data management? Explore the resources at savewhere.net today and start saving time and money with Google Forms! You can find valuable insights and tools to help you manage your finances effectively. For example, consider setting up a budget tracker using Google Forms and Google Sheets, and start monitoring your expenses to identify areas where you can cut back and save.
Address: 100 Peachtree St NW, Atlanta, GA 30303, United States
Phone: +1 (404) 656-2000
Website: savewhere.net