
Saving your Twitch broadcasts is essential for content creators. It allows you to repurpose content, engage with your audience, and build your brand. At savewhere.net, we provide the tips and strategies you need to manage your streaming career effectively. Learn to archive streams, download videos, and optimize your content for future use and financial wellbeing.
1. Understanding Twitch VODs
Twitch VODs, or Videos on Demand, are recordings of your past live streams. These recordings are automatically saved if you enable the “Store past broadcasts” option in your Twitch settings. Understanding VODs is crucial for content creators who want to repurpose their content, share highlights, or build a library of their streams for viewers to watch at their convenience.
1.1. What Are Twitch VODs?
Twitch VODs are recordings of your previous live streams that viewers can watch anytime. According to Twitch’s Help Center, VODs provide a way for streamers to archive their content and allow viewers to catch up on streams they may have missed.
1.2. Why Save Your Twitch Broadcasts?
Saving your Twitch broadcasts offers several key benefits:
- Content Repurposing: You can edit and share highlights on other platforms like YouTube, TikTok, and social media.
- Audience Engagement: VODs allow viewers to watch your streams at their convenience, increasing engagement and viewership.
- Building a Content Library: Creating an archive of your streams helps build a valuable resource for new and existing viewers.
- Monetization Opportunities: Saved broadcasts can be used to create paid content, tutorials, or exclusive content for subscribers.
Saving broadcasts contributes to your financial wellbeing by creating more opportunities to engage with your audience, enhance your content, and monetize your streaming efforts.
1.3. How Long Are Twitch VODs Stored?
By default, Twitch stores VODs for a limited time. For regular channels, VODs are typically stored for 14 days. However, Twitch Partners, Affiliates, and users with Twitch Prime or Turbo subscriptions have their VODs stored for 60 days.
To ensure your content remains available, it’s essential to download and archive your VODs. This way, you can preserve your valuable content indefinitely and repurpose it as needed.
2. Enabling Automatic Archiving of Twitch Streams
To save your Twitch VODs automatically, you need to enable the “Store past broadcasts” option in your Twitch settings. This ensures that all your streams are recorded and saved for later use.
2.1. Step-by-Step Guide to Enabling Automatic Archiving
Here’s how to enable automatic archiving on Twitch:
-
Go to Your Twitch Profile:
- Start by navigating to the Twitch website and logging into your account.
- Click on your profile picture in the top-right corner of the screen to open the dropdown menu.
Alt Text: Twitch profile picture location on the Twitch website
-
Open Creator Dashboard:
- In the dropdown menu, select Creator Dashboard. This will take you to the central hub for managing your Twitch channel.
Alt Text: Selecting Creator Dashboard from the Twitch profile menu
-
Navigate to Stream Settings:
- In the Creator Dashboard, find the Settings tab on the left-hand sidebar.
- Click on Settings to expand the menu, then select Stream.
Alt Text: Accessing Stream settings in the Creator Dashboard on Twitch
-
Enable Store Past Broadcasts:
- Scroll down to the VOD Settings section.
- Find the Store past broadcasts option and toggle the switch to the on position. This will ensure that your future streams are automatically saved as VODs.
Alt Text: Enabling the Store past broadcasts setting in Twitch VOD settings
Enabling this feature is essential for maintaining a continuous record of your broadcasts, allowing you to easily download and repurpose your content.
2.2. Additional VOD Settings
After enabling past broadcast storage, another section will appear with the option to automatically publish past broadcasts as VODs. If you turn this off, VODs will remain unpublished by default. The advantage of this is better control over your public image — that 5-minute test stream won’t be accessible to everyone.
Alt Text: Choosing whether to automatically publish VODs on Twitch
2.3. Benefits of Automatic Archiving
- Consistency: Ensures all your streams are saved without manual intervention.
- Convenience: Simplifies the process of content management and repurposing.
- Peace of Mind: You can focus on streaming, knowing your content is being recorded.
By enabling automatic archiving, you are taking a proactive step in managing your streaming career and ensuring your content remains accessible for future use.
3. Downloading Your Twitch Streams
Downloading your Twitch streams allows you to save your content locally, repurpose it for other platforms, and ensure you have a backup of your valuable broadcasts.
3.1. Step-by-Step Guide to Downloading VODs
Here’s how to download your Twitch streams:
-
Go to Your Twitch Profile:
- Navigate to the Twitch website and log into your account.
- Click on your profile picture in the top-right corner to open the dropdown menu.
Alt Text: Location of profile picture for accessing Twitch settings
-
Open Video Producer:
- In the dropdown menu, select Video Producer. This will take you to the page where all your past broadcasts are listed.
Alt Text: Accessing the Video Producer section on Twitch
-
Select the VOD to Download:
- In the Video Producer menu, find the past stream you want to download from the list below.
- Click the ⠇ button (More options) on the far right of the VOD.
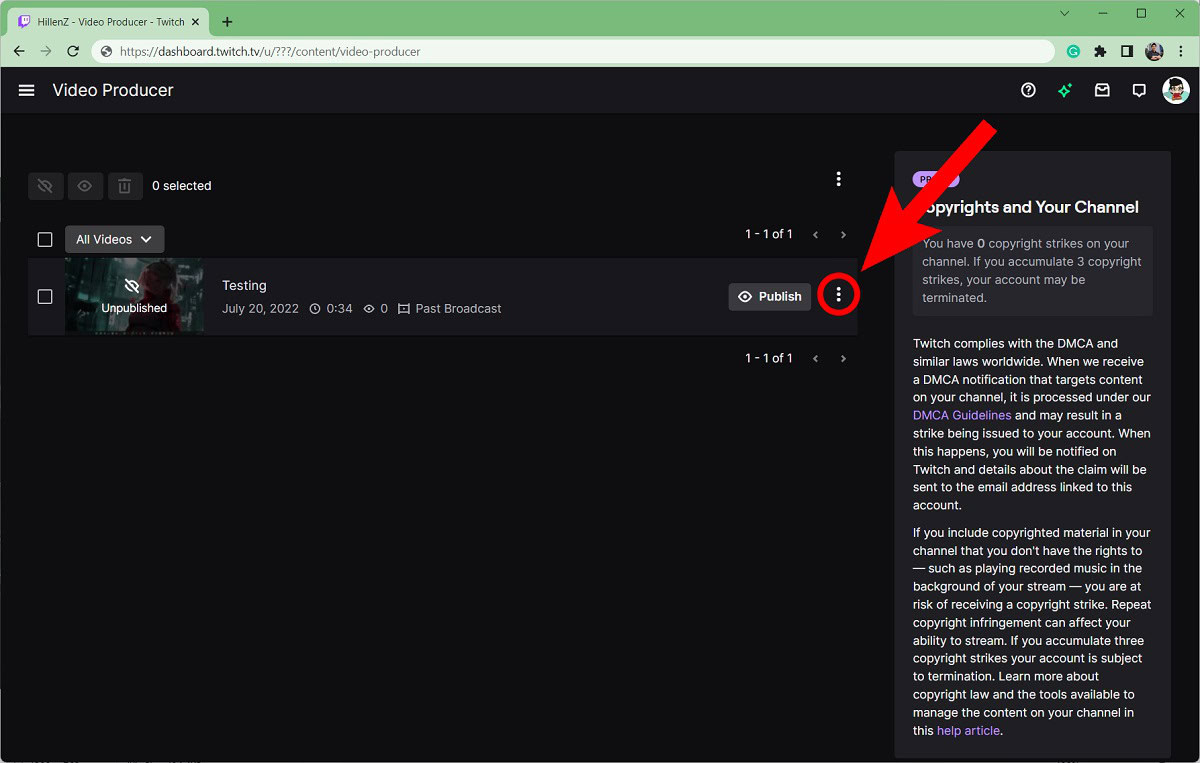 More options button
 -
Download the VOD:
- From the dropdown menu that appears, click Download.
- Your VOD will be downloaded as an MP4 file, which you can save and use as needed.
Alt Text: Selecting the Download option for a Twitch VOD
Downloading your VODs ensures you have a local copy of your content for future use.
3.2. Tips for Managing Downloaded VODs
- Organize Your Files: Create a structured folder system to manage your downloaded VODs. Use naming conventions that include the date, title, and any relevant information for easy retrieval.
- Backup Your Content: Store your VODs in multiple locations, such as external hard drives, cloud storage, or NAS devices, to protect against data loss.
- Edit and Repurpose: Use video editing software to create highlights, compilations, or tutorials from your VODs. Share these edited versions on other platforms to expand your reach.
- Optimize for Different Platforms: Adjust the format and resolution of your videos to suit the requirements of different platforms like YouTube, TikTok, and social media.
By following these tips, you can effectively manage your downloaded VODs and maximize their value.
3.3. Using Third-Party Tools
Several third-party tools can help you download and manage your Twitch VODs more efficiently. These tools often offer additional features like batch downloading, automated archiving, and more advanced editing options.
Some popular tools include:
- Twitch Leecher: A user-friendly tool for downloading Twitch VODs in bulk.
- Streamlink: A command-line utility that supports various streaming services, including Twitch.
- VideoProc Converter: A comprehensive video processing tool that can download, convert, and edit your VODs.
These tools can save you time and effort in managing your Twitch content, making it easier to repurpose and share your streams.
4. Repurposing Your Twitch Broadcasts
Repurposing your Twitch broadcasts is an excellent way to maximize the value of your content, reach a wider audience, and enhance your brand.
4.1. Creating Highlight Reels
Highlight reels are short, engaging videos that showcase the best moments from your streams. They are perfect for sharing on social media, YouTube, and other platforms to attract new viewers and engage your existing audience.
How to Create Highlight Reels:
- Review Your VODs: Watch your past broadcasts and identify the most exciting, funny, or memorable moments.
- Use Video Editing Software: Use video editing software like Adobe Premiere Pro, Final Cut Pro, or DaVinci Resolve to cut and edit your clips.
- Add Music and Effects: Enhance your highlight reels with background music, sound effects, and visual effects to make them more engaging.
- Optimize for Social Media: Create different versions of your highlight reels optimized for different platforms. For example, shorter videos for TikTok and Instagram, and longer videos for YouTube.
By creating high-quality highlight reels, you can attract new viewers and drive traffic to your Twitch channel.
4.2. Making Tutorials and Guides
If your streams often involve gameplay, tutorials, or educational content, you can repurpose them into standalone tutorials and guides. These can be shared on YouTube, your website, or other platforms to provide value to your audience.
How to Make Tutorials and Guides:
- Identify Key Topics: Review your streams and identify the key topics or skills you covered.
- Extract Relevant Clips: Cut out the sections of your VODs where you discussed these topics.
- Add Explanations and Annotations: Use video editing software to add explanations, annotations, and graphics to clarify your points.
- Create a Structured Guide: Organize your clips into a logical and easy-to-follow guide.
By providing valuable tutorials and guides, you can establish yourself as an authority in your niche and attract a loyal audience.
4.3. Sharing on Social Media
Social media is a powerful tool for promoting your Twitch content. Share clips, highlights, and announcements on platforms like Twitter, Facebook, Instagram, and TikTok to reach a wider audience and drive traffic to your channel.
Tips for Sharing on Social Media:
- Tailor Your Content: Create different versions of your content optimized for each platform.
- Use Engaging Captions: Write compelling captions that grab attention and encourage viewers to click through to your Twitch channel.
- Use Hashtags: Use relevant hashtags to increase the visibility of your posts.
- Engage with Your Audience: Respond to comments and messages to build relationships with your followers.
- Post Regularly: Maintain a consistent posting schedule to keep your audience engaged.
By effectively using social media, you can significantly expand your reach and grow your Twitch community.
4.4. Creating Podcasts
If your streams involve discussions, interviews, or commentary, you can extract the audio and repurpose it into a podcast. Podcasts are a great way to reach a new audience and provide value to your existing viewers in a different format.
How to Create Podcasts:
- Extract Audio from VODs: Use audio editing software to extract the audio from your Twitch VODs.
- Edit and Enhance Audio: Clean up the audio by removing background noise, adjusting levels, and adding intro/outro music.
- Choose a Podcast Hosting Platform: Use a podcast hosting platform like Libsyn, Buzzsprout, or Anchor to distribute your podcast.
- Promote Your Podcast: Share your podcast on social media, your website, and other platforms to attract listeners.
By creating a podcast, you can provide valuable content to your audience in a convenient and accessible format.
5. Overcoming Challenges in Saving Twitch Broadcasts
While saving Twitch broadcasts is essential for content creators, it can come with its own set of challenges. Understanding these challenges and how to overcome them ensures you can effectively manage your streaming career and maximize your content’s value.
5.1. Storage Limitations
One of the primary challenges is storage limitations. Twitch stores VODs for a limited time—14 days for regular channels and 60 days for Partners, Affiliates, and Twitch Prime/Turbo users.
How to Overcome:
- Download Regularly: Make it a habit to download your VODs regularly to ensure you don’t lose valuable content.
- Use External Storage: Invest in external hard drives or cloud storage services to store your downloaded VODs.
- Prioritize Content: Focus on saving the most valuable and engaging content if you have limited storage space.
5.2. Time Commitment
Downloading, editing, and repurposing VODs can be time-consuming, especially for streamers with busy schedules.
How to Overcome:
- Batch Processing: Download multiple VODs at once to save time.
- Outsource Editing: Consider hiring a video editor to help with editing and repurposing your content.
- Use Automation Tools: Utilize tools like Twitch Leecher or Streamlink to automate the downloading process.
5.3. Technical Issues
Technical issues, such as internet connectivity problems or software glitches, can sometimes disrupt the downloading or editing process.
How to Overcome:
- Stable Internet Connection: Ensure you have a stable and reliable internet connection to avoid interruptions during downloads.
- Regular Backups: Create regular backups of your downloaded VODs to protect against data loss.
- Troubleshooting: Learn basic troubleshooting techniques to address common technical issues.
5.4. Copyright Concerns
Using copyrighted music or content in your streams can lead to copyright strikes or takedowns, which can affect your ability to save and repurpose your VODs.
How to Overcome:
- Use Royalty-Free Music: Use royalty-free music from sources like Epidemic Sound or Artlist.
- Obtain Permissions: Obtain permission from copyright holders before using their content in your streams.
- Monitor Your Content: Regularly monitor your VODs for copyright issues and take appropriate action if necessary.
5.5. Finding the Best Moments
Reviewing hours of streamed content to find the best moments for highlight reels or tutorials can be a daunting task.
How to Overcome:
- Take Notes During Streams: Take notes during your streams, marking the timestamps of key moments or highlights.
- Use Chat Logs: Review your chat logs to identify moments that generated a lot of engagement or excitement.
- Collaborate with Viewers: Ask your viewers to suggest highlights or key moments from your streams.
By addressing these challenges effectively, you can streamline your content creation process and maximize the value of your Twitch broadcasts.
6. Optimizing Your Twitch Channel for VOD Viewership
Optimizing your Twitch channel for VOD viewership can significantly increase the number of views and engagement your saved broadcasts receive.
6.1. Compelling Titles and Descriptions
Creating compelling titles and descriptions for your VODs is essential for attracting viewers.
Tips for Compelling Titles:
- Use Keywords: Include relevant keywords in your titles to improve search visibility.
- Be Specific: Clearly indicate the content of the VOD in your title.
- Use Numbers: Use numbers to create a sense of structure and intrigue (e.g., “5 Tips for Winning at [Game]”).
Tips for Engaging Descriptions:
- Summarize Content: Provide a brief summary of the VOD’s content.
- Use Keywords: Include relevant keywords in your descriptions to improve search visibility.
- Add Timestamps: Add timestamps to help viewers navigate to specific sections of the VOD.
6.2. Attractive Thumbnails
Thumbnails are the first thing viewers see when browsing your VODs. Creating attractive and eye-catching thumbnails can significantly increase click-through rates.
Tips for Attractive Thumbnails:
- Use High-Quality Images: Use high-resolution images that are clear and visually appealing.
- Include Text: Add text to your thumbnails to convey the content of the VOD.
- Use Consistent Branding: Use consistent branding elements (e.g., colors, fonts, logos) to create a cohesive look and feel.
6.3. Playlists and Categories
Organizing your VODs into playlists and categories makes it easier for viewers to find and watch the content they’re interested in.
Tips for Playlists and Categories:
- Create Themed Playlists: Create playlists based on game titles, series, or topics.
- Use Descriptive Names: Use descriptive names for your playlists and categories to make it clear what they contain.
- Keep Playlists Updated: Regularly update your playlists with new VODs.
6.4. Promoting Your VODs
Promoting your VODs on social media and other platforms can help you reach a wider audience and drive traffic to your Twitch channel.
Tips for Promoting Your VODs:
- Share on Social Media: Share links to your VODs on social media platforms like Twitter, Facebook, and Instagram.
- Engage with Your Audience: Encourage your viewers to share your VODs with their friends.
- Use Email Marketing: Use email marketing to notify your subscribers when you upload new VODs.
6.5. Engaging with Viewers
Engaging with viewers in the comments section of your VODs can help build a loyal community and encourage repeat viewership.
Tips for Engaging with Viewers:
- Respond to Comments: Respond to comments and questions from viewers in a timely manner.
- Ask for Feedback: Ask viewers for feedback on your VODs and use their suggestions to improve your content.
- Run Contests and Giveaways: Run contests and giveaways to incentivize viewers to watch and engage with your VODs.
By optimizing your Twitch channel for VOD viewership, you can maximize the reach and impact of your saved broadcasts.
7. Monetizing Your Twitch VODs
Monetizing your Twitch VODs can be an excellent way to generate revenue and support your streaming career.
7.1. Twitch Affiliate and Partner Programs
Joining the Twitch Affiliate or Partner program is the first step towards monetizing your VODs. These programs offer various monetization options, including subscriptions, donations, and ad revenue.
How to Qualify:
- Twitch Affiliate: Meet the minimum requirements, including 50 followers, 500 minutes broadcast in the past 30 days, an average of 3 concurrent viewers, and 7 unique broadcast days.
- Twitch Partner: Meet the higher requirements, including consistently high viewership and engagement, and a commitment to producing high-quality content.
7.2. Subscriptions
Subscriptions are a recurring source of revenue that viewers pay to support your channel. As an Affiliate or Partner, you can offer various subscription tiers with different benefits, such as emotes, badges, and ad-free viewing.
Tips for Subscriptions:
- Offer Value: Provide compelling benefits that incentivize viewers to subscribe.
- Promote Subscriptions: Regularly promote your subscription options during your streams.
- Engage with Subscribers: Show appreciation for your subscribers and engage with them in a meaningful way.
7.3. Donations
Donations are one-time contributions that viewers can make to support your channel. Use third-party services like Streamlabs or StreamElements to set up donation options.
Tips for Donations:
- Set Up Donation Alerts: Set up donation alerts to acknowledge and thank viewers who donate.
- Offer Incentives: Offer incentives for donations, such as shout-outs or custom content.
- Be Grateful: Show gratitude for every donation, no matter how small.
7.4. Ad Revenue
As a Twitch Affiliate or Partner, you can earn revenue by running ads during your streams. The amount of revenue you earn depends on the number of viewers and the frequency of ads.
Tips for Ad Revenue:
- Balance Ads: Balance the frequency of ads to avoid disrupting the viewing experience.
- Communicate with Viewers: Communicate with your viewers about the ads and explain how they support your channel.
- Experiment with Ad Formats: Experiment with different ad formats to find what works best for your audience.
7.5. Sponsorships
Sponsorships involve partnering with brands to promote their products or services on your channel. This can be a lucrative source of revenue, especially for popular streamers with a large and engaged audience.
Tips for Sponsorships:
- Find Relevant Brands: Partner with brands that are relevant to your content and audience.
- Be Transparent: Be transparent with your viewers about your sponsorships.
- Deliver Value: Deliver value to your sponsors by creating engaging and authentic content.
7.6. Affiliate Marketing
Affiliate marketing involves promoting products or services and earning a commission for every sale made through your unique affiliate link.
Tips for Affiliate Marketing:
- Choose Relevant Products: Choose products or services that are relevant to your content and audience.
- Be Transparent: Be transparent with your viewers about your affiliate links.
- Provide Value: Provide value to your viewers by offering honest and informative reviews.
By effectively monetizing your Twitch VODs, you can turn your passion for streaming into a sustainable career.
8. Essential Tools for Managing Twitch Broadcasts
To efficiently manage your Twitch broadcasts, you need the right tools for recording, editing, and optimizing your content.
8.1. Streaming Software
Streaming software is essential for capturing and broadcasting your streams to Twitch. Popular options include OBS Studio, Streamlabs OBS, and XSplit.
Features to Look For:
- Customizable Overlays: Customizable overlays to add branding and visual elements to your streams.
- Multiple Sources: Support for multiple sources, such as webcams, microphones, and game captures.
- Scene Transitions: Scene transitions to smoothly switch between different layouts.
8.2. Video Editing Software
Video editing software is essential for editing and repurposing your Twitch VODs. Popular options include Adobe Premiere Pro, Final Cut Pro, and DaVinci Resolve.
Features to Look For:
- Multi-Track Editing: Multi-track editing to combine video, audio, and graphics.
- Color Correction: Color correction tools to enhance the visual quality of your videos.
- Special Effects: Special effects to add visual flair to your videos.
8.3. Audio Editing Software
Audio editing software is essential for cleaning up and enhancing the audio in your Twitch VODs. Popular options include Audacity, Adobe Audition, and GarageBand.
Features to Look For:
- Noise Reduction: Noise reduction tools to remove background noise and hum.
- EQ and Compression: EQ and compression tools to balance and enhance the audio levels.
- Audio Effects: Audio effects to add creative effects to your audio.
8.4. Thumbnail Creation Tools
Thumbnail creation tools are essential for creating attractive and eye-catching thumbnails for your Twitch VODs. Popular options include Adobe Photoshop, Canva, and GIMP.
Features to Look For:
- Templates: Pre-designed templates to quickly create professional-looking thumbnails.
- Text Tools: Text tools to add text and graphics to your thumbnails.
- Image Editing Tools: Image editing tools to enhance and manipulate your images.
8.5. Cloud Storage
Cloud storage services are essential for backing up and storing your Twitch VODs. Popular options include Google Drive, Dropbox, and OneDrive.
Features to Look For:
- Large Storage Capacity: Large storage capacity to store all your VODs.
- Automatic Syncing: Automatic syncing to keep your files backed up and up-to-date.
- File Sharing: File sharing options to easily share your VODs with others.
By using these essential tools, you can streamline your content creation process and effectively manage your Twitch broadcasts.
9. Legal Considerations for Saving Twitch Broadcasts
When saving and repurposing Twitch broadcasts, it’s crucial to be aware of and adhere to legal considerations to avoid potential issues.
9.1. Copyright Law
Copyright law protects original works of authorship, including music, videos, and other content. Using copyrighted material in your streams without permission can lead to copyright strikes or takedowns. According to the U.S. Copyright Office, copyright protection exists from the moment the work is created in fixed form.
Best Practices:
- Use Royalty-Free Content: Use royalty-free music and content from sources like Epidemic Sound or Artlist.
- Obtain Permissions: Obtain permission from copyright holders before using their content in your streams.
- Fair Use: Understand the concept of fair use, which allows limited use of copyrighted material for purposes such as criticism, commentary, news reporting, teaching, scholarship, and research.
9.2. Twitch’s Terms of Service
Twitch has specific terms of service that all users must adhere to. Violating these terms can result in account suspension or termination. Twitch’s Terms of Service outline acceptable conduct and content standards on the platform.
Key Considerations:
- Content Restrictions: Be aware of content restrictions, such as prohibitions on hate speech, harassment, and illegal activities.
- Community Guidelines: Follow Twitch’s community guidelines to ensure a positive and respectful environment for viewers.
- DMCA Compliance: Comply with the Digital Millennium Copyright Act (DMCA) by promptly addressing any copyright infringement claims.
9.3. Privacy Laws
Privacy laws protect the personal information of individuals. Be mindful of privacy laws when streaming and avoid sharing sensitive information about yourself or others. The Privacy Act of 1974 governs the collection, use, and disclosure of personal information by federal agencies.
Best Practices:
- Obtain Consent: Obtain consent from individuals before sharing their personal information in your streams.
- Anonymize Data: Anonymize data whenever possible to protect the privacy of individuals.
- Review Privacy Policies: Review the privacy policies of Twitch and any third-party services you use to understand how your data is being collected and used.
9.4. Disclosure Requirements
When promoting products or services on your channel, be transparent with your viewers about any sponsorships or affiliate relationships. The Federal Trade Commission (FTC) has specific guidelines for disclosing endorsements and affiliate links.
Best Practices:
- Use Clear Disclosures: Use clear and conspicuous disclosures to inform viewers about your sponsorships or affiliate relationships.
- Follow FTC Guidelines: Follow the FTC’s guidelines for endorsements and testimonials to ensure compliance.
- Be Honest and Transparent: Be honest and transparent with your viewers about your relationships with brands.
By adhering to these legal considerations, you can protect yourself from potential legal issues and maintain a positive reputation in the streaming community.
10. Savewhere.net: Your Partner in Streaming Success
At savewhere.net, we are committed to helping you achieve your streaming goals. We provide valuable resources, tips, and strategies to help you manage your Twitch broadcasts effectively and maximize your content’s value. Savewhere.net offers insights into financial management, streaming tips, and ways to optimize your content for different platforms, contributing to your overall financial wellbeing.
10.1. Tips and Strategies
We offer a wide range of tips and strategies to help you succeed on Twitch, including:
- Content Creation: Tips for creating engaging and high-quality content.
- Audience Engagement: Strategies for building a loyal and engaged audience.
- Monetization: Tips for monetizing your Twitch channel and generating revenue.
- Legal Compliance: Guidance on legal considerations for streaming.
10.2. Exclusive Offers and Discounts
We partner with leading brands and services to bring you exclusive offers and discounts on streaming tools and resources. This collaborative approach helps streamers access essential resources at reduced costs.
10.3. Community Support
Join our community of streamers to connect with like-minded individuals, share tips and strategies, and get support and encouragement. Savewhere.net fosters a supportive environment where streamers can collaborate, share experiences, and learn from each other.
10.4. Stay Updated
Stay up-to-date with the latest news, trends, and best practices in the streaming industry by following our blog and social media channels. Savewhere.net provides timely updates and actionable insights to help streamers stay ahead of the curve.
By partnering with savewhere.net, you can gain access to the resources, tools, and support you need to thrive on Twitch.
Address: 100 Peachtree St NW, Atlanta, GA 30303, United States.
Phone: +1 (404) 656-2000.
Website: savewhere.net.
FAQs About Saving Twitch Broadcasts
1. Are Twitch VODs saved automatically?
Yes, Twitch VODs can be saved automatically if you enable the “Store past broadcasts” option in your settings. This ensures your streams are recorded and available for later viewing.
2. How long does Twitch store VODs?
Twitch stores VODs for 14 days for regular channels. Twitch Partners, Affiliates, and users with Twitch Prime or Turbo subscriptions have their VODs stored for 60 days.
3. How do I download my Twitch streams?
To download your Twitch streams, go to your profile, select “Video Producer,” find the VOD you want to download, click the “More options” button, and choose “Download.”
4. Can I repurpose my Twitch broadcasts for other platforms?
Yes, you can repurpose your Twitch broadcasts by creating highlight reels, tutorials, and sharing clips on social media. This helps expand your reach and engage a wider audience.
5. What are the legal considerations for saving Twitch broadcasts?
Legal considerations include copyright law, Twitch’s terms of service, privacy laws, and disclosure requirements. Be sure to use royalty-free content and obtain necessary permissions.
6. What tools do I need to manage my Twitch broadcasts?
Essential tools include streaming software (OBS Studio), video editing software (Adobe Premiere Pro), audio editing software (Audacity), thumbnail creation tools (Canva), and cloud storage (Google Drive).
7. How can I monetize my Twitch VODs?
You can monetize your Twitch VODs through subscriptions, donations, ad revenue, sponsorships, and affiliate marketing. Joining the Twitch Affiliate or Partner program is the first step.
8. What is the best way to optimize my Twitch channel for VOD viewership?
Optimize your channel by creating compelling titles and descriptions, using attractive thumbnails, organizing VODs into playlists, promoting VODs on social media, and engaging with viewers in the comments.
9. How does Savewhere.net help with managing Twitch broadcasts?
Savewhere.net provides valuable resources, tips, and strategies for managing your Twitch broadcasts effectively. This includes guidance on content creation, audience engagement, monetization, and legal compliance.
10. What are some challenges in saving Twitch broadcasts and how can I overcome them?
Challenges include storage limitations, time commitment, technical issues, and copyright concerns. Overcome these by downloading regularly, using external storage, outsourcing editing, and ensuring legal compliance.
Remember, managing your Twitch broadcasts effectively can enhance your streaming career and help you reach a wider audience. Explore savewhere.net for more tips and resources to help you succeed.