Installing curtain rods might seem like a straightforward task, but knowing precisely Where To Hang Curtain Rods can dramatically impact the look and feel of your room. It’s not just about functionality; the height and width at which you mount your curtain rods play a crucial role in enhancing your windows and the overall aesthetics of your space. We recently tackled a project involving numerous window treatments in our duplex, and we discovered a simple yet effective technique to ensure level and equally spaced curtain rods every time. This guide will walk you through the best practices for where to hang curtain rods, promising to simplify your curtain installation and elevate your home decor effortlessly. Plus, we’re excited to share our totally free trick to speed up the process!
For our recent installations, we opted for budget-friendly curtain rods similar to these, readily available at most major retailers, and paired them with versatile ring clips. To keep costs down without sacrificing style, we also utilized affordable $14 white Ikea curtain panels, employing our go-to method for making Ikea curtains appear more luxurious. By combining these smart strategies, we achieved significant savings throughout the entire house.
Before we delve into the “how-to,” let’s address the fundamental question: where exactly should your curtain rods be positioned? Here are some essential curtain placement guidelines:
How HIGH Should You Hang Curtain Rods?
While there’s no rigid rule engraved in stone, the consensus among design enthusiasts is that curtains look most sophisticated when hung HIGH AND WIDE. Think of it as a mantra: higher and wider than the window itself. This approach is not merely about aesthetics; it’s about creating an optical illusion. Hanging curtains higher than the window frame makes your windows appear larger and more imposing, simultaneously adding a sense of height to your room, drawing the eye upward and making the space feel more expansive. In the image below, showcasing a room with 9-foot ceilings, you can observe how elevating the curtain rods allows the window trim to have breathing room and encourages the eye to travel seamlessly from the floor to the near-ceiling height of the curtains.
 Beach house living room featuring tall white curtains on three windows, enhancing the room's height and spaciousness.
sofa | side table | coffee table | rug | bookcase | lamps | wall: SW White Heron | trim: SW Stone Isle
Relating to floor level, design experts generally recommend that curtains should either touch or almost touch the floor. Preferences vary; some prefer a slight hover above the floor, while others opt for a dramatic fabric pooling effect at the base. Our preference leans towards a gentle graze of the floor, as demonstrated in our showhouse dining room. We find this subtle contact helps maintain the curtains’ position and prevents excessive movement.
The precise placement of your curtain rod is influenced by several elements such as ceiling height, curtain length, and the style of your trim and molding. Therefore, a definitive measurement applicable to every scenario is elusive. However, as a general guideline, we typically position our curtain rods approximately 3-4 inches below the ceiling. In rooms with crown molding, we adjust this to 3-4 inches below the bottom edge of the crown molding. This placement ensures that the entire curtain rod, including the finials, resides comfortably within the painted area between the window and the ceiling line.
A critical point to remember is that curtain rod height should be determined in relation to the ceiling, not the window. The common misconception that curtains must align with the window frame often leads to hanging curtains too low, diminishing the potential for height and grandeur.
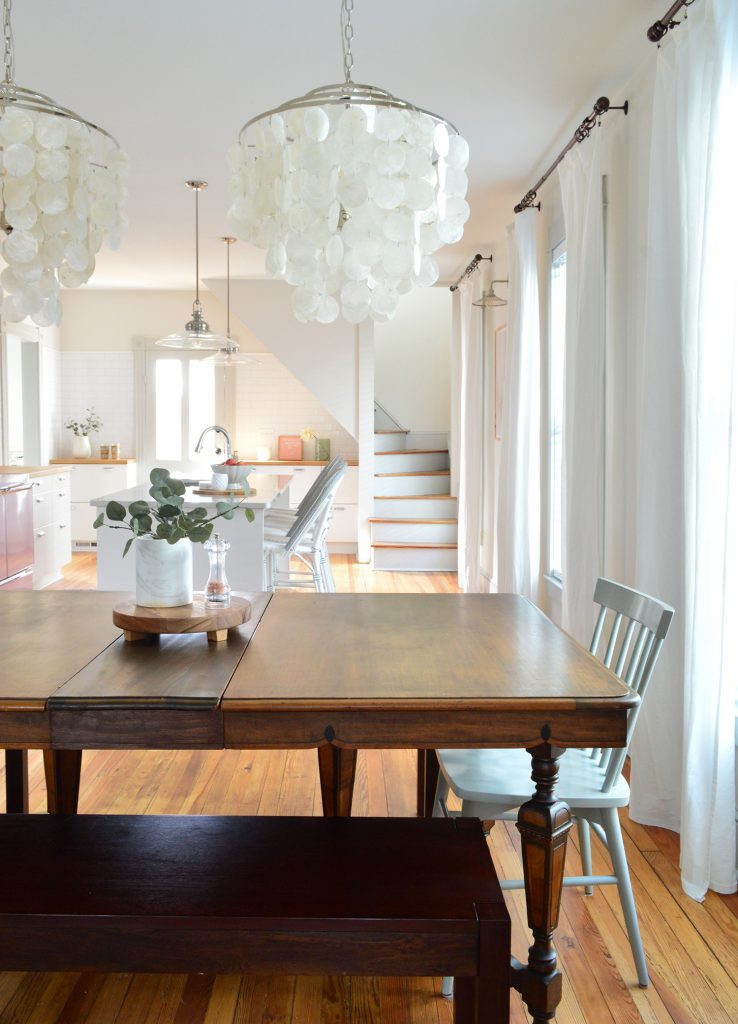 Dining room in a beach house showcasing a row of curtains hung with dark bronze rods, positioned high to accentuate ceiling height.
capiz chandeliers | benches | chair | marble vase | stools | pendants | sconces
However, practical considerations sometimes necessitate adjustments. For instance, if your window trim is situated very close to the crown molding or ceiling, the 3-4 inch buffer might not be feasible, as illustrated in the following image.
Additionally, rooms with exceptionally high ceilings or sloped ceilings present unique scenarios. In such cases, you’ll need to exercise your judgment, as determining curtain rod height relative to the ceiling might not be applicable.
 Curtain examples in a showhouse with a vaulted ceiling, demonstrating adjustments needed for unique architectural spaces.
Ultimately, our preferred method for confirming the ideal curtain height involves a visual check. Hold up half of the curtain rod with a curtain panel temporarily attached and have someone step back to assess the overall look. This should be done after you’ve washed, ironed, and prepped your curtains to account for any changes in length, but before hemming, as hemming should be finalized once the curtains are hung to ensure perfect length.
How WIDE Should You Hang Curtains?
Similar to height, deciding how wide to hang curtain rods depends on various factors, including window size, adjacent wall features (especially other windows), and your desired fullness of the curtain panels. Generally, we aim to position the rod brackets approximately 8-11 inches beyond the outer edge of the window trim.
By extending the curtain rod beyond the window trim, you subtly expose the wall and create the illusion of wider windows. Essentially, the curtain panels should hang primarily against the wall adjacent to the window, NOT directly in front of the window. Hanging curtains directly over the window can make it appear smaller and obstruct valuable natural light. This wider placement makes a significant positive difference in both perceived window size and room brightness.
sofa | side table | coffee table | rug | lamps | media cabinet
In situations where two windows are closely spaced, like in our bedroom example below, you might need to reduce the 8-11 inch extension from the window trim. Conversely, in scenarios where you’re aiming to fill a large expanse of wall space, extending the curtain rod even wider can be advantageous.
 Master bedroom featuring two windows on one wall, with curtain rods placed to visually connect the windows and enhance the wall space.
bed | nightstand | armchair | dresser | floor lamp |chandelier
You can even strategically adjust the width, hanging the rod wider on one side than the other to visually correct a window that’s not centered on the wall. This technique, further discussed here, can make a remarkable difference in room symmetry. Ultimately, flexibility is key when determining curtain rod width.
Our Easy Curtain Hanging Trick (On Video)
Once you have determined your ideal width (distance from the window trim) and height (distance from the ceiling), our simple trick becomes incredibly useful. John demonstrates the entire process in the video below, offering a visual guide to our efficient method. While photos follow the video, we highly recommend watching the video to fully grasp the technique.
NOTE: You can also view the video on YouTube here.
Tools & Materials Needed
Beyond your curtain rod and the standard mounting hardware (brackets, screws, wall anchors), you’ll only need a few readily available items to expedite the installation:
- Power drill
- Small drill bit (e.g., 3/32″) for pilot holes
- Larger drill bit (e.g., 3/16″) for wall anchor holes
- Tape measure or ruler
- Pen or pencil
- Scrap cardboard (packaging from curtain panels works perfectly)
- Stool or stepladder
How to Hang Curtain Rods
Here’s a concise overview of the steps we’ll cover to guide you on where to hang curtain rods effectively:
- Determine measurements
- Create a cardboard template
- Drill pilot holes
- Drill larger holes & insert anchors
- Install curtain brackets
- Mount rod & add curtain panels
Step 1: Determine Your Measurements
To begin, temporarily hold a curtain panel on the rod to visually assess the optimal placement. Then, position the curtain rod bracket against the wall at your desired spot to take precise measurements. Using a tape measure, determine your preferred distance from the outside edge of the window frame (in our case, a specific 10.5 inches) and the distance down from the ceiling (we chose 3 inches). These measurements should be taken to the top screw hole of the rod bracket, as this point dictates where you’ll need to drill.
Step 2: Make A Cardboard Template
Utilize a piece of scrap cardboard to create your template. Mark your desired width measurement (e.g., 10.5 inches) from both sides of the cardboard and your height measurement (e.g., 3 inches) down from the top edge. Repurposing the cardboard from your curtain packaging is an excellent, eco-friendly option. After marking these lines, align the curtain rod bracket with the marked points and indicate the locations of the two screw holes on BOTH 10.5-inch marks.
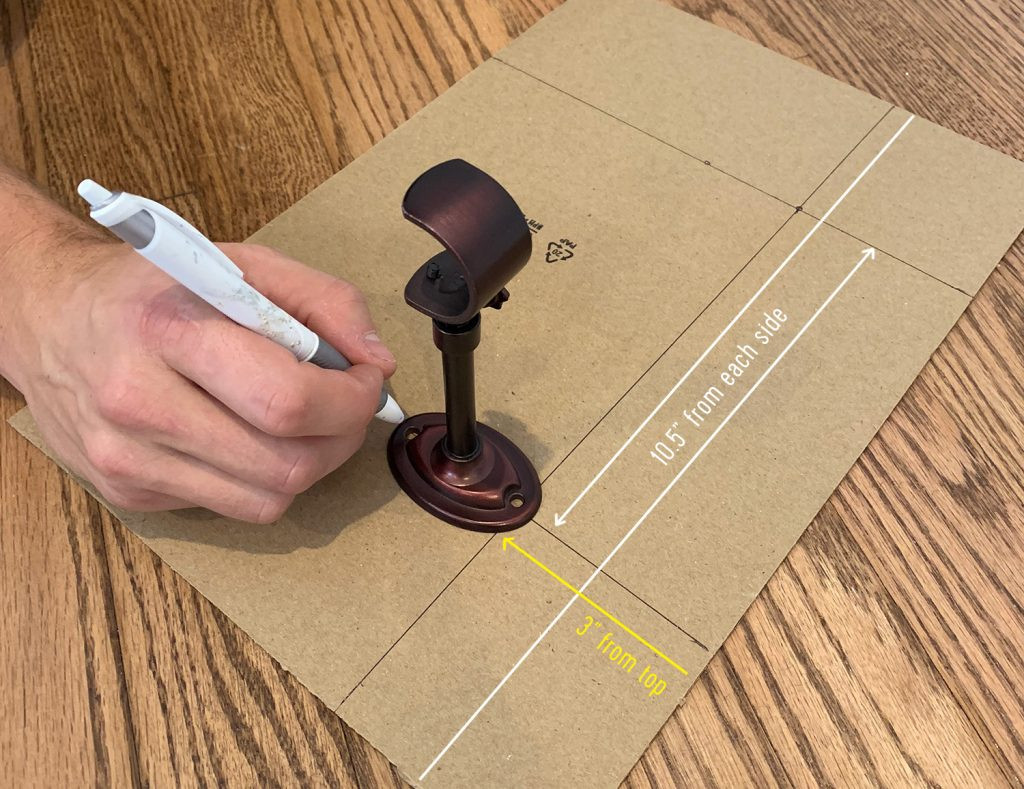 Cardboard template marked with measurements for hanging curtain rods, showing screw hole positions.
Step 3. Drill Pilot Holes
Equip your power drill with a small pilot drill bit (we used a 3/32″ bit). Position your cardboard template above the window, ensuring the top edge is flush against the ceiling and the side edge aligns with the outer edge of the window frame. Drill pilot holes through the screw hole markings on your template.
A crucial note regarding levelness: ceilings are not always perfectly level, especially in older homes. However, when hanging curtains close to the ceiling, it’s often visually preferable for the rod to follow any slight ceiling slope. This alignment usually appears more level to the eye than a perfectly leveled rod against an uneven ceiling. Thus, a level is not necessary for this method.
Quick Tip: Addressing Sloped Ceilings
If you have sloped ceilings, don’t worry! When mounting curtain rods near the ceiling, aligning the rod with the ceiling’s slope is actually advantageous. The ceiling serves as the closest visual reference for a straight line, making the rod appear level even if it isn’t perfectly so. A perfectly leveled rod next to a sloped ceiling might actually look askew or emphasize the ceiling’s unevenness. Therefore, using the ceiling as your guide works surprisingly well, especially in homes with less-than-perfect ceilings.
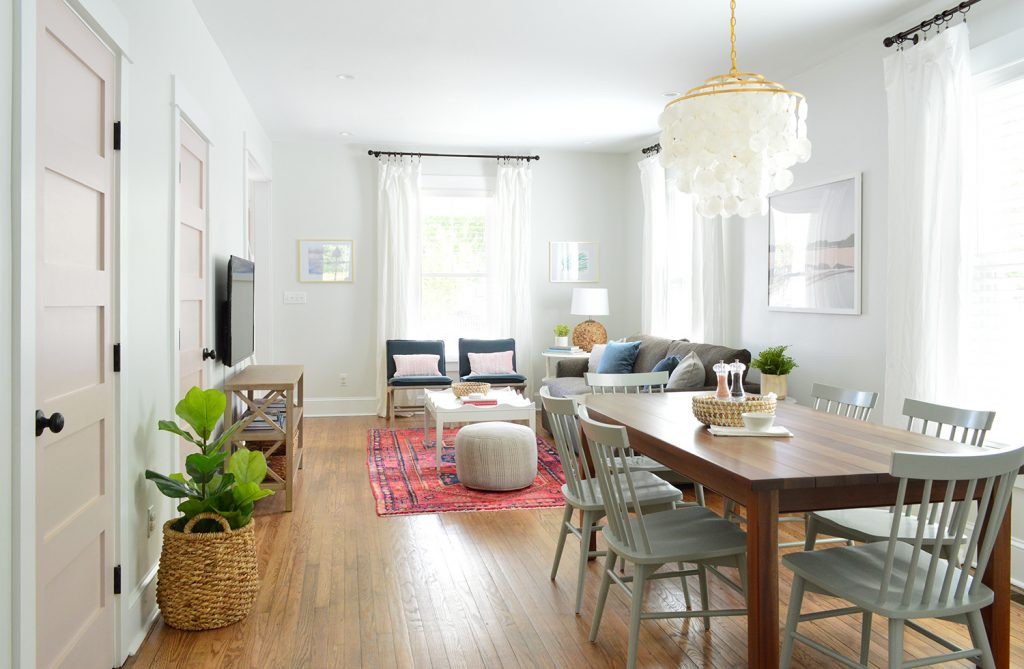 Bright beach house living and dining room with pink doors, showcasing curtains hung to complement the architectural lines, even with a potentially uneven ceiling.
Step 4. Drill Larger Holes & Add Anchors
After drilling pilot holes on the opposite side of the window using the other half of your template (remember marking 10.5 inches from both sides?), proceed to enlarge the pilot holes. If you encounter studs while drilling, skip to the next step, as studs provide solid support and negate the need for anchors. Otherwise, you’ll need to use wall anchors, typically included with your curtain rod hardware.
Replace your pilot drill bit with a larger bit that matches your anchors’ size (ours required a 3/16″ bit). Drill into each pilot hole to create larger holes suitable for the anchors. The cardboard template cleverly catches drywall dust, minimizing cleanup.
With all anchor holes drilled, gently tap the anchors into place using a hammer or mallet. If the anchors push in too easily by hand, the holes are likely too large. In this case, switch to a smaller drill bit or maintain a steadier hand while drilling. Loose anchors can compromise the stability of your curtain rod, potentially causing it to sag or detach from the wall over time.
Step 5. Install Your Curtain Brackets
The remaining steps are quite straightforward. Hammer in your anchors fully and secure the curtain rod brackets to the wall using the provided screws. Our video demonstration shows this entire process in real-time, highlighting just how quickly it all comes together.
 Attaching a curtain rod bracket to the wall using a power drill, demonstrating the ease of installation.
Step 6. Add Your Rod & Curtain Panels
With both brackets securely mounted, you can now hang your curtain rod, ideally with your curtain panel already attached. At this stage, your basic installation is complete, unless your curtain panels require hemming. Or, for a quick fix, you can cleverly conceal any excess length behind furniture, as we’ve done in the past!
Bonus Tip: Correct Any Rod Sagging
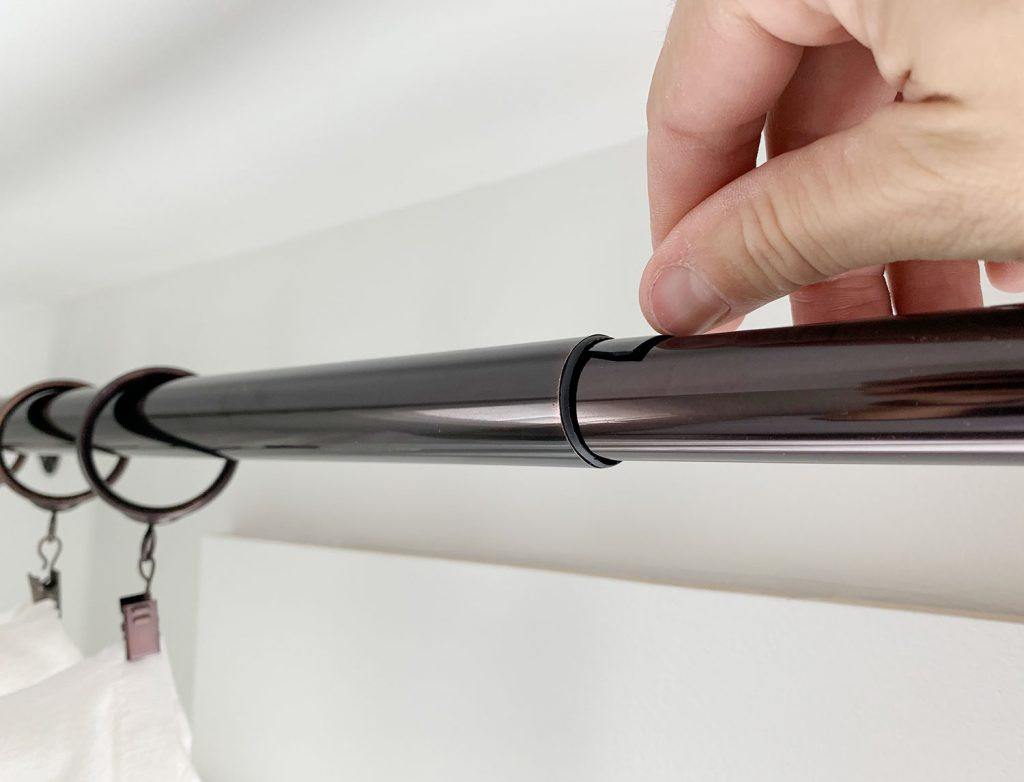
Depending on the length and construction of your curtain rod, you might observe a slight sag in the middle, particularly at the connection point of rod segments. While some curtain rod sets include a third, center bracket to address this, it’s often unnecessary for moderately sized windows. We rely on a somewhat unconventional yet effective hack instead.
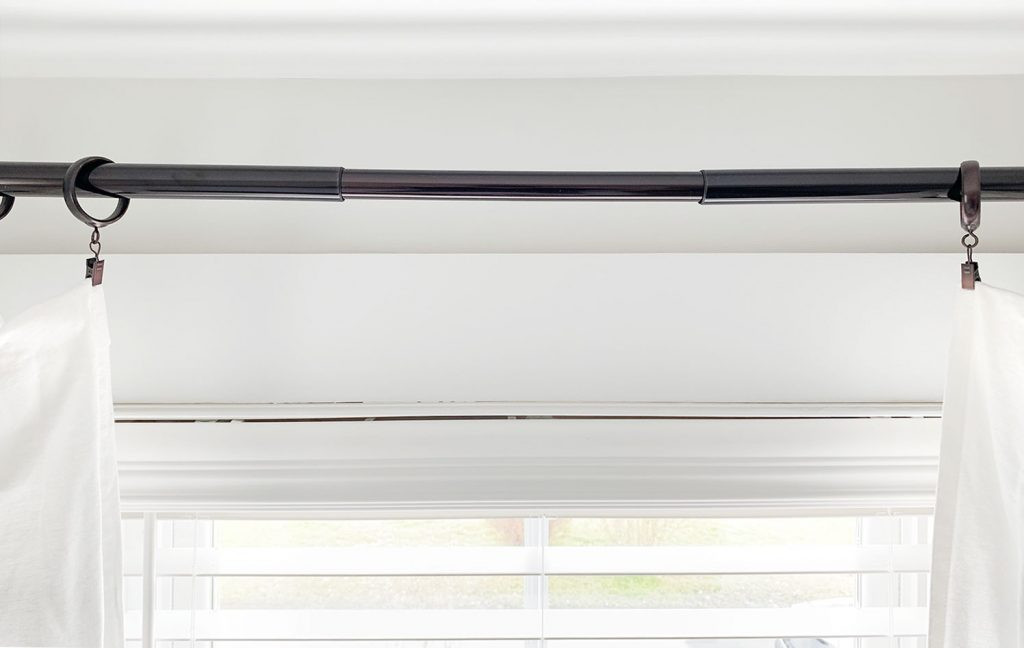 Curtain rod sagging in the middle, highlighting a common issue with longer rods.
First, take the protective plastic end caps that come with the curtain rods (these are typically part of the packaging) and use a utility knife or scissors to cut off small slices.
Then, wedge a piece of this plastic inside the curtain rod at the sagging connection point. Crucially, position the plastic piece on the TOP side of the rod. If it doesn’t slide in completely, slightly rotate the rod to conceal the plastic from view. Since the top of the rod is rarely visible, this minor adjustment remains unnoticed.
 Plastic piece inserted into a curtain rod to eliminate sagging, demonstrating a simple and free solution.
This may seem like an unusual fix, but it effectively eliminates minor rod sagging, resulting in a much neater and more polished appearance. It’s a free and resourceful solution that we highly recommend.
More Curtain Hanging Advice
For further insights, explore our tips on hanging inexpensive white curtains and elevating their appearance to achieve a more high-end look.
If the idea of curtains still feels overwhelming, remember that curtains aren’t always mandatory. We’ve also created a guide on when curtains might not be necessary in a room, offering alternative window treatment ideas. Spoiler alert: some spaces are best left without curtains altogether!
P.S. Curious about where we sourced something in our home or the paint colors on our walls? *Click here***. We’ve also compiled a comprehensive master list of sources & paint colors for the beach house for you. And we’re currently developing a source list for the duplex—it’s still a work in progress, but many items are already listed on this page**, with more updates to come.
*This post contains affiliate links*