
Achieving a radiant and healthy-looking complexion often comes down to mastering the art of highlighting. This transformative makeup product can instantly brighten your face, accentuate your best features, and give you that coveted “lit-from-within” glow. If you’ve ever wondered Where Do I Put Highlighter for the most flattering effect, you’re not alone. Many makeup enthusiasts, from beginners to seasoned pros, seek to perfect their highlighting technique.
Whether you’re new to the world of highlighter or looking to refine your application skills, this guide will provide you with expert tips and easy-to-follow tricks to master the glowing art of highlighting. Get ready to elevate your makeup routine and unlock a new level of radiance!
What is Makeup Highlighter?
Makeup highlighter is a cosmetic product specifically formulated to enhance your skin’s natural luminosity. It works by catching and reflecting light, drawing attention to the areas where it’s applied. The primary goal of a highlighter is to mimic the way light naturally hits your face, creating a more sculpted, youthful, and vibrant appearance. By strategically applying highlighter, you can make your skin appear healthier, dewier, and more radiant overall.
Understanding where to put highlighter is crucial for achieving the desired effect. It’s about knowing which areas of your face naturally catch light and using the highlighter to amplify that natural glow. Whether you prefer a subtle shimmer for everyday wear or a more intense glow for special occasions, highlighter is a versatile tool that can be incorporated into any makeup routine.
Why Use Makeup Highlighter?
Makeup highlighter is more than just a shimmer product; it’s a powerful tool that serves several key purposes in enhancing your overall makeup look. Understanding these benefits will help you appreciate why knowing where do i put highlighter is so important.
Accentuating Your Best Facial Features
The main purpose of highlighter is to draw attention to the high points of your face. These are the areas that naturally catch light, such as your cheekbones, brow bones, and the bridge of your nose. By applying highlighter to these areas, you bring them forward, making them appear more prominent and sculpted. When combined with contouring, highlighting can create a beautifully defined and balanced facial structure, enhancing your natural beauty.
Creating a Youthful and Healthy Glow
One of the most sought-after benefits of highlighter is its ability to impart a youthful and healthy glow to your skin. Highlighter adds a touch of dewiness and luminosity, making your complexion look fresh, vibrant, and revitalized. This is particularly beneficial for mature skin, as it can help counteract dullness and restore a youthful radiance. Knowing where to put highlighter for a mature face is key to achieving a subtle yet effective glow without emphasizing fine lines.
Balancing Your Overall Makeup Look
Highlighter plays a crucial role in balancing your makeup, especially when used in conjunction with contour. While contouring adds depth and shadow to sculpt and define, highlighter brings light and dimension back to the face. This interplay of light and shadow creates a harmonious and well-rounded makeup look. By strategically placing highlighter, you can ensure that your makeup doesn’t look flat or one-dimensional.
Adding Radiance for Any Occasion
Whether you’re aiming for a subtle daytime glow or a glamorous evening look, highlighter is your go-to product for adding radiance. It’s incredibly effective in photos and under various lighting conditions, making your skin look luminous and healthy. A touch of highlighter can instantly elevate your look, making you appear more polished and put-together, whether you’re heading to the office or out for a special event.
Enhancing Makeup Versatility Beyond the Face
The versatility of highlighter extends beyond just the face. You can use it to add a touch of shimmer to other areas like your collarbones, shoulders, and even eyelids. This makes it a multi-purpose product that can seamlessly transition from daytime to nighttime looks and can be used to enhance various aspects of your overall appearance. For example, highlighting your collarbones can add a beautiful definition when wearing off-shoulder tops or dresses.
For anyone new to highlighting, the initial question is often where to put highlighter makeup to achieve the best results. With a bit of practice and understanding of your face shape and features, you’ll find that incorporating highlighter into your routine can be a game-changer, adding a touch of magic to your everyday makeup.
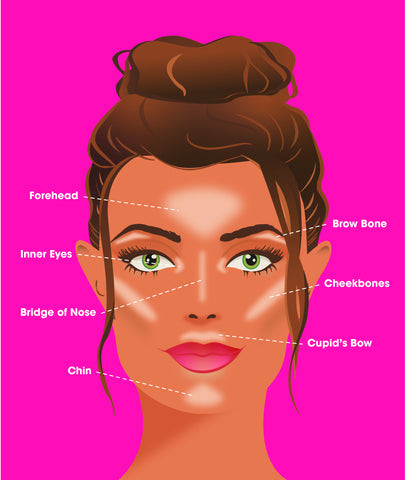
Where to Apply Highlighter for a Perfect Glow?
Understanding where to put highlighter makeup is the most important step in achieving a flawless, radiant glow. Highlighter is designed to mimic natural light reflection on your face, so applying it to the right spots is key to enhancing your features and creating a luminous effect. If you’re wondering about specific areas like “where do i put blush and highlighter?”, remember that highlighter typically goes above blush on the cheekbones. Here’s a detailed guide to the best placement for your face highlighter:
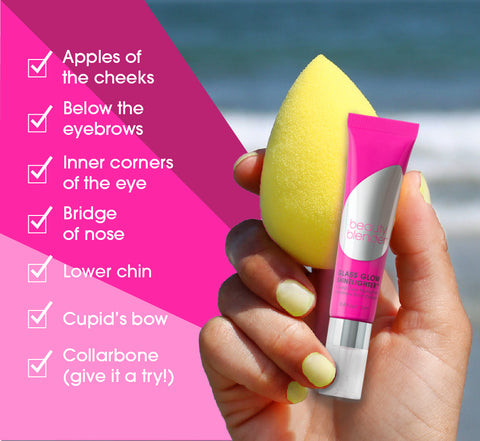
Cheekbones
The cheekbones are arguably the most popular and effective spot for highlighter application. Applying highlighter to the tops of your cheekbones, just above where you apply blush, will instantly lift and accentuate your face. This placement catches the light beautifully, creating a youthful, sculpted, and dewy glow. When people talk about the “best highlighter placement,” cheekbones are almost always the first area mentioned.
Brow Bones
Applying a subtle touch of highlighter just below your eyebrows, along the brow bone, is a fantastic way to define your brows and open up your eyes. This technique creates a lifting effect, making your eyes appear larger, brighter, and more awake. A light shimmer in this area also adds dimension to your eye makeup and enhances your overall eye look.
Bridge of the Nose
Highlighting the bridge of your nose can help elongate your face and create a refined, sculpted appearance. Applying a thin, delicate line of highlighter down the center of your nose from the bridge to just before the tip can create the illusion of a longer, more slender nose. For a natural glow, it’s best to use a lightweight and finely milled face highlighter to avoid an overly stark or artificial look.
Cupid’s Bow
A touch of highlighter on the cupid’s bow – the V-shaped area just above your upper lip – is a simple yet incredibly effective way to make your lips appear fuller and more defined. This small dab of shimmer catches the light and creates the illusion of a more pronounced pout, adding dimension and enhancing your lip shape. It’s a favorite trick among makeup artists for achieving a naturally plump-looking lip.
Inner Corners of the Eyes
Brightening the inner corners of your eyes with highlighter is a makeup artist secret for instantly looking refreshed and wide awake. Applying a small amount of highlighter to this area can dramatically brighten your entire face and counteract signs of fatigue. This trick is especially useful for creating a bright, youthful appearance, even after a long night or early morning.
Chin
Dabbing a small amount of highlighter on the center of your chin can add balance and symmetry to your face. This subtle touch of glow helps to tie your entire makeup look together, creating a harmonious and radiant finish. It’s a less common but equally effective placement for adding overall luminosity to the face.
Collarbones and Shoulders
Highlighter isn’t limited to just your face! For special occasions or when wearing outfits that expose your décolletage, applying highlighter to your collarbones and shoulders can add a beautiful touch of shimmer and definition. This is particularly stunning in evening light or for events where you want to showcase a glamorous, all-over glow.
By understanding where to use highlighter makeup and experimenting with these different placements, you can truly transform your makeup and enhance your natural beauty. Practice applying highlighter to each of these areas to discover what works best for your face shape and desired look.
 where to put highlighter
How to Apply Highlighter Like a Pro?
Knowing how to apply a highlighter is just as important as knowing where to place it. The right application technique can make the difference between a subtle, natural glow and an overdone, artificial shimmer. Whether you’re wondering “how to apply highlighter stick” or powder, these step-by-step guidelines will help you achieve a professional-quality finish:
Prep Your Skin for a Smooth Application
A well-prepped base is absolutely crucial for flawless highlighter application. Start with a clean, moisturized face and follow with a primer. Primer creates a smooth canvas, filling in pores and fine lines, which allows the highlighter to blend seamlessly and last longer. Proper skin prep ensures that your highlighter doesn’t look patchy or uneven.
Know Precisely Where to Use Highlighter Makeup
Reiterating where to use highlighter makeup is essential. Remember to focus on the high points of your face where light naturally reflects:
- Cheekbones: Sweep highlighter on the tops of cheekbones for a lifted effect.
- Brow Bones: Apply a small amount under eyebrows to define and brighten eyes.
- Bridge of the Nose: Add a thin line down the center for a sculpted nose.
- Cupid’s Bow: Highlight above the upper lip for fuller-looking lips.
- Inner Corners of the Eyes: Dab highlighter to brighten and awaken the eyes.
- Chin: Add a touch to the center of the chin for balance.
Use the Right Tools for Seamless Application
The tools you use significantly impact the application and finish of your highlighter. Choosing the right applicators can make the process easier and more precise:
- Makeup Sponges: A damp makeup sponge is excellent for blending liquid or cream highlighters into the skin for a seamless, natural glow. The dampness helps to sheer out the product and prevent harsh lines.
- Makeup Brushes: For powder highlighters, fan brushes or tapered brushes are ideal. Fan brushes provide a soft, diffused application, perfect for a subtle shimmer. Tapered brushes allow for more precise and targeted application, which is great for areas like the bridge of the nose or cupid’s bow.
Blend, Blend, Blend for a Natural Finish
Blending is the golden rule of highlighter application. After applying highlighter to your desired areas, gently blend the edges to eliminate any harsh lines or visible demarcation. Whether you’re using your fingers, a sponge, or a brush, ensure that the highlighter seamlessly transitions into the rest of your makeup. Proper blending is what makes your glow look natural and “lit-from-within.”
Set Your Glow for Longevity
To ensure your radiant glow lasts all day, set your highlighter. You can use a setting spray to lock everything in place and enhance the longevity of your makeup. Alternatively, a light dusting of translucent powder over the highlighter can also help to set it without dulling the shimmer. Setting your highlighter prevents it from fading, smudging, or migrating throughout the day.
Mastering how to use highlighter effectively is a journey of understanding your face, experimenting with different techniques, and finding what works best for you. By following these steps, you’ll be well on your way to achieving a radiant, professional-looking glow that enhances your natural beauty and elevates your entire makeup game.
 how to apply highlighter
Common Mistakes to Avoid When Using Highlighter
Highlighter is a fantastic tool, but it’s easy to fall into common pitfalls that can take your look from glowing to garish. Avoiding these mistakes is crucial for mastering highlighter and creating a flawless finish. Here are some common errors to be mindful of:
Applying Too Much Highlighter
One of the most frequent mistakes is over-application. Using too much highlighter can quickly shift your look from radiant to greasy or overly shiny. The key is to start with a small amount of product and build up the intensity gradually. Remember, less is often more when it comes to highlighter, especially for a natural, everyday look.
Using the Wrong Highlighter Shade
Choosing an inappropriate highlighter shade for your skin tone can result in an unnatural or unflattering look. Avoid shades that are too frosty, ashy, or mismatched to your complexion. The best highlighter shades complement your undertones and blend seamlessly into your skin. For fair skin, champagne or pearlescent shades often work well. For medium skin tones, gold or rose gold shades can be beautiful. And for deeper skin tones, bronze or copper shades can provide a stunning glow.
Skipping Proper Blending
Highlighter should look like a natural, seamless glow, not a harsh streak of shimmer sitting on top of your skin. Failing to blend your highlighter properly can leave visible lines and make your makeup look unfinished. Always take the time to blend the edges of your highlighter using a sponge, brush, or your fingertips until it melts into your skin.
Applying Highlighter to the Wrong Areas
Knowing where to put highlighter makeup is essential to avoid unflattering placement. Avoid applying highlighter to areas that don’t naturally catch light or areas where you have texture, such as the center of your cheeks (if you have prominent pores there) or forehead (if you’re prone to oiliness). Focus on the high points as outlined earlier for the most flattering results.
Forgetting Essential Skin Prep
Applying highlighter directly to dry or unprepped skin can lead to a patchy and uneven application. Always prep your skin with moisturizer and primer to create a smooth base. Primer is particularly important as it helps the highlighter glide on effortlessly and adhere evenly, preventing it from clinging to dry patches or emphasizing texture.
Not Considering Your Overall Makeup Look
Your highlighter should complement your entire makeup look. Avoid pairing an intensely glittery or blinding highlighter with very heavy contouring or bold eyeshadow, as this can easily become overwhelming and unbalanced. For a more cohesive and sophisticated effect, choose a highlighter intensity that aligns with the rest of your makeup. If you’re going for a natural makeup look, opt for a subtle, soft-focus highlighter.
Forgetting to Set Your Makeup for Longevity
Highlighter that isn’t set properly is prone to fading, smudging, or migrating throughout the day. To ensure your glow stays put, use a setting spray or a light dusting of translucent powder to lock it in. Setting your highlighter is especially important if you have oily skin or are wearing makeup for an extended period.
By being aware of these common mistakes and focusing on proper technique and placement, you can confidently use highlighter to enhance your features and achieve a radiant, natural-looking glow every time. Practice and experimentation are key to finding the perfect balance and mastering the art of highlighting for your unique skin and style.
FAQ About Highlighter Application
Do you apply highlighter before or after blush for the best effect?
For the most seamless and radiant look, always apply highlighter after blush. Applying blush first allows you to see where the color sits on your cheeks and then strategically place your highlighter just above the blush on the highest points of your cheekbones. This layering technique ensures that the highlighter stands out and adds a natural, luminous glow without overshadowing your blush. It also makes blending both products together much easier, resulting in a polished finish.
Where do you put highlighter on a mature face to look youthful?
On mature skin, the key is to apply highlighter sparingly and strategically to avoid accentuating fine lines and wrinkles. Focus on areas that still retain their youthful structure, such as the tops of the cheekbones, the brow bones, and the bridge of the nose. Opt for creamy or liquid formulas, as they tend to blend more seamlessly into mature skin and provide a dewy, hydrating finish rather than settling into lines like some powder highlighters can. Avoid using highlighter on areas with texture or wrinkles, and choose subtle, soft-shimmer highlighters over glittery or chunky formulas for a more refined and youthful glow.
Do you use highlighter before or after foundation for optimal luminosity?
Generally, highlighter is applied after foundation. Foundation creates an even base and evens out skin tone, providing a smooth canvas for highlighter. Applying highlighter after foundation allows it to sit beautifully on top of your base makeup, maximizing its luminosity and ensuring it stands out. However, for an all-over subtle radiance, you can mix a liquid highlighter with your foundation before applying it. This technique provides a more diffused, “lit-from-within” glow rather than targeted highlight.
What is the absolute best way to apply highlighter for a flawless finish?
The best way to apply highlighter for a flawless finish involves several key steps: start with well-prepped skin, focus application on the high points of your face (cheekbones, brow bones, nose bridge, cupid’s bow, inner corners of eyes, and chin), use appropriate tools like damp makeup sponges or soft brushes for blending, and always blend thoroughly to eliminate harsh lines. Build up the intensity gradually, starting with a small amount of product and adding more if desired. Finally, set your highlighter with setting spray or translucent powder to ensure longevity. Practice and a light hand are your best allies in achieving a flawless highlighter application.
Which type of highlighter is best for achieving a gorgeous, radiant glow?
The “best” type of highlighter for a gorgeous glow depends on your skin type, desired intensity, and personal preference. Cream and liquid highlighters are excellent for achieving a dewy, natural, and hydrated-looking glow, especially on dry or mature skin. Powder highlighters, particularly finely milled ones, are versatile and buildable, offering a range from subtle shimmer to intense radiance, and are generally suitable for all skin types. Consider your skin type and the kind of glow you’re aiming for when choosing between cream, liquid, or powder formulas.
What exactly does a highlighter do for your face in terms of makeup effect?
Highlighter’s primary function is to enhance your face by reflecting light off the high points. This creates the illusion of dimension, lift, and radiance. It makes areas like your cheekbones appear more prominent, your eyes brighter, and your overall complexion more youthful and healthy-looking. Highlighter complements contouring by bringing light to the areas that contour recedes, creating a sculpted and balanced facial structure. In essence, highlighter adds luminosity and vitality to your makeup, taking it from flat to dynamic and glowing.
What’s the best kind of highlighter to choose if you want a natural-looking glow?
For a natural-looking glow, opt for highlighters that have a subtle sheen rather than intense glitter or shimmer. Cream or liquid highlighters are often ideal for a dewy, skin-like finish, as they melt seamlessly into the skin. Look for lightweight, buildable formulas that allow you to control the intensity of the glow. Shades that are close to your skin tone or slightly lighter, with pearlescent or champagne undertones, tend to look the most natural. Finely milled powder highlighters with a soft, diffused finish can also work well for a natural glow, as long as they aren’t overly sparkly or metallic.
Mastering the art of highlighting is all about understanding where do i put highlighter and how to apply it effectively. By following these tips and practicing your technique, you’ll be able to achieve a radiant, glowing complexion that enhances your natural beauty and elevates your makeup look for any occasion.