Have you ever taken a screenshot on your Mac and then struggled to find it? You press Command-Shift-3 or Command-Shift-4, hear the camera shutter sound, but the image seems to vanish into thin air. You’re not alone. Many Mac users, especially those new to macOS or after system updates, find themselves asking: “Where Are Screenshots Saved?”
This guide will provide you with a clear and comprehensive answer to this question. We’ll explore the default screenshot location on your Mac, how to easily find your screenshots, and importantly, how to customize where your screenshots are saved. We’ll also touch upon troubleshooting common issues that might prevent you from finding your screenshots.
Default Screenshot Location on macOS
By default, macOS saves screenshots directly to your Desktop. This is the most common and convenient location for most users, allowing for quick access and easy organization of your captured images. When you take a screenshot using the standard keyboard shortcuts (Command-Shift-3 for the entire screen, or Command-Shift-4 for a selection), you should see a new file appear on your desktop named something like “Screenshot date at time.png”.
However, there are situations where your screenshots might not be saved to the desktop, leading to confusion and frustration. Let’s investigate how to find them and ensure they are saved where you expect them to be.
How to Find Your Screenshots
If you’ve taken a screenshot and don’t see it on your desktop, don’t worry, it’s likely still saved somewhere on your Mac. Here are a few methods to locate them:
Using Finder
Finder is your Mac’s built-in file manager and the most straightforward way to search for your screenshots:
- Open Finder: Click on the Finder icon in your Dock (it looks like a blue and white smiley face), or press Command-Space Bar and type “Finder” then press Enter.
- Navigate to Desktop: In the Finder window sidebar, click on “Desktop”.
- Search for “Screenshot”: In the Finder search bar in the top right corner, type “Screenshot”. This will filter the files on your Desktop to show all files with “Screenshot” in their name, which should include your missing screenshots.
- Sort by Date: To quickly find the most recent screenshots, click on the “Date Modified” column header to sort files by the date they were last changed, with the newest files at the top.
Using Spotlight Search
Spotlight is macOS’s powerful system-wide search tool, perfect for quickly finding files regardless of their location:
- Open Spotlight: Press Command-Space Bar.
- Type “Screenshot”: Start typing “Screenshot”. Spotlight will begin showing results as you type.
- Select “Show All in Finder”: At the bottom of the Spotlight results, you’ll likely see an option like “Show All in Finder…”. Click this. This will open a Finder window displaying all files on your Mac that match “Screenshot”, sorted by relevance. You can then further refine your search by sorting by date modified as described in the Finder method above.
Changing the Default Screenshot Location
If you prefer to save your screenshots to a different location than the Desktop, macOS offers a built-in way to change the default save folder. This is particularly useful if you want to keep your desktop clutter-free or automatically organize your screenshots into a specific folder.
Using the Screenshot App (Shift-Command-5)
The Screenshot app is the most user-friendly way to manage your screenshot settings, including changing the save location:
-
Launch the Screenshot App: Press Shift-Command-5. This will bring up a small toolbar at the bottom of your screen.
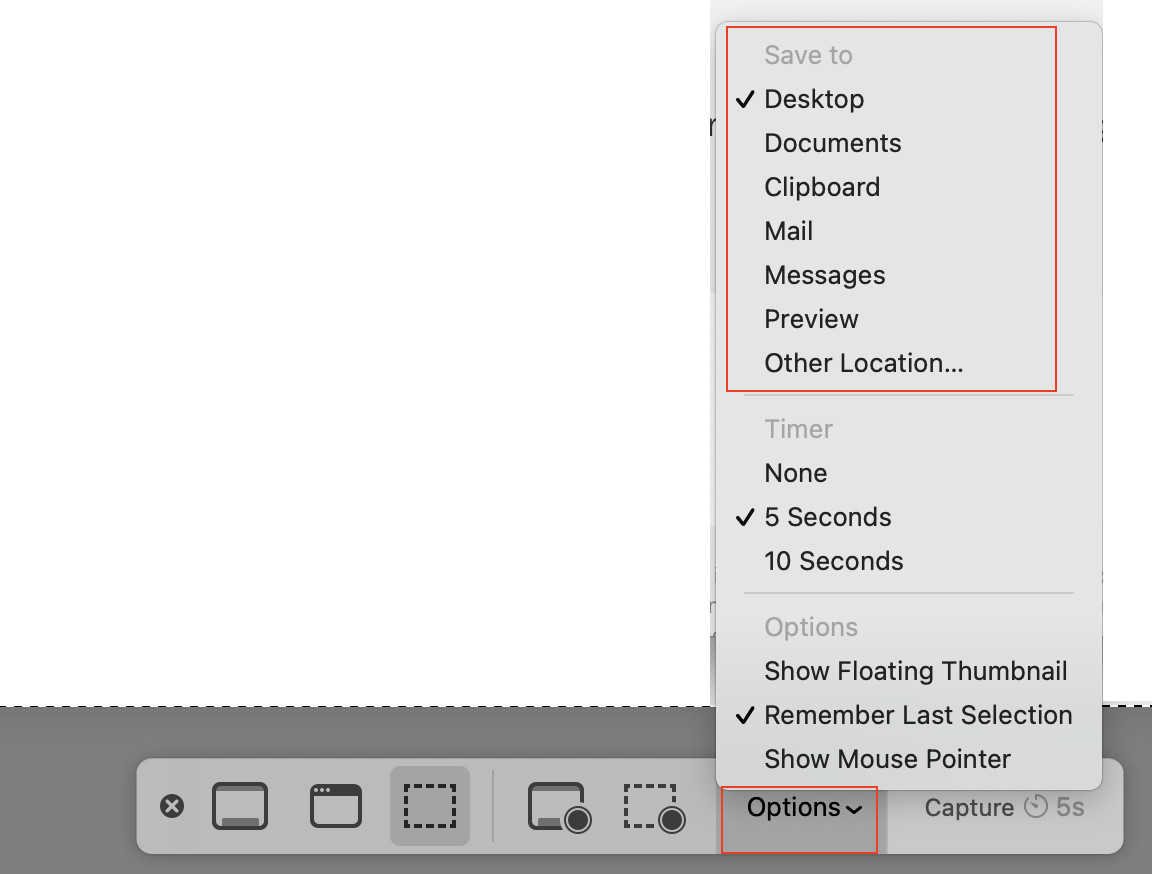 Screenshot App Options Menu
Alt Text: Screenshot app options menu in macOS showing the “Options” dropdown with “Save to” location settings.
-
Click “Options”: In the Screenshot app toolbar, click on the “Options” dropdown menu.
-
Choose “Save to”: In the “Options” menu, you’ll see a “Save to” section. Here you can select from several default locations like “Desktop”, “Documents”, “Clipboard”, “Mail”, or “Messages”.
-
Choose “Other Location”: To save screenshots to a custom folder, select “Other Location…” from the “Save to” menu. A Finder window will appear, allowing you to choose any folder on your Mac as the new default save location for screenshots. Navigate to your desired folder and click “Choose”.
From now on, any screenshots you take will be saved to the location you selected in the Screenshot app options. This setting will persist even after restarting your Mac, until you change it again.
Using Terminal Commands (Advanced)
For users comfortable with the command line, you can also change the screenshot save location using Terminal. This method offers more flexibility but requires careful execution of commands.
-
Open Terminal: Open the Terminal application, found in Applications > Utilities.
-
Use the
defaults writecommand: To change the save location, you’ll use thedefaults writecommand followed by the necessary arguments. For example, to set the save location to a folder named “Screenshots” within your “Pictures” folder in your home directory, you would use the following command:defaults write com.apple.screencapture location ~/Pictures/ScreenshotsExplanation:
defaults write com.apple.screencapture location: This is the core command to change the screenshot location setting.~/Pictures/Screenshots: This is the path to the new save location.~represents your home directory, and/Pictures/Screenshotsspecifies the “Screenshots” folder within your “Pictures” folder. Replace this with the actual path to your desired folder. You can drag and drop a folder into Terminal to get its full path.
-
Restart SystemUIServer: After changing the location with the
defaults writecommand, you need to restart the SystemUIServer process for the changes to take effect. Use the following command:killall SystemUIServerThis command will restart the user interface server, and your new screenshot save location will be active.
Important Note: Be very careful when using Terminal commands. Incorrect commands can potentially cause system issues. Double-check your commands before executing them.
Troubleshooting Screenshot Saving Issues
In some cases, you might still encounter problems finding your screenshots even after checking the default location and settings. Here are some common troubleshooting steps:
Dropbox Interference
As mentioned in the original forum discussion, cloud storage services like Dropbox can sometimes interfere with the default screenshot saving behavior. Dropbox, for example, can be configured to automatically save screenshots to your Dropbox folder instead of the default Desktop location.
If you use Dropbox or similar services, check their settings to see if they have a screenshot saving feature enabled. If so, you can either disable this feature if you want screenshots to be saved to your chosen default location, or configure Dropbox to save screenshots to a specific folder within your Dropbox if that’s your preference.
Safe Mode
If you suspect a system issue or software conflict is preventing screenshots from saving correctly, booting your Mac in Safe Mode can help diagnose the problem. Safe Mode starts your Mac with minimal system extensions and drivers, which can help isolate whether a third-party application or extension is causing the issue.
To boot into Safe Mode:
- Restart your Mac.
- Immediately after your Mac restarts, press and hold the Shift key.
- Release the Shift key when you see the login window.
- Log in to your Mac. You will be in Safe Mode.
In Safe Mode, try taking a screenshot. If screenshots are saved correctly in Safe Mode, it indicates that a third-party application or extension is likely interfering in normal mode. Reboot your Mac normally to exit Safe Mode and then try to identify and disable potentially conflicting software.
Permissions Issues
In rare cases, file permissions issues might prevent screenshots from being saved to the designated location. This is less common but can occur after system updates or if file permissions have been altered.
You can try resetting file permissions, though this is an advanced troubleshooting step and should be done with caution. Apple’s Disk Utility has a “First Aid” feature that can sometimes repair permission issues, but for more complex problems, you might need to use Terminal commands or seek further technical assistance.
Conclusion
Knowing “where are screenshots saved” on your Mac is fundamental for efficient workflow. By understanding the default Desktop location, utilizing Finder and Spotlight for searching, and mastering the Screenshot app or Terminal for customization, you can take control of your screenshot saving process.
If you’re still having trouble, remember to check for interference from cloud services like Dropbox and consider troubleshooting in Safe Mode. With these tips, you should be able to confidently find and manage your screenshots on your Mac and ensure they are always saved exactly where you need them.