Achieving a radiant, glowing complexion is a sought-after beauty goal, and highlighter is your secret weapon. This transformative makeup product can instantly brighten your face, enhance your best features, and take your look from flat to fabulous. However, knowing Where To Put Highlighter is crucial to avoid common makeup mishaps and unlock its full potential.
Whether you’re a makeup novice or a seasoned pro looking to refine your technique, this comprehensive guide will walk you through expert tips and easy-to-follow tricks to master the art of highlighting. Get ready to elevate your makeup game and discover the secrets to a naturally luminous glow!
Understanding Makeup Highlighter
Makeup highlighter is a beauty product formulated to capture and reflect light, enhancing your skin’s natural radiance. It works by accentuating the high points of your face, the areas where light naturally hits. By strategically applying highlighter, you can create a more youthful, vibrant, and healthy-looking complexion. Highlighters come in various forms, including powders, creams, and liquids, offering different levels of intensity and finishes, from a subtle sheen to a dramatic, dazzling glow.
To effectively use highlighter and know where to put highlighter makeup for the most flattering results, understanding your face structure is key. Identifying your face shape and the areas that naturally catch light will guide you in precise application, ensuring a sculpted and luminous finish. Whether you’re preparing for a casual day or a glamorous evening, incorporating highlighter into your makeup routine is a simple yet powerful way to enhance your overall appearance.
The Versatile Uses of Makeup Highlighter
Makeup highlighter is more than just a shimmer product; it’s a versatile tool with multiple benefits that can transform your makeup look. Its primary function is to enhance your features and create a radiant, healthy glow, but its applications extend beyond just adding shimmer. Let’s explore the key uses of makeup highlighter:
Accentuating Your Best Features
Highlighter’s main purpose is to draw attention to the areas of your face that naturally catch light. These high points include your cheekbones, brow bones, the bridge of your nose, and Cupid’s bow. Strategically placing highlighter on these areas brings them forward, enhancing your facial structure and creating a more sculpted appearance. Learning how to apply contour and highlight together can create a beautifully balanced and defined look that accentuates your natural beauty.
Creating a Youthful and Healthy Glow
One of the most significant advantages of using highlighter is its ability to impart a youthful and healthy glow to your skin. It adds a dewy, luminous finish, making your skin appear fresher, more vibrant, and revitalized. This effect is perfect for both everyday wear and special occasions, instantly brightening your complexion and giving you a “lit-from-within” radiance.
Balancing and Harmonizing Your Makeup
Highlighter plays a crucial role in balancing your overall makeup look, especially when used in conjunction with contour. While contouring adds depth and dimension by creating shadows, highlighter brightens and lifts areas you want to emphasize. This harmonious interplay between light and shadow creates a sculpted, balanced effect, enhancing your natural features and adding sophistication to your makeup.
Adding Radiance for Any Occasion
Whether you’re aiming for a subtle daytime glow or a striking evening look, highlighter is the perfect product to add radiance. It’s exceptionally effective for photography, events, or any time you want to enhance your natural luminosity. Highlighter can create a stunning effect that catches the light beautifully, making you look radiant and polished.
Enhancing Makeup Versatility Beyond the Face
The versatility of highlighter extends beyond just the face. You can use it to add a touch of shimmer to other areas like your collarbones, shoulders, or even eyelids. This makes it a multi-purpose product that can seamlessly transition from daytime to nighttime looks, adding a touch of glam wherever you desire.
If you’re new to highlighting, understanding how to use highlighter makeup and, most importantly, where to apply highlighter is essential for achieving the best results. With a bit of practice, you’ll discover how transformative this simple step can be in your daily beauty routine.
 where to put highlighter
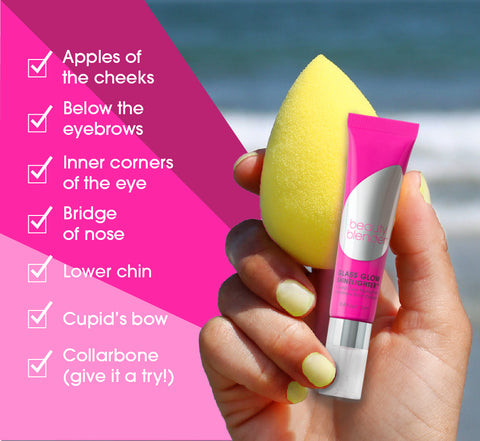
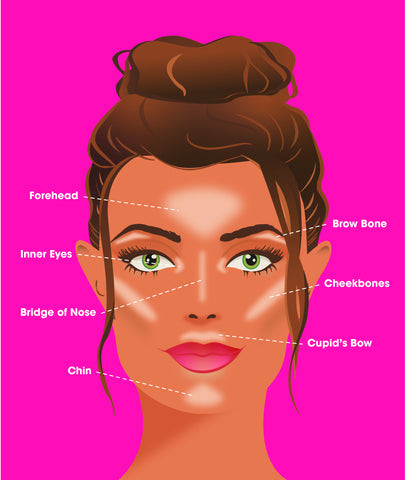
Key Areas: Where to Put Highlighter for Maximum Impact
Knowing where to put highlighter makeup is the key to unlocking a flawless, radiant glow. Highlighter is designed to enhance your natural bone structure and create luminosity by reflecting light from the highest points of your face. If you’re unsure about where to use highlighter makeup, this guide will break down the essential areas to target for a professional and stunning finish:
Cheekbones: The Go-To Highlight
The cheekbones are the most popular and impactful area to apply highlighter. Sweeping highlighter along the tops of your cheekbones, just above your blush and contour, instantly lifts and accentuates your face. This placement catches the light beautifully, creating a youthful and dewy glow that enhances your facial contours. This is truly where the best highlighter application makes a significant difference.
Brow Bones: Open Up Your Eyes
Applying a subtle touch of highlighter just below your eyebrows, along the brow bone, is a game-changer for your eyes. This technique not only defines your brows but also visually opens up your eyes, making them appear larger, brighter, and more awake. It adds a subtle lift to the brow area, enhancing your overall eye makeup look.
Bridge of the Nose: Sculpt and Elongate
Highlighting the bridge of your nose can create the illusion of a longer, more refined nose and add overall facial symmetry. Applying a thin line of lightweight highlighter down the center of your nose can create a sculpted appearance and enhance your profile. For a natural effect, use a light hand and blend well.
Cupid’s Bow: Fuller, Defined Lips
A touch of highlighter on the Cupid’s bow, the V-shaped area just above your upper lip, is a simple yet effective trick to make your lips appear fuller and more defined. This subtle highlight catches the light and draws attention to the center of your lips, enhancing their shape and adding dimension to your lip makeup.
Inner Corners of the Eyes: Brighten and Awaken
Brightening the inner corners of your eyes with highlighter is a fantastic way to look refreshed and wide awake, even when you’re tired. This trick instantly illuminates the eyes, making you appear more alert and youthful. It’s especially beneficial for counteracting dark circles and creating a brighter, more vibrant appearance.
Chin: Balance and Harmony
Dabbing a small amount of highlighter on the center of your chin adds a subtle touch of glow and helps balance your facial features. This placement ties your entire makeup look together, creating a harmonious and radiant finish without being overly shimmery. It provides a subtle point of light that complements the rest of your highlighted areas.
Collarbones and Shoulders: Extend the Glow
Don’t limit your highlighter to just your face! For special occasions or when wearing off-the-shoulder outfits, extend your glow to your collarbones and shoulders. Applying highlighter to these areas adds a beautiful shimmer to your décolletage, enhancing your overall look and creating a glamorous effect.
By understanding where to use highlighter makeup and experimenting with these strategic placements, you can effectively enhance your natural features and achieve a radiant, professional-quality makeup finish every time you apply it.
Mastering the Application: How to Apply Highlighter Like a Pro
Knowing how to apply a highlighter on the face is just as important as knowing where to put it. Proper application technique ensures a seamless, natural-looking glow rather than harsh lines or an artificial shimmer. Whether you are a beginner or want to refine your skills, follow this step-by-step guide to how to apply highlighter for a flawless finish:
Step 1: Prep Your Skin for a Smooth Canvas
A well-prepared base is essential for seamless highlighter application. Start with a clean, moisturized face and apply your regular skincare routine. Follow with a primer to create a smooth canvas. Primer minimizes pores, evens out skin texture, and helps your highlighter blend effortlessly and last longer. Proper skin prep is the foundation for a radiant makeup look.
Step 2: Identify Where to Use Highlighter Makeup
Revisit the key areas where highlighter works best: cheekbones, brow bones, bridge of the nose, Cupid’s bow, inner corners of the eyes, and chin. Focusing on these high points ensures you are enhancing your natural features and creating a balanced, luminous look. Remember, less is often more, especially when starting.
Step 3: Choose the Right Tools for Precise Application
The tools you use significantly impact the application and finish of your highlighter. Here are recommended tools:
- Makeup Sponges: A damp makeup sponge is ideal for cream or liquid highlighters. It allows for seamless blending and a natural, diffused glow. Use a dabbing or stippling motion to press the highlighter into the skin without dragging.
- Makeup Brushes: For powder highlighters, opt for a fan or tapered brush. A fan brush provides a soft, diffused application, perfect for a subtle sheen. A tapered brush allows for more precise placement and buildable intensity.
Step 4: Blend for a Seamless, Natural Finish
Blending is the most critical step in achieving a flawless glow. After applying highlighter to your desired areas, gently blend the edges to eliminate any harsh lines. Use your makeup sponge, brush, or even your fingertips to soften the edges and create a seamless transition between the highlighter and the rest of your makeup. The goal is to make it look like your natural skin is glowing.
Step 5: Set Your Glow for Longevity
To ensure your radiant glow lasts all day, set your highlighter. Use a setting spray or a light dusting of translucent powder, especially if you have oily skin or are in a humid environment. Setting spray locks in your makeup and adds to the longevity of your highlight, while translucent powder helps control shine without dulling the luminosity.
Mastering how to use highlighter effectively is about understanding your face, practicing different techniques, and choosing the right products and tools. By following these steps, you can achieve a radiant, glowing complexion that enhances your natural beauty and elevates your entire makeup look.
 how to apply highlighter
Common Highlighter Mistakes to Avoid
While highlighter is a fantastic tool, it’s easy to make mistakes that can result in an unnatural or overdone look. To ensure you achieve a flawless, radiant glow, avoid these common highlighter pitfalls:
Mistake 1: Applying Too Much Highlighter
One of the most frequent mistakes is over-application. Using too much highlighter can make your skin look greasy or artificial rather than naturally glowing. Start with a small amount of product and build up the intensity gradually. Remember, it’s easier to add more than to remove excess highlighter.
Mistake 2: Choosing the Wrong Shade for Your Skin Tone
Selecting the wrong highlighter shade can lead to an unnatural, mismatched look. Avoid shades that are too frosty, glittery, or don’t complement your skin’s undertones. For fair skin, opt for pearl or champagne shades; for medium skin, gold or rose gold tones work beautifully; and for deep skin, bronze or copper shades provide a stunning glow.
Mistake 3: Neglecting to Blend Properly
Highlighter should seamlessly blend into your skin, creating a natural-looking glow. Failing to blend adequately can leave harsh, visible lines or streaks of shimmer on your face. Always blend the edges of your highlighter using a makeup sponge, brush, or fingertips until it merges flawlessly with your skin.
Mistake 4: Incorrect Placement – Applying in the Wrong Areas
Knowing where to put highlighter makeup is crucial. Avoid applying highlighter in areas that don’t naturally catch light, such as the center of your cheeks, forehead, or directly under the eyes (unless targeting inner corners). Incorrect placement can accentuate texture or make your face appear unbalanced.
Mistake 5: Skipping Skin Preparation
Applying highlighter directly to dry, unprepared skin can result in a patchy, uneven application. Always prep your skin with primer to create a smooth base. Proper skin preparation ensures the highlighter glides on effortlessly, blends seamlessly, and lasts longer without emphasizing dry patches or texture.
Mistake 6: Ignoring Your Overall Makeup Look
Your highlighter should complement your entire makeup look. Avoid pairing an intensely glittery highlighter with heavy contouring or bold eyeshadow, as it can easily become overwhelming. For a balanced effect, choose a highlighter that enhances your features without overpowering them. Consider the occasion and opt for a more subtle glow for daytime and a more intense shimmer for evening events.
Mistake 7: Forgetting to Set Your Makeup
Highlighter that isn’t set can fade, smudge, or migrate throughout the day, especially in oily areas. Use a setting spray or a light dusting of translucent powder to lock in your glow and ensure it stays vibrant and in place for hours. Setting your makeup is essential for longevity and preventing your highlighter from losing its impact.
By avoiding these common mistakes and focusing on correct techniques, you can master the art of highlighting and achieve a radiant, natural-looking glow that enhances your best features without looking artificial or overdone. Practice and experimentation are key to finding the perfect balance for your unique skin and style.
Frequently Asked Questions About Highlighter Application
Do you apply highlighter before or after blush?
Apply highlighter after blush. Blush provides a base color on the apples of your cheeks, and highlighter is then applied on the high points of the cheekbones, above the blush, to enhance and add dimension. This order ensures that the highlighter stands out and creates a natural, luminous glow that complements your blush.
Where do you put highlighter on mature skin?
For mature skin, apply highlighter sparingly and strategically to avoid emphasizing fine lines and wrinkles. Focus on areas like the tops of the cheekbones, brow bones, and the bridge of the nose. Opt for cream or liquid formulas that blend seamlessly and provide a subtle, dewy glow rather than shimmery powders that can settle into текстуры. Avoid using highlighter on areas with pronounced wrinkles or texture.
Do you use highlighter before or after foundation?
Apply highlighter after foundation. Foundation creates an even base and evens out your skin tone. Applying highlighter after foundation allows it to sit on top of your base and effectively reflect light, maximizing its luminosity. For an all-over subtle glow, you can mix a liquid highlighter with your foundation before application, but for targeted highlighting, apply it after foundation.
What is the best way to apply highlighter?
The best way to apply highlighter is to focus on the high points of your face: cheekbones, brow bones, bridge of the nose, and Cupid’s bow. Use a damp makeup sponge for cream or liquid highlighters, and a fan or tapered brush for powder highlighters. Blend thoroughly to eliminate harsh lines and create a seamless, natural-looking glow. Build up the intensity gradually for a controlled application.
Which highlighter to choose for a gorgeous glow?
Choose a highlighter that complements your skin tone and desired finish. For a natural glow, opt for cream or liquid highlighters with a subtle sheen. For a more intense, glamorous glow, powder highlighters with shimmer particles are ideal. Consider your skin type: cream highlighters are great for dry skin, while powder highlighters are suitable for oily or combination skin. Always test the shade on your skin to ensure it blends seamlessly and provides the desired radiance.
What does a highlighter do for your face?
Highlighter enhances your face by reflecting light off the high points, creating a brighter, more youthful, and radiant complexion. It adds dimension to your features, making areas like cheekbones, brow bones, and the nose bridge stand out. Highlighter also complements contouring by brightening specific areas and balancing the overall makeup look, resulting in a sculpted and luminous finish.
What’s the best highlighter for a natural glow?
The best highlighter for a natural glow is one that enhances your skin’s natural radiance without appearing overly shimmery or artificial. Look for lightweight, buildable formulas with a subtle sheen. Cream or liquid highlighters are excellent for achieving a dewy, fresh finish, while finely milled powder highlighters provide a soft, diffused glow. Shades like champagne, pearl, or soft gold are generally flattering for a natural, lit-from-within radiance.
By mastering where to put highlighter and how to apply highlighter, you’re well on your way to achieving a stunning, radiant complexion that enhances your natural beauty and elevates your makeup to the next level. Embrace the glow!