Keeping tabs on the devices signed in to your Apple Account is crucial for maintaining your digital security and managing your Apple ecosystem effectively. Just like you meticulously sign on a check to authorize a transaction, you need to periodically verify and approve the devices accessing your Apple ID. This ensures that only your trusted devices have access to your personal information and Apple services. This guide will walk you through the steps to find your Apple Account device list across various platforms and empower you to take control of your device security.
Easily Access Your Apple Device List
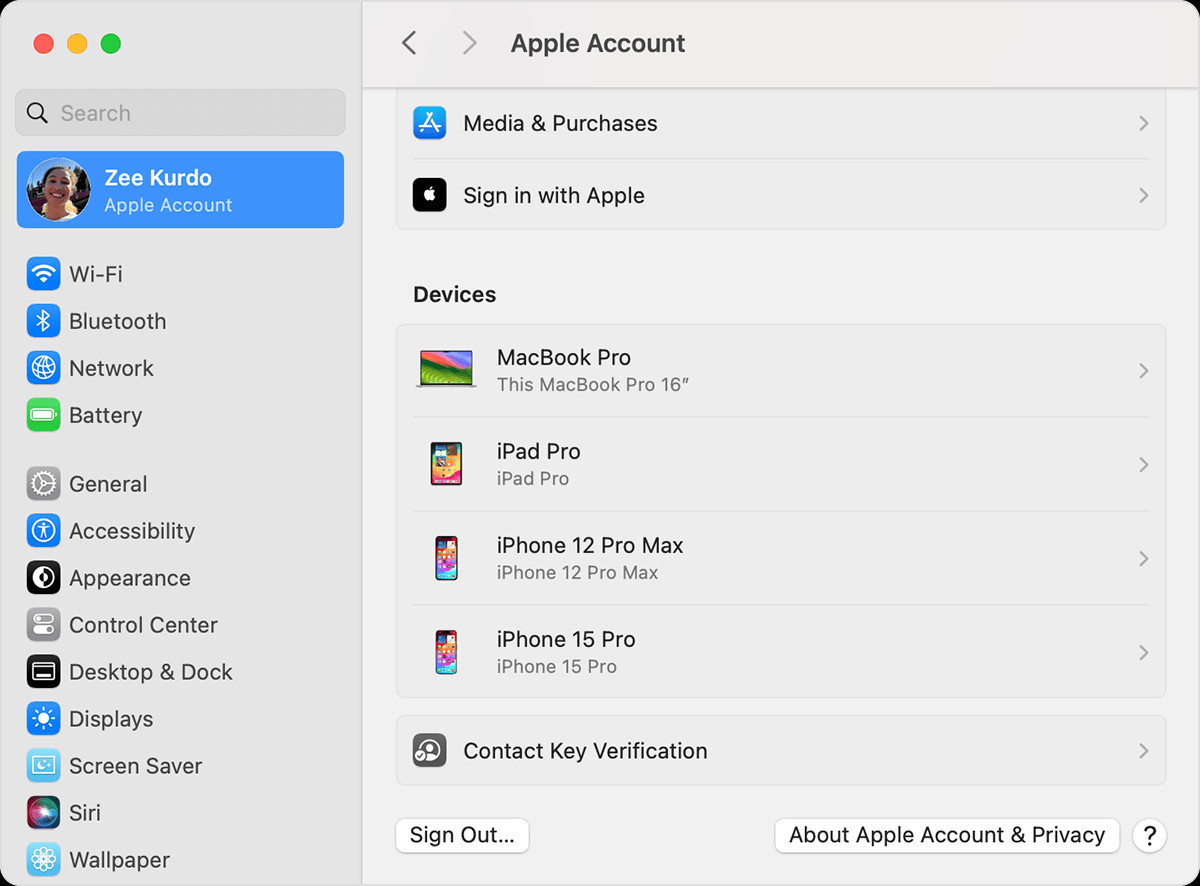
Apple provides straightforward methods to view a comprehensive list of devices currently signed in with your Apple Account. Whether you are using an iPhone, iPad, Mac, Windows PC, or accessing through the web, the process is designed to be user-friendly.
Checking Your Device List on iPhone, iPad, or Apple Watch
For users within the Apple ecosystem, directly accessing the device list from your iPhone, iPad, or Apple Watch is incredibly convenient:
-
Open the Settings app on your iPhone or iPad. For Apple Watch, use the Watch app on your iPhone.
-
Tap on [Your Name] at the top of the Settings menu.
-
Scroll down the page to locate your device list. It will display all devices currently logged in with your Apple ID.
-
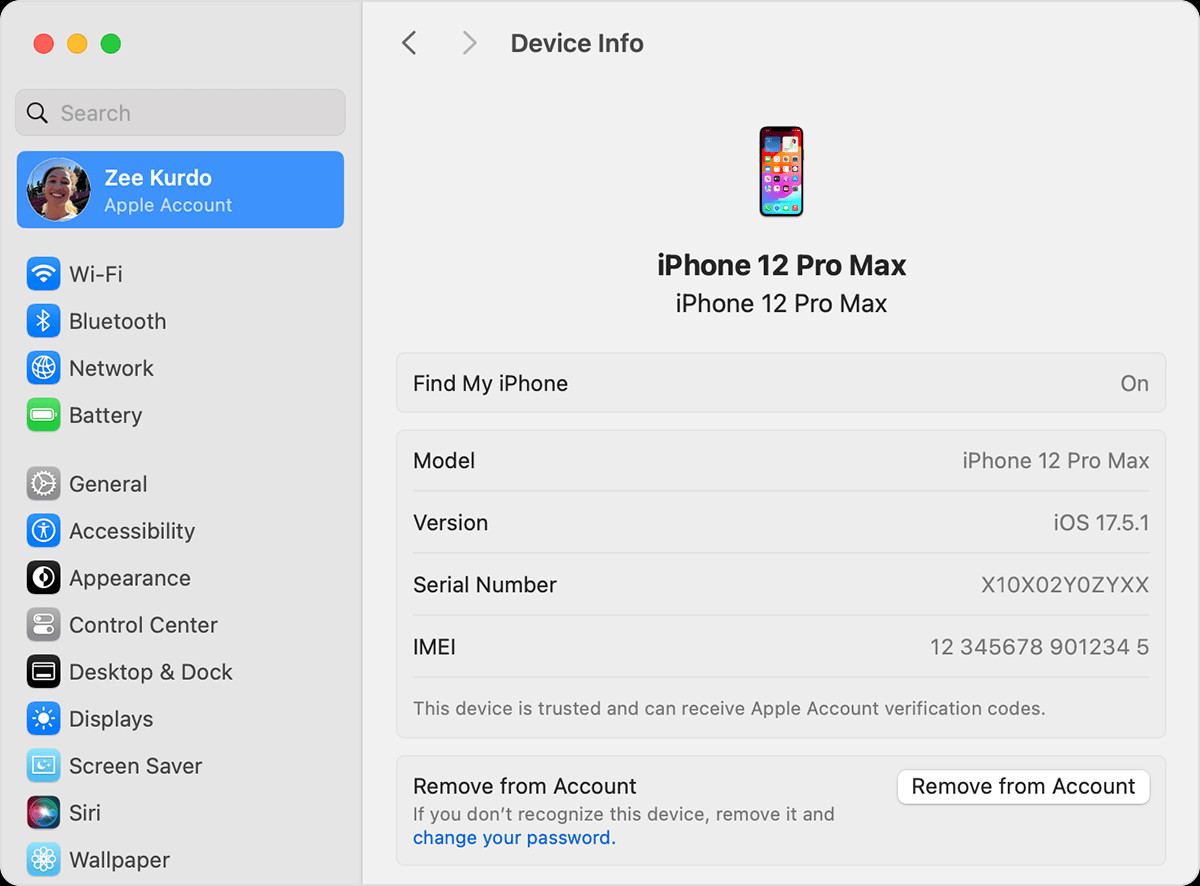
Tap on any device name in the list to view detailed information about that specific device. This includes the device model, serial number, operating system version, and importantly, whether it is marked as a trusted device capable of receiving Apple Account verification codes.
 iPhone Settings showing Apple ID and device list
This image, while showing macOS settings, conceptually represents the device list accessible on iPhone and iPad as well, highlighting the similar information displayed.
You might be prompted to answer your security questions to access these device details, adding an extra layer of security to your account information.
Viewing Your Signed-In Devices on a Mac
Mac users can also effortlessly access their device list directly from their system settings:
-
Click on the Apple menu () in the top-left corner of your screen.
-
Select System Settings.
-
Click on [Your Name].
-
Scroll down to find the list of devices associated with your Apple ID.
-
Click on any device name to see more details, such as the device model, serial number, and OS version.
iPhone Settings showing Apple ID and device listSimilar to iOS devices, accessing detailed device information on macOS might require you to answer your security questions for verification.
Accessing Your Apple Device List on a Windows PC
Even if you are primarily a Windows user, Apple ensures you can still manage your Apple Account devices:
- Open iCloud for Windows on your PC.
- In the iCloud for Windows interface, locate and click on Account Details. This is usually found at the top of the window.
- A window will pop up displaying a list of devices signed in to your Apple Account. The information displayed might vary slightly depending on the device type.
Checking Your Devices via the Web
For platform-agnostic access or when using devices outside of the Apple ecosystem like Android, consoles, or smart TVs, the Apple Account website provides a universal solution:
- Navigate to account.apple.com in your web browser.
- Sign in to your Apple Account using your Apple ID and password.
- Once logged in, locate and select the Devices section.
- If your devices are not immediately visible, click on View Details and answer your security questions to proceed.
- Click on any device in the list to view its detailed information, including model, serial number, OS version, and trusted device status.
Adding Devices to Your Apple Account List
Adding a device to your Apple Account device list is an automatic process that occurs when you sign in to Apple services on a new device. Think of it as signing your name to officially include the device in your authorized list. To add a device, simply sign in with your Apple ID in the following locations depending on your device type:
- For iPhone and iPad: Sign in to iCloud, iMessage, FaceTime, Media & Purchases (App Store, iTunes Store), or Game Center. Paired Apple Watches will also appear in the list automatically.
- For macOS or Windows 10 and later: Sign in to iCloud on the device.
- For Apple TV: Sign in to the Store app.
It’s important to note that AirPods, while associated with your Apple ID, are managed through the Find My app and will not appear directly in the Apple Account device list. Devices running older operating systems (iOS 7 or earlier, OS X Mavericks or earlier) will also not be displayed in your device list.
Removing Devices for Enhanced Security
Regularly reviewing your Apple Account device list is not just about knowing where you’re signed in; it’s also a crucial security practice. If you identify devices you no longer use or don’t recognize, removing them is essential. This is akin to canceling a check to prevent unauthorized transactions – in this case, unauthorized access to your Apple Account.
Removing a device from your list enhances your account security in several ways:
- Prevents Verification Code Display: Removed devices will no longer be able to receive Apple Account verification codes if you use two-factor authentication.
- Revokes Service Access: The device will lose access to iCloud and other Apple services, including Find My, until you sign in again with two-factor authentication.
- Stops Unrecognized Access: If you see a device you don’t recognize, removing it immediately prevents potential unauthorized access to your account.
Remember, removing a device only prevents access until someone signs in again. To permanently remove a device, you need to sign out of Apple services on that device or erase it completely.
Here’s how to remove a device from your Apple Account list:
Removing a Device Using iPhone or iPad
- Go to Settings > [Your Name].
- Scroll down and tap on the device you wish to remove.
- Tap Remove from Account.
- A confirmation message will appear. Review it and tap again to confirm the removal.
Removing a Device Using a Mac
-
Open System Settings from the Apple menu.
-
Click on [Your Name].
-
Select the device you want to remove.
-
Click Remove from Account.
 Mac System Settings showing Remove from Account button
 -
Review the confirmation message and click again to confirm.
Removing a Device Through the Web
- Sign in to account.apple.com and go to the Devices section.
- Select the device you intend to remove.
- Click on “Remove from account” (or similar wording).
- Review the confirmation message and click again to finalize the removal.
Permanently Ensuring Device Removal
To ensure a device does not reappear on your list after removal, especially if you still possess the device, you must take further steps. Just like you would destroy a check after voiding it, you need to take definitive action with the device:
- Sign out of Apple Services: On the device you want to permanently remove, sign out of iCloud, Media & Purchases, iMessage, FaceTime, and Game Center.
- Erase the Device: For a more thorough approach, especially if you are giving away or disposing of the device, erase the device completely using the factory reset options.
By regularly checking your Apple Account device list and promptly removing any unrecognized or unused devices, you are taking proactive steps to safeguard your digital life. Just like diligently signing and managing your checks, managing your device list is a fundamental aspect of responsible digital security.
Published Date: Original publish date from source article if available.