
You’re wondering, “Can You Save Google Slides As A Video?” Absolutely! With the right tools and techniques, transforming your static presentations into dynamic videos is easier than you might think. Savewhere.net is here to guide you through the process of creating engaging video presentations from your Google Slides, helping you to save time, extend your reach, and repurpose your content effectively. Discover how to leverage screen recording and video editing to enhance your content and captivate your audience. Unlock new possibilities with video, including content repurposing and improved accessibility.
1. Understanding the Need: Why Convert Google Slides to Video?
Why should you bother converting your Google Slides into a video format? Let’s explore the key reasons and benefits.
1.1. Expanding Your Reach and Impact
Converting your Google Slides to video significantly broadens the audience you can reach. A live presentation is limited by time and location, but a video can be shared and viewed anytime, anywhere. According to a study by Statista, online video consumption is steadily increasing, with projections indicating continued growth. By turning your slides into videos, you tap into this vast audience, ensuring your message reaches more people.
1.2. Enhancing Accessibility for a Diverse Audience
Video presentations offer enhanced accessibility features that static slides can’t match. Features like captions and transcripts make your content available to viewers with hearing impairments. Moreover, these captions can be translated into multiple languages, extending your reach to a global audience. Accessibility isn’t just about compliance; it’s about inclusivity. By making your content accessible, you ensure that everyone can benefit from your knowledge.
1.3. Maximizing Engagement and Retention
Videos are inherently more engaging than static slides. Incorporating animations, voiceovers, and other multimedia elements can significantly boost viewer engagement. Research from Forrester shows that viewers retain 95% of a message when they watch it in a video, compared to 10% when reading it in text. By converting your slides into engaging videos, you ensure your audience not only pays attention but also remembers your message.
1.4. Repurposing Content for Multiple Platforms
Once you’ve created a video from your Google Slides, you can repurpose it across various platforms. Share it on YouTube, embed it on your website, or use it as part of an online course. This versatility saves time and effort, as you’re leveraging a single piece of content for multiple purposes.
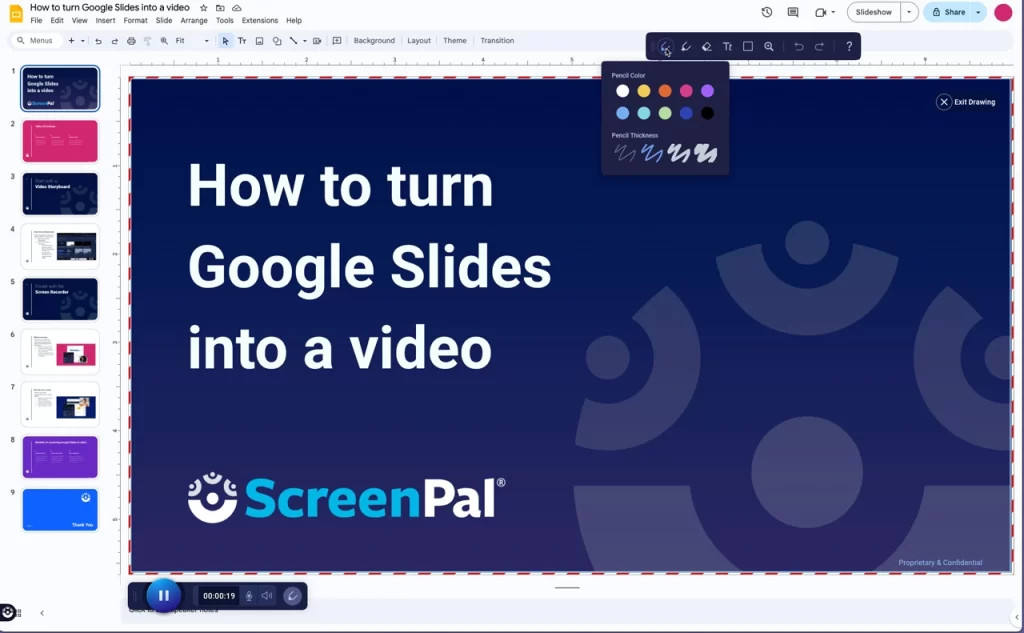 Google Slides presentation converted into a video
1.5. Showcasing Professionalism and Polish
A well-produced video presentation reflects professionalism and attention to detail. High-quality visuals, clear audio, and seamless transitions create a polished final product. This enhances your credibility and makes a lasting impression on your audience.
2. Addressing the Challenges: Common Issues Users Face
Despite the benefits, converting Google Slides to video can present some challenges. Let’s address these issues head-on.
2.1. Technical Difficulties with Recording
Many users struggle with the technical aspects of recording their presentations. Issues like poor audio quality, screen resolution problems, and syncing voiceovers with slides are common. Investing in good-quality recording equipment and software can mitigate these issues. Additionally, practicing your presentation beforehand helps ensure a smooth recording.
2.2. Limited Editing Capabilities in Google Slides
Google Slides offers basic presentation tools but lacks advanced video editing features. Users often find it challenging to add effects, transitions, or annotations to their videos within Google Slides. To overcome this, consider using third-party video editing software that offers more extensive editing capabilities.
2.3. File Size and Format Compatibility
Large video files can be difficult to share and may not be compatible with all platforms. Optimizing your video for different formats and compressing the file size without sacrificing quality is essential. Online tools and software can help you convert your video to the appropriate format and compress it effectively.
2.4. Maintaining Engagement and Avoiding Monotony
A static video of slides can quickly become monotonous. Maintaining audience engagement requires creativity and the incorporation of dynamic elements. Use animations, transitions, and voiceovers to keep your viewers interested. Breaking up the presentation with interactive elements like polls or quizzes can also help maintain engagement.
2.5. Ensuring Accessibility for All Viewers
Creating accessible videos requires careful attention to detail. Adding captions, transcripts, and audio descriptions ensures that your content is available to all viewers, including those with disabilities. Many video editing tools offer features that automate the process of adding captions and transcripts, making it easier to create accessible content.
3. Exploring Solutions: Tools and Techniques for Conversion
Now that we understand the benefits and challenges, let’s explore the various tools and techniques you can use to convert Google Slides to video.
3.1. Screen Recording Software
Screen recording software is a straightforward way to capture your Google Slides presentation as a video. Tools like ScreenPal, OBS Studio, and Camtasia allow you to record your screen, webcam, and audio simultaneously.
3.1.1. ScreenPal
ScreenPal offers a user-friendly interface and robust editing features, making it an excellent choice for beginners and professionals alike. It allows you to record your screen and webcam, add annotations, and edit your video with ease.
3.1.2. OBS Studio
OBS Studio is a free and open-source screen recording software that offers advanced features like scene switching, custom transitions, and audio mixing. It’s a popular choice for gamers and streamers but can also be used to create professional-quality video presentations.
3.1.3. Camtasia
Camtasia is a premium screen recording and video editing software that offers a wide range of features, including advanced editing tools, animations, and effects. It’s a great choice for creating polished, professional-looking video presentations.
3.2. Google Slides Built-In Recording Feature
Google Slides has introduced a built-in recording feature that allows you to record your presentation directly within the platform. While it offers basic recording capabilities, it may not provide the advanced editing features of dedicated screen recording software.
3.3. Video Editing Software
Video editing software is essential for polishing your recorded presentation and adding effects, transitions, and annotations. Tools like Adobe Premiere Pro, Final Cut Pro, and iMovie offer a wide range of editing features.
3.3.1. Adobe Premiere Pro
Adobe Premiere Pro is a professional-grade video editing software that offers advanced editing tools, color correction, and audio mixing capabilities. It’s a popular choice for filmmakers and video editors but can also be used to create high-quality video presentations.
3.3.2. Final Cut Pro
Final Cut Pro is a video editing software designed for macOS that offers a user-friendly interface and powerful editing features. It’s a great choice for Mac users who want to create professional-looking video presentations.
3.3.3. iMovie
iMovie is a free video editing software included with macOS that offers basic editing features like trimming, adding transitions, and adding music. It’s a great choice for beginners who want to create simple video presentations.
3.4. Online Video Platforms
Online video platforms like YouTube and Vimeo offer tools for recording, editing, and hosting your video presentations. These platforms also provide analytics to track viewer engagement and performance.
3.4.1. YouTube
YouTube is the world’s largest video-sharing platform, offering tools for recording, editing, and hosting your video presentations. It also provides analytics to track viewer engagement and performance.
3.4.2. Vimeo
Vimeo is a video-sharing platform that focuses on high-quality content and offers tools for recording, editing, and hosting your video presentations. It also provides analytics to track viewer engagement and performance.
4. Step-by-Step Guide: Converting Google Slides to Video
Let’s dive into a detailed, step-by-step guide on how to convert your Google Slides to video using various methods.
4.1. Using ScreenPal to Create a Video Storyboard
ScreenPal’s video storyboard feature allows you to import your Google Slides into a storyboard format, making it easy to record narration and add effects.
4.1.1. Step 1: Open the Storyboard Creator
Select the Stories storyboard icon from the ScreenPal website or the app to start a new video storyboard. Choose “Storyboard” then “Start from a Document” to import your Google Slides.
4.1.2. Step 2: Import Your Google Slides Presentation
Connect your Google account and navigate to your slides document. Select it and either double-click or select “OK” to import. You’ll see an interactive storyboard where each section is a slide from your presentation.
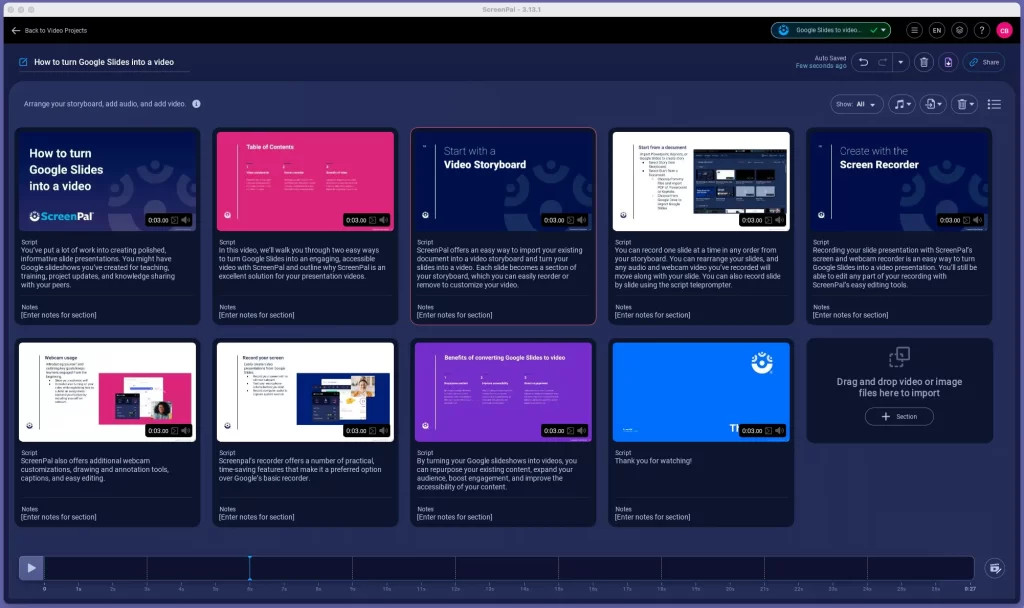 Interactive storyboard for Google Slides video
4.1.3. Step 3: Record Audio on Your Slides
Start with any slide and select “Add audio” to record your voiceover narration with or without your webcam. If you added a script to your slide, you’ll see it below your video preview like a teleprompter.
4.1.4. Step 4: Edit Any Slides to Enhance Your Video
Select “Edit video” on any slide to edit and enhance your video. With ScreenPal’s easy video editing tools, you can trim and cut sections, add text, arrows, and shapes, overlay images and videos, blur or highlight areas, and add sound effects and music.
4.1.5. Step 5: Save and Share Your Video Presentation
Save to your device as an MP4 file or choose from other video file formats. Publish directly to YouTube, Google Drive, Dropbox, or Vimeo. Upload to ScreenPal.com and share with a link or embed anywhere.
4.2. Using ScreenPal’s Screen Recorder
ScreenPal’s screen recorder is a straightforward way to capture your Google Slides presentation as a video.
4.2.1. Step 1: Launch the Recorder
Launch the screen recorder from ScreenPal’s website or app. If this is your first time using ScreenPal, the app will automatically download, and you’ll be ready to go after a quick install.
4.2.2. Step 2: Record Your Google Slides Presentation
After launching the screen recorder, a transparent recorder box will appear on your screen. Drag and drop the sides of this box so that your Google Slides presentation fits inside.
4.2.3. Step 3: Finish Recording
At any point in your presentation, you can select the large blue “Pause” button to pause recording. You can resume recording right where you left off, preview what you’ve already recorded, and back up to an earlier section to resume.
4.2.4. Step 4: Edit Your Recording to Enhance Your Video Presentation
ScreenPal’s video editor is intuitive and easy to use and includes all the editing features you need to create a professional-looking video presentation.
4.2.5. Step 5: Save and Share Your Video Presentation
Save to your device as an MP4 file, or choose from other video file types. Publish directly to YouTube, Google Drive, Dropbox, or Vimeo. Upload to ScreenPal.com and share with a link or embed anywhere.
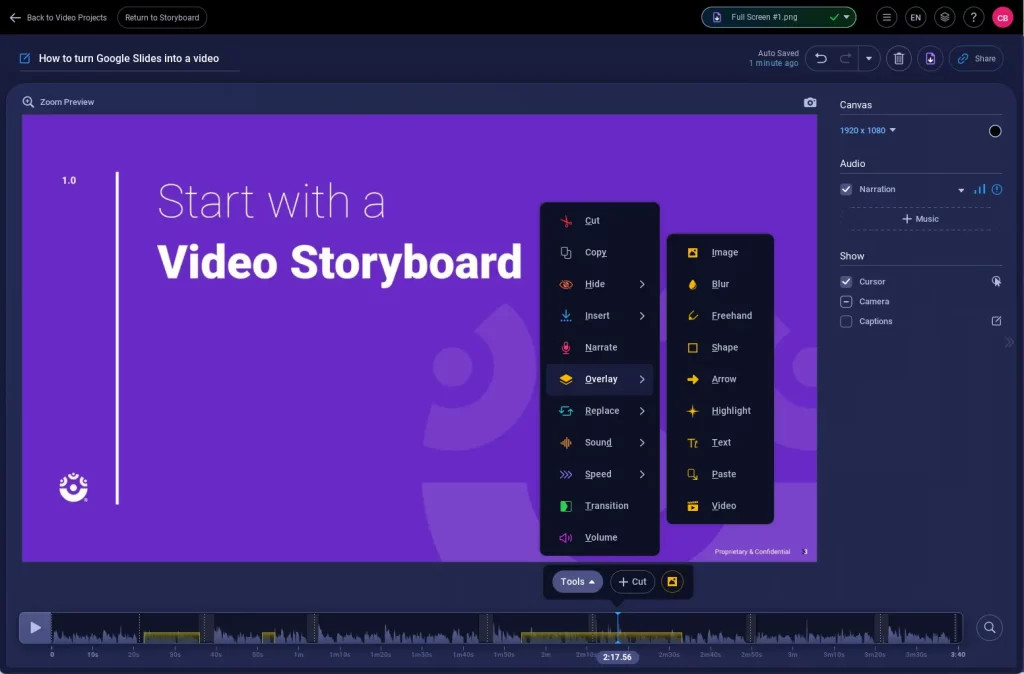 Edit Google Slides video with ScreenPal video editor
4.3. Using Google Slides Built-In Recording Feature
Google Slides now offers a built-in recording feature, making it easier to create videos directly from your presentations.
4.3.1. Step 1: Open Your Google Slides Presentation
Open the Google Slides presentation you want to convert into a video.
4.3.2. Step 2: Access the Recording Feature
Go to “Slide show” and select “Record.” This will open the recording interface.
4.3.3. Step 3: Set Up Your Recording
Ensure your microphone and webcam are properly configured. You can choose to record with or without your webcam.
4.3.4. Step 4: Record Your Presentation
Click the “Start recording” button and begin presenting your slides. Speak clearly and advance through your slides as you would in a live presentation.
4.3.5. Step 5: Finish and Save Your Recording
Click the “Stop recording” button when you are finished. Your video will be saved to Google Drive.
4.4. Using OBS Studio for Recording
OBS Studio is a free and powerful tool for recording your Google Slides presentation.
4.4.1. Step 1: Download and Install OBS Studio
Download OBS Studio from the official website and install it on your computer.
4.4.2. Step 2: Configure OBS Studio
Open OBS Studio and configure your recording settings. Add a “Display Capture” source to record your screen and a “Audio Input Capture” source for your microphone.
4.4.3. Step 3: Open Your Google Slides Presentation
Open the Google Slides presentation you want to record.
4.4.4. Step 4: Start Recording
Click the “Start Recording” button in OBS Studio and begin presenting your slides.
4.4.5. Step 5: Stop Recording
Click the “Stop Recording” button when you are finished. Your video will be saved to your computer.
5. Advanced Tips: Enhancing Your Video Presentations
To create truly outstanding video presentations, consider these advanced tips.
5.1. Optimizing Audio Quality
Good audio quality is crucial for engaging video presentations. Invest in a high-quality microphone and record in a quiet environment. Use noise reduction software to eliminate background noise.
5.2. Adding Visual Effects and Transitions
Visual effects and transitions can make your video presentations more dynamic and engaging. Use transitions to smoothly move between slides and add visual effects to highlight key information.
5.3. Incorporating Animations and Multimedia Elements
Animations and multimedia elements can capture your audience’s attention and make your presentations more memorable. Use animations to reveal information gradually and incorporate images, videos, and audio clips to illustrate your points.
5.4. Creating Interactive Elements
Interactive elements like polls, quizzes, and surveys can boost viewer engagement and provide valuable feedback. Use interactive video platforms like ScreenPal to add these elements to your presentations.
5.5. Optimizing for Different Platforms
Optimize your video presentations for different platforms to ensure they look and sound their best. Use the appropriate video format, resolution, and aspect ratio for each platform.
6. Real-World Examples: Successful Video Presentations
Let’s look at some real-world examples of successful video presentations.
6.1. Educational Tutorials
Educational tutorials often use video presentations to explain complex concepts and demonstrate practical skills. These tutorials typically incorporate screen recordings, voiceovers, and annotations to guide viewers through the learning process.
6.2. Business Presentations
Business presentations use video to deliver key messages, showcase products, and engage stakeholders. These presentations often incorporate high-quality visuals, animations, and multimedia elements to create a polished and professional impression.
6.3. Marketing and Promotional Videos
Marketing and promotional videos use video presentations to attract potential customers and promote products or services. These videos often incorporate compelling visuals, storytelling techniques, and calls to action to drive conversions.
6.4. Training and Development Videos
Training and development videos use video presentations to educate employees and improve their skills. These videos often incorporate interactive elements, quizzes, and assessments to reinforce learning and track progress.
7. Savewhere.net: Your Partner in Saving Time and Money
At Savewhere.net, we understand the importance of efficient content creation and cost-effective solutions. By converting your Google Slides into engaging videos, you’re not only expanding your reach but also saving time and resources.
7.1. Tips and Tricks for Financial Savings
We offer a plethora of tips and tricks to help you save money on various aspects of your life. From budgeting strategies to finding the best deals, Savewhere.net is your go-to resource for financial savvy.
7.2. Maximizing Your ROI with Video Content
Video content can significantly boost your return on investment (ROI) when used effectively. By creating high-quality video presentations from your Google Slides, you can attract more viewers, engage your audience, and drive conversions.
7.3. Community Support and Resources
Join our community of like-minded individuals who are passionate about saving money and creating impactful content. Access our resources, share your experiences, and learn from others.
7.4. Stay Updated with the Latest Trends
Keep up with the latest trends in video marketing and content creation by following Savewhere.net. We provide regular updates and insights to help you stay ahead of the curve.
8. Call to Action: Start Creating Engaging Videos Today
Ready to transform your Google Slides into captivating videos? Follow our step-by-step guides, explore the various tools and techniques, and start creating engaging content that resonates with your audience.
8.1. Explore Savewhere.net for More Tips and Tricks
Visit Savewhere.net to discover more tips and tricks for saving money, creating impactful content, and maximizing your financial potential.
8.2. Join Our Community of Savers and Creators
Become a part of our community and connect with like-minded individuals who are passionate about saving money and creating engaging content.
8.3. Share Your Success Stories
Share your success stories with us and inspire others to transform their Google Slides into engaging videos.
8.4. Contact Us for Personalized Guidance
Need personalized guidance? Contact us at +1 (404) 656-2000 or visit our office at 100 Peachtree St NW, Atlanta, GA 30303, United States. Our team of experts is here to help you achieve your video creation goals.
9. Addressing User Intent: Answering Common Questions
To ensure we fully address user intent, let’s answer some frequently asked questions related to saving Google Slides as a video.
9.1. Can I Convert Google Slides to MP4 Directly?
Yes, using tools like ScreenPal or OBS Studio, you can record your Google Slides presentation and save it as an MP4 file. This format is widely compatible and easy to share.
9.2. What is the Best Software to Record Google Slides?
ScreenPal is a popular choice due to its user-friendly interface and robust editing features. OBS Studio is another excellent option for those seeking a free and powerful tool.
9.3. How Can I Add Audio to My Google Slides Video?
You can add audio by recording a voiceover while presenting your slides using screen recording software. Alternatively, you can add audio tracks in video editing software after recording.
9.4. Is There a Free Way to Convert Google Slides to Video?
Yes, OBS Studio is a free and open-source screen recording software. Additionally, some online video platforms offer free recording and editing tools.
9.5. How Do I Make My Google Slides Video More Engaging?
Incorporate animations, transitions, and multimedia elements. Add interactive elements like polls and quizzes to boost viewer engagement.
9.6. Can I Add Captions to My Google Slides Video?
Yes, most video editing software allows you to add captions to your video. You can manually type captions or use automatic transcription features.
9.7. How Do I Share My Google Slides Video?
You can share your video on platforms like YouTube, Vimeo, Google Drive, or embed it on your website.
9.8. What is the Best Resolution for Recording Google Slides?
A resolution of 1080p is generally recommended for recording Google Slides to ensure clear and crisp visuals.
9.9. Can I Edit My Google Slides Video After Recording?
Yes, you can use video editing software to trim, add effects, and enhance your video after recording.
9.10. How Do I Optimize My Google Slides Video for Mobile Viewing?
Use a mobile-friendly video format like MP4 and ensure your video is responsive and easy to view on smaller screens.
10. Conclusion: Empowering You to Create Engaging Video Content
Converting Google Slides to video opens up a world of possibilities for content creation, engagement, and accessibility. By following our comprehensive guide, exploring the various tools and techniques, and leveraging the resources at Savewhere.net, you can create captivating video presentations that resonate with your audience and drive results. Embrace the power of video and start transforming your Google Slides into engaging content today! Savewhere.net is committed to helping you save money and create impactful content. Visit our website at savewhere.net for more information and resources. Let’s embark on this journey together and unlock your video creation potential.