
Finding your saved passwords on your iPhone is simple, and savewhere.net is here to guide you through the process. Unlocking this feature ensures you never forget those crucial login details again, allowing you to streamline your online experience and protect your digital identity. Let’s dive into how to access, manage, and safeguard your stored credentials, covering everything from using iCloud Keychain to exploring third-party password managers, and discover valuable tips for staying secure.
1. Where Do I Find My Saved Passwords on My iPhone?
You can find your saved passwords on your iPhone within the Settings app or the dedicated Passwords app (in iOS 18 and later). This feature securely stores your usernames and passwords for websites and apps, making it convenient to access your accounts. Let’s explore the steps to access your saved passwords and manage them effectively.
1.1 Accessing Saved Passwords in the Passwords App (iOS 18 and later)
If your iPhone has iOS 18, finding your saved passwords is more streamlined than ever. Here’s how to do it:
-
Open the Passwords app: Look for the Passwords app icon on your home screen.
-
Authenticate: Use Face ID, Touch ID, or your passcode to unlock the app.
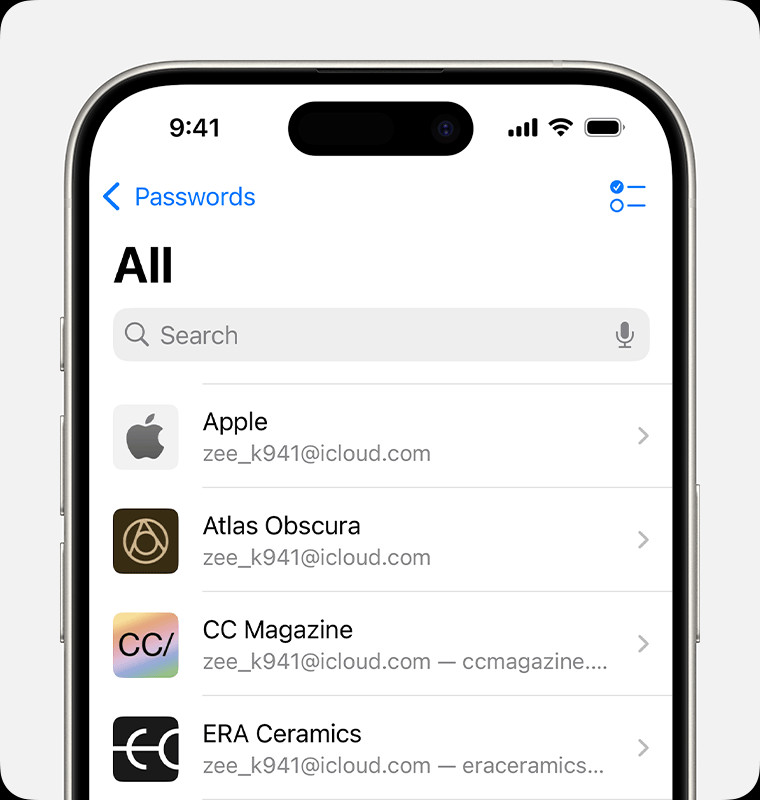 The Passwords app on iPhone.
 -
Browse or search: Select a category or Shared Group, then select a website or app to view its password or passkey.
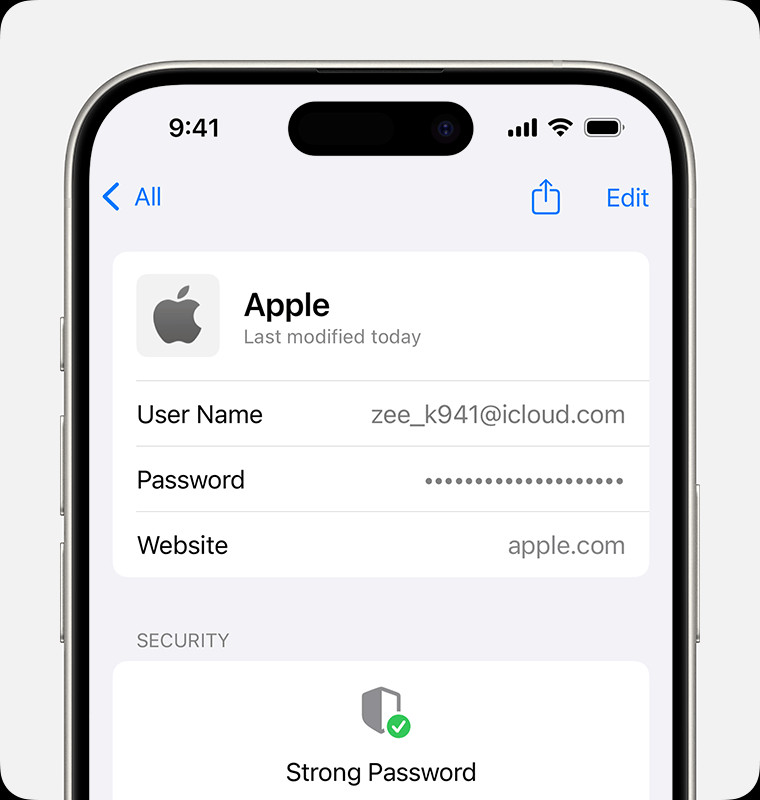 Find a saved password in the Passwords app.
1.1.1 Updating Passwords
Keeping your passwords up-to-date is essential for security. Here’s how to change a password in the Passwords app:
- Select the entry: Choose the website or app whose password you want to change.
- Edit: Tap “Edit,” then tap “Change Password.”
- Follow the prompts: You’ll be redirected to the website or app to change your password.
1.1.2 Deleting Passwords
If you no longer need a saved password, you can easily delete it:
- Select the entry: Choose the website or app.
- Edit: Tap “Edit,” then tap “Delete Password” or “Delete Passkey.”
1.2 Accessing Saved Passwords in Settings (iOS 17 or earlier)
For iPhones with iOS 17 or earlier, the process is slightly different but still straightforward:
- Open Settings: Tap the Settings app icon on your home screen.
- Scroll Down and Tap Passwords: Find “Passwords” in the list and tap it.
- Authenticate: Use Face ID, Touch ID, or your passcode to proceed.
- Browse or Search: A list of saved passwords will appear. You can scroll through the list or use the search bar to find a specific website or app.
- View Password: Tap on the website or app to view the saved username and password.
1.2.1 Updating Passwords
To update a password in iOS 17 or earlier:
- Select the Entry: Tap the website or app whose password you want to change.
- Tap Edit: In the upper-right corner, tap “Edit.”
- Modify the Password: Change the password and tap “Done.”
1.2.2 Deleting Passwords
To delete a password in iOS 17 or earlier:
- Select the Entry: Tap the website or app.
- Tap Delete Password: Confirm your decision to delete the password.
1.3 Using Siri to Find Saved Passwords
Siri can quickly retrieve your saved passwords. This hands-free method is convenient, especially when you need a password on the fly.
- Activate Siri: Say “Hey Siri” or press and hold the side button (or Home button on older models).
- Ask for Passwords: Say something like, “Show me my passwords” or “What’s my password for Hulu?”
- Authenticate: Siri will prompt you to authenticate using Face ID, Touch ID, or your passcode.
- View Password: Siri will display the requested password.
This method is useful, but ensure you are in a secure environment when using Siri to reveal passwords.
2. What Should I Do If I Can’t Find a Saved Password?
If you can’t find a saved password on your iPhone, it can be frustrating. Several reasons might cause this, and troubleshooting is essential.
2.1 Check “All” or “My Passwords”
Ensure you are viewing all your saved credentials. In the Passwords app, select “All.” In iOS 17 or earlier, make sure the Settings screen says “Passwords” at the top, not a Shared Group name.
2.2 Review Recently Deleted Passwords
You may have accidentally deleted the password. Here’s how to check:
- In the Passwords app: Tap “Deleted.”
- In iOS 17 or earlier: Go to Settings > Passwords, then tap “Recently Deleted.”
If you find the password, you can recover it.
2.3 Ensure iCloud Keychain is Enabled
iCloud Keychain syncs your passwords across all your Apple devices. If it’s not enabled, your passwords won’t be available on all devices.
- Open Settings: Tap the Settings app.
- Tap Your Name: At the top, tap your name to access your Apple ID settings.
- Tap iCloud: Scroll down and tap “iCloud.”
- Enable Keychain: Ensure that “Keychain” is turned on.
If iCloud Keychain is enabled, your passwords should sync across your devices.
2.4 Check Shared Groups (iOS 17 and later)
In iOS 17 and later, passwords can be shared with groups. If you moved a password to a shared group, it might not be visible on devices with older software. Ensure your iPhone has iOS 17 or later to view these passwords.
2.5 Consider Third-Party Password Managers
If you use a third-party password manager like LastPass, 1Password, or Dashlane, your passwords will be stored in those apps.
- Open the App: Launch the password manager app.
- Authenticate: Use your master password, Face ID, or Touch ID to unlock the app.
- Search for Password: Find the website or app to view its password.
Ensure the password manager is properly configured and synced on your iPhone.
3. How Does iCloud Keychain Work?
iCloud Keychain is Apple’s built-in password management system. It securely stores your passwords, credit card information, and Wi-Fi passwords across your iPhone, iPad, and Mac. According to Apple, iCloud Keychain uses AES-256 encryption, ensuring your data remains secure.
3.1 Setting Up iCloud Keychain
If you haven’t already, setting up iCloud Keychain is straightforward:
- Open Settings: Tap the Settings app.
- Tap Your Name: At the top, tap your name to access your Apple ID settings.
- Tap iCloud: Scroll down and tap “iCloud.”
- Enable Keychain: Turn on “Keychain.”
- Approve with Security Code: You may be prompted to enter your Apple ID password or approve the process on another device.
3.2 Benefits of Using iCloud Keychain
- Seamless Integration: iCloud Keychain integrates seamlessly with Safari and other apps, automatically filling in your passwords.
- Cross-Device Syncing: Your passwords are synced across all your Apple devices.
- Security: iCloud Keychain uses robust encryption to protect your data.
- Easy to Use: It’s built into iOS, making it convenient and user-friendly.
3.3 Disadvantages of Using iCloud Keychain
- Platform Lock-In: iCloud Keychain is primarily designed for Apple devices, making it less useful if you use Android or Windows devices.
- Limited Features: Compared to dedicated password managers, iCloud Keychain has fewer advanced features.
4. What Are The Best Third-Party Password Managers?
If iCloud Keychain doesn’t meet your needs, several excellent third-party password managers are available.
4.1 LastPass
LastPass is a popular password manager that offers a range of features, including:
- Password Generation: Creates strong, unique passwords.
- Auto-Filling: Automatically fills in passwords on websites and apps.
- Secure Notes: Stores sensitive information like credit card details and secure notes.
- Cross-Platform Support: Available on various platforms, including iOS, Android, Windows, and macOS.
According to LastPass, their service uses AES-256 bit encryption, salted hashing, and PBKDF2 SHA-256 to secure your data.
4.2 1Password
1Password is another top-tier password manager known for its security and user-friendly interface. Key features include:
- Password Generation: Generates strong, random passwords.
- Auto-Filling: Automatically fills in login credentials.
- Travel Mode: Removes sensitive data when crossing borders.
- Secure Sharing: Allows you to securely share passwords with family members or colleagues.
1Password uses AES-256 encryption and end-to-end encryption to protect your data, as stated on their website.
4.3 Dashlane
Dashlane is a feature-rich password manager that offers additional security features:
- Password Generation: Creates strong, unique passwords.
- Auto-Filling: Automatically fills in passwords.
- VPN: Includes a built-in VPN for secure browsing.
- Password Health: Monitors your passwords for vulnerabilities.
Dashlane employs AES-256 encryption and two-factor authentication to safeguard your passwords.
4.4 Comparison Table of Password Managers
| Feature | LastPass | 1Password | Dashlane | iCloud Keychain |
|---|---|---|---|---|
| Password Generation | Yes | Yes | Yes | Yes |
| Auto-Filling | Yes | Yes | Yes | Yes |
| Cross-Platform | Yes | Yes | Yes | No |
| Secure Notes | Yes | Yes | Yes | Yes |
| Two-Factor Auth | Yes | Yes | Yes | Yes |
| VPN | No | No | Yes | No |
| Travel Mode | No | Yes | No | No |
| Password Health | Yes | Yes | Yes | No |
| Encryption | AES-256 | AES-256 | AES-256 | AES-256 |
| Starting Price | Free | $2.99/mo | $4.99/mo | Included with Apple Devices |
Choosing the right password manager depends on your specific needs and preferences.
5. How Can I Improve My Password Security?
Improving your password security is crucial to protect your online accounts from unauthorized access. Strong passwords and proactive habits are your first line of defense.
5.1 Use Strong, Unique Passwords
The foundation of good password security is using strong, unique passwords for each of your accounts. A strong password should:
- Be at least 12 characters long.
- Include a mix of uppercase and lowercase letters.
- Contain numbers and symbols.
- Not be based on personal information (e.g., birthdate, name).
According to the National Institute of Standards and Technology (NIST), longer passwords are more secure because they take longer to crack.
5.2 Enable Two-Factor Authentication (2FA)
Two-factor authentication adds an extra layer of security to your accounts. Even if someone knows your password, they will need a second verification method, such as a code sent to your phone.
- Check Account Settings: Most major online services (e.g., Google, Facebook, Amazon) offer 2FA.
- Enable 2FA: Go to the security settings of your account and enable two-factor authentication.
- Choose a Method: You can use an authenticator app (like Google Authenticator or Authy) or receive codes via SMS.
Enabling 2FA significantly reduces the risk of unauthorized access to your accounts.
5.3 Regularly Update Your Passwords
It’s a good practice to change your passwords regularly, especially for sensitive accounts like email and banking.
- Schedule Password Updates: Set a reminder to update your passwords every three to six months.
- Prioritize High-Risk Accounts: Focus on accounts that contain sensitive information.
- Use a Password Manager: Password managers can help you generate and store new, strong passwords.
5.4 Avoid Reusing Passwords
Reusing passwords across multiple accounts is a risky practice. If one account is compromised, all accounts with the same password could be at risk.
- Use Unique Passwords: Ensure that each account has a unique password.
- Password Manager: Use a password manager to keep track of different passwords.
5.5 Monitor for Data Breaches
Stay informed about data breaches that could expose your passwords. Services like “Have I Been Pwned” allow you to check if your email address has been involved in a data breach.
- Visit “Have I Been Pwned”: Go to the Have I Been Pwned website.
- Enter Your Email: Enter your email address to check if it has been compromised.
- Take Action: If your email has been involved in a breach, change your passwords immediately.
5.6 Be Cautious of Phishing Attacks
Phishing attacks are designed to trick you into revealing your passwords. Be wary of suspicious emails, messages, or websites that ask for your login credentials.
- Verify Sender: Always verify the sender of an email before clicking on any links or providing information.
- Check Website URL: Ensure that the website URL is legitimate and secure (HTTPS).
- Avoid Suspicious Links: Do not click on links in suspicious emails or messages.
- Never Share Passwords: Never share your passwords with anyone via email or phone.
5.7 Use a Secure Network
When accessing sensitive accounts, use a secure network. Avoid using public Wi-Fi networks without a VPN, as they can be vulnerable to hacking.
- Use a VPN: A VPN encrypts your internet traffic, protecting your data from eavesdropping.
- Avoid Public Wi-Fi: Limit your use of public Wi-Fi networks for sensitive activities.
By implementing these strategies, you can significantly improve your password security and protect your online accounts.
6. What Are The Common Password Mistakes?
Avoiding common password mistakes is critical to maintaining strong online security. Many people unknowingly make errors that can compromise their accounts.
6.1 Using Predictable Passwords
One of the most common mistakes is using passwords that are easy to guess. These include:
- Personal Information: Passwords based on your name, birthdate, or address.
- Common Words: Using dictionary words or common phrases.
- Keyboard Patterns: Using patterns like “qwerty” or “123456.”
According to a study by NordPass, the most common passwords are often simple and predictable.
6.2 Reusing Passwords
Reusing the same password across multiple accounts is a significant risk. If one account is compromised, all accounts with the same password could be at risk.
- Unique Passwords: Use a unique password for each account.
- Password Manager: Rely on a password manager to generate and store different passwords.
6.3 Sharing Passwords
Sharing passwords with others, even trusted friends or family members, can be risky. The more people who know your password, the higher the chance it could be compromised.
- Avoid Sharing: Do not share your passwords with anyone.
- Use Secure Sharing Features: If you need to share a password, use a secure password-sharing feature offered by password managers.
6.4 Not Using Two-Factor Authentication
Failing to enable two-factor authentication (2FA) leaves your accounts vulnerable to password breaches. 2FA adds an extra layer of security, making it more difficult for hackers to access your accounts.
- Enable 2FA: Turn on 2FA for all accounts that offer it.
- Use Authenticator Apps: Use authenticator apps like Google Authenticator or Authy for added security.
6.5 Storing Passwords Insecurely
Storing passwords in plain text or in unsecured locations, such as a note on your computer or in an unencrypted file, is a risky practice.
- Use Password Managers: Store your passwords in a secure password manager.
- Avoid Plain Text Storage: Never write down or store passwords in plain text.
6.6 Ignoring Password Breach Notifications
Ignoring notifications about password breaches can leave your accounts vulnerable. If you receive a notification that your password has been compromised, take immediate action.
- Monitor Breach Notifications: Stay informed about data breaches.
- Change Passwords Immediately: If your password has been compromised, change it immediately.
6.7 Falling For Phishing Scams
Falling for phishing scams can lead to your passwords being stolen. Phishing attacks often involve deceptive emails or websites that trick you into revealing your login credentials.
- Be Cautious: Be wary of suspicious emails or messages.
- Verify Links: Always verify the legitimacy of links before clicking on them.
- Never Share Passwords: Never share your passwords in response to an email or message.
By avoiding these common password mistakes, you can significantly improve your online security.
7. How Can I Stay Updated on New Security Features?
Staying informed about new security features and updates is vital for protecting your online accounts and personal information.
7.1 Follow Security Blogs and News Outlets
Numerous security blogs and news outlets provide up-to-date information on the latest security threats, vulnerabilities, and best practices.
- Krebs on Security: A well-respected blog covering cybersecurity news and analysis.
- The Hacker News: A popular source for cybersecurity news and technical information.
- Dark Reading: A comprehensive resource for cybersecurity insights and analysis.
- Wired: Offers in-depth coverage of technology and security trends.
Subscribing to newsletters or following these sources on social media can help you stay informed.
7.2 Subscribe to Vendor Updates
Many software and hardware vendors offer newsletters or update services that provide information on new security features, patches, and best practices for their products.
- Apple: Subscribe to Apple’s security updates to stay informed about iOS, macOS, and other Apple product security features.
- Google: Follow Google’s security blog and update services for information on Chrome, Android, and other Google products.
- Microsoft: Subscribe to Microsoft’s security bulletins for updates on Windows and other Microsoft products.
7.3 Use Social Media
Social media platforms like Twitter and LinkedIn can be valuable sources of information on security updates and trends.
- Follow Security Experts: Follow cybersecurity experts and thought leaders on Twitter.
- Join LinkedIn Groups: Join cybersecurity-related groups on LinkedIn to participate in discussions and share information.
7.4 Attend Webinars and Conferences
Attending webinars and conferences focused on cybersecurity can provide in-depth knowledge and insights into the latest security trends and technologies.
- RSA Conference: One of the leading cybersecurity conferences in the world.
- Black Hat: A cybersecurity conference that features training sessions and briefings on the latest security threats and vulnerabilities.
- DEF CON: A hacker convention that offers a range of activities, including hacking competitions and workshops.
7.5 Regularly Check Security Settings
Periodically review the security settings of your online accounts and devices to ensure that you are taking advantage of the latest security features.
- Review Account Settings: Check the security settings of your email, social media, and other online accounts.
- Update Software: Keep your software and operating systems up to date.
- Enable Security Features: Enable security features like two-factor authentication and password alerts.
7.6 Participate in Security Communities
Engaging with online security communities and forums can provide valuable insights and knowledge on security best practices and new features.
- Reddit: Participate in security-related subreddits like r/cybersecurity and r/privacy.
- Stack Exchange: Ask and answer security-related questions on Stack Exchange’s Information Security site.
By staying informed and actively engaging with the security community, you can ensure that you are taking the necessary steps to protect your online security.
8. How Do I Set Up AutoFill on My iPhone?
AutoFill on your iPhone streamlines your online experience by automatically entering saved information, such as credit card details and contact information. Here’s how to set it up:
8.1 Enable AutoFill for Passwords
First, make sure AutoFill for passwords is enabled in your iPhone settings:
- Open Settings: Tap the Settings app.
- Tap Passwords: Scroll down and tap “Passwords.”
- Enable AutoFill Passwords: Ensure that “AutoFill Passwords” is turned on.
8.2 Set Up AutoFill for Credit Cards
To use AutoFill for credit card information, follow these steps:
- Open Settings: Tap the Settings app.
- Tap Safari: Scroll down and tap “Safari.”
- Tap AutoFill: Tap “AutoFill.”
- Enable Credit Cards: Turn on “Credit Cards.”
- Saved Credit Cards: Tap “Saved Credit Cards” to add or edit your credit card information.
8.3 Use AutoFill for Contact Information
AutoFill can also automatically fill in your contact information from the Contacts app:
- Open Settings: Tap the Settings app.
- Tap Safari: Scroll down and tap “Safari.”
- Tap AutoFill: Tap “AutoFill.”
- Enable Use Contact Info: Turn on “Use Contact Info.”
- My Info: Tap “My Info” and select your contact card from the Contacts app.
8.4 Troubleshooting AutoFill
If AutoFill isn’t working as expected, try these troubleshooting steps:
- Verify Settings: Double-check that AutoFill is enabled for passwords, credit cards, and contact information.
- Update iOS: Make sure your iPhone is running the latest version of iOS.
- Restart iPhone: Restart your iPhone to refresh the system.
- Check Website Compatibility: AutoFill may not work on all websites.
8.5 Benefits of Using AutoFill
- Convenience: AutoFill saves time and effort by automatically entering your information.
- Accuracy: Reduces the risk of errors when entering your details manually.
- Security: Stored information is encrypted and protected by Face ID or Touch ID.
By setting up AutoFill on your iPhone, you can streamline your online experience and improve your overall security.
9. How To Find Saved Wi-Fi Passwords on Your iPhone
Finding saved Wi-Fi passwords on your iPhone can be useful when you need to share your Wi-Fi network details with guests or connect other devices.
9.1 Accessing Wi-Fi Passwords (iOS 16 and Later)
With iOS 16 and later versions, Apple has made it easier to view your saved Wi-Fi passwords directly on your iPhone.
- Open Settings: Tap the Settings app on your home screen.
- Tap Wi-Fi: Scroll down and tap “Wi-Fi.”
- Tap Edit: Tap the “Edit” button in the upper-right corner of the screen. You may be prompted to use Face ID, Touch ID, or your passcode to authenticate.
- Select Network: Tap the network you want to view the password for.
- View Password: In the network details, tap the password field. You may need to authenticate again. The password will be displayed.
9.2 Sharing Wi-Fi Passwords
Once you have found the Wi-Fi password, you can easily share it with others.
- Copy Password: Tap the password to copy it to your clipboard.
- Share Password: Paste the password into a message, email, or another app to share it.
9.3 Using iCloud Keychain
If you have iCloud Keychain enabled, your Wi-Fi passwords are automatically synced across your Apple devices.
- Ensure iCloud Keychain is Enabled: Go to Settings > Your Name > iCloud > Keychain and make sure it’s turned on.
- Access on Other Devices: On your other Apple devices, such as your iPad or Mac, the Wi-Fi passwords should automatically be available.
9.4 Alternative Methods (Older iOS Versions)
For older iOS versions, viewing Wi-Fi passwords directly is not possible. However, you can use a Mac to view the passwords if iCloud Keychain is enabled.
- Open Keychain Access on Mac: Open the Keychain Access app on your Mac (located in /Applications/Utilities/).
- Search for Network: Search for the name of the Wi-Fi network.
- Show Password: Check the box next to “Show Password.” You may be prompted to enter your administrator password to authenticate.
9.5 Security Considerations
When sharing Wi-Fi passwords, be mindful of security considerations.
- Share Securely: Avoid sharing passwords over insecure channels, such as unencrypted emails.
- Change Password Regularly: Consider changing your Wi-Fi password periodically for added security.
Finding and sharing Wi-Fi passwords on your iPhone is now more convenient than ever with the latest iOS updates.
10. Why Should I Use Savewhere.net For Financial Guidance?
Savewhere.net offers a wealth of resources and guidance to help you manage your finances and save money effectively.
10.1 Expert Tips and Strategies
Savewhere.net provides expert tips and strategies on various aspects of personal finance, including budgeting, saving, investing, and debt management.
- Budgeting Techniques: Learn how to create a budget that works for you and track your expenses effectively.
- Saving Strategies: Discover practical tips for saving money on everyday expenses, such as groceries, transportation, and entertainment.
- Investment Advice: Get guidance on investing your money wisely to achieve your financial goals.
- Debt Management: Find strategies for paying off debt and improving your credit score.
10.2 Real-World Examples and Success Stories
Savewhere.net shares real-world examples and success stories from individuals who have successfully saved money and achieved their financial goals.
- Inspiration: Get inspired by others who have overcome financial challenges and achieved success.
- Practical Advice: Learn from their experiences and apply their strategies to your own financial situation.
10.3 Tools and Resources
Savewhere.net offers a range of tools and resources to help you manage your finances effectively.
- Budgeting Templates: Download free budgeting templates to track your income and expenses.
- Savings Calculators: Use savings calculators to estimate how much you can save over time.
- Investment Tools: Access investment tools and resources to help you make informed investment decisions.
10.4 Community Support
Savewhere.net provides a community forum where you can connect with other individuals who are also focused on saving money and achieving their financial goals.
- Share Ideas: Share your own tips and strategies for saving money.
- Get Advice: Ask questions and get advice from other members of the community.
- Stay Motivated: Stay motivated by connecting with others who share your goals.
10.5 Up-to-Date Information
Savewhere.net provides up-to-date information on the latest financial trends, discounts, and offers.
- Deals and Discounts: Find the best deals and discounts on products and services.
- Financial News: Stay informed about the latest financial news and trends.
- Policy Updates: Get updates on changes in financial policies and regulations.
10.6 Easy-to-Implement Tips
Savewhere.net focuses on providing tips and strategies that are easy to implement in your daily life.
- Practical Advice: Get practical advice that you can start using right away.
- Simple Steps: Learn simple steps for saving money and improving your finances.
By leveraging the resources and guidance available on savewhere.net, you can take control of your finances and achieve your financial goals. Whether you’re looking to save money on everyday expenses, pay off debt, or invest for the future, savewhere.net can help you get there.
Ready to take control of your financial future? Visit savewhere.net today to discover more tips, deals, and resources. Join our community of savvy savers and start making your money work for you!