
Saving a file as a PNG in Photoshop is straightforward. You can easily save your images as PNGs, ensuring high quality and transparency. At savewhere.net, we guide you through the steps to make the most of your image editing while managing your digital assets efficiently.
1. Understanding the Basics of Saving in Photoshop
Photoshop offers various saving options to suit different needs. Unlike some applications that primarily use one file type, Photoshop provides multiple formats to save your work. Each format has unique characteristics, making it essential to understand their differences to optimize your workflow and file management. This knowledge helps you save time and ensures your images are always in the best format for their intended use.
1.1 Default File Type: PSD
The default file type in Photoshop is PSD (Photoshop Document). This format is ideal for ongoing projects because it preserves all the layers, effects, and other editing information within your image. Saving as a PSD allows you to re-edit your work later without losing any progress. However, PSD files are primarily designed for use within Photoshop.
If you plan to share your image with others or use it in different applications, you’ll need to save a copy in a more universally compatible format like JPEG or PNG. According to Adobe, PSD files are best for preserving complex editing work.
1.2 Common File Formats: JPEG and PNG
JPEG (Joint Photographic Experts Group) and PNG (Portable Network Graphics) are common file formats suitable for various purposes. These formats can be viewed and edited on nearly any computer or mobile device, making them ideal for sharing.
- JPEG: Best for photographs and images with many colors. JPEG uses compression, which can reduce file size but may also reduce image quality.
- PNG: Best for graphics, logos, and images with text or transparency. PNG uses lossless compression, which preserves image quality but may result in larger file sizes.
Unlike PSD files, these formats do not retain layer information. Therefore, they are not suitable for further editing. For instance, if you’re working on a logo that requires a transparent background, PNG is the preferred format because it supports transparency, unlike JPEG.
1.3 Save for Web (Legacy)
The Save for Web (Legacy) feature in Photoshop is specifically designed to optimize images for online use. This tool allows you to save images with settings that reduce file size without significantly compromising image quality. Optimized images load faster on websites, improving user experience.
- Optimization: Save for Web (Legacy) provides options to resize images, choose the best file format (JPEG, PNG, GIF), and adjust quality settings to achieve the smallest possible file size while maintaining acceptable image quality.
- Resizing: Resizing images directly in the Save for Web (Legacy) dialog box helps reduce file size. However, platforms like Facebook and Tumblr often automatically resize images, so resizing might not always be necessary.
- Quality Settings: Experimenting with different quality settings in JPEG format helps find the optimal balance between image quality and file size.
2. Why Save as PNG?
Saving an image as a PNG is crucial in various scenarios, particularly when you need to preserve image quality and transparency. PNG files use lossless compression, meaning no data is lost during the compression process. This makes PNG the preferred choice for images that require high detail and clarity, such as logos, graphics with text, and images with transparent backgrounds. Understanding when to use PNG can significantly enhance the visual appeal and professional look of your projects.
2.1 Preserving Image Quality
PNG’s lossless compression ensures that your images maintain their original quality, even after multiple saves. This is particularly important for images you plan to edit further or use in high-resolution formats. Unlike JPEG, which can introduce artifacts and reduce sharpness due to its lossy compression, PNG keeps every pixel intact, preserving fine details and vibrant colors.
- Example: When creating a digital painting or detailed illustration, saving as PNG ensures that every brushstroke and color nuance is perfectly preserved.
2.2 Supporting Transparency
One of the most significant advantages of PNG is its ability to handle transparency. This feature allows you to create images with transparent backgrounds, which is essential for logos, watermarks, and graphics that need to be overlaid on different backgrounds. Transparency ensures that the image blends seamlessly with its environment, providing a professional and polished look.
- Example: A logo designed for a website often needs a transparent background to avoid obscuring the website’s design. Saving the logo as a PNG ensures that it can be placed on any background without a visible border.
2.3 Best for Graphics and Text
PNG is also ideal for graphics and images with text because it preserves sharp lines and clear text, preventing the blurring or distortion that can occur with JPEG compression. This is particularly important for infographics, banners, and other visual content where readability is crucial.
- Example: An infographic containing charts, graphs, and text needs to be saved as a PNG to ensure that all elements remain crisp and legible.
3. Step-by-Step Guide: How to Save a File as PNG in Photoshop
Saving a file as a PNG in Photoshop is a straightforward process. Here’s a detailed, step-by-step guide to help you through the process:
3.1 Open Your Image in Photoshop
First, open the image you want to save as a PNG in Photoshop. You can do this by going to File > Open and selecting the image from your computer.
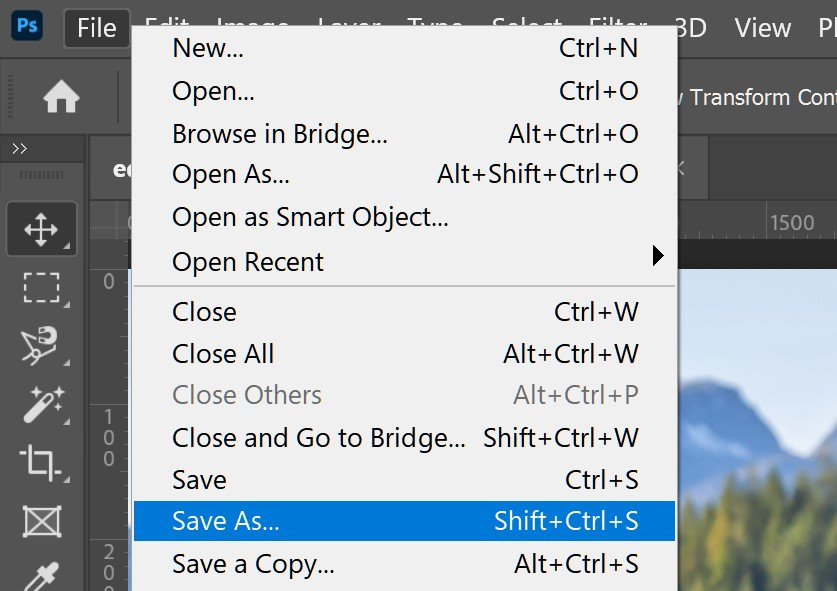
3.2 Go to Save As
Once your image is open, go to File > Save As. This will open the Save As dialog box, where you can specify the file name, location, and format.
3.3 Choose PNG Format
In the Save As dialog box, locate the Format dropdown menu. Click on it and select PNG (*.PNG) from the list of available formats.
3.4 Name Your File
Give your file a descriptive name to easily identify it later. Make sure to choose a name that reflects the content and purpose of the image.
3.5 Select a Save Location
Choose a location on your computer where you want to save the PNG file. Select a folder that is easy to access and remember.
3.6 Save Your Image
After selecting the PNG format, naming your file, and choosing a save location, click the Save button. Photoshop will then save your image as a PNG file.
3.7 PNG Options Dialog Box
Depending on your version of Photoshop, you might see a PNG Options dialog box. Here, you can choose the compression level. The default settings usually work well, but you can adjust them if needed. Click OK to proceed.
- Interlace: This option allows the image to load progressively in web browsers. Choosing “None” will load the image from top to bottom.
3.8 Verify Your Saved PNG File
Navigate to the location where you saved the file and open it to ensure it has been saved correctly as a PNG. Check the image quality and transparency, if applicable, to make sure everything looks as expected.
4. Optimizing PNG Files in Photoshop
Optimizing PNG files is crucial for maintaining image quality while reducing file size, which is especially important for web use. Photoshop offers several techniques to achieve this balance. Properly optimized PNG files enhance website loading times and improve overall user experience.
4.1 Using Save for Web (Legacy)
While the standard “Save As” function works for creating PNG files, the Save for Web (Legacy) option provides more control over optimization.
-
Go to File > Export > Save for Web (Legacy).
-
In the Save for Web dialog box, choose PNG-8 or PNG-24 from the preset menu.
- PNG-8: This format is best for graphics with fewer colors and supports simple transparency. It reduces file size by limiting the color palette.
- PNG-24: This format supports millions of colors and full transparency, making it suitable for complex images requiring high quality.
4.2 Adjusting Color Palette
If you choose PNG-8, you can further reduce file size by adjusting the color palette.
- In the Save for Web dialog box, under the PNG-8 settings, you’ll see a Colors option.
- Reduce the number of colors to the lowest acceptable level. Experiment to find the best balance between color accuracy and file size.
4.3 Transparency Options
When saving PNG files with transparency, ensure that the transparency settings are correctly configured in the Save for Web dialog box.
- Check the Transparency box to preserve transparent areas.
- Adjust the Matte option to control how transparent edges blend with the background. Setting the matte color to match the background can help reduce halo effects.
4.4 Image Size and Dimensions
Reducing the dimensions of your image can significantly decrease the file size.
- In the Save for Web dialog box, adjust the Image Size settings.
- Enter the desired width and height. Make sure to maintain the aspect ratio to avoid distortion.
4.5 Using Third-Party Optimization Tools
For more advanced optimization, consider using third-party tools specifically designed for PNG compression. These tools often employ sophisticated algorithms to further reduce file size without compromising quality.
- TinyPNG: A popular online tool that uses smart lossy compression techniques to reduce PNG file size.
- ImageOptim: A free, open-source tool for Mac that optimizes images by removing unnecessary metadata and applying advanced compression.
5. Common Issues and Troubleshooting
While saving files as PNGs in Photoshop is usually straightforward, you might encounter some common issues. Here are some problems and their solutions to help you troubleshoot:
5.1 File Size Too Large
Problem: The PNG file size is larger than expected, which can slow down website loading times.
Solution:
- Use Save for Web (Legacy): This option allows you to optimize the image by reducing the color palette and adjusting transparency settings.
- Reduce Image Dimensions: Decrease the width and height of the image to lower the file size.
- Use PNG-8: For images with fewer colors, PNG-8 can significantly reduce file size compared to PNG-24.
- Third-Party Optimization Tools: Use tools like TinyPNG or ImageOptim to further compress the file without losing quality.
5.2 Transparency Issues
Problem: The transparent areas of the PNG appear with a white or colored background.
Solution:
- Check Transparency Settings: In the Save for Web (Legacy) dialog box, ensure the Transparency box is checked.
- Adjust Matte Option: Use the Matte option to blend the transparent edges with a background color that matches your website or design.
- Verify Layers: Make sure that the layers you intend to be transparent are indeed transparent in the Photoshop file.
5.3 Image Quality Loss
Problem: The image appears blurry or pixelated after saving as a PNG.
Solution:
- Use PNG-24: This format supports more colors and maintains higher image quality compared to PNG-8.
- Avoid Over-Compression: Be cautious when using third-party optimization tools, as aggressive compression can sometimes degrade image quality.
- Check Original Image: Ensure the original image in Photoshop is of high quality before saving as a PNG.
5.4 Compatibility Issues
Problem: The PNG file does not display correctly in certain browsers or applications.
Solution:
- Use Standard PNG Format: Ensure that you are saving the file in a standard PNG format that is widely supported.
- Test in Different Environments: Check the PNG file in various browsers and applications to identify any compatibility issues.
- Convert to Another Format: If compatibility issues persist, consider converting the PNG to another format like JPEG for broader support.
5.5 Photoshop Version Issues
Problem: Some Save As options are missing or different in older versions of Photoshop.
Solution:
- Update Photoshop: If possible, update to the latest version of Photoshop to access the most current features and options.
- Use Legacy Features: In older versions, the Save for Web option might be located under a different menu or have slightly different settings.
6. Practical Examples and Use Cases
Understanding how to save a file as a PNG in Photoshop becomes even more valuable when you see it applied in real-world scenarios. Here are some practical examples and use cases that highlight the importance of using PNG format effectively.
6.1 Web Design and Development
In web design and development, PNG files are essential for creating visually appealing and functional websites.
- Logos: Saving logos as PNGs with transparent backgrounds ensures they can be placed on any website background without unsightly borders. This is crucial for maintaining a consistent brand image.
- Icons: Icons used for navigation, buttons, and other interactive elements benefit from PNG’s sharp lines and transparency. This ensures they look crisp and clean on various screen sizes and resolutions.
- Graphics: Web graphics, such as banners and illustrations, often require high quality and transparency. PNG format preserves these elements, enhancing the overall visual appeal of the website.
6.2 Digital Marketing
PNG files play a vital role in digital marketing campaigns, ensuring that marketing materials look professional and engaging.
- Social Media Graphics: Social media posts often include images with text and graphics. Saving these as PNGs ensures that the text remains legible and the graphics retain their clarity, even after being compressed by social media platforms.
- Email Marketing: Email marketing campaigns rely on visually appealing images to capture attention. Using PNGs for graphics and logos ensures they look sharp and professional in email clients.
- Advertisements: Online advertisements, such as display ads and banner ads, require high-quality images that load quickly. Optimizing PNGs for web use ensures that these ads are both visually appealing and efficient.
6.3 Print Design
While PNG is primarily used for digital images, it can also be useful in print design, especially when transparency is required.
- Posters and Flyers: When designing posters and flyers with transparent elements or overlays, PNG format ensures that these elements are printed accurately and with high quality.
- Business Cards: Logos and graphics on business cards benefit from PNG’s sharp lines and transparency, ensuring they look professional and polished.
- Brochures: Brochures often include a mix of text and graphics. Saving these elements as PNGs ensures that they retain their clarity and sharpness when printed.
6.4 Video Editing
In video editing, PNG files are used for overlays, lower thirds, and other graphical elements.
- Overlays: PNGs with transparent backgrounds are ideal for creating overlays, such as watermarks and logos, that can be placed on top of video footage.
- Lower Thirds: Lower thirds, which display information such as names and titles, benefit from PNG’s sharp text and transparency, ensuring they look clean and professional.
- Animations: Animated graphics often require transparency. Saving these animations as a series of PNG frames ensures that they retain their quality and transparency throughout the video.
7. Maximizing Efficiency with savewhere.net
At savewhere.net, we understand the importance of efficient digital asset management. Knowing how to save files as PNGs in Photoshop is just one aspect of optimizing your workflow. We offer a range of resources and tips to help you manage your digital assets effectively and save time and money.
7.1 Tips for Saving Time
- Use Photoshop Actions: Automate repetitive tasks by creating Photoshop Actions for saving files as PNGs with specific settings.
- Batch Processing: Use Photoshop’s Batch Processing feature to save multiple files as PNGs at once, saving you valuable time.
- Templates: Create templates with pre-set settings for saving PNG files, ensuring consistency and efficiency in your workflow.
7.2 Money-Saving Strategies
- Optimize File Sizes: Reducing PNG file sizes not only improves website loading times but also saves on storage costs.
- Use Free Optimization Tools: Take advantage of free online tools like TinyPNG and ImageOptim to further compress PNG files without sacrificing quality.
- Efficient Workflow: By streamlining your workflow and using efficient techniques, you can reduce the time spent on image editing, saving you money on labor costs.
8. Keeping Up with Trends and Updates
The world of graphic design and digital asset management is constantly evolving. To stay ahead of the curve, it’s important to keep up with the latest trends and updates in Photoshop and related technologies.
8.1 Staying Informed
- Adobe Creative Cloud Updates: Regularly check for updates to Adobe Creative Cloud and Photoshop to access new features and improvements.
- Industry Blogs and Forums: Follow industry blogs and forums to stay informed about the latest trends and best practices in graphic design and digital asset management.
- Online Courses and Tutorials: Take online courses and tutorials to enhance your skills and learn new techniques for working with PNG files in Photoshop.
8.2 Adapting to Change
- Experiment with New Features: Explore new features in Photoshop to discover how they can improve your workflow and help you create better PNG files.
- Adjust Your Workflow: Be prepared to adjust your workflow as new technologies and techniques emerge.
- Stay Flexible: Flexibility is key to success in the ever-changing world of graphic design and digital asset management.
9. How Understanding File Formats Can Save You Money
Understanding different file formats and when to use them can lead to significant cost savings. Here’s how:
9.1 Optimized Storage
- Choosing the Right Format: Selecting the appropriate file format, like PNG for transparency and JPEG for photographs, ensures files are not unnecessarily large. Smaller files require less storage space, reducing cloud storage costs.
- Archiving Strategies: Implementing a clear archiving strategy involves compressing and converting older files to more efficient formats, freeing up valuable storage space.
9.2 Reduced Bandwidth Usage
- Web Optimization: Using optimized PNG files on your website reduces bandwidth usage. Smaller files load faster, improving user experience and lowering data transfer costs.
- Email Marketing: Sending optimized PNG images in email campaigns ensures faster loading times for recipients and reduces the risk of emails being flagged as spam due to large attachments.
9.3 Efficient Workflow
- Time Savings: Knowing how to save and optimize PNG files quickly streamlines your workflow. Reduced time spent on image editing translates to lower labor costs and increased productivity.
- Automation: Automating tasks like batch saving and compression with Photoshop Actions minimizes manual work, further reducing time and costs.
9.4 Improved Collaboration
- Consistent Formats: Standardizing file formats across your team ensures compatibility and reduces the risk of file conversion issues. This streamlines collaboration and avoids costly delays.
- Clear Guidelines: Establishing clear guidelines on when to use PNG versus other formats prevents confusion and ensures everyone follows best practices for file management.
9.5 Avoiding Rework
- High-Quality Originals: Saving original designs as high-quality PNG files prevents the need to recreate assets later. High-quality originals ensure that you can adapt and reuse assets without quality loss, saving time and resources.
- Proper Archiving: Maintaining an organized archive of PNG files ensures that you can quickly retrieve and reuse assets when needed, avoiding the expense of re-designing from scratch.
10. FAQs About Saving Files as PNG in Photoshop
Here are some frequently asked questions about saving files as PNG in Photoshop:
10.1 What is the difference between PNG-8 and PNG-24?
PNG-8 supports up to 256 colors and is best for graphics with fewer colors. PNG-24 supports millions of colors and full transparency, making it suitable for complex images requiring high quality.
10.2 How do I reduce the file size of a PNG in Photoshop?
Use Save for Web (Legacy) to optimize the image, reduce the color palette, and adjust transparency settings. You can also use third-party optimization tools like TinyPNG or ImageOptim.
10.3 Why is my PNG file too large?
The PNG file size may be large due to high image dimensions, a large color palette, or unnecessary metadata. Optimize the image using Save for Web (Legacy) and third-party optimization tools.
10.4 How do I save a PNG with a transparent background?
In the Save for Web (Legacy) dialog box, ensure the Transparency box is checked. Also, verify that the layers you intend to be transparent are indeed transparent in the Photoshop file.
10.5 Can I use PNG for photos?
While PNG can be used for photos, JPEG is generally a better choice due to its efficient compression. PNG is best for graphics, logos, and images with text or transparency.
10.6 How do I ensure my PNG file is compatible with all browsers?
Use the standard PNG format and test the file in various browsers to identify any compatibility issues. If issues persist, consider converting the PNG to another format like JPEG for broader support.
10.7 What is Save for Web (Legacy) in Photoshop?
Save for Web (Legacy) is a feature in Photoshop that allows you to optimize images for online use by reducing file size without significantly compromising image quality. It provides options to resize images, choose the best file format (JPEG, PNG, GIF), and adjust quality settings.
10.8 How do I automate the process of saving files as PNG in Photoshop?
Use Photoshop Actions to automate repetitive tasks such as saving files as PNGs with specific settings. You can also use Photoshop’s Batch Processing feature to save multiple files as PNGs at once.
10.9 What are some best practices for managing PNG files?
- Use descriptive file names.
- Organize files into folders.
- Use version control.
- Back up your files regularly.
10.10 How do I keep up with the latest trends and updates in Photoshop?
Regularly check for updates to Adobe Creative Cloud and Photoshop, follow industry blogs and forums, and take online courses and tutorials.
Saving files as PNGs in Photoshop is a fundamental skill that can greatly enhance your graphic design and digital asset management capabilities. By understanding the nuances of PNG format and following the tips and best practices outlined in this guide, you can create high-quality images that are optimized for various purposes.
Remember to visit savewhere.net for more valuable tips and resources on saving money and managing your digital assets efficiently. Explore our website to discover a wealth of information and tools that can help you optimize your workflow and achieve your financial goals. Let savewhere.net be your trusted partner in navigating the world of digital asset management and financial savings.
Saving a file as a PNG in Photoshop can be done in just a few steps, but understanding the best practices and optimization techniques will give you an edge in managing your digital assets. For more money-saving tips and expert advice, visit savewhere.net today. Discover how to make the most of your resources and achieve your financial goals with our comprehensive guides and tools.
Address: 100 Peachtree St NW, Atlanta, GA 30303, United States
Phone: +1 (404) 656-2000
Website: savewhere.net