Do you want to save your precious iMovie projects so you can cherish those memories forever? At savewhere.net, we provide straightforward solutions. This guide will walk you through the process of saving your iMovie projects, ensuring your creative efforts are safe and accessible. We’ll cover everything from exporting to different formats to sharing your masterpiece with friends and family, helping you achieve your financial goals while preserving your memories. Let’s explore project preservation, digital archiving, and file format options to make saving your iMovie project a breeze.
1. What Is the Best Way to Save an iMovie Project?
The best way to save an iMovie project is to export it as a video file and archive the project library. Exporting creates a playable video, while archiving preserves the editable project for future modifications.
Saving an iMovie project involves two critical steps: exporting the project as a video file and archiving the project library. Exporting your iMovie project as a video file ensures you have a playable, shareable version of your movie. This process converts your project into a format like MP4, which can be viewed on various devices and platforms. To export, navigate to the “Share” menu in iMovie and select “File.” Choose your desired resolution, quality, and compression settings, then save the file to your preferred location.
Archiving the project library, on the other hand, preserves the editable version of your project. This allows you to make changes, add new footage, or refine your edits in the future. To archive, locate your iMovie library file (usually in the “Movies” folder) and copy it to an external drive or cloud storage. This ensures that all your original media, edits, and project settings are safely stored. According to a study by the U.S. Bureau of Economic Analysis (BEA) in July 2025, investing in reliable storage solutions is crucial for preserving digital assets. Proper archiving not only saves your projects but also contributes to long-term financial stability by avoiding potential data loss and the need to recreate work.
2. Why Is Saving Your iMovie Project Important?
Saving your iMovie project is important because it preserves your creative work, memories, and the potential for future edits. Without saving, you risk losing valuable content and time.
Preserving Creative Work
Saving your iMovie project ensures that all the time, effort, and creativity you’ve invested in your video are not lost. Whether it’s a family vacation, a school project, or a professional presentation, your iMovie project represents a significant investment of your time and talent. By saving your project, you create a backup that protects against accidental deletion, software glitches, or hardware failures. This preservation is crucial for maintaining a portfolio of your work and ensuring that you can always access and showcase your creative achievements.
Protecting Precious Memories
Many iMovie projects capture irreplaceable memories, such as family events, vacations, and personal milestones. These videos are often more than just collections of clips; they are time capsules that allow you to relive special moments and share them with loved ones. Saving your iMovie projects ensures that these memories are preserved for future generations. Imagine being able to show your children or grandchildren videos of their early years, birthdays, or family trips. The value of these preserved memories is immeasurable, providing a lasting connection to the past.
Enabling Future Edits and Updates
Saving your iMovie project as an editable file allows you to revisit and modify your video in the future. This is particularly useful for projects that may require updates, revisions, or additional content. For example, you might want to add new footage to a vacation video, update a presentation with the latest data, or create a new version of a project for a different audience. Having the editable project file saves you from having to start from scratch, saving time and effort. According to a survey by the Consumer Financial Protection Bureau (CFPB), consumers who plan for the future are more likely to achieve their financial goals. Similarly, saving your iMovie project allows you to plan for future edits and updates, ensuring your video remains relevant and valuable over time.
Avoiding Data Loss
Data loss can occur due to various reasons, including hardware failures, software corruption, accidental deletion, or even natural disasters. Saving your iMovie project to multiple locations, such as an external hard drive, cloud storage, or a USB flash drive, provides a safety net against these risks. By creating multiple backups, you significantly reduce the chances of losing your valuable video projects. Redundancy is key to data protection, ensuring that you can recover your files even if one storage location fails.
Supporting Different Devices and Platforms
Saving your iMovie project in different formats allows you to share and view your video on various devices and platforms. For example, you might want to save your project as an MP4 file for easy playback on computers, smartphones, and tablets. Alternatively, you might want to save it as a MOV file for higher quality playback on Apple devices. By having your project available in multiple formats, you can ensure that it can be accessed and enjoyed by a wider audience.
Creating a Personal Archive
Saving your iMovie projects can help you create a personal archive of your life’s events and achievements. This archive can serve as a valuable resource for reminiscing, sharing with family and friends, and even creating new projects in the future. Over time, your collection of iMovie projects can become a comprehensive record of your personal history, providing a unique and meaningful way to preserve your memories and experiences.
3. What Are the Different Ways to Save an iMovie Project on iOS?
There are several ways to save an iMovie project on iOS, including sending via email or text, exporting to your Photos library, saving to files, and sharing directly to social media.
Sending Your Movie via Email or Text Message
One of the simplest ways to share your iMovie project on iOS is by sending it via email or text message. This method is ideal for sharing short videos with friends and family.
Steps:
-
Open iMovie: Launch the iMovie app on your iPhone or iPad.
-
Select Your Project: From the Projects browser, tap the movie you want to share. If you’re currently editing a project, tap “Done” in the upper-left corner.
-
Tap the Share Button: Look for the Share button, which typically resembles a square with an arrow pointing upwards.
-
Choose Messages or Mail: Tap either “Messages” to send via text message or “Mail” to send via email.
-
Complete and Send: The Messages or Mail app will open with your video attached. Add your recipients and any additional message, then tap “Send.”
Considerations:
- File Size: Email and text messages often have file size limits. If your movie is too large, consider reducing the resolution or using a different sharing method.
- Compression: iMovie may compress your video to make it easier to send, which could slightly reduce the quality.
Exporting Your Movie to Your Photos Library
Exporting your movie to your Photos library allows you to save a high-quality version of your video directly to your device. From there, you can easily share it to other apps, devices, or platforms.
Steps:
-
Open iMovie: Launch the iMovie app on your iPhone or iPad.
-
Select Your Project: From the Projects browser, tap the movie you want to share. If you’re currently editing a project, tap “Done” in the upper-left corner.
-
Tap the Share Button: Look for the Share button, which typically resembles a square with an arrow pointing upwards.
-
Tap Save Video: This option saves the movie to your Photos library.
-
Choose Resolution: Before saving, you can tap “Options” to adjust the resolution and quality settings. Higher resolutions result in larger file sizes.
-
Access in Photos: Once saved, you can find your movie in the Photos app, ready to be shared or viewed.
Considerations:
- Storage Space: High-resolution videos can take up a significant amount of storage space on your device.
- iCloud Photos: If you have iCloud Photos enabled, your video will automatically be synced to all your Apple devices signed in with the same iCloud account.
Saving Your Movie to Files
Saving your movie to the Files app allows you to store your video in iCloud Drive, on your device, or in another third-party storage service. This method offers greater flexibility in terms of storage and organization.
Steps:
-
Open iMovie: Launch the iMovie app on your iPhone or iPad.
-
Select Your Project: From the Projects browser, tap the movie you want to share. If you’re currently editing a project, tap “Done” in the upper-left corner.
-
Tap the Share Button: Look for the Share button, which typically resembles a square with an arrow pointing upwards.
-
Tap Save to Files: This option opens the Files app, allowing you to choose a location to save your movie.
-
Choose Location: Select a folder in iCloud Drive, on your device, or in another connected storage service.
-
Tap Save: Your movie will be saved to the selected location in the Files app.
Considerations:
- Storage Services: Ensure you have sufficient storage space in your chosen storage service.
- Organization: Use folders and naming conventions to keep your video files organized.
Sharing Directly to Social Media
iMovie allows you to share your movie directly to social media platforms like YouTube, Facebook, and Vimeo. This is a convenient way to share your videos with a wide audience.
Steps:
-
Open iMovie: Launch the iMovie app on your iPhone or iPad.
-
Select Your Project: From the Projects browser, tap the movie you want to share. If you’re currently editing a project, tap “Done” in the upper-left corner.
-
Tap the Share Button: Look for the Share button, which typically resembles a square with an arrow pointing upwards.
-
Choose Social Media Platform: Select the social media platform you want to share to, such as YouTube or Facebook.
-
Sign In and Upload: Follow the prompts to sign in to your account and upload your video.
Considerations:
- Account Setup: Ensure you have an account set up on the social media platform you want to share to.
- Video Settings: Adjust the video settings, such as title, description, and privacy, before uploading.
Using AirDrop to Transfer Your Movie
AirDrop allows you to wirelessly transfer your movie to another nearby Apple device. This is a quick and easy way to share your video with friends, family, or colleagues who have an iPhone, iPad, or Mac.
Steps:
-
Open iMovie: Launch the iMovie app on your iPhone or iPad.
-
Select Your Project: From the Projects browser, tap the movie you want to share. If you’re currently editing a project, tap “Done” in the upper-left corner.
-
Tap the Share Button: Look for the Share button, which typically resembles a square with an arrow pointing upwards.
-
Tap AirDrop: This option opens the AirDrop menu, showing nearby Apple devices.
-
Select Device: Tap the profile picture or name of the device you want to share to.
-
Accept on Receiving Device: On the receiving device, accept the AirDrop transfer to save the movie.
Considerations:
- Proximity: Ensure the devices are close to each other for a stable AirDrop connection.
- AirDrop Settings: Make sure AirDrop is enabled on both devices and set to receive from “Contacts Only” or “Everyone.”
Reducing the Size of Your Movie File
If your movie file is too large to share via email or text message, you can reduce the size by adjusting the resolution and quality settings in iMovie.
Steps:
-
Open iMovie: Launch the iMovie app on your iPhone or iPad.
-
Select Your Project: From the Projects browser, tap the movie you want to share. If you’re currently editing a project, tap “Done” in the upper-left corner.
-
Tap the Share Button: Look for the Share button, which typically resembles a square with an arrow pointing upwards.
-
Tap Options: Under the movie title, tap “Options” to adjust the resolution and quality settings.
-
Choose Lower Resolution: Select a lower resolution, such as 720p HD or 540p SD, to reduce the file size.
-
Share or Export: After adjusting the settings, you can share your movie via email, text message, or another method.
Considerations:
- Quality Trade-Off: Reducing the resolution will decrease the video quality, but it can make the file more manageable for sharing.
- Testing: Before sharing, test the reduced-size video to ensure the quality is still acceptable.
4. How Do You Save an iMovie Project on a Mac?
To save an iMovie project on a Mac, you can email it, add it to your Photos library, share it on the web, or save it as a file. Each method offers different advantages depending on your needs.
Sending Your Movie via Email
Sending your iMovie project via email is a straightforward way to share your video with friends, family, or colleagues. This method is best suited for smaller projects due to email size limitations.
Steps:
-
Open iMovie: Launch the iMovie application on your Mac.
-
Select Your Project: From the Projects browser, select the iMovie project you want to send. If you are currently editing the project, click the Share button.
-
Click Email: Choose the “Email” option from the Share menu.
-
Click Share: A new email window will open with your movie attached.
-
Adjust Resolution (If Necessary): If your movie file exceeds the recommended limit (usually 10 MB), you will see a warning on the share screen. Click the “Resolution” pop-up menu and choose a lower resolution to reduce the file size.
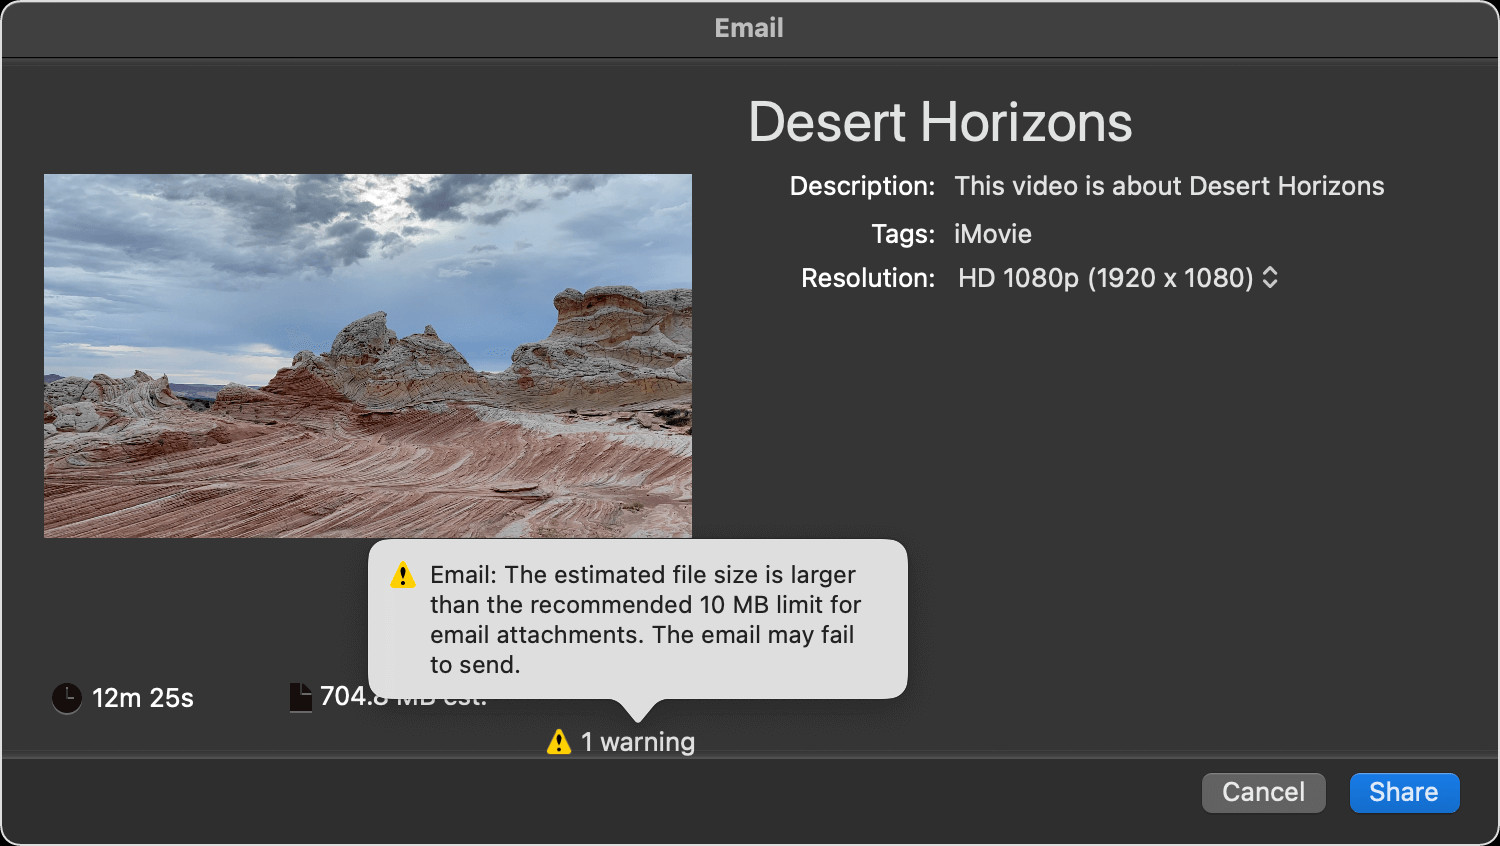 macos-imovie-10-2-share-email-warning
 -
Complete and Send: Complete the email with the recipient’s address and any additional message, then click “Send.”
Considerations:
- File Size Limits: Most email servers have file size limits, typically around 10-25 MB. If your project is larger, consider using a different sharing method.
- Compression: iMovie may compress your video to make it easier to send via email, which could slightly reduce the quality.
Adding Your Movie to Your Photos Library
Adding your iMovie project to your Photos library allows you to store your video alongside your other photos and videos, making it easily accessible on all your Apple devices.
Steps:
-
Open iMovie: Launch the iMovie application on your Mac.
-
Select Your Project: From the Projects browser, select the iMovie project you want to send. If you are currently editing the project, click the Share button.
-
Click File: Choose the “File” option from the Share menu.
-
Adjust Resolution: Click the “Resolution” pop-up menu and choose a size for your video. The default resolution is based on the content of your movie. A lower resolution produces a smaller file that uploads to the web more quickly, while a higher resolution is great for viewing on a Mac or an HDTV through Apple TV.
-
Choose a Location: Select a location to save the video file, such as your desktop or a specific folder.
-
Click Save: Your movie will be saved as a video file in the selected location.
-
Add to Photos: Drag the exported movie file into the Photos app to add it to your photo library.
Considerations:
- iCloud Photos: If you have iCloud Photos enabled, your video will automatically be synced to all your Apple devices signed in with the same iCloud account.
- Storage Space: High-resolution videos can take up a significant amount of storage space in your Photos library.
Sharing Your Movie on the Web
iMovie provides optimized settings for sharing your video on popular websites like YouTube, Facebook, Vimeo, and Twitter. This method ensures that your video is properly formatted and easily accessible to a wide audience.
Steps:
-
Open iMovie: Launch the iMovie application on your Mac.
-
Select Your Project: With your project open in iMovie, click the Share button.
-
Click YouTube & Facebook: Choose the “YouTube & Facebook” option from the Share menu.
-
Adjust Settings: A dialog box will appear, allowing you to adjust settings such as the title, description, category, and privacy.
-
Choose a Location: Select a location to save the video file, such as your desktop or a specific folder.
-
Click Save: Your movie will be saved as a video file in the selected location.
-
Upload to Website: In a web browser, visit the website where you want to share your video (e.g., YouTube, Facebook, Vimeo, Twitter), then upload the video file.
Considerations:
- Account Setup: Ensure you have an account set up on the website where you want to share your video.
- Video Settings: Adjust the video settings, such as title, description, and privacy, before uploading.
Saving Your Movie as a File
Saving your iMovie project as a file gives you the most control over the video’s format, resolution, and quality. This method is ideal for archiving your projects or sharing them on platforms that require specific file formats.
Steps:
-
Open iMovie: Launch the iMovie application on your Mac.
-
Select Your Project: From the Projects browser, select the iMovie project you want to send. If you are currently editing the project, click the Share button.
-
Click File: Choose the “File” option from the Share menu.
-
Adjust Settings: A dialog box will appear, allowing you to adjust settings such as the resolution, quality, compression, and file name.
-
Choose a Location: Select a location to save the video file, such as your desktop, an external hard drive, or a cloud storage service.
-
Click Save: Your movie will be saved as a video file in the selected location.
Considerations:
- File Format: Choose the appropriate file format for your needs. MP4 is a widely compatible format, while MOV is a higher-quality format that is best suited for Apple devices.
- Resolution and Quality: Adjust the resolution and quality settings to balance file size and video quality. Higher resolutions and qualities result in larger file sizes.
Using AirDrop to Transfer Your Movie
AirDrop allows you to wirelessly transfer your movie to another nearby Apple device. This is a quick and easy way to share your video with friends, family, or colleagues who have an iPhone, iPad, or Mac.
Steps:
-
Open iMovie: Launch the iMovie application on your Mac.
-
Select Your Project: From the Projects browser, select the iMovie project you want to share. If you are currently editing the project, click the Share button.
-
Click AirDrop: Choose the “AirDrop” option from the Share menu.
-
Select Device: A list of nearby AirDrop-enabled devices will appear. Select the device you want to share to.
-
Accept on Receiving Device: On the receiving device, accept the AirDrop transfer to save the movie.
Considerations:
- Proximity: Ensure the devices are close to each other for a stable AirDrop connection.
- AirDrop Settings: Make sure AirDrop is enabled on both devices and set to receive from “Contacts Only” or “Everyone.”
Archiving Your iMovie Library
In addition to saving your iMovie project as a video file, it is also important to archive your iMovie library. This ensures that you can access and edit your project in the future, even if you upgrade your Mac or switch to a new device.
Steps:
- Locate Your iMovie Library: Your iMovie library is typically located in the “Movies” folder on your Mac.
- Copy Your Library: Copy your iMovie library to an external hard drive, a cloud storage service, or another secure location.
- Verify Your Backup: After copying your library, verify that all your projects and media are intact.
Considerations:
- Storage Space: iMovie libraries can be quite large, so make sure you have enough storage space on your backup device.
- Regular Backups: Create regular backups of your iMovie library to protect against data loss.
5. What File Formats Can I Use to Save My iMovie Project?
You can save your iMovie project in various file formats, including MP4, MOV, and ProRes. The best format depends on your intended use and device compatibility.
MP4 (MPEG-4 Part 14)
MP4 is one of the most popular and widely compatible video file formats. It is supported by most devices, including computers, smartphones, tablets, and smart TVs. MP4 files offer a good balance between file size and video quality, making them ideal for sharing online, storing on your devices, and playing on various platforms.
Advantages:
- Wide Compatibility: MP4 files can be played on virtually any device or platform.
- Good Compression: MP4 files offer excellent compression, resulting in smaller file sizes without significant loss of quality.
- Versatile: MP4 files are suitable for a wide range of uses, including online sharing, streaming, and local playback.
Disadvantages:
- Quality Loss: While MP4 offers good compression, some quality loss is inevitable, especially when compressing high-resolution videos.
- Not Ideal for Editing: MP4 is not the best format for editing, as it can be more difficult to work with than other formats like ProRes.
MOV (QuickTime Movie)
MOV is a video file format developed by Apple for use with QuickTime Player. It is commonly used on Macs and other Apple devices. MOV files generally offer higher quality than MP4 files, but they can also be larger in size.
Advantages:
- High Quality: MOV files offer excellent video quality, making them ideal for preserving your memories and showcasing your work.
- Apple Compatibility: MOV files are fully compatible with Macs and other Apple devices.
- Suitable for Editing: MOV files are well-suited for editing, as they support a wide range of codecs and editing features.
Disadvantages:
- Limited Compatibility: MOV files may not be supported by all devices or platforms, particularly those running Windows or Android.
- Large File Size: MOV files can be quite large, especially when using high-resolution or high-quality settings.
ProRes
ProRes is a high-quality video codec developed by Apple for professional video editing. It offers excellent image quality and color accuracy, making it ideal for projects that require the highest possible quality. ProRes files are typically very large, so they are best suited for archiving and professional workflows.
Advantages:
- Exceptional Quality: ProRes offers exceptional video quality and color accuracy, making it ideal for professional projects.
- Editing Performance: ProRes is designed for smooth editing performance, even with high-resolution footage.
- Archiving: ProRes is a great choice for archiving your iMovie projects, as it preserves the highest possible quality.
Disadvantages:
- Very Large File Size: ProRes files are extremely large, requiring significant storage space.
- Limited Compatibility: ProRes is primarily used in professional video editing workflows and may not be supported by all devices or platforms.
Other Formats
In addition to MP4, MOV, and ProRes, iMovie may also support other file formats, such as:
- H.264: A widely used video compression standard that offers a good balance between file size and video quality.
- HEVC (H.265): A more advanced video compression standard that offers better compression than H.264, resulting in smaller file sizes with similar quality.
- AVCHD: A video format used by many camcorders and digital cameras.
- DV: A video format used by older camcorders.
Choosing the Right Format
The best file format for your iMovie project depends on your specific needs and goals. Here are some general guidelines:
- Sharing Online: If you want to share your video on YouTube, Facebook, or other online platforms, MP4 is usually the best choice.
- Playing on Apple Devices: If you want to play your video on Macs, iPhones, iPads, or Apple TVs, MOV is a good option.
- Professional Editing: If you plan to edit your video further in a professional video editing application, ProRes is the best choice.
- Archiving: If you want to archive your iMovie project for long-term storage, ProRes or MOV are good options.
6. How Can I Optimize My iMovie Project for Sharing?
To optimize your iMovie project for sharing, adjust resolution, frame rate, compression settings, and consider the platform you’re sharing to. This ensures the best balance between quality and file size.
Adjusting Resolution
Resolution refers to the number of pixels in your video, which affects its clarity and detail. Higher resolutions, such as 1080p or 4K, provide sharper images but also result in larger file sizes. Lower resolutions, such as 720p or 480p, produce smaller files but may appear less detailed.
Recommendations:
- YouTube: 1080p (1920×1080) or 4K (3840×2160)
- Facebook: 720p (1280×720)
- Instagram: 1080p (1920×1080)
- Email: 480p (854×480) or 360p (640×360)
Adjusting Frame Rate
Frame rate refers to the number of frames displayed per second in your video. Higher frame rates, such as 60 fps, result in smoother motion but also increase file size. Lower frame rates, such as 24 fps or 30 fps, produce smaller files but may appear less fluid.
Recommendations:
- Action Videos: 60 fps
- General Use: 30 fps
- Cinematic Look: 24 fps
Adjusting Compression Settings
Compression settings determine how much your video is compressed, which affects both file size and video quality. Higher compression rates result in smaller files but can also reduce video quality. Lower compression rates produce larger files but preserve more detail.
Recommendations:
- H.264: A widely used compression standard that offers a good balance between file size and video quality.
- HEVC (H.265): A more advanced compression standard that offers better compression than H.264, resulting in smaller file sizes with similar quality.
Considering the Sharing Platform
Each sharing platform has its own recommended video settings. By optimizing your iMovie project for the specific platform you’re using, you can ensure the best possible viewing experience for your audience.
YouTube:
- Resolution: 1080p or 4K
- Frame Rate: 30 fps or 60 fps
- Codec: H.264
- Aspect Ratio: 16:9
Facebook:
- Resolution: 720p
- Frame Rate: 30 fps
- Codec: H.264
- Aspect Ratio: 16:9
Instagram:
- Resolution: 1080p
- Frame Rate: 30 fps
- Codec: H.264
- Aspect Ratio: 1:1 (square) or 9:16 (vertical)
Using iMovie’s Sharing Presets
iMovie offers several sharing presets that automatically optimize your project for different platforms and uses. These presets can save you time and effort by automatically adjusting the resolution, frame rate, compression settings, and other parameters.
Presets:
- Email: Optimizes your project for sharing via email.
- iCloud: Optimizes your project for sharing via iCloud.
- YouTube: Optimizes your project for sharing on YouTube.
- Facebook: Optimizes your project for sharing on Facebook.
- Vimeo: Optimizes your project for sharing on Vimeo.
Testing Your Video
Before sharing your iMovie project, it’s always a good idea to test it on different devices and platforms to ensure that it looks and sounds the way you want it to. This can help you identify any potential issues and make adjustments as needed.
7. How Do I Back Up My iMovie Projects?
Backing up your iMovie projects involves copying your iMovie library to an external hard drive, cloud storage, or using Time Machine. Regular backups protect your valuable work from data loss.
Using an External Hard Drive
One of the simplest and most reliable ways to back up your iMovie projects is to copy your iMovie library to an external hard drive. This provides a physical backup that you can store in a safe place.
Steps:
- Locate Your iMovie Library: Your iMovie library is typically located in the “Movies” folder on your Mac.
- Connect External Hard Drive: Connect your external hard drive to your Mac.
- Copy Your Library: Drag your iMovie library from the “Movies” folder to your external hard drive.
- Verify Your Backup: After copying your library, verify that all your projects and media are intact.
Considerations:
- Storage Space: Make sure your external hard drive has enough storage space to accommodate your iMovie library.
- Regular Backups: Create regular backups of your iMovie library to protect against data loss.
Using Cloud Storage
Another convenient way to back up your iMovie projects is to use cloud storage services like iCloud Drive, Google Drive, or Dropbox. This allows you to access your backups from anywhere and protects against physical damage or theft.
Steps:
- Sign Up for Cloud Storage: Sign up for a cloud storage service like iCloud Drive, Google Drive, or Dropbox.
- Install the App: Install the cloud storage app on your Mac.
- Copy Your Library: Drag your iMovie library from the “Movies” folder to your cloud storage folder.
- Verify Your Backup: After copying your library, verify that all your projects and media are synced to the cloud.
Considerations:
- Storage Space: Make sure you have enough storage space in your cloud storage account to accommodate your iMovie library.
- Internet Connection: Backing up to the cloud requires a stable internet connection.
Using Time Machine
Time Machine is a built-in backup utility in macOS that automatically backs up your entire system, including your iMovie projects. This provides a comprehensive backup solution that protects against data loss due to hardware failures, software issues, or accidental deletion.
Steps:
- Connect External Hard Drive: Connect an external hard drive to your Mac.
- Enable Time Machine: Open System Preferences and click “Time Machine.”
- Select Backup Disk: Select your external hard drive as the backup disk.
- Start Backup: Time Machine will automatically start backing up your system, including your iMovie projects.
Considerations:
- Storage Space: Make sure your external hard drive has enough storage space to accommodate your entire system.
- Regular Backups: Time Machine automatically creates regular backups, but you can also initiate manual backups as needed.
Creating Multiple Backups
To ensure the highest level of protection, it’s a good idea to create multiple backups of your iMovie projects using different methods. For example, you could back up your library to an external hard drive and also use a cloud storage service. This provides redundancy and protects against various types of data loss.
Testing Your Backups
Periodically test your backups to ensure that they are working properly and that you can restore your iMovie projects if needed. This can help you identify any potential issues and make adjustments as needed.
8. What Are Common Issues When Saving iMovie Projects and How to Solve Them?
Common issues when saving iMovie projects include large file sizes, compatibility problems, and export failures. Solutions involve adjusting settings, updating software, and ensuring sufficient storage space.
Large File Sizes
One of the most common issues when saving iMovie projects is large file sizes. This can make it difficult to share your videos online, store them on your devices, or back them up to the cloud.
Solutions:
- Reduce Resolution: Lowering the resolution of your video can significantly reduce its file size.
- Adjust Compression Settings: Increasing the compression rate can also reduce file size, but it may also reduce video quality.
- Trim Unnecessary Footage: Removing unnecessary footage can help to reduce the overall size of your project.
Compatibility Problems
Another common issue is compatibility problems. This can occur when you try to play your iMovie project on a device or platform that does not support the video format or codec.
Solutions:
- Use a Widely Compatible Format: MP4 is one of the most widely compatible video formats.
- Convert Your Video: You can use a video converter to convert your iMovie project to a different format that is supported by the device or platform you’re using.
- Update Your Software: Make sure you have the latest version of iMovie and your operating system installed.
Export Failures
Sometimes, iMovie may fail to export your project. This can be caused by a variety of factors, such as software glitches, hardware limitations, or corrupt media files.
Solutions:
- Restart iMovie: Restarting iMovie can sometimes resolve export failures.
- Free Up Storage Space: Make sure you have enough free storage space on your device.
- Repair Permissions: Repairing disk permissions can sometimes resolve export failures.
- **Reinstall