
Saving Excel files into PDF format is essential for sharing, archiving, and ensuring document integrity. Are you looking for a clear and efficient way to convert your Excel spreadsheets to PDF? This guide on savewhere.net will walk you through multiple methods, ensuring your data is preserved perfectly. Discover the easiest and most effective ways to transform your Excel files into shareable, presentable PDFs, and learn how savewhere.net can help you manage your finances better.
1. Why Save Excel as PDF?
Why is saving an Excel file as a PDF a good idea? You can ensure that your data is presentable and easy to share with others. There are several reasons why converting your Excel sheets to PDF is beneficial:
- Preservation of Formatting: PDFs maintain the original formatting, fonts, and layout of your Excel spreadsheet, regardless of the recipient’s software or operating system. This ensures your data is displayed exactly as you intended.
- Enhanced Security: PDFs can be password-protected, preventing unauthorized access and ensuring sensitive financial data remains secure. This feature is crucial when sharing budget plans or financial reports.
- Universal Compatibility: PDFs are viewable on virtually any device, from desktops to smartphones, making them accessible to a wide audience without requiring specific software like Microsoft Excel.
- Reduced File Size: Often, PDFs can be compressed to a smaller file size than Excel files, making them easier to email and store, which is beneficial for managing large datasets on savewhere.net.
- Archival Purposes: PDFs are ideal for archiving financial records and statements. Their static format ensures that the data remains unchanged over time, preserving the integrity of your financial history.
- Professional Presentation: Converting Excel charts and data into a PDF provides a polished, professional look for presentations, reports, and client communications. This is particularly useful for presenting financial analyses or investment strategies.
- Printing: When printing, PDFs ensure that the document appears exactly as it does on the screen, preventing issues with formatting or layout that can occur with Excel files. This is important for printing budget summaries or expense reports.
By converting your Excel files to PDF, you enhance their usability, security, and presentation, making them a versatile format for various financial management needs.
2. Understanding Your Options Before Converting
Before you dive into converting your Excel files to PDF, it’s crucial to consider several key settings to ensure the final PDF meets your needs. Setting the right options beforehand will save you time and prevent the need for multiple conversions.
2.1. Page Orientation: Portrait or Landscape
- What it is: Page orientation refers to the direction in which your content is printed on the page. Portrait is vertical, while landscape is horizontal.
- Why it matters: The orientation affects how your data is displayed. Landscape is often better for wide spreadsheets with many columns, while portrait is suitable for narrower datasets.
- How to choose: Consider the width of your data. If your spreadsheet extends horizontally, choose landscape to prevent columns from being cut off.
2.2. Content Selection: What to Include in Your PDF
- What it is: You can choose to include specific elements of your Excel file in the PDF, such as certain cells, specific sheets, or the entire workbook.
- Why it matters: Selecting the right content ensures that your PDF contains only the information you need. This is useful when you want to share only a portion of your data.
- How to choose:
- Specific Cells: Select the exact cells you want to include for focused data sharing.
- Specific Sheets: Choose particular sheets when you only need certain sections of your workbook.
- Entire Workbook: Include all sheets if you want to provide a complete view of your data.
2.3. Gridlines: To Show or Not to Show
- What it is: Gridlines are the light gray lines that define the cells in your spreadsheet.
- Why it matters: Gridlines can help readers differentiate between cells, but they may not always be necessary for a clean, professional look.
- How to choose:
- Show Gridlines: Useful when you need clear cell boundaries for data interpretation.
- Hide Gridlines: Provides a cleaner, more polished appearance, especially for presentations.
2.4. Print Quality: Standard vs. High
- What it is: Print quality affects the resolution and clarity of your PDF. Standard quality is suitable for most uses, while high quality is better for detailed graphics and charts.
- Why it matters: Higher quality ensures that your charts and graphs are crisp and clear, but it also increases file size.
- How to choose:
- Standard: Ideal for documents with primarily text and simple data.
- High: Best for documents with detailed charts, graphs, or images that require sharp resolution.
2.5. Margins: Adjusting Space Around Content
- What it is: Margins define the space between your content and the edges of the page.
- Why it matters: Adjusting margins can help fit more data on a page or create a more visually appealing layout.
- How to choose:
- Narrow Margins: Fit more data on a single page.
- Wide Margins: Improve readability by adding more white space around your content.
2.6. Scaling: Fitting Data to Page
- What it is: Scaling allows you to adjust the size of your content to fit within the page boundaries.
- Why it matters: This ensures that your entire spreadsheet fits on the printed page, preventing cut-off columns or rows.
- How to choose:
- Fit to Page: Automatically scales your content to fit the page width.
- Custom Scaling: Manually adjust the scaling percentage for precise control over the size of your content.
By carefully considering these options before converting your Excel file to PDF, you can create a document that is perfectly tailored to your specific needs, whether it’s for sharing financial data, archiving records, or presenting professional reports.
3. Saving an Excel Workbook as a PDF: Step-by-Step
This is the most straightforward method for converting your Excel file into a PDF. Here’s how to do it:
- Open Your Excel Workbook: Launch Microsoft Excel and open the file you want to convert.
 File tab in Excel with a red box around it.
-
Go to the File Tab: Click on the “File” tab located in the top-left corner of the Excel window.
-
Select “Save As”: In the File menu, click on “Save As”. This option allows you to choose the file format and location for saving your Excel file.
 Browse button in Excel highlighted.
- Choose a Save Location: Click “Browse” to select the folder where you want to save the PDF file.
 PDF selected from dropdown menu in Excel Save As dialog box.
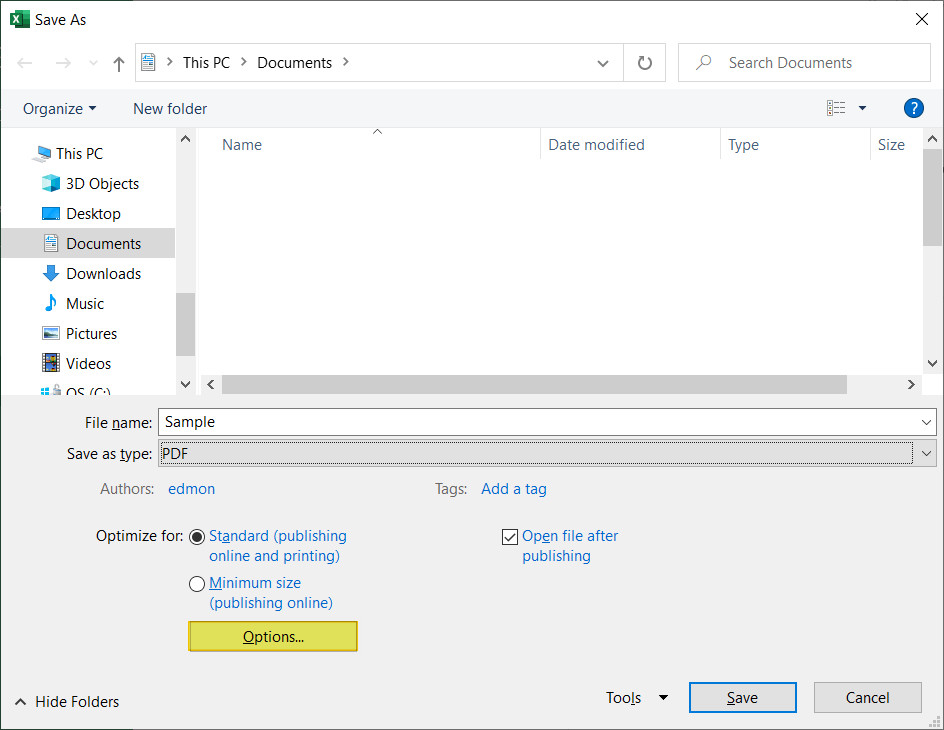
- Select PDF as the File Format: In the “Save As” dialog box, find the dropdown menu labeled “Save as type:” and select “PDF (*.pdf)” from the list.
 Highlighted options button in Save As dialog box.
-
Adjust Options (Optional): Click the “Options…” button to customize your PDF. Here, you can choose to save the entire workbook, specific sheets, or a selection of cells. You can also adjust settings like DPI and encryption.
-
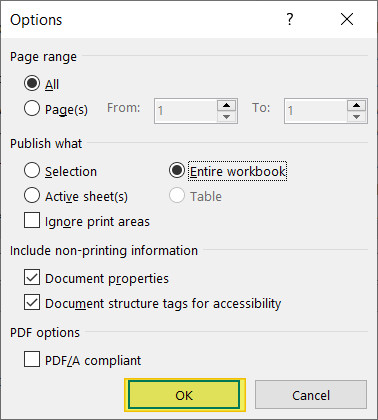
Select What to Publish: In the Options dialog, choose what you want to include in the PDF.
- Entire Workbook: Select this option to convert all sheets in your workbook to PDF.
- Active Sheet(s): Choose this to convert only the currently active sheet(s).
- Selection: This option is active if you’ve selected a specific range of cells. Only those cells will be converted.
-
Click OK: After selecting your desired options, click “OK” to close the Options dialog.
 Ok button highlighted in Options dialog box .
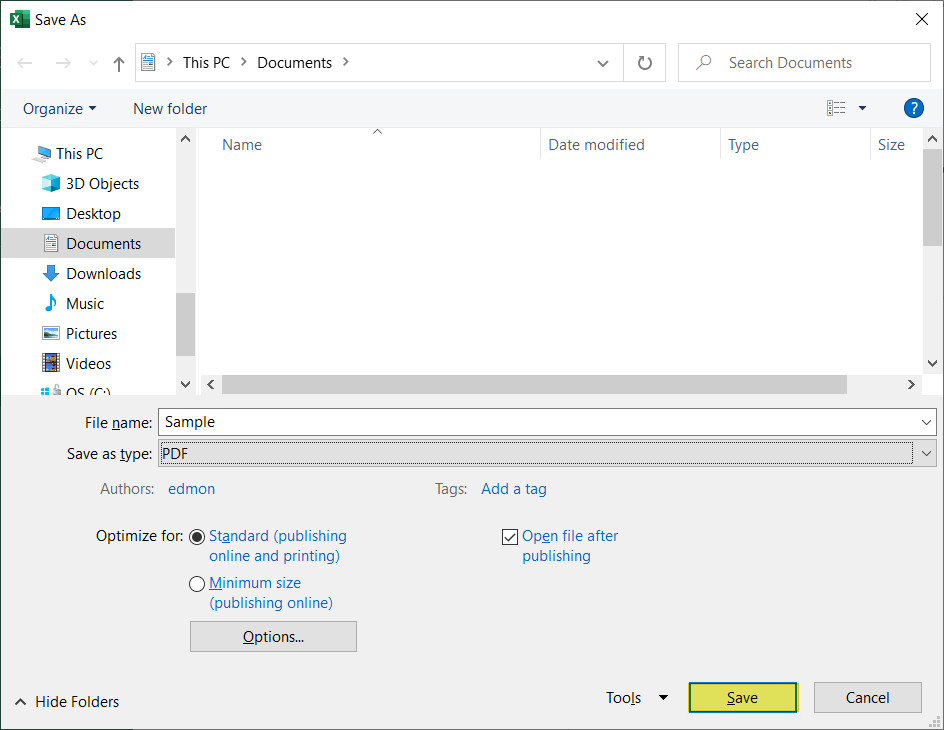
- Save the File: Click the “Save” button. Excel will convert your workbook (or selected parts) into a PDF file and save it to the location you specified.
 Save button highlighted in Save As dialog box.
4. Exporting an Excel Workbook as a PDF
The “Export” function provides another quick way to convert your Excel workbook to a PDF. Here’s how:
- Open Your Excel Workbook: Open the Excel file you wish to convert.
File tab in Excel with a red box around it.
-
Go to the File Tab: Click the “File” tab in the upper-left corner of the Excel window.
-
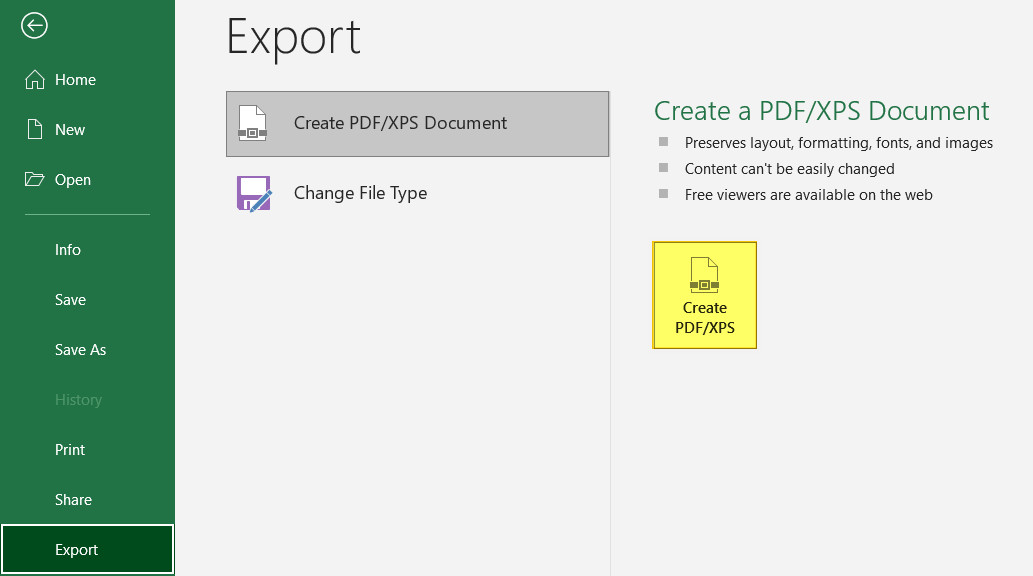
Select “Export”: In the File menu, click on “Export”. This will take you to the export options.
 Create PDF XPS button in Microsoft Excel highlighted.
- Click “Create PDF/XPS Document”: Choose this option to start the PDF conversion process.
Highlighted options button in Save As dialog box.
-
Adjust Options (Optional): Click the “Options…” button to customize your PDF. You can select the entire workbook, specific sheets, or a selection of cells.
-
Select What to Publish:
- Entire Workbook: Converts all sheets to PDF.
- Active Sheet(s): Converts only the active sheet(s).
- Selection: Converts only the cells you have selected.
-
Click OK: After selecting your desired options, click “OK” to close the Options dialog.
Ok button highlighted in Options dialog box .
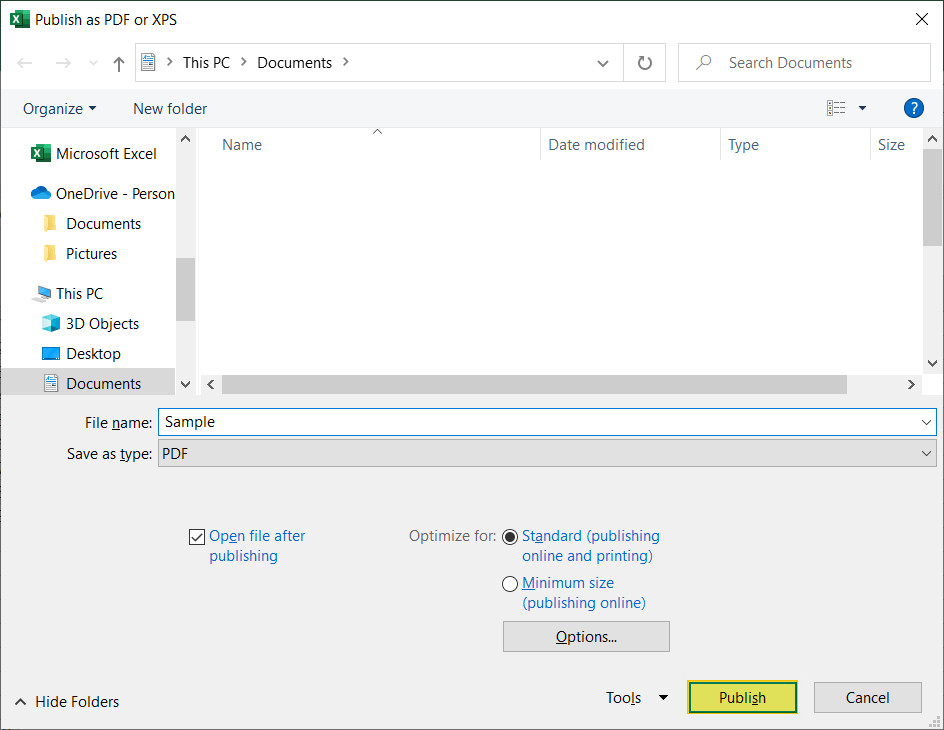
- Click “Publish”: Choose a save location and click “Publish”. Excel will then convert your selected content into a PDF file.
 Publish button highlight in Publish as PDF or XPS button dialog box.
5. Save As vs. Export: What’s the Difference?
Both the “Save As” and “Export” methods achieve the same result: converting your Excel file to a PDF. However, there are subtle differences:
- Save As: This option allows you to save your Excel file in various formats, including PDF, Excel formats, CSV, and more. It’s a versatile option for saving files in different formats.
- Export: This method is specifically designed for converting your file to PDF or XPS (XML Paper Specification). It’s a more direct route if you know you want a PDF.
Which Should You Use?
- If you need to save your file in multiple formats, “Save As” is the better choice.
- If you only need a PDF, “Export” provides a quicker, more direct route.
For most users, the choice depends on their specific needs and workflow. Both methods are reliable for converting Excel files to PDF.
6. Saving a Single Excel Sheet as PDF
Sometimes, you only need to save a single sheet from your Excel workbook as a PDF. Here’s how to do it:
- Open Your Excel Workbook: Open the Excel file and select the sheet you want to save.
File tab in Excel with a red box around it.
-
Go to the File Tab: Click on “File” in the top-left corner.
-
Select “Save As”: Click on “Save As” from the File menu.
Browse button in Excel highlighted.
- Choose a Save Location: Click “Browse” to select where you want to save the PDF.
PDF selected from dropdown menu in Excel Save As dialog box.
- Select PDF as the File Format: In the “Save As” dialog box, choose “PDF (*.pdf)” from the “Save as type:” dropdown menu.
Save button highlighted in Save As dialog box.
- Click “Save”: The active sheet will be saved as a PDF.
7. Saving Multiple Excel Sheets as One PDF
If you need to combine several sheets into a single PDF, follow these steps:
- Open Your Excel Workbook: Open the Excel file that contains the sheets you want to combine.
File tab in Excel with a red box around it.
-
Go to the File Tab: Click “File” in the top-left corner.
-
Select “Save As”: Click “Save As” from the File menu.
Browse button in Excel highlighted.
- Choose a Save Location: Click “Browse” to select where you want to save the PDF.
PDF selected from dropdown menu in Excel Save As dialog box.
- Select PDF as the File Format: Choose “PDF (*.pdf)” from the “Save as type:” dropdown menu.
Highlighted options button in Save As dialog box.
- Click “Options…”: This will open the Options dialog box.
 Page range radio button and options in Excel highlighted in Options dialog box.
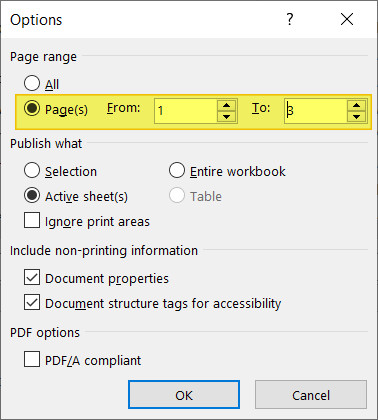
- Select the Page Range:
- If the sheets you want to save are in a continuous range, select “Page(s)” and enter the starting and ending page numbers.
- If the sheets are not in a continuous range, you will need to print to PDF. Select the sheets you wish to print by clicking the sheet tabs while holding the Ctrl key. Then, go to File > Print and select “Microsoft Print to PDF” as your printer. Click “Print” and save the file.
- Click “OK”: After specifying the page range, click “OK”.
Ok button highlighted in Options dialog box .
- Click “Save”: The selected sheets will be combined into a single PDF.
Save button highlighted in Save As dialog box.
8. Saving Specific Areas or Cells as a PDF
To save only a specific area or selected cells as a PDF, follow these steps:
- Open Your Excel Workbook: Open the Excel file and select the specific cells you want to save.
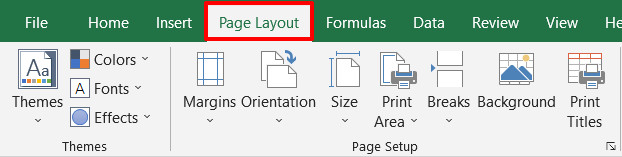 Page Layout tab in Excel with a red box around it.
- Go to the Page Layout Tab: Click on the “Page Layout” tab.
 Mouse selecting cells in Microsoft Excel.
- Select the Cells: Use your mouse to select the specific cells you want to include in the PDF.
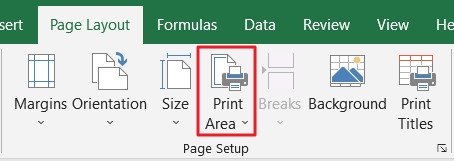 Print Area button in Excel with red box around it.
- Set the Print Area: Click the “Print Area” button.
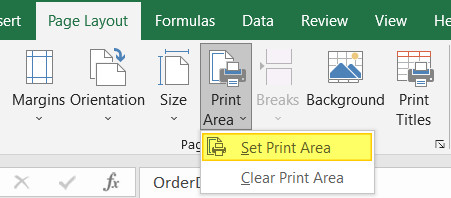 Set Print Area button highlighted.
- Choose “Set Print Area”: This will define the selected cells as the area to be printed.
File tab in Excel with a red box around it.
-
Go to the File Tab: Click on the “File” tab.
-
Select “Save As”: Click on “Save As”.
Browse button in Excel highlighted.
- Choose a Save Location: Click “Browse” to select where you want to save the PDF.
PDF selected from dropdown menu in Excel Save As dialog box.
- Select PDF as the File Format: Choose “PDF (*.pdf)” from the “Save as type:” dropdown menu.
- Click “Save”: Only the selected cells will be saved as a PDF.
9. Advanced Tips for Optimizing Excel to PDF Conversions
Optimizing your Excel to PDF conversions can enhance the quality and usability of your documents. Here are some advanced tips to ensure your PDFs look professional and are easy to work with:
9.1. Adjusting Page Breaks
- Why it matters: Correct page breaks prevent data from being cut off awkwardly between pages.
- How to do it:
- Go to the “View” tab and click “Page Break Preview”.
- Drag the blue lines to adjust the page breaks to fit your data logically.
- Insert manual page breaks by selecting a row or column and going to “Page Layout” > “Breaks” > “Insert Page Break”.
9.2. Scaling Options
- Why it matters: Scaling ensures that your entire spreadsheet fits onto the page without losing readability.
- How to do it:
- Go to “Page Layout” > “Scale to Fit”.
- Use the “Width” and “Height” dropdowns to specify how many pages wide and tall your document should be.
- Alternatively, manually adjust the scaling percentage in the “Scale” box.
9.3. Print Titles
- Why it matters: Print titles repeat row and column headers on every page, making it easier to read multi-page documents.
- How to do it:
- Go to “Page Layout” > “Print Titles”.
- In the “Rows to repeat at top” and “Columns to repeat at left” fields, specify the rows and columns you want to repeat on each page.
9.4. Handling Large Spreadsheets
- Why it matters: Large spreadsheets can be difficult to convert to PDF without losing data or readability.
- How to do it:
- Divide the spreadsheet into smaller, more manageable sections.
- Use the “Selection” option in the Save As dialog to convert specific sections to PDF.
- Adjust scaling and page breaks to ensure each section fits neatly on the page.
9.5. Converting Charts and Graphs
- Why it matters: Charts and graphs need to be clear and legible in the PDF version.
- How to do it:
- Ensure charts are appropriately sized and labeled.
- Use high-quality settings when saving to PDF to maintain the clarity of the visuals.
- Consider saving charts as separate images and inserting them into a document for greater control over their appearance.
9.6. Adding Headers and Footers
- Why it matters: Headers and footers add context and professionalism to your documents.
- How to do it:
- Go to “Insert” > “Header & Footer”.
- Add information such as the document title, page number, date, and company logo.
9.7. Removing Unnecessary Elements
- Why it matters: Removing unnecessary elements streamlines your PDF and makes it easier to read.
- How to do it:
- Hide or delete blank rows and columns.
- Remove unnecessary comments or annotations.
- Simplify complex formulas or data to focus on essential information.
9.8. Choosing the Right PDF Standard
- Why it matters: Different PDF standards (e.g., PDF/A for archiving) offer specific features and compatibility.
- How to do it:
- Explore the options available in your PDF software to select the standard that best meets your needs.
- PDF/A ensures long-term accessibility and preservation of the document.
9.9. Protecting Your PDF
- Why it matters: Protecting your PDF prevents unauthorized access and modifications.
- How to do it:
- Use the password protection features available in Excel or your PDF software.
- Set permissions to restrict printing, copying, or editing.
By implementing these advanced tips, you can create PDFs from your Excel files that are well-formatted, easy to read, and optimized for your specific needs.
10. Streamline Your Finances with savewhere.net
Effectively managing your finances is critical, and savewhere.net is here to help. Beyond just converting Excel files to PDF, our platform offers a wealth of resources to assist you in achieving your financial goals.
10.1. Budgeting Tools
- Track Expenses: Monitor your spending habits to identify areas where you can save.
- Create Budgets: Develop personalized budgets that align with your financial goals.
- Visualize Data: Use charts and graphs to understand your financial health at a glance.
10.2. Savings Strategies
- Expert Tips: Access articles and guides filled with practical saving advice.
- Money-Saving Hacks: Discover creative ways to cut costs in your daily life.
- Investment Advice: Learn how to grow your savings with smart investment strategies.
10.3. Deal Finder
- Exclusive Offers: Find special deals and discounts from top retailers.
- Cash-Back Rewards: Earn money back on your everyday purchases.
- Promo Codes: Instantly save with the latest promo codes.
10.4. Financial Education
- Comprehensive Guides: Learn about personal finance topics, from budgeting to investing.
- Expert Advice: Get insights from financial professionals to make informed decisions.
- Interactive Tools: Use calculators and other tools to plan your financial future.
10.5. Community Support
- Connect with Others: Share tips and strategies with fellow savers.
- Ask Questions: Get answers to your financial questions from experienced members.
- Stay Motivated: Find inspiration and support to reach your savings goals.
With savewhere.net, you have access to a comprehensive suite of tools and resources designed to empower you to take control of your finances. Whether you’re saving for a down payment on a house, planning for retirement, or simply trying to make ends meet, we’re here to help you succeed.
11. Real-World Examples of Saving Money
Discover practical ways to save money in your daily life with these real-world examples. These tips are designed to be simple, effective, and easy to implement, helping you achieve your financial goals with savewhere.net.
11.1. Grocery Shopping
- Plan Your Meals: Create a weekly meal plan to avoid impulse purchases and reduce food waste.
- Shop with a List: Stick to your grocery list to avoid buying unnecessary items.
- Compare Prices: Check unit prices to find the best deals on essential items.
- Use Coupons: Take advantage of coupons and discounts to save on your favorite products.
- Buy in Bulk: Purchase non-perishable items in bulk to save money over time.
- Example: By planning meals, shopping with a list, and using coupons, a family in Atlanta saved $50-$75 per week on groceries.
11.2. Transportation
- Carpool: Share rides with coworkers or neighbors to reduce gas and parking costs.
- Use Public Transportation: Take advantage of buses, trains, and subways to save on commuting expenses.
- Bike or Walk: Opt for biking or walking for short trips to save on gas and improve your health.
- Maintain Your Vehicle: Keep your car well-maintained to prevent costly repairs.
- Shop Around for Insurance: Compare auto insurance rates to find the best deal.
- Example: An Atlanta resident who started carpooling with a coworker saved $100-$150 per month on gas and parking.
11.3. Home Energy
- Use Energy-Efficient Appliances: Switch to energy-efficient appliances to reduce electricity consumption.
- Adjust Your Thermostat: Set your thermostat a few degrees higher in the summer and lower in the winter to save on heating and cooling costs.
- Seal Drafts: Seal windows and doors to prevent drafts and reduce energy loss.
- Turn Off Lights: Turn off lights when you leave a room to save electricity.
- Unplug Electronics: Unplug electronics when not in use to avoid standby power consumption.
- Example: A family in Atlanta saved $30-$50 per month on their energy bill by using energy-efficient appliances and adjusting their thermostat.
11.4. Entertainment
- Take Advantage of Free Activities: Explore free activities in your city, such as parks, museums, and community events.
- Host Potlucks: Organize potlucks with friends instead of eating out at restaurants.
- Stream Movies and TV Shows: Subscribe to streaming services instead of paying for cable.
- Use Library Resources: Borrow books, movies, and music from the library for free.
- Look for Discounts: Check for discounts on entertainment activities, such as matinee movie tickets or museum passes.
- Example: By using library resources and taking advantage of free activities, an individual in Atlanta saved $50-$100 per month on entertainment.
11.5. Personal Finance
- Create a Budget: Develop a detailed budget to track your income and expenses.
- Pay Off Debt: Focus on paying off high-interest debt to save money on interest payments.
- Automate Savings: Set up automatic transfers to your savings account to ensure consistent savings.
- Review Subscriptions: Cancel unnecessary subscriptions to save money each month.
- Negotiate Bills: Negotiate lower rates on your bills, such as internet, phone, and insurance.
- Example: An Atlanta resident who created a budget and automated savings saved $200-$300 per month.
11.6. Shopping
- Compare Prices: Compare prices online and in stores to find the best deals.
- Use Cashback Apps and Websites: Earn cashback on your purchases by using cashback apps and websites.
- Shop During Sales: Take advantage of sales events, such as Black Friday and Cyber Monday, to save on your purchases.
- Buy Used Items: Purchase used items, such as clothing and furniture, to save money.
- Use Store Loyalty Programs: Sign up for store loyalty programs to earn rewards and discounts.
- Example: By comparing prices and using cashback apps, a shopper in Atlanta saved $50-$100 per month on purchases.
12. Common Mistakes to Avoid When Saving to PDF
When saving Excel files as PDFs, avoiding common mistakes can save time and ensure your documents look professional. Here are some pitfalls to watch out for:
12.1. Forgetting to Set the Print Area
- The Mistake: Saving a PDF without setting the print area can result in unwanted rows, columns, or blank spaces being included in the final document.
- The Solution: Before saving, select the specific cells, charts, or data you want to include and set the print area by going to “Page Layout” > “Print Area” > “Set Print Area.”
12.2. Ignoring Page Orientation
- The Mistake: Failing to choose the correct page orientation (portrait or landscape) can cause your data to be cut off or appear squished in the PDF.
- The Solution: Go to “Page Layout”