Saving files effectively on Microsoft Word is essential for preventing data loss and managing your documents efficiently; learn how to save your hard work with savewhere.net’s tips and tricks. With our guidance, you’ll be able to protect your documents and optimize your workflow. Let’s explore file management, document security, and data preservation.
1. Understanding the Basics of Saving in Microsoft Word
Saving your work in Microsoft Word is more than just clicking a button; it’s about preserving your thoughts, ideas, and efforts. So, how do you save a file on Microsoft Word? You can save a file on Microsoft Word by clicking the “File” tab, then selecting “Save” or “Save As,” choosing your desired location and file name, and finally, clicking “Save.” Let’s delve deeper into the specifics of saving, exploring different options and best practices to ensure your documents are safe and accessible when you need them.
1.1. The Importance of Saving Regularly
Regularly saving your work is crucial to prevent data loss. A recent study by the U.S. Bureau of Labor Statistics indicates that unexpected computer crashes or power outages can result in significant productivity losses, costing businesses billions of dollars annually. Regularly saving your work mitigates the risk of losing valuable data and time.
Saving every few minutes is a good practice, especially when working on lengthy or complex documents. Microsoft Word has an AutoRecover feature that automatically saves your work at set intervals, but relying solely on this feature is risky. Manual saving gives you more control and ensures that your latest changes are always secured.
1.2. Save vs. Save As: Knowing the Difference
Understanding the difference between “Save” and “Save As” is fundamental to effective document management.
- Save: This command updates the existing file with the latest changes. If you’ve already named and saved your document, clicking “Save” will overwrite the previous version with the current one. This is ideal for quick updates and minor edits.
- Save As: This command allows you to create a new file or save an existing one with a different name, format, or location. It’s useful when you want to keep the original file intact while creating a modified version or when you need to convert the document to a different file type, such as a PDF or an older Word format (.doc).
Using “Save As” is particularly beneficial when you’re working on a template or a document you want to repurpose without altering the original.
1.3. Quick Ways to Save: Keyboard Shortcuts
Keyboard shortcuts can significantly speed up the saving process. Here are some essential shortcuts:
- Ctrl + S (Windows) or Cmd + S (Mac): This is the most common and quickest way to save your document. Use it frequently to ensure your latest changes are recorded.
- F12: Pressing F12 opens the “Save As” dialog box, allowing you to quickly save a new copy or change the file format.
- Alt + F, then S: This shortcut opens the File menu and selects the Save option, useful if you prefer using the keyboard for navigation.
Incorporating these shortcuts into your workflow can save you valuable time and effort, especially when you’re working under tight deadlines.
2. Step-by-Step Guide: Saving Your Word Document
To save your Word document, follow these steps for efficient file management.
2.1. Using the “Save” Command
The “Save” command is your go-to option for quickly updating your document with the latest changes. Here’s how to use it:
- Open Your Document: Launch Microsoft Word and open the document you want to save.
- Make Your Edits: Make the necessary changes to your document.
- Click the File Tab: Go to the top-left corner of the Word window and click on the “File” tab.
- Select “Save”: In the dropdown menu, click on “Save.” If this is the first time you are saving the document, Word will prompt you to choose a location and file name.
- Confirm Save: If the document has been previously saved, your changes will be automatically saved to the existing file. You’ll see a brief loading indicator, and then you’re all set.
2.2. Using the “Save As” Command
The “Save As” command is essential when you want to create a new copy of your document or save it in a different format. Here’s how to use it:
- Open Your Document: Launch Microsoft Word and open the document you want to save.
- Make Your Edits: Make the necessary changes to your document.
- Click the File Tab: Go to the top-left corner of the Word window and click on the “File” tab.
- Select “Save As”: In the dropdown menu, click on “Save As.” This will open the “Save As” dialog box.
- Choose a Location: Select where you want to save the new copy of your document. You can choose from locations like “OneDrive,” “This PC,” or “Browse” to select a specific folder.
- Name Your File: In the “File name” box, enter a new name for your document. This is crucial to differentiate the new copy from the original.
- Select File Format: In the “Save as type” dropdown menu, choose the desired file format. Options include “.docx” (the default Word format), “.pdf,” “.rtf,” “.txt,” and older Word formats like “.doc.”
- Click “Save”: After selecting the location, file name, and format, click the “Save” button. Word will save a new copy of your document in the specified location and format.
2.3. Saving to Different Locations: OneDrive, This PC, and More
Microsoft Word offers several options for saving your documents to various locations, providing flexibility and accessibility.
- OneDrive: Saving to OneDrive ensures your files are backed up in the cloud and accessible from any device with an internet connection. To save to OneDrive, select “OneDrive” from the “Save As” dialog box and choose the appropriate folder.
- This PC: Saving to “This PC” stores your files directly on your computer’s hard drive. Select “This PC” from the “Save As” dialog box and choose the folder where you want to save the file. This is useful for offline access.
- Browse: The “Browse” option allows you to navigate to any folder on your computer or connected devices, such as USB drives. This is ideal for organizing your files in specific locations.
- SharePoint: If you’re working in a corporate environment, you might have the option to save to SharePoint, a platform for sharing and collaborating on documents within an organization.
Choosing the right saving location depends on your specific needs. Cloud storage like OneDrive is excellent for accessibility and backup, while saving to “This PC” is suitable for offline use.
2.4. Saving in Different Formats: DOCX, PDF, RTF, and More
Microsoft Word supports a variety of file formats, each with its own advantages.
- .DOCX: This is the default file format for modern versions of Microsoft Word. It’s compatible with most word processing programs and supports advanced features like formatting, images, and macros.
- .PDF: The Portable Document Format (PDF) is ideal for sharing documents that need to retain their formatting. PDFs are universally readable and prevent recipients from easily making changes.
- .RTF: Rich Text Format (RTF) is a more basic format that preserves formatting while being compatible with a wide range of word processors and operating systems. It’s useful for sharing documents with people who may not have the latest version of Word.
- .DOC: This is the file format used by older versions of Microsoft Word (97-2003). Saving in this format can be necessary when sharing documents with users who have not upgraded to newer versions.
- .TXT: Plain Text Format (TXT) saves only the text content of your document, stripping away all formatting. This is useful for creating simple text files or for cleaning up documents with complex formatting issues.
To save in a different format, select the desired option from the “Save as type” dropdown menu in the “Save As” dialog box. Choosing the right format ensures that your document can be opened and viewed correctly by the intended recipients.
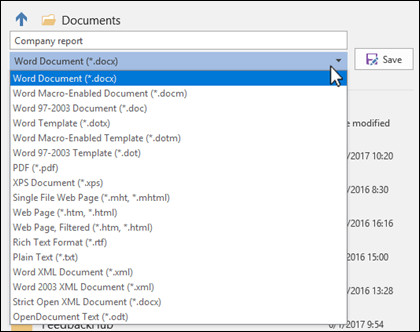 Saving in different formats in Microsoft Word, highlighting the Save as type dropdown menu
3. AutoSave and AutoRecover: Protecting Your Work Automatically
AutoSave and AutoRecover are essential features in Microsoft Word that automatically protect your work against unexpected data loss. Understanding how these features work and how to configure them can save you from potential frustration.
3.1. How AutoSave Works
AutoSave is a feature that automatically saves your file at regular intervals, ensuring that your latest changes are always backed up. Here’s how it works:
- Enabled by Default: AutoSave is typically enabled by default when you save your file to OneDrive or SharePoint in Microsoft 365.
- Automatic Saving: When enabled, AutoSave automatically saves your document every few seconds. This means you don’t have to manually click the “Save” button constantly.
- Cloud Storage Requirement: AutoSave requires your document to be stored on OneDrive, OneDrive for Business, or SharePoint. If your file is saved locally on your computer, AutoSave will not function.
- Version History: AutoSave also keeps a version history of your document, allowing you to revert to earlier versions if needed.
To ensure AutoSave is functioning, check that your document is saved to a cloud location and that the AutoSave toggle in the top-left corner of the Word window is switched on.
3.2. How AutoRecover Works
AutoRecover is designed to recover unsaved changes in case of a crash or unexpected shutdown. Here’s how it works:
- Automatic Temporary Files: AutoRecover automatically creates temporary files while you’re working on a document. These files contain a snapshot of your work at specific intervals.
- Default Interval: By default, AutoRecover saves a temporary file every 10 minutes. This interval can be adjusted in Word’s settings.
- Document Recovery: If Word closes unexpectedly due to a crash or power outage, the next time you open Word, the Document Recovery pane will appear. This pane lists the automatically recovered files.
- Recovering Your Work: You can then open the recovered file and save it to your desired location. Note that AutoRecover is not a substitute for manually saving your work regularly.
3.3. Configuring AutoRecover Settings
You can configure AutoRecover settings to better suit your needs. Here’s how:
- Open Word Options: Click the “File” tab, then click “Options” at the bottom of the menu.
- Go to Save Settings: In the Word Options dialog box, click “Save.”
- Adjust AutoRecover Interval: In the “Save documents” section, you’ll find the “Save AutoRecover information every x minutes” option. You can change the interval to a shorter duration (e.g., 5 minutes) for more frequent backups.
- Set AutoRecover File Location: You can also specify the location where AutoRecover files are stored. This can be useful if you want to ensure the files are saved to a specific folder.
- Keep the Last AutoRecovered Version: Ensure the “Keep the last AutoRecovered version if I close without saving” option is checked. This ensures that Word retains the last saved version even if you accidentally close the document without saving.
- Click OK: Click “OK” to save your changes.
3.4. Best Practices for Using AutoSave and AutoRecover
To maximize the benefits of AutoSave and AutoRecover, follow these best practices:
- Save to OneDrive or SharePoint: Always save your documents to OneDrive or SharePoint to enable AutoSave and ensure your files are backed up in the cloud.
- Adjust AutoRecover Interval: Reduce the AutoRecover interval to 5 minutes or less for more frequent backups, especially when working on critical documents.
- Manually Save Regularly: Even with AutoSave and AutoRecover enabled, manually save your work regularly (using Ctrl + S or Cmd + S) to ensure your latest changes are always secured.
- Check Document Recovery After a Crash: After an unexpected shutdown, always check the Document Recovery pane when you reopen Word to recover any unsaved work.
- Verify Recovered Files: When recovering a file, carefully review the recovered content to ensure that all your changes have been restored correctly.
By understanding and effectively using AutoSave and AutoRecover, you can significantly reduce the risk of data loss and protect your valuable work in Microsoft Word.
4. Troubleshooting Common Saving Issues
Even with the best practices in place, you might encounter issues while saving your work in Microsoft Word. Here are some common problems and how to troubleshoot them.
4.1. “Word Cannot Save the File Because of a File Permission Error”
This error typically occurs when Word doesn’t have the necessary permissions to save the file to the selected location. Here’s how to resolve it:
- Run Word as Administrator:
- Close Word.
- Right-click the Word icon on your desktop or in the Start menu.
- Select “Run as administrator.”
- Try saving the file again.
- Check File Permissions:
- Navigate to the folder where you’re trying to save the file.
- Right-click the folder and select “Properties.”
- Go to the “Security” tab.
- Ensure that your user account has “Full control” permissions. If not, click “Edit,” select your account, and check the “Full control” box.
- Click “Apply” and then “OK.”
- Save to a Different Location:
- Try saving the file to a different location, such as your desktop or a different folder in your documents.
- If saving to a different location works, the issue might be with the original folder’s permissions or storage.
- Disable Antivirus Software Temporarily:
- Sometimes, antivirus software can interfere with Word’s ability to save files.
- Temporarily disable your antivirus software and try saving the file again. Remember to re-enable your antivirus software afterward.
4.2. “Disk is Full” or “Not Enough Memory” Errors
These errors indicate that there’s not enough space on your hard drive or not enough memory (RAM) available to save the file. Here’s how to address them:
- Free Up Disk Space:
- Delete unnecessary files, such as temporary files, old documents, and unused programs.
- Empty the Recycle Bin.
- Use Disk Cleanup to remove temporary files and system clutter.
- Close Unnecessary Programs:
- Close any programs you’re not currently using to free up memory.
- Use Task Manager (Ctrl + Shift + Esc) to identify and close resource-intensive processes.
- Increase Virtual Memory:
- Right-click on “This PC” or “My Computer” and select “Properties.”
- Click on “Advanced system settings.”
- In the “System Properties” window, go to the “Advanced” tab and click “Settings” under “Performance.”
- Go to the “Advanced” tab again and click “Change” under “Virtual memory.”
- Uncheck “Automatically manage paging file size for all drives.”
- Select your system drive (usually C:) and choose “Custom size.”
- Enter an initial size and maximum size that are larger than the recommended size. Click “Set” and then “OK.”
- Restart your computer for the changes to take effect.
- Save to a Different Drive:
- If possible, save the file to a different hard drive or external storage device that has more available space.
4.3. “File is Corrupted” Error
A corrupted file can prevent you from saving your work. Here’s how to handle this issue:
- Try Opening the File in WordPad or Notepad:
- Right-click the file and select “Open with.”
- Choose WordPad or Notepad. If you can open the file, save the text content to a new Word document.
- Use Word’s “Open and Repair” Feature:
- Open Microsoft Word.
- Click the “File” tab and then click “Open.”
- Browse to the location of the corrupted file.
- Select the file and click the dropdown arrow next to the “Open” button.
- Choose “Open and Repair.” Word will attempt to repair the file.
- Recover Text from Any File:
- Open Microsoft Word.
- Click the “File” tab and then click “Open.”
- In the “Files of type” dropdown menu, select “Recover Text from Any File.”
- Select the corrupted file and click “Open.” Word will attempt to recover the text from the file.
- Revert to a Previous Version:
- If you have AutoSave enabled and your file is stored on OneDrive or SharePoint, revert to a previous version of the file.
- Open the file in Word, click “File,” then “Info,” and select “Version History.” Choose a previous version and click “Restore.”
4.4. Word Freezes or Crashes While Saving
If Word freezes or crashes while saving, it can be due to various reasons, such as add-ins, conflicting programs, or system issues. Here’s how to troubleshoot:
- Restart Word:
- Close Word and reopen it. This can sometimes resolve temporary glitches.
- Restart Your Computer:
- Restarting your computer can clear up system resources and resolve conflicts.
- Run Word in Safe Mode:
- Press the Windows key + R, type
winword /safe, and press Enter. This will open Word in Safe Mode, which disables add-ins. - Try saving the file in Safe Mode. If it works, the issue is likely due to an add-in.
- Press the Windows key + R, type
- Disable Add-Ins:
- In Word, click the “File” tab, then click “Options.”
- Click “Add-ins.”
- In the “Manage” dropdown menu, select “COM Add-ins” and click “Go.”
- Uncheck the boxes next to the add-ins you want to disable.
- Restart Word and try saving the file again.
- Update Microsoft Office:
- Ensure that you have the latest updates for Microsoft Office.
- Open Word, click the “File” tab, then click “Account.”
- Under “Product Information,” click “Update Options” and select “Update Now.”
- Repair Microsoft Office:
- If updating doesn’t resolve the issue, try repairing Microsoft Office.
- Close all Office applications.
- Open the Control Panel and go to “Programs” > “Programs and Features.”
- Find Microsoft Office in the list, right-click it, and select “Change.”
- Choose “Quick Repair” or “Online Repair” and follow the prompts.
By systematically troubleshooting these common saving issues, you can minimize disruptions and ensure that your work is always safe and accessible.
5. Advanced Saving Techniques
Beyond the basics, several advanced techniques can help you save time, improve organization, and enhance collaboration when working with Microsoft Word.
5.1. Saving a Document as a Template
Saving a document as a template can save time when creating similar documents in the future. Here’s how to do it:
- Create Your Document: Open Microsoft Word and create the document you want to use as a template. Include all the standard formatting, text, and placeholders.
- Click the File Tab: Go to the top-left corner of the Word window and click on the “File” tab.
- Select “Save As”: In the dropdown menu, click on “Save As.”
- Choose a Location: Select where you want to save the template. By default, Word saves templates in the “Custom Office Templates” folder.
- Select “Word Template (*.dotx)”: In the “Save as type” dropdown menu, choose “Word Template (*.dotx).”
- Name Your Template: In the “File name” box, enter a name for your template.
- Click “Save”: Click the “Save” button.
To use your template:
- Click the “File” tab, then click “New.”
- Click “Personal” or “Custom” to find your saved template.
- Select your template and click “Create.” A new document based on your template will open.
5.2. Using Version Control Effectively
Version control is essential for tracking changes and managing different versions of a document, especially when collaborating with others.
- Manual Versioning:
- Save each significant version of your document with a different name (e.g., “Document_v1,” “Document_v2”).
- Include a brief description of the changes in the file name or in a separate log.
- Using Word’s Version History:
- If you save your document to OneDrive or SharePoint, Word automatically keeps a version history.
- To access Version History, open the document in Word, click “File,” then “Info,” and select “Version History.”
- You can view, compare, and restore previous versions of the document.
- Track Changes:
- Use Word’s “Track Changes” feature to record all edits made to a document.
- To enable Track Changes, go to the “Review” tab and click “Track Changes.”
- All insertions, deletions, and formatting changes will be marked.
- Collaborators can accept or reject changes, making it easy to manage revisions.
5.3. Password Protecting Your Documents
Password protection adds an extra layer of security to your documents, preventing unauthorized access.
- Open Your Document: Open the Microsoft Word document you want to protect.
- Click the File Tab: Go to the top-left corner of the Word window and click on the “File” tab.
- Select “Info”: In the dropdown menu, click on “Info.”
- Protect Document: Click on “Protect Document” and select “Encrypt with Password.”
- Enter a Password: Enter a strong password in the “Password” box and click “OK.”
- Confirm Your Password: Re-enter the password to confirm and click “OK.”
- Save Your Document: Save the document to apply the password protection.
To open the document, you’ll need to enter the password. Remember to choose a strong password and keep it in a safe place.
5.4. Reducing File Size for Easier Sharing
Large Word files can be difficult to share via email or upload to online platforms. Here are some techniques to reduce file size:
- Compress Images:
- In Word, select an image in your document.
- Go to the “Picture Format” tab and click “Compress Pictures.”
- Choose a lower resolution (e.g., “Web” or “Email”) and select whether to apply the compression to all images in the document.
- Save Images Separately at a Lower Resolution:
- Right-click on an image and select “Save as Picture.”
- Save the image at a lower resolution and reinsert it into the document.
- Remove Unnecessary Formatting:
- Clear any unnecessary formatting from your document.
- Use the “Clear All Formatting” option in the “Home” tab.
- Save as DOCX:
- Ensure your document is saved in the “.docx” format, which is more efficient than older formats like “.doc.”
- Remove Embedded Fonts:
- Go to “File” > “Options” > “Save.”
- Uncheck “Embed fonts in the file.” This can significantly reduce file size if you’re using common fonts.
- Use File Compression Tools:
- Compress the Word file using a file compression tool like WinZip or 7-Zip to create a smaller archive for sharing.
By using these advanced saving techniques, you can enhance your productivity, protect your documents, and streamline your workflow in Microsoft Word.
6. Saving Tips for Different Scenarios
The way you save your documents can vary based on the specific scenario you’re in. Here are some tailored tips for different situations.
6.1. Saving While Collaborating on a Document
When working with multiple collaborators, efficient saving practices are crucial to avoid conflicts and ensure everyone is on the same page.
- Use OneDrive or SharePoint:
- Store the document on OneDrive or SharePoint to enable real-time collaboration.
- Multiple users can work on the document simultaneously, and changes are automatically synced.
- Track Changes:
- Enable the “Track Changes” feature in Word to record all edits made by collaborators.
- Review and accept or reject changes to maintain control over the final document.
- Communicate Regularly:
- Use communication tools like Microsoft Teams or email to coordinate with collaborators.
- Discuss significant changes and resolve conflicts promptly.
- Version History:
- Regularly check the version history to review past edits and revert to previous versions if necessary.
- Consistent Saving Practices:
- Establish clear guidelines for saving and naming conventions to avoid confusion.
- Designate a lead editor to manage and finalize the document.
6.2. Saving Confidential Information
When dealing with confidential information, security is paramount. Follow these tips to protect your sensitive data:
- Password Protection:
- Encrypt the document with a strong password to prevent unauthorized access.
- Share the password securely with authorized individuals only.
- Restrict Editing Permissions:
- Use Word’s “Restrict Editing” feature to control what changes can be made to the document.
- Go to the “Review” tab and click “Restrict Editing” to set permissions.
- Remove Metadata:
- Metadata can contain sensitive information, such as author name, company, and creation date.
- Use Word’s “Inspect Document” feature to remove metadata before sharing. Go to “File” > “Info” > “Inspect Document” and click “Inspect.”
- Secure Storage:
- Store the document in a secure location, such as an encrypted hard drive or a password-protected cloud storage service.
- Physical Security:
- If printing the document, ensure that physical copies are stored securely and shredded when no longer needed.
6.3. Saving Large Documents
Large documents can be challenging to manage due to their size and complexity. Here are some tips for saving them efficiently:
- Optimize Images:
- Compress images to reduce file size. Use Word’s “Compress Pictures” feature or save images separately at a lower resolution.
- Break into Smaller Sections:
- Divide the document into smaller, more manageable sections.
- Save each section as a separate file and link them together using a table of contents or hyperlinks.
- Use Styles Consistently:
- Use Word’s built-in styles for headings, paragraphs, and other formatting elements.
- Consistent use of styles can reduce file size and improve document structure.
- Remove Unnecessary Elements:
- Remove any unnecessary graphics, embedded objects, or complex formatting that contribute to file size.
- Save as DOCX:
- Ensure the document is saved in the “.docx” format, which is more efficient than older formats like “.doc.”
- Regularly Save and Back Up:
- Save the document frequently to prevent data loss.
- Back up the document to multiple locations, such as an external hard drive and a cloud storage service.
6.4. Saving When Working Offline
Working offline requires careful planning to ensure your changes are saved and synced when you reconnect to the internet.
- Use OneDrive’s Offline Access:
- OneDrive allows you to access and edit your files offline.
- Enable offline access in OneDrive settings to sync your files to your computer.
- Save Locally First:
- If you can’t use OneDrive’s offline access, save the document to your computer’s hard drive.
- Create a backup copy on an external storage device for added security.
- Sync Changes When Online:
- When you reconnect to the internet, OneDrive will automatically sync your changes to the cloud.
- Verify that all changes have been synced correctly.
- Communicate with Collaborators:
- If you’re working with collaborators, inform them that you’ll be working offline.
- Coordinate to avoid conflicting edits when you reconnect.
- Version Control:
- Keep track of different versions manually while offline.
- When back online, use Word’s version history feature to merge any conflicting changes.
By following these saving tips tailored to different scenarios, you can ensure that your documents are always secure, manageable, and accessible, regardless of your working environment.
7. The Role of SaveWhere.net in Your Saving Strategy
SaveWhere.net is your premier resource for mastering the art of saving in Microsoft Word and beyond. We understand the challenges you face in managing your documents effectively and securely, and we’re here to provide solutions that streamline your workflow.
7.1. Comprehensive Guides and Tutorials
SaveWhere.net offers an extensive library of guides and tutorials that cover every aspect of saving in Microsoft Word. Whether you’re a beginner looking to understand the basics or an advanced user seeking to optimize your saving techniques, we have resources tailored to your needs. Our content is regularly updated to reflect the latest features and best practices in Microsoft Word.
7.2. Expert Tips and Tricks
Our team of experts at SaveWhere.net is dedicated to sharing insider tips and tricks that can significantly enhance your productivity. From keyboard shortcuts to advanced saving techniques, we provide practical advice that you can implement immediately. Stay ahead of the curve with our exclusive content and discover new ways to save time and effort.
7.3. Troubleshooting Assistance
Encountering issues while saving your work can be frustrating. SaveWhere.net offers comprehensive troubleshooting assistance to help you resolve common saving problems. Our step-by-step guides provide clear instructions on how to address errors, recover corrupted files, and prevent data loss. We’re here to support you every step of the way.
7.4. Community Support and Forums
Join the SaveWhere.net community to connect with other users, share your experiences, and ask questions. Our forums provide a platform for collaboration and support, where you can exchange ideas and learn from your peers. Benefit from the collective knowledge of our community and find solutions to your saving challenges.
7.5. Personalized Recommendations
SaveWhere.net offers personalized recommendations based on your specific needs and preferences. Whether you’re working on a collaborative project, dealing with confidential information, or managing large documents, we provide tailored advice to optimize your saving strategy. Let us help you find the best solutions for your unique situation.
7.6. Stay Updated with the Latest Features
Microsoft Word is constantly evolving, with new features and updates being released regularly. SaveWhere.net keeps you informed about the latest changes and how they can impact your saving practices. Stay updated with our timely articles and tutorials, and ensure that you’re always using the most effective saving techniques.
SaveWhere.net is more than just a website; it’s your partner in mastering the art of saving in Microsoft Word. With our comprehensive resources, expert tips, and community support, you’ll be well-equipped to manage your documents effectively and securely.
8. Conclusion: Mastering the Art of Saving in Microsoft Word
Mastering the art of saving in Microsoft Word is essential for anyone who wants to protect their work, manage their documents efficiently, and collaborate effectively with others. By understanding the basics of saving, utilizing advanced techniques, and following best practices, you can minimize data loss, streamline your workflow, and enhance your productivity.
8.1. Recap of Key Points
- Regular Saving: Save your work frequently to prevent data loss due to unexpected crashes or power outages.
- Save vs. Save As: Understand the difference between “Save” for updating existing files and “Save As” for creating new copies or changing file formats.
- Keyboard Shortcuts: Use keyboard shortcuts like Ctrl + S (Cmd + S on Mac) and F12 to save time.
- AutoSave and AutoRecover: Enable AutoSave and AutoRecover to automatically protect your work. Configure AutoRecover settings for more frequent backups.
- Troubleshooting: Know how to troubleshoot common saving issues, such as file permission errors, disk space problems, and corrupted files.
- Advanced Techniques: Use advanced techniques like saving as a template, version control, password protection, and reducing file size to enhance your workflow.
- Scenario-Specific Tips: Tailor your saving practices to different scenarios, such as collaborating on a document, handling confidential information, managing large documents, and working offline.
- Leverage SaveWhere.net: Utilize SaveWhere.net as your premier resource for comprehensive guides, expert tips, troubleshooting assistance, and community support.
8.2. Final Thoughts and Recommendations
Saving in Microsoft Word is more than just a mechanical task; it’s a crucial aspect of effective document management. By adopting a strategic approach to saving, you can ensure that your work is always safe, accessible, and well-organized.
- Make Saving a Habit: Develop a habit of saving your work regularly, ideally every few minutes, to minimize the risk of data loss.
- Explore Advanced Features: Take the time to explore Word’s advanced saving features, such as version history, password protection, and template creation.
- Stay Informed: Stay updated with the latest features and best practices in Microsoft Word by following SaveWhere.net and other reputable resources.
- Practice and Experiment: Experiment with different saving techniques to find what works best for you and your specific needs.
- Share Your Knowledge: Share your saving tips and experiences with others to help them improve their document management practices.
8.3. Call to Action
Ready to take your saving skills to the next level? Visit SaveWhere.net today to explore our comprehensive guides, expert tips, and community support. Discover new ways to protect your work, streamline your workflow, and enhance your productivity in Microsoft Word.
Join our community of users, share your experiences, and ask questions. Together, we can master the art of saving in Microsoft Word and unlock the full potential of this powerful tool.
Visit SaveWhere.net now and start saving smarter today Join the savewhere.net community and start saving smarter today and visit us at 100 Peachtree St NW, Atlanta, GA 30303, United States or call us at +1 (404) 656-2000.
9. Frequently Asked Questions (FAQs)
9.1. How Often Should I Save My Word Document?
You should save your Word document every 10-15 minutes, or immediately after making significant changes. Regular saving prevents data loss from unexpected crashes or power outages.
9.2. What Is the Difference Between “Save” and “Save As” in Word?
“Save” updates the existing file with the latest changes, while “Save As” creates a new file or saves an existing one with a different name, format, or location.
9.3. How Do I Enable AutoSave in Microsoft Word?
AutoSave is enabled by default when you save your file to OneDrive or SharePoint in Microsoft 365. Ensure the AutoSave toggle in the top-left corner of the Word window is switched on.
9.4. How Do I Recover an Unsaved Word Document After a Crash?
When you reopen Word after a crash, the Document Recovery pane will appear. Select the recovered file and save it to your