
Saving files on your MacBook doesn’t have to be a daunting task. At savewhere.net, we believe in simplifying the process and empowering you to manage your digital life with ease. Discover practical tips and tricks to optimize your file-saving habits, enhance productivity, and gain better control over your finances, potentially saving you money along the way with better organization and efficient workflows. Learn smart strategies for money management, budgeting tips, and financial planning to help you achieve financial wellness.
1. Understanding the Basics of Saving Files on a MacBook
Saving files on your MacBook is a fundamental skill, but understanding the nuances can significantly improve your efficiency. What’s the best way to save files quickly and securely?
The best way to save files quickly and securely on your MacBook involves using the “Save” or “Save As” commands, choosing appropriate file formats, and selecting secure storage locations. Properly naming your files and utilizing cloud storage options also contribute to both speed and security. Let’s dive into the details:
1.1. The Save vs. Save As Commands
- Save: This command updates the existing file with the latest changes. It’s ideal when you’re working on a document and want to preserve your progress without creating a new file.
- Save As: This command creates a new file, allowing you to change the name, format, or location of the document. It’s perfect for making a copy, converting file types, or organizing your files into different folders.
1.2. Choosing the Right File Format
Selecting the correct file format ensures compatibility and data integrity. Here are some common formats:
- .docx: Microsoft Word document, widely used and compatible with most word processors.
- .pdf: Portable Document Format, excellent for preserving document formatting and sharing.
- .jpg, .png: Image formats, suitable for photos and graphics.
- .xlsx: Microsoft Excel spreadsheet, used for data analysis and organization.
- .pptx: Microsoft PowerPoint presentation, ideal for creating and sharing presentations.
According to research from Microsoft, using the appropriate file format can reduce file size by up to 50%, saving valuable storage space and improving transfer speeds.
1.3. Selecting a Secure Storage Location
Where you save your files is crucial for both accessibility and security:
- Local Storage: Saving files on your MacBook’s hard drive provides quick access but carries the risk of data loss if your device is damaged or stolen.
- External Hard Drives: A good option for backing up large amounts of data, but remember to keep the drive in a secure location.
- Cloud Storage: Services like iCloud, Google Drive, and Dropbox offer automatic backups and accessibility from multiple devices.
According to a study by Cybersecurity Ventures, businesses and individuals are increasingly turning to cloud storage for its enhanced security features and accessibility. Cloud storage spending is projected to reach $623.3 billion by 2024.
1.4. Naming Conventions and Organization
- Descriptive Names: Use clear, descriptive names that reflect the content of the file. For example, “Budget_Report_Q3_2024.xlsx” is much more informative than “Document1.xlsx.”
- Folder Structure: Create a logical folder structure to categorize your files. Use folders for different projects, clients, or types of documents.
- Tags: Utilize macOS tags to add keywords to your files, making them easier to find using Spotlight search.
By implementing these strategies, you can save files quickly, securely, and efficiently on your MacBook. This not only saves time but also reduces the risk of data loss and improves overall productivity.
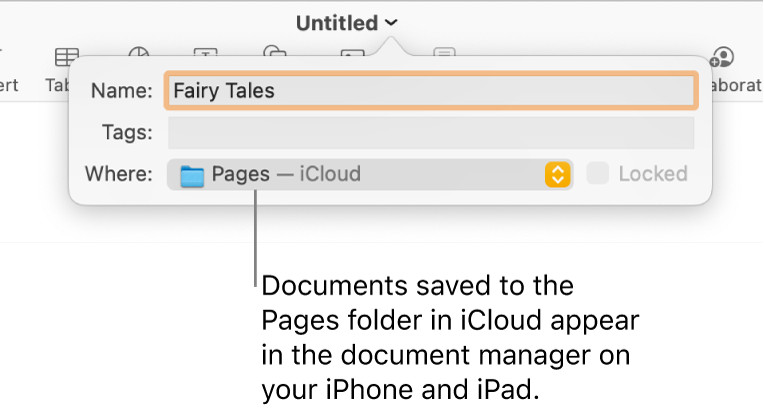 MacBook Save Dialog
The MacBook Save dialog with iCloud as the selected storage location.
2. Step-by-Step Guide to Saving a New Document on Your Macbook
Saving a new document on your MacBook is a straightforward process. How can you ensure your documents are saved correctly from the start?
To ensure your documents are saved correctly from the start, follow these detailed steps:
2.1. Open the Application
Launch the application you’re using to create your document, such as Pages, Microsoft Word, or TextEdit.
2.2. Create or Open a Document
- New Document: If you’re starting from scratch, create a new document by selecting “File” > “New” (or press Command + N).
- Existing Document: If you’re working on an existing document, open it by selecting “File” > “Open” (or press Command + O) and navigating to the file.
2.3. Initiate the Save Process
To save your document for the first time, follow these steps:
- Click “File” in the menu bar at the top of your screen.
- Select “Save” (or press Command + S).
2.4. Enter a Name and Add Tags (Optional)
A dialog box will appear, prompting you to name your document.
- Name: Enter a descriptive name in the “Save As” field.
- Tags: Add one or more tags in the “Tags” field to help categorize and find your document later.
2.5. Choose a Location
Select where you want to save your document:
- Click the “Where” pop-up menu.
- Choose a location from the list (e.g., Desktop, Documents, Downloads, or a specific folder).
- iCloud Drive: If you want your document to be accessible on all your devices set up with iCloud Drive, save it in the Pages folder in iCloud Drive. To see this option, ensure iCloud Drive is set up on your Mac. According to Apple Support, using iCloud Drive provides seamless syncing and backup for your documents across all your Apple devices.
- New Folder: To create a new folder for your document, click the “Where” pop-up menu, choose “Other,” then click “New Folder” at the bottom of the dialog. Enter a name for the folder and click “Create.”
2.6. Save the Document
After choosing a name and location, click the “Save” button. Your document is now saved in the selected location.
2.7. Auto Save Feature
macOS has an auto-save feature that automatically saves your work as you go, preventing data loss. By default, this feature is enabled. To ensure it’s active:
- Go to “System Preferences” > “General.”
- Ensure the “Ask to keep changes when closing documents” box is unchecked.
With these steps, you can confidently save new documents on your MacBook, ensuring they are correctly named, stored, and backed up. This process not only keeps your files organized but also contributes to a more efficient and stress-free workflow. Remember to regularly review and organize your files to maintain a clean and accessible digital workspace.
3. How to Rename a Document on Your Macbook
Renaming a document on your MacBook is a simple yet essential task for keeping your files organized. What’s the quickest way to rename a file?
The quickest way to rename a file on your MacBook is to click on the file name at the top of the window and enter the new name. This method is efficient and integrated directly into the macOS interface. Let’s explore the detailed steps and alternative methods to ensure you can rename documents with ease:
3.1. Using the Title Bar
- Open the Document: Open the document you want to rename in its respective application (e.g., Pages, Microsoft Word, TextEdit).
- Click the Document Name: At the top of the application window, you’ll see the current name of the document. Click on this name.
- Enter a New Name: A text field will appear, allowing you to enter a new name for the document. Type in the new name.
- Dismiss the Dialog: Click anywhere outside the dialog box or press “Return” to save the new name.
3.2. Using Finder
- Open Finder: Locate the document in Finder. You can do this by clicking on the Finder icon in the Dock or by pressing Command + Shift + A.
- Select the File: Find the file you want to rename and click on it to select it.
- Rename the File:
- Method 1: Click and Rename: Click on the file name once, wait a second, and click again. The name will become editable.
- Method 2: Right-Click (or Control-Click): Right-click (or Control-click) on the file and select “Rename” from the context menu.
- Method 3: Use the Keyboard: Select the file and press the “Return” key.
- Enter a New Name: Type the new name for the file.
- Confirm the Change: Press “Return” or click anywhere outside the file name to save the change.
3.3. Best Practices for Renaming Documents
- Descriptive Names: Use descriptive names that clearly indicate the content of the file. For example, instead of “Document1.docx,” use “Project_Report_Q3_2024.docx.”
- Consistency: Maintain a consistent naming convention for your files to make them easier to locate and manage.
- Avoid Special Characters: Avoid using special characters (e.g., *, ?, :, “) in your file names, as they can cause compatibility issues.
- Date Convention: Incorporate dates in your file names for time-sensitive documents. Use a consistent date format (e.g., YYYY-MM-DD) to ensure proper sorting.
Renaming documents on your MacBook is a simple task that can significantly improve your file management and organization. Whether you use the title bar method or Finder, following these steps and best practices will help you maintain a clean and efficient digital workspace. Regularly reviewing and renaming your files ensures that you can quickly find what you need, saving you time and reducing frustration.
4. Creating a Copy of a Document on Your Macbook
Creating a copy of a document on your MacBook is a valuable skill for safeguarding your work and experimenting with changes. What’s the best approach to duplicate a file?
The best approach to duplicate a file on your MacBook involves using the “Save As” command or the “Duplicate” function in Finder. These methods ensure that you create an exact copy of your document without altering the original. Let’s explore these approaches in detail:
4.1. Using the “Save As” Command
- Open the Document: Open the document you want to copy in its respective application (e.g., Pages, Microsoft Word, TextEdit).
- Hold the Option Key: Press and hold the “Option” key on your keyboard.
- Click “File” in the Menu Bar: While holding the Option key, click on “File” in the menu bar at the top of your screen.
- Select “Save As”: With the Option key held down, the “Save As” option will appear in the File menu. Select “Save As.”
- Enter a New Name: A dialog box will appear, prompting you to name the copy. Enter a new, descriptive name for the copy.
- Choose a Location: Select where you want to save the copy. You can choose a folder on your Mac, an external drive, or a cloud storage location.
- Save the Copy: Click the “Save” button. The copy of your document is now saved in the selected location.
4.2. Using the “Duplicate” Function in Finder
- Open Finder: Locate the document in Finder.
- Select the File: Click on the file to select it.
- Duplicate the File:
- Method 1: Right-Click (or Control-Click): Right-click (or Control-click) on the file and select “Duplicate” from the context menu.
- Method 2: Use the Keyboard: Select the file and press Command + D.
- Locate the Copy: A copy of the file will appear in the same folder as the original, with the name “[Original Name] copy.”
- Rename the Copy: Click on the copy’s name and rename it to something descriptive.
4.3. Why Create a Copy?
- Backup: Creating a copy serves as a backup, protecting you from data loss if the original file is corrupted or accidentally deleted.
- Experimentation: You can freely experiment with changes in the copy without risking the integrity of the original document.
- Version Control: Making copies at different stages of a project allows you to revert to earlier versions if needed.
4.4. Best Practices for Managing Copies
- Descriptive Names: Use descriptive names that differentiate the copy from the original. For example, “Project_Report_Q3_2024_Backup.docx” or “Project_Report_Q3_2024_Draft2.docx.”
- Consistent Location: Store copies in a consistent location, such as a dedicated “Backup” folder or a version-specific folder.
- Regular Backups: Regularly create copies of important documents to ensure you always have a recent backup.
Creating copies of your documents on your MacBook is a simple yet powerful way to protect your work and maintain version control. Whether you use the “Save As” command or the “Duplicate” function in Finder, following these steps and best practices will help you safeguard your data and streamline your workflow. Regularly backing up your files ensures that you can quickly recover from unexpected issues, saving you time and reducing stress.
The Pages app icon on a MacBook.
5. Saving a Document in a Different Format on Your Macbook
Sometimes, you need to save a document in a different format to ensure compatibility with other software or devices. How do you convert a file to a different format?
To convert a file to a different format, use the “Export” or “Save As” command in your application, selecting the desired format from the available options. This ensures that your document can be opened and viewed correctly on different platforms. Let’s explore the detailed steps for various applications:
5.1. Using the “Export” Command
- Open the Document: Open the document you want to convert in its respective application (e.g., Pages, Microsoft Word, TextEdit).
- Click “File” in the Menu Bar: Click on “File” in the menu bar at the top of your screen.
- Select “Export To”: In the File menu, look for an option like “Export To” or “Export.” The exact wording may vary depending on the application.
- Choose the Desired Format: A submenu will appear, listing the available file formats. Select the format you want to convert your document to (e.g., PDF, Microsoft Word, Plain Text).
- Customize Export Settings (Optional): Some applications allow you to customize export settings. For example, when exporting to PDF, you might be able to choose image quality, password protection, and accessibility options.
- Save the Converted File: A dialog box will appear, prompting you to name the converted file and choose a location to save it. Enter a name, select a location, and click “Save.”
5.2. Using the “Save As” Command
- Open the Document: Open the document you want to convert.
- Click “File” in the Menu Bar: Click on “File” in the menu bar.
- Select “Save As”: Choose the “Save As” option.
- Choose the Desired Format: In the Save As dialog box, there will be a “File Format” or “Save as type” dropdown menu. Click on this menu and select the format you want to convert your document to.
- Customize Save Settings (Optional): Some applications provide options to customize settings specific to the file format.
- Save the Converted File: Enter a name for the converted file, choose a location, and click “Save.”
5.3. Common File Formats and Their Uses
- .PDF (Portable Document Format): Preserves formatting and is ideal for sharing documents that need to look the same on any device.
- .DOCX (Microsoft Word Document): Widely used for word processing and compatible with most word processors.
- .TXT (Plain Text): A simple format that contains only text, without any formatting.
- .RTF (Rich Text Format): Supports basic formatting like fonts, styles, and images.
- .JPEG, .PNG (Image Formats): Used for saving images; JPEG is best for photographs, while PNG is better for graphics with sharp lines and text.
5.4. Example: Converting a Pages Document to PDF
- Open your document in Pages.
- Click “File” > “Export To” > “PDF.”
- Customize settings like image quality and password protection if needed.
- Click “Next,” enter a name, choose a location, and click “Export.”
5.5. Benefits of Converting File Formats
- Compatibility: Ensures your document can be opened and viewed correctly on different devices and operating systems.
- Accessibility: Some formats, like PDF, can be made more accessible for users with disabilities.
- Preservation: Converts documents to formats that are less likely to become obsolete over time.
Converting documents to different formats on your MacBook is a crucial skill for ensuring compatibility and accessibility. Whether you use the “Export” or “Save As” command, following these steps will help you create files that can be easily shared and viewed by anyone, regardless of their software or device. Regularly converting files as needed ensures that your documents remain useful and accessible over the long term.
6. Utilizing iCloud Drive for Seamless File Saving on Your Macbook
iCloud Drive offers a seamless way to save and access your files across all your Apple devices. How can you make the most of iCloud Drive for file management?
To make the most of iCloud Drive for file management, enable it on all your devices, organize your files into folders, and understand how to share and collaborate on documents stored in iCloud. This ensures that your files are always accessible, backed up, and easily shared. Let’s dive into the details:
6.1. Enabling iCloud Drive
- On Your Mac:
- Go to “System Preferences” > “Apple ID.”
- Select “iCloud” in the sidebar.
- Make sure “iCloud Drive” is checked.
- Click the “Options” button next to iCloud Drive and ensure that the apps you want to sync with iCloud Drive are selected (e.g., Pages, Numbers, Keynote).
- On Your iPhone or iPad:
- Go to “Settings” > “[Your Name]” > “iCloud.”
- Make sure “iCloud Drive” is toggled on.
- Enable the apps you want to sync with iCloud Drive.
6.2. Saving Files to iCloud Drive
When saving a new document or moving an existing one, choose iCloud Drive as the destination:
- Saving a New Document: When you save a new document (File > Save), select “iCloud Drive” from the “Where” dropdown menu.
- Moving Existing Documents: To move existing documents to iCloud Drive, simply drag and drop them into the iCloud Drive folder in Finder.
6.3. Organizing Files in iCloud Drive
- Create Folders: Organize your files into folders within iCloud Drive to maintain a clear and structured file system.
- Naming Conventions: Use consistent and descriptive naming conventions for your files and folders.
- Color-Coding: Use macOS tags to color-code your folders for quick visual identification.
6.4. Sharing and Collaboration
iCloud Drive makes it easy to share files and collaborate with others:
- Sharing Files:
- Right-click (or Control-click) on the file or folder you want to share in Finder.
- Select “Share” > “Add People.”
- Choose how you want to share the file (e.g., Mail, Messages, Copy Link).
- Set permissions (e.g., “Only invited people,” “Anyone with the link”) and choose whether collaborators can make changes or only view the file.
- Collaboration:
- When sharing a document, you can invite others to collaborate in real-time. Changes made by collaborators are automatically synced across all devices.
6.5. Benefits of Using iCloud Drive
- Accessibility: Access your files from any Apple device, as well as from a web browser on any computer.
- Automatic Backup: iCloud Drive automatically backs up your files, protecting you from data loss.
- Seamless Syncing: Changes made on one device are automatically synced to all other devices.
- Collaboration: Easily share files and collaborate with others in real-time.
6.6. Managing iCloud Storage
iCloud Drive uses your iCloud storage. To manage your storage:
- Check Your Storage:
- On Your Mac: Go to “System Preferences” > “Apple ID” > “iCloud” > “Manage.”
- On Your iPhone or iPad: Go to “Settings” > “[Your Name]” > “iCloud” > “Manage Storage.”
- Optimize Storage:
- Delete unnecessary files and folders.
- Move large files to an external drive.
- Upgrade your iCloud storage plan if needed.
Utilizing iCloud Drive effectively can greatly enhance your file management on your MacBook. By enabling iCloud Drive, organizing your files, and understanding how to share and collaborate, you can ensure that your documents are always accessible, backed up, and easily shared. Regularly managing your iCloud storage will also help you maintain an efficient and stress-free digital workspace.
7. Troubleshooting Common File Saving Issues on a Macbook
Even with the best practices, you might encounter issues when saving files on your MacBook. What should you do when you can’t save a file?
When you can’t save a file on your MacBook, start by checking disk space, verifying file permissions, and ensuring the application is stable. If these steps don’t resolve the issue, try saving to a different location or restarting your Mac. Let’s explore these troubleshooting steps in detail:
7.1. Check Disk Space
One of the most common reasons for being unable to save a file is insufficient disk space.
- How to Check:
- Click the Apple menu > “About This Mac” > “Storage.”
- Review the available storage space.
- Resolution:
- Delete unnecessary files and applications.
- Move large files to an external drive or cloud storage.
- Empty the Trash.
7.2. Verify File Permissions
Incorrect file permissions can prevent you from saving changes to a file.
- How to Check:
- Locate the file in Finder.
- Right-click (or Control-click) on the file and select “Get Info.”
- Scroll down to the “Sharing & Permissions” section.
- Ensure that your user account has “Read & Write” privileges.
- Resolution:
- If your permissions are set to “Read only,” change them to “Read & Write.”
- If you don’t have permission to change the settings, contact the file owner or system administrator.
7.3. Application Stability
Sometimes, an application may become unstable and prevent you from saving files.
- How to Check:
- If the application is frozen or unresponsive, it may be unstable.
- Check the Activity Monitor (Applications > Utilities > Activity Monitor) to see if the application is using excessive resources.
- Resolution:
- Force quit the application (Option + Command + Esc) and reopen it.
- Restart your MacBook.
- Update the application to the latest version.
- Reinstall the application if the issue persists.
7.4. Save to a Different Location
Try saving the file to a different location to rule out issues with the original destination.
- How to Try:
- Select “File” > “Save As” and choose a different folder (e.g., Desktop, Documents).
- Resolution:
- If the file saves successfully to a different location, the original folder may have issues. Try moving the file to the new location and troubleshooting the original folder.
7.5. Restart Your Macbook
Restarting your MacBook can resolve many temporary software issues.
- How to Restart:
- Click the Apple menu and select “Restart.”
- Resolution:
- After restarting, try saving the file again.
7.6. Check File Format Compatibility
Ensure that the file format you are trying to save in is compatible with the application.
- How to Check:
- Verify that the application supports the file format you are trying to save in (e.g., saving a Pages document as a .docx file).
- Resolution:
- Save the file in a compatible format.
- Use the “Export” command to convert the file to a different format.
7.7. Contact Support
If none of the above steps resolve the issue, contact the application’s support team or Apple Support for further assistance.
Troubleshooting file saving issues on your MacBook involves a systematic approach to identify and resolve the underlying problem. By checking disk space, verifying file permissions, ensuring application stability, and trying alternative saving locations, you can often resolve the issue and prevent data loss. Regularly maintaining your system and keeping your applications up to date can also help prevent future file saving problems.
8. Advanced Tips for Efficient File Management on Your Macbook
Beyond the basics, there are several advanced techniques to boost your file management efficiency on a MacBook. What are some advanced tips for managing files effectively?
Some advanced tips for managing files effectively on a MacBook include using smart folders, automating tasks with Hazel, leveraging iCloud Drive for collaboration, and utilizing tags for quick organization. These strategies can save time, improve organization, and enhance productivity. Let’s explore these techniques in detail:
8.1. Smart Folders
Smart Folders are dynamic folders that automatically organize files based on specific criteria.
- How to Create:
- Open Finder and select “File” > “New Smart Folder.”
- Click the “+” button to add search criteria (e.g., file type, date modified, keywords).
- Save the Smart Folder with a descriptive name.
- Benefits:
- Automatically organize files based on your chosen criteria.
- Dynamically update as new files meet the criteria.
- Save time by eliminating manual organization.
- Example: Create a Smart Folder that automatically collects all PDF files created in the last month.
8.2. Automating Tasks with Hazel
Hazel is a third-party application that automates file management tasks based on predefined rules.
- How to Use:
- Install Hazel from Noodlesoft.
- Create rules to watch specific folders and perform actions based on file attributes (e.g., rename files, move files, add tags).
- Benefits:
- Automatically organize files based on complex rules.
- Reduce manual file management tasks.
- Improve consistency in file organization.
- Example: Set up Hazel to automatically rename downloaded files based on their content and move them to appropriate folders.
8.3. Leveraging iCloud Drive for Collaboration
iCloud Drive offers robust features for sharing and collaborating on documents.
- How to Use:
- Store your files in iCloud Drive.
- Share files and folders with others, setting appropriate permissions (e.g., view only, edit).
- Collaborate in real-time on documents, with changes automatically synced across all devices.
- Benefits:
- Seamless collaboration with others.
- Automatic syncing of changes across all devices.
- Easy access to shared files.
- Example: Share a project folder with team members, allowing them to edit documents and stay updated on the latest changes.
8.4. Utilizing Tags for Quick Organization
Tags are keywords that you can assign to files and folders to make them easier to find.
- How to Use:
- Select a file or folder in Finder.
- Click “File” > “Tags” and choose from the available tags or create a new one.
- Search for files by tag in Finder by typing the tag name in the search bar.
- Benefits:
- Quickly find files based on keywords.
- Organize files across different folders.
- Improve search efficiency.
- Example: Tag all files related to a specific client with the client’s name, making it easy to find all relevant documents.
8.5. Using Stacks on the Desktop
Stacks automatically organize files on your desktop into neat piles based on file type, date, or tags.
- How to Use:
- Right-click on the desktop and select “Use Stacks.”
- Choose how you want to group the stacks (e.g., by Kind, Date Last Opened, Date Added, Tags).
- Benefits:
- Keep your desktop clean and organized.
- Quickly access files on the desktop.
- Reduce clutter.
- Example: Group files on your desktop by file type, so all images, documents, and spreadsheets are neatly organized into separate stacks.
8.6. Keyboard Shortcuts for File Management
Using keyboard shortcuts can significantly speed up your file management tasks.
- Common Shortcuts:
- Command + N: New Finder window
- Command + O: Open selected file
- Command + S: Save
- Command + Shift + S: Save As
- Command + D: Duplicate
- Command + Delete: Move to Trash
- Command + Shift + Delete: Empty Trash
- Command + I: Get Info
- Space Bar: Quick Look
- Benefits:
- Speed up file management tasks.
- Reduce reliance on the mouse.
- Improve overall efficiency.
- Example: Use Command + Shift + S to quickly save a copy of a document with a new name.
By implementing these advanced file management tips, you can significantly improve your efficiency and organization on your MacBook. Smart Folders, Hazel, iCloud Drive, tags, Stacks, and keyboard shortcuts can all help you save time, reduce clutter, and enhance your productivity. Regularly reviewing and optimizing your file management practices will ensure that you maintain a clean and efficient digital workspace.
9. How to Recover Lost or Unsaved Files on Your Macbook
Losing unsaved work can be frustrating, but macOS offers several ways to recover lost or unsaved files. What steps can you take to retrieve lost data?
To retrieve lost data on your MacBook, start by checking the AutoSave folder, using Time Machine backups, and looking for temporary files. If these methods don’t work, consider using data recovery software. Let’s explore these recovery steps in detail:
9.1. Check the AutoSave Folder
macOS has an AutoSave feature that automatically saves your work as you go.
- How to Check:
- AutoSave typically saves files every few minutes. If an application crashes or you forget to save, the AutoSave version may be available.
- The location of the AutoSave folder varies by application. Some applications save AutoSave files in the
~/Library/Autosave Informationfolder.
- Resolution:
- Navigate to the AutoSave folder and look for the most recent version of your file.
- Open the AutoSave file and save it to a safe location.
9.2. Use Time Machine Backups
Time Machine is macOS’s built-in backup utility that automatically backs up your files to an external drive.
- How to Use:
- Connect your Time Machine backup drive to your MacBook.
- Open Time Machine by clicking the Time Machine icon in the menu bar or by searching for it in Spotlight.
- Navigate to the folder where the lost file was located.
- Use the timeline on the right side of the screen to find a backup from before the file was lost.
- Select the file and click “Restore.”
- Benefits:
- Reliable backup and recovery of files.
- Ability to restore entire system or individual files.
- Automatic backups ensure that your files are always protected.
- Example: Restore a lost document from a Time Machine backup created yesterday.
9.3. Look for Temporary Files
Applications often create temporary files while you are working on a document. These files may contain unsaved data.
- How to Check:
- Temporary files typically have extensions like
.tmpor start with a~character. - Search for temporary files in the folder where the lost file was located.
- Temporary files typically have extensions like
- Resolution:
- Open any temporary files you find in a text editor or the application that created them.
- Look for any recoverable data and save it to a new file.
9.4. Use Data Recovery Software
If you cannot recover your lost file using the above methods, consider using data recovery software.
- Recommended Software:
- Disk Drill: A popular data recovery tool for macOS that can recover files from internal and external drives.
- EaseUS Data Recovery Wizard: Another effective data recovery tool with a user-friendly interface.
- How to Use:
- Download and install the data recovery software.
- Select the drive where the lost file was located.
- Run a scan to search for recoverable files.
- Preview the recovered files and save them to a safe location.
- Benefits:
- Comprehensive scanning for lost files.
- Ability to recover files from formatted or damaged drives.
- User-friendly interfaces.
- Example: Use Disk Drill to recover a deleted document from your MacBook’s hard drive.
9.5. Prevention Tips
To prevent future data loss:
- Enable AutoSave: Ensure that AutoSave is enabled in your applications.
- Use Time Machine: Set up Time Machine to automatically back up your files to an external drive.
- Save Frequently: Save your work frequently to minimize data loss if an application crashes.
- Use Cloud Storage: Store your files in cloud storage services like iCloud Drive, Google Drive, or Dropbox to automatically back up your files and make them accessible from any device.
Recovering lost or unsaved files on your MacBook involves a combination of checking AutoSave, using Time Machine backups, looking for temporary files, and considering data recovery software. By following these steps, you can often retrieve your lost data and minimize the impact of unexpected data loss. Regularly backing up your files and using AutoSave can help prevent future data loss and ensure that your work is always protected.
10. Maximizing Your Macbook’s Storage for Better File Management
Efficient file management is closely linked to how well you manage your MacBook’s storage. How can you optimize your storage for better file organization?
To optimize your storage for better file organization, start by identifying large and unused files, utilizing cloud storage, and enabling Optimized Storage features. Regularly decluttering your