Saving images as JPGs in Photoshop is a crucial skill for sharing and storing your creations, and Savewhere.net is here to guide you. Understanding the different methods and settings allows you to optimize image quality and file size for various purposes. Learn how to expertly save your Photoshop masterpieces as JPGs, balancing quality and file size for optimal use with savewhere.net’s expert guidance. Dive into effective image management and discover how to leverage file compression and color profiles for professional results.
1. Understanding the JPEG Image Format
Why save your images as JPEGs? The answer lies in the balance between quality and file size.
JPEG (Joint Photographic Experts Group) is a widely used format that uses lossy compression to keep file sizes manageable while maintaining acceptable image quality. This makes it ideal for various applications, from web use to sharing images with friends and clients.
- Versatility: JPEGs are supported by almost every image viewer and operating system, making them perfect for sharing your work on blogs, social media, or via email.
- Manageable File Size: The compression algorithm reduces file size, which is crucial for faster loading times on websites and easier sharing.
 Save As option Photoshop
Alt Text: The Save As dialog box in Adobe Photoshop, highlighting the file format options for saving a project.
1.1. The Downside of JPEG: Lossy Compression
One downside of JPEG is its lossy compression. Every time you save an image as a JPEG, some data is lost. This can lead to a gradual decrease in image quality if the file is repeatedly edited and saved.
- Quality Degradation: Repeated saving can result in noticeable artifacts and reduced sharpness.
- Best Practices: Always keep your original file in Photoshop’s native PSD format. Save copies as JPEGs for sharing or web use.
1.2. JPEG vs. Other Formats
Understanding how JPEG compares to other common image formats is essential.
| Format | Compression | Use Cases |
|---|---|---|
| JPEG | Lossy | Photos, web images, general use where file size is important |
| PNG | Lossless | Graphics with transparency, images with text, when quality is paramount |
| GIF | Lossless | Animated images, simple graphics |
| TIFF | Lossless | Archiving, professional printing, high-quality images where file size is not a primary concern |
| PSD | Lossless | Working files in Photoshop, preserving layers and editing capabilities |
2. How to Save Photoshop as JPEG: Step-by-Step
Let’s explore different methods to save your files as JPEGs in Photoshop. Each method offers its own advantages and levels of control.
2.1. Method 1: The ‘Save As’ Technique
The “Save As” method is straightforward and suitable for most users. Here’s how to do it:
- Open Your File: Open your file in Photoshop.
- Navigate to ‘Save As’: Go to ‘File’ in the top menu and select ‘Save As’.
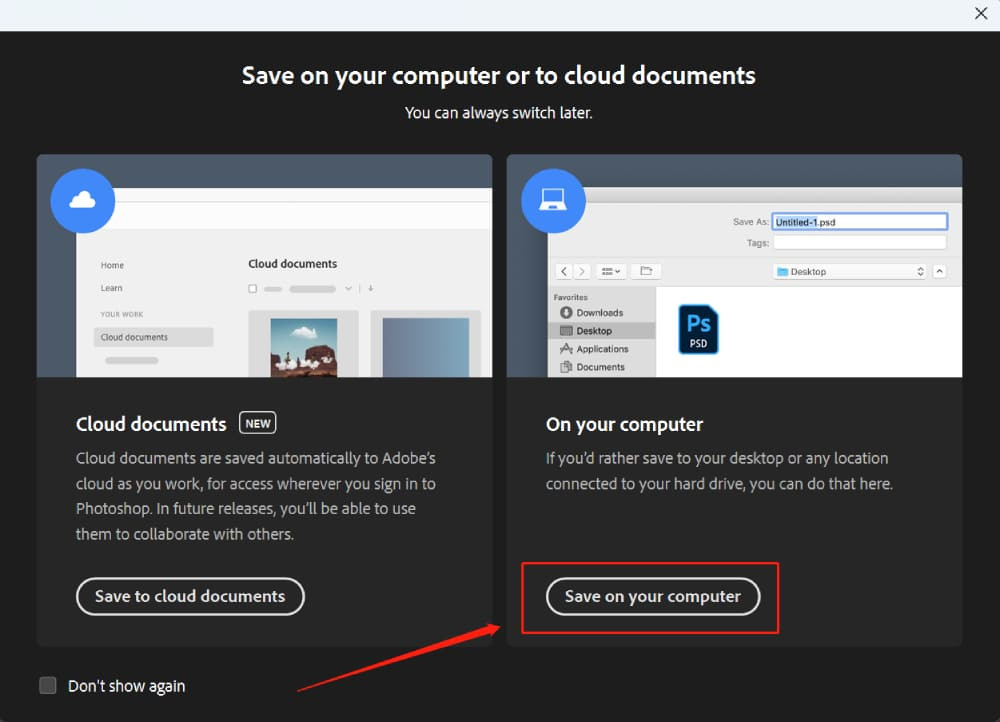
- Choose Save Location: A panel will appear. Choose ‘On Your Computer’.
- Select JPEG Format: In the dialog box, under ‘Format’, select ‘JPEG’.
- Name and Save: Give your file a name, choose a location, and click ‘Save’.
2.2. Understanding JPEG Options
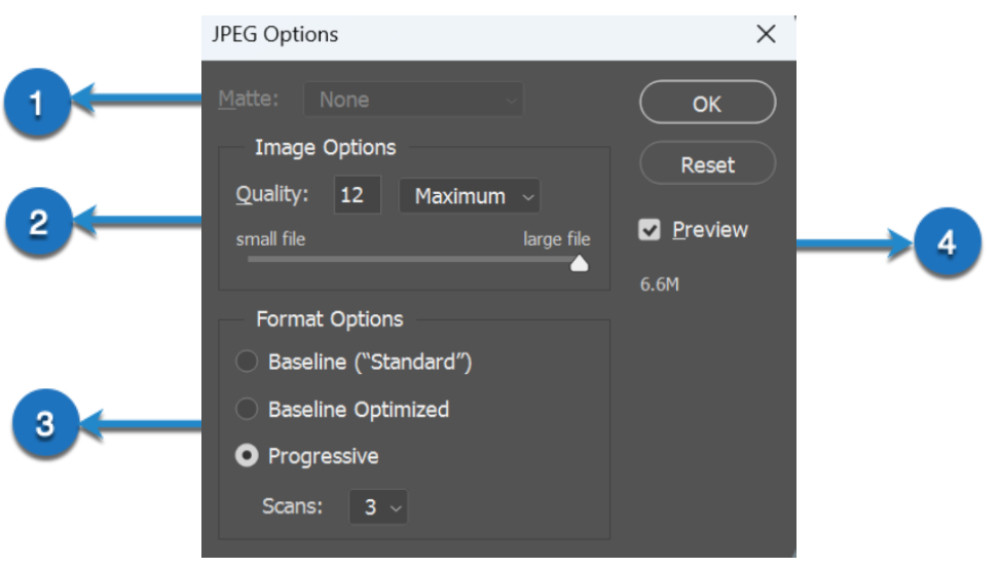
After clicking ‘Save’, the ‘JPEG Options’ box appears, providing several settings to adjust.
 JPEG Options in Photoshop
Alt Text: JPEG options popup window inside of Adobe Photoshop.
2.2.1. Matte
The ‘Matte’ option is relevant when working with images containing transparency. Since JPEG does not support transparency, this option fills the transparent areas with a color of your choice.
- Use Case: Ideal for flattening images with transparent backgrounds before saving as JPEG.
- Color Selection: Choose a color that blends well with the rest of the image to avoid harsh edges.
2.2.2. Image Options: Quality
The ‘Quality’ slider ranges from 0 to 12, with 12 offering the highest quality but also the largest file size. The sweet spot depends on the intended use of the image.
- High Quality (10-12): Best for images that will be printed or require minimal compression artifacts.
- Medium Quality (5-9): Suitable for web use and general sharing, balancing quality and file size.
- Low Quality (0-4): Use for thumbnails or images where file size is more critical than quality.
- File Size Estimation: Pay attention to the estimated file size displayed, which helps you gauge the impact of your settings.
2.2.3. Format Options
You can choose between three formatting types: ‘Baseline (“Standard”)’, ‘Baseline Optimized’, and ‘Progressive’.
- Baseline (“Standard”): Offers the best compatibility across devices and platforms.
- Baseline Optimized: Provides a smaller file size with the same image quality, ideal for web use.
- Progressive: Loads in successive layers of detail, improving the viewing experience for large images on web pages.
2.2.4. Preview
The ‘Preview’ checkbox allows you to see the changes made in the ‘JPEG Options’ dialog box in real-time in your Photoshop workspace.
- Visual Feedback: Check this box to see how your settings affect the image before saving.
- Iterative Adjustments: Adjust the parameters and observe the preview to strike the perfect balance between image quality and file size.
2.3. Method 2: The ‘Export As’ Option
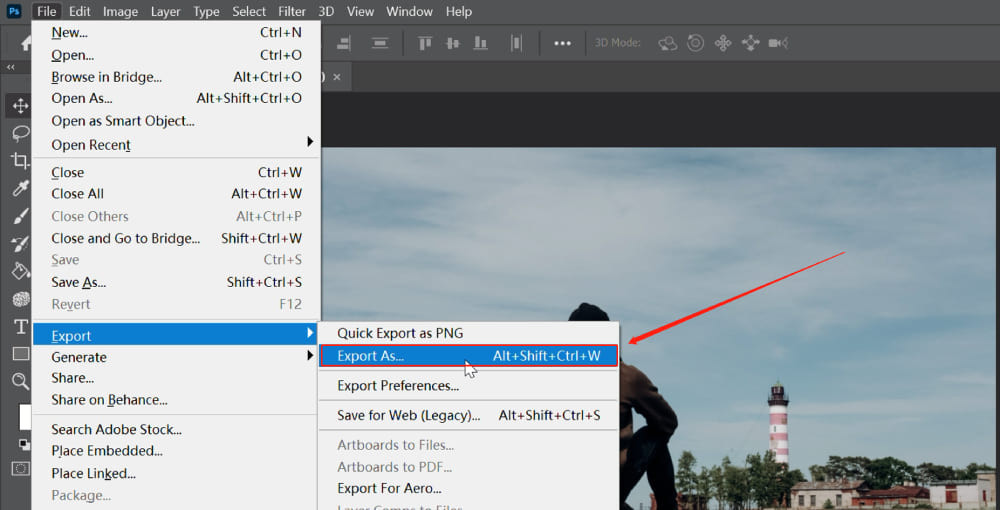
The ‘Export As’ feature gives you more control over your output and is especially useful for web graphics.
- Navigate to ‘Export As’: Go to ‘File’ > ‘Export’ > ‘Export As’.
- Select JPEG Format: In the dialog box, select ‘JPEG’ as the format.
- Adjust Settings: Tweak options like ‘Quality’, ‘Width’, ‘Height’, and ‘Canvas Size’.
- Convert to sRGB: Check the ‘Convert to sRGB’ option for web and mobile viewing.
- Export: Click ‘Export’ to save the file.
 Export As Photoshop
Alt Text: The Export As window in Adobe Photoshop with JPG selected as the format for exporting.
2.4. Method 3: The ‘Save for Web (Legacy)’ Method
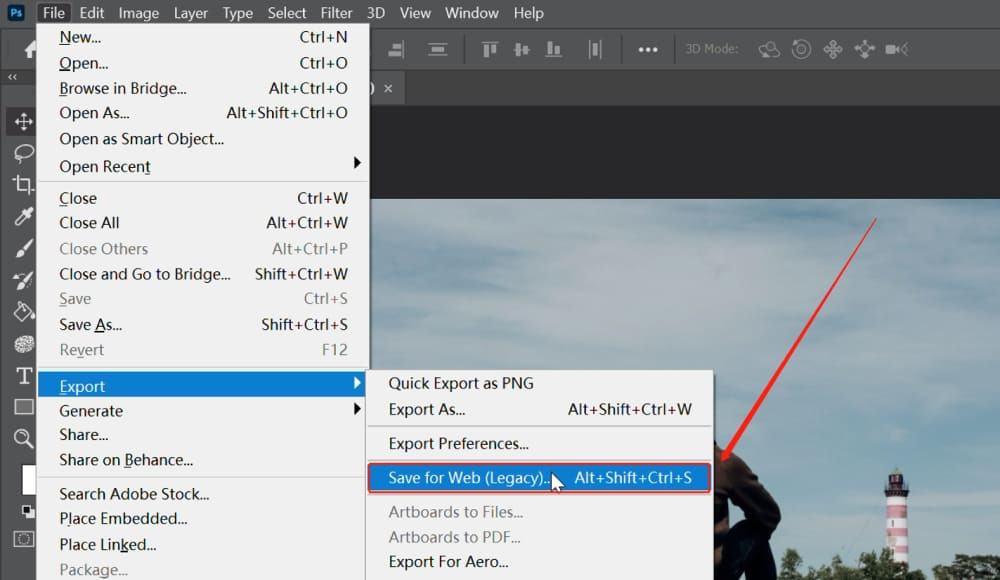
While an older feature, ‘Save for Web (Legacy)’ is still a favorite for its fine-grained control over image optimization.
- Navigate to ‘Save for Web (Legacy)’: Go to ‘File’ > ‘Export’ > ‘Save for Web (Legacy)’.
- Choose JPEG: Select ‘JPEG’ as your file format.
- Adjust Parameters: Fine-tune settings like ‘Preset’, ‘JPEG Quality’, ‘Optimized’, and more.
- Preview and Save: Preview the image and click ‘Save’ to export.
 Save for Web (Legacy) Photoshop
Alt Text: Save for Web Legacy window, where users can change the file type, and make adjustments to color, image size, and metadata.
2.4.1. Preset
The ‘Preset’ dropdown allows you to select from a variety of predefined settings, which can be a real timesaver. You can also save your own settings as a new preset for future use.
- Efficiency: Quickly apply common settings for different use cases.
- Customization: Create and save custom presets for specific projects or recurring tasks.
2.4.2. JPEG Quality
Here, you can adjust the quality of your JPEG image. The scale goes from 0 (Lowest quality, smallest file size) to 100 (Highest quality, largest file size).
- Fine-Grained Control: Adjust the quality in increments to achieve the desired balance.
- Visual Assessment: Use the preview to visually assess the impact of your quality settings.
2.4.3. Optimized
Checking this box will enable a more optimized form of JPEG that results in smaller file sizes without significant loss in quality.
- Efficiency: Reduce file size without significantly impacting visual quality.
- Web Performance: Improve website loading times by using optimized JPEGs.
2.4.4. Progressive
A Progressive JPEG will load in stages when viewed in a web browser. First, a low-quality version of the full image will appear, and then it will gradually increase in quality.
- Enhanced User Experience: Provide a better viewing experience, especially on slower internet connections.
- Perceived Performance: Improve the perceived loading speed of web pages with large images.
2.4.5. Embed Color Profile
If checked, this option includes the color profile of your image in the file. This can help ensure colors look correct on devices that support color management.
- Color Accuracy: Maintain color fidelity across different devices and platforms.
- Professional Use: Essential for professional workflows where color accuracy is critical.
2.4.6. Blur
This option applies a small amount of blur to your image, which can reduce file size but may also affect sharpness.
- File Size Reduction: Slightly blur images to reduce file size, especially for images with fine details.
- Careful Application: Use sparingly, as excessive blur can degrade image quality.
2.4.7. Convert to sRGB
If checked, this will convert your image to the sRGB color space, which is the most widely used color space for displaying images and videos on digital devices.
- Compatibility: Ensure your images display correctly on most devices and browsers.
- Standard Practice: Recommended for web use to avoid color discrepancies.
2.4.8. Preview Options
Here you can choose how you want to preview your image. ‘Internet Standard RGB (No Color Management)’ is a good general setting to use.
- Accurate Representation: Preview images with settings that mimic how they will appear online.
- Informed Decisions: Make informed decisions about quality and optimization based on the preview.
2.4.9. Metadata
This dropdown lets you choose how much of your image’s metadata to include in the file. Including all metadata will increase the file size.
- Data Management: Decide whether to include copyright information, camera settings, and other metadata.
- Privacy Considerations: Be mindful of privacy when sharing images online, as metadata can reveal location and other personal information.
2.4.10. Image Size
Here, you can adjust the dimensions of your image. Be careful not to enlarge your image here, as it can result in a loss of quality.
- Precise Dimensions: Set exact pixel dimensions for specific web layouts or print requirements.
- Quality Preservation: Avoid upscaling images, as it can introduce pixelation and blurriness.
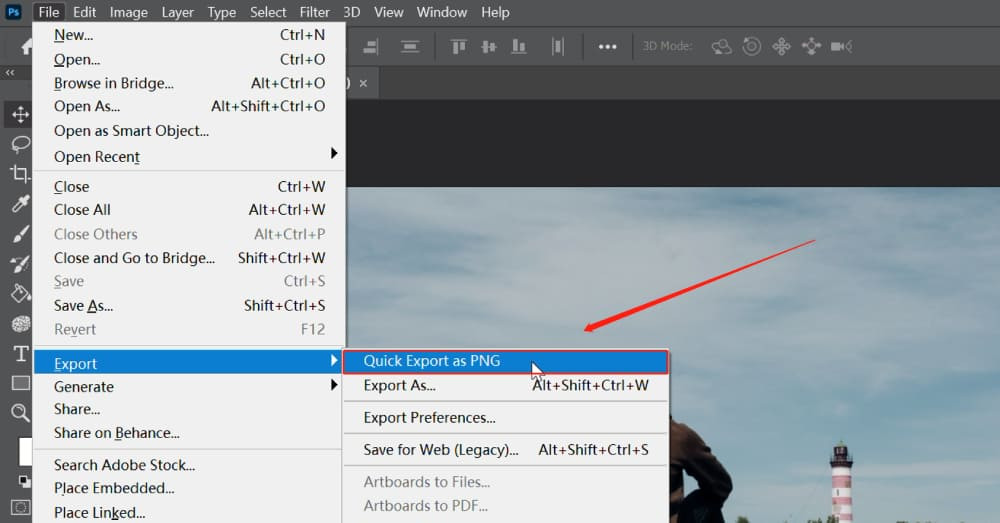
2.5. Method 4: Quick Export as JPEG
Photoshop also supports a quick one-click option to export file formats. This can be achieved by navigating through ‘File’ > ‘Export’ > ‘Quick Export as XXX’.
- Navigate to ‘Quick Export’: Go to ‘File’ > ‘Export’ > ‘Quick Export as XXX’.
- Set Preferences: To change the default format, click ‘Edit’ > ‘Preferences’ > ‘Export’.
- Select JPEG: In the panel, set the ‘Quick Export Format’ to JPEG.
 Quick Export Photoshop
Alt Text: Export options and JPG export settings in Adobe Photoshop.
3. Additional Tips for Saving Photoshop as JPEG
In this tutorial, we’ve walked through various methods of saving JPEG in Photoshop. While these steps may seem straightforward, they involve numerous parameters.
3.1. Understanding Color Profiles
Color profiles ensure that the colors in your image are accurately reproduced across different devices.
- sRGB: Standard color profile for web use.
- Adobe RGB: Wider color gamut, suitable for print and professional work.
- Choosing the Right Profile: Convert to sRGB for web, use Adobe RGB for print, or retain the original profile if unsure.
3.2. File Naming Conventions
Use descriptive and organized file names to keep your files manageable.
- Descriptive Names: Include relevant information like date, project name, and version number.
- Consistent Format: Follow a consistent naming convention for all your files.
- Example: “ProjectName_20240715_v01.jpg”
3.3. Batch Processing
Automate repetitive tasks by using Photoshop’s batch processing feature.
- Automate Tasks: Apply the same settings to multiple files at once.
- Time-Saving: Efficient for large projects with consistent requirements.
3.4. Resizing for Web
Optimize images for web use by resizing them to the appropriate dimensions.
- Reduce File Size: Smaller images load faster on websites.
- Maintain Aspect Ratio: Resize images proportionally to avoid distortion.
- Use CSS: Use CSS to control image size on your website, allowing you to use larger images for better quality on high-resolution displays.
3.5. Sharpening Techniques
Apply sharpening to enhance the details in your images, especially after resizing.
- Unsharp Mask: Common sharpening filter in Photoshop.
- Smart Sharpen: More advanced filter with greater control.
- Subtle Sharpening: Avoid over-sharpening, which can introduce artifacts.
4. Common Mistakes to Avoid When Saving as JPEG
Avoiding these common mistakes can help you maintain image quality and optimize your workflow.
4.1. Repeatedly Saving the Same File
Each time you save a JPEG, the image is re-compressed, leading to quality degradation.
- Keep Originals: Always save your original file as a PSD and only save copies as JPEGs.
- Non-Destructive Workflow: Use adjustment layers and smart objects to avoid making permanent changes to your original image.
4.2. Setting Quality Too Low
Saving at a very low-quality setting can result in noticeable compression artifacts.
- Visual Inspection: Always preview the image at different quality settings to find the right balance.
- Target Use: Consider the intended use of the image when choosing a quality setting.
4.3. Ignoring Color Profiles
Failing to embed the correct color profile can result in color shifts on different devices.
- sRGB for Web: Always convert to sRGB for web use.
- Monitor Calibration: Calibrate your monitor to ensure accurate color representation.
4.4. Over-Resizing Images
Enlarging images beyond their original size can lead to pixelation and blurriness.
- Original Dimensions: Avoid upscaling images unless absolutely necessary.
- Vector Graphics: Use vector graphics for elements that need to be scaled without loss of quality.
4.5. Neglecting Metadata
Omitting important metadata can make it difficult to manage and track your images.
- Copyright Information: Include copyright information to protect your work.
- Descriptive Tags: Add descriptive tags to make your images searchable.
5. Optimizing JPEG for Different Platforms
Different platforms have different requirements for image size and quality. Here’s how to optimize your JPEGs for various uses.
5.1. Web Use
Optimizing images for the web involves balancing file size and visual quality.
- File Size Limits: Keep file sizes as small as possible to reduce loading times.
- Image Dimensions: Resize images to the appropriate dimensions for your website layout.
- Compression: Use optimized JPEG settings to reduce file size without significant loss of quality.
- Tools: Use online tools like TinyPNG or ImageOptim to further compress your images.
5.2. Social Media
Each social media platform has its own recommended image dimensions and file size limits.
| Platform | Recommended Dimensions | File Size Limit |
|---|---|---|
| 1200 x 630 pixels | 8 MB | |
| 1080 x 1080 pixels (square) | 8 MB | |
| 1200 x 675 pixels | 5 MB | |
| 1200 x 627 pixels | 5 MB | |
| 1000 x 1500 pixels (vertical) | 20 MB |
- Optimize for Each Platform: Resize and compress images specifically for each platform to ensure they look their best.
- Test and Adjust: Experiment with different settings to find the optimal balance between quality and file size.
5.3. Print Use
Printing requires high-resolution images to ensure sharp details and accurate colors.
- High Resolution: Use images with a resolution of at least 300 DPI (dots per inch).
- Color Profiles: Use appropriate color profiles for printing, such as Adobe RGB or CMYK.
- Avoid Compression Artifacts: Save JPEGs at the highest quality setting to minimize compression artifacts.
- Professional Printing: Consult with your printing service for specific requirements and recommendations.
6. Using Third-Party Tools for JPEG Optimization
Several third-party tools can help you optimize your JPEGs for various purposes.
6.1. TinyPNG
TinyPNG uses smart lossy compression techniques to reduce the file size of your JPEGs.
- Smart Compression: Reduces file size without significant loss of quality.
- Easy to Use: Simple drag-and-drop interface.
- Free and Paid Plans: Offers a free plan for basic use and paid plans for more advanced features.
6.2. ImageOptim
ImageOptim is a free, open-source tool that optimizes JPEGs, PNGs, and GIFs.
- Multiple Optimization Tools: Uses several tools to find the best compression settings.
- Lossless and Lossy Compression: Supports both lossless and lossy compression techniques.
- Free and Open-Source: Completely free to use and customize.
6.3. Adobe Lightroom
Adobe Lightroom offers powerful image editing and optimization tools.
- Comprehensive Editing: Offers a wide range of editing tools, including color correction, sharpening, and noise reduction.
- Export Options: Provides flexible export options for optimizing images for web, print, and social media.
- Batch Processing: Allows you to apply the same settings to multiple images at once.
7. Practical Examples of Saving as JPEG in Different Scenarios
Let’s look at some practical examples of how to save as JPEG in different scenarios.
7.1. Saving a Photo for a Blog Post
- Resize the Image: Resize the image to the appropriate dimensions for your blog layout. For example, 1200 pixels wide.
- Sharpen the Image: Apply a slight amount of sharpening to enhance the details.
- Convert to sRGB: Convert the image to the sRGB color profile.
- Save as JPEG: Save the image as a JPEG using the “Save for Web (Legacy)” option with a quality setting of 60-70.
- Optimize with TinyPNG: Further optimize the image using TinyPNG to reduce the file size.
7.2. Saving a Graphic for Social Media
- Resize the Graphic: Resize the graphic to the recommended dimensions for the specific social media platform. For example, 1080 x 1080 pixels for Instagram.
- Convert to sRGB: Convert the graphic to the sRGB color profile.
- Save as JPEG: Save the graphic as a JPEG using the “Save for Web (Legacy)” option with a quality setting of 70-80.
- Test on the Platform: Test the image on the platform to ensure it looks good and loads quickly.
7.3. Saving a High-Resolution Photo for Print
- Check the Resolution: Ensure the image has a resolution of at least 300 DPI.
- Use Adobe RGB or CMYK: Use the appropriate color profile for printing, such as Adobe RGB or CMYK.
- Save as JPEG: Save the image as a JPEG using the “Save As” option with the highest quality setting (12).
- Consult with the Printing Service: Consult with your printing service for specific requirements and recommendations.
8. The Impact of Saving as JPEG on Website Performance
Saving images as JPEGs correctly can significantly impact your website’s performance.
8.1. Page Load Speed
Optimized JPEGs load faster, improving the user experience and reducing bounce rates.
- Faster Loading Times: Reduced file sizes mean faster loading times.
- Improved User Experience: Visitors are more likely to stay on your site if pages load quickly.
8.2. SEO Benefits
Search engines consider page load speed as a ranking factor.
- Higher Rankings: Faster websites tend to rank higher in search results.
- Improved Crawlability: Search engine crawlers can index your site more efficiently.
8.3. Bandwidth Usage
Smaller JPEGs consume less bandwidth, reducing hosting costs.
- Reduced Costs: Lower bandwidth usage can result in lower hosting fees.
- Scalability: Optimize images to ensure your website can handle increased traffic.
9. How Savewhere.net Can Help You Save Money on Photoshop and Related Tools
Savewhere.net provides resources and information to help you save money on software and tools like Adobe Photoshop.
9.1. Discounted Software
Find discounts and promotions on Adobe Photoshop and other creative software.
- Exclusive Deals: Access exclusive deals and discounts through Savewhere.net.
- Comparison Shopping: Compare prices from different retailers to find the best deal.
9.2. Free Alternatives
Explore free alternatives to Adobe Photoshop that offer similar features.
- GIMP: A powerful, open-source image editor.
- Krita: A professional-grade painting program.
- Photopea: A free, online image editor with a Photoshop-like interface.
9.3. Tutorials and Guides
Access tutorials and guides on using Photoshop and its alternatives effectively.
- Step-by-Step Instructions: Learn how to use various features and tools.
- Tips and Tricks: Discover tips and tricks for optimizing your workflow and saving time.
9.4. Community Support
Connect with other users and share tips and advice.
- Forums and Discussions: Participate in forums and discussions.
- Expert Advice: Get advice from experienced users and professionals.
10. Frequently Asked Questions (FAQs) About Saving as JPEG in Photoshop
10.1. What is the best quality setting for saving a JPEG in Photoshop?
The best quality setting depends on the intended use of the image. For web use, a quality setting of 60-80 is usually sufficient. For print use, use the highest quality setting (12).
10.2. Should I use Baseline or Progressive JPEG?
Progressive JPEGs load in stages, which can improve the viewing experience on slow internet connections. Baseline JPEGs are more compatible with older browsers.
10.3. What is the difference between sRGB and Adobe RGB?
sRGB is the standard color profile for web use, while Adobe RGB has a wider color gamut and is suitable for print use.
10.4. How can I reduce the file size of a JPEG without losing too much quality?
Use the “Save for Web (Legacy)” option in Photoshop and experiment with different quality settings. You can also use third-party tools like TinyPNG to further compress your images.
10.5. Why do my JPEGs look different on different devices?
This can be due to differences in color calibration and color profiles. Ensure you are using the sRGB color profile for web use and calibrate your monitor for accurate color representation.
10.6. What is metadata and should I include it when saving as JPEG?
Metadata is information about the image, such as camera settings, copyright information, and descriptive tags. Including metadata can be useful for managing and tracking your images, but it can also increase the file size.
10.7. How do I save a Photoshop file as a JPEG without losing layers?
JPEG format does not support layers. You need to flatten the image before saving it as a JPEG. To preserve the layers, save the original file as a PSD.
10.8. Can I save a transparent image as a JPEG?
JPEG format does not support transparency. You can use the “Matte” option to fill the transparent areas with a color of your choice or save the image as a PNG, which supports transparency.
10.9. What are the best dimensions for saving a JPEG for Instagram?
The recommended dimensions for Instagram posts are 1080 x 1080 pixels (square) or 1080 x 1350 pixels (portrait).
10.10. How do I batch process images in Photoshop to save them as JPEGs?
Use the “Action” feature in Photoshop to record a series of steps and then apply that action to a batch of images using the “Batch” command.
Saving images as JPEGs in Photoshop is an essential skill for anyone working with digital images. By understanding the different methods, settings, and optimization techniques, you can ensure your images look their best while maintaining manageable file sizes. Remember to keep your original files safe, use the appropriate color profiles, and optimize your images for the intended platform. With the tips and resources provided by Savewhere.net, you can master the art of saving as JPEG and save money on software and tools.
Ready to optimize your images and save money? Visit Savewhere.net today to discover more tips, tricks, and resources for managing your digital assets efficiently. Explore our articles, tutorials, and community forums to enhance your skills and connect with fellow creatives. Don’t miss out on exclusive deals and discounts on Adobe Photoshop and other essential tools. Start saving today and take your creative projects to the next level! Address: 100 Peachtree St NW, Atlanta, GA 30303, United States. Phone: +1 (404) 656-2000. Website: savewhere.net.