
Saving your iMovie movie is essential for sharing your creative projects with the world, preserving them for future viewing, or editing them further. At savewhere.net, we understand the importance of easily managing your digital creations. This guide will walk you through the different methods to save your iMovie projects on both iOS devices and Macs, ensuring your memories are always accessible. Learn simple ways to manage your video projects, archive your precious moments, and efficiently share your movies with friends and family.
1. Why Can’t I Directly “Save” My iMovie Project?
iMovie doesn’t have a traditional “save” button because it constantly autosaves your work as you edit. This means your progress is continuously being recorded. However, to finalize and share your movie, you need to export or share it in a specific format. This is an important difference compared to traditional file-based applications.
iMovie’s autosave feature is a significant advantage because it minimizes the risk of losing your work due to unexpected interruptions. According to Apple’s support documentation, iMovie automatically saves changes every few seconds, providing a seamless editing experience. But, to truly “save” your project for sharing or archiving, you must export it.
2. What Are the Key Differences Between Saving and Exporting in iMovie?
Saving in iMovie is an automatic background process, while exporting is a manual process to create a final, shareable video file. Saving preserves the project within iMovie for future edits, whereas exporting converts your project into a standalone video file that can be viewed on various devices and platforms.
Understanding this difference is crucial for effective iMovie usage. Think of saving as keeping your work-in-progress intact within the iMovie environment. Exporting, on the other hand, is like rendering the final version of your document as a PDF, ready to be distributed. This distinction ensures you always have the option to tweak your project before finalizing it.
3. How Do I Export My iMovie Project on iPhone or iPad?
To export your iMovie project on an iPhone or iPad, follow these steps:
-
From the Projects browser, tap the movie you want to export. If you’re in the editing interface, tap “Done” in the upper-left corner.
-
Tap the Share button.
-
To adjust the resolution or format, tap “Options” and then “Done” after setting your preferences.
-
Choose your export destination:
- AirDrop: Tap “AirDrop” and select the recipient’s profile picture.
- Save Video: Tap “Save Video” to export the movie to your Photos library. This option integrates with iCloud Photos, allowing access from all your Apple devices.
- Save to Files: Tap “Save to Files,” select a location in iCloud Drive or on your device, and tap “Save.” This method is also compatible with third-party storage services enabled in the Files app.
The “Save to Files” option is particularly useful for backing up your projects to external drives or cloud services like Dropbox or Google Drive. According to a guide by iMore, using cloud services ensures your projects are safe and accessible across different devices.
4. What Resolution and Format Options Should I Choose When Exporting on iOS?
When exporting your iMovie project on iOS, the best resolution and format options depend on your intended use. For sharing online, 1080p is generally a good choice. Lower resolutions like 720p create smaller files that upload faster, but may sacrifice some visual quality.
-
Resolution:
- 1080p: Ideal for online sharing and viewing on most devices.
- 720p: Suitable for faster uploads and smaller file sizes.
- 4K: Best for high-resolution displays and preserving maximum detail.
-
Format:
- MP4: The standard format for online videos, compatible with most platforms.
- MOV: Apple’s native format, offering high quality but potentially larger file sizes.
Choosing the right settings can significantly impact the viewing experience and storage requirements. According to a study by Statista, MP4 is the most widely used video format for online content due to its balance between quality and file size.
5. How Can I Share My iMovie Project Directly to Social Media from iOS?
To share your iMovie project directly to social media from iOS:
- In the Projects browser, select the project and tap the Share button.
- Tap “Save Video” to save the movie to your Photos library.
- Open the social media app (e.g., YouTube, Facebook) and upload the video from your Photos library.
This method ensures that your video is saved locally before being uploaded, giving you more control over the sharing process. Many social media platforms have specific video requirements, so it’s always a good idea to check their guidelines before uploading.
6. What Should I Do if My iMovie Project Is Too Large to Share on iOS?
If your iMovie project is too large to share on iOS, reduce the file size by:
- Returning to the share screen and tapping “Options.”
- Choosing a lower resolution.
- Consider trimming the video to reduce its length.
- Compressing the video using third-party apps designed for video compression.
Lowering the resolution is the most straightforward way to reduce file size, but it will affect the video’s quality. Trimming unnecessary sections or using compression apps can help maintain better quality while reducing the file size.
7. How Do I Export My iMovie Project on Mac?
To export your iMovie project on Mac:
- From the Projects browser, select the iMovie project, click the More button, and choose “Share Project.” If you’re editing a project, click the Share button.
- Select “File.”
- Adjust the resolution by clicking the Resolution pop-up menu.
- Choose a location to save the video file and click “Save.”
The “File” option provides the most control over the export settings, allowing you to customize the resolution, quality, and file format. This is especially useful for users who need specific settings for professional purposes.
8. What Are the Recommended Export Settings for Different Uses on Mac?
The recommended export settings for different uses on Mac are:
- For Web Sharing (YouTube, Vimeo): Choose 1080p or 720p resolution, H.264 codec, and a frame rate that matches your source footage (usually 24 or 30 fps).
- For Archiving: Choose the highest resolution available (4K if supported), ProRes codec, and preserve the original frame rate.
- For Email: Choose 720p or lower resolution to keep the file size small enough to send via email.
These settings balance quality and file size, ensuring your videos look good without consuming excessive storage space or bandwidth. According to Adobe’s video encoding guidelines, H.264 is the most versatile codec for web sharing due to its broad compatibility.
9. How Can I Share My iMovie Project Directly to YouTube or Facebook from Mac?
To share your iMovie project directly to YouTube or Facebook from Mac:
- With your project open in iMovie, click the Share button.
- Click “YouTube & Facebook.”
- Choose a location to save the video file and click “Save.”
- In a web browser, go to the website where you want to share your video, and upload the video file.
iMovie provides optimized settings for sharing to YouTube and Facebook, simplifying the process. This special setting also works well for sharing to other websites like Vimeo and Twitter.
10. How Do I Email an iMovie Project from My Mac?
To email an iMovie project from your Mac:
- From the Projects browser, select the iMovie project you want to send, click the More button, and choose “Share Project.” If you’re editing a project, click the Share button.
- Click “Email.”
- Click “Share.” If the movie file exceeds the recommended limit (usually 10 MB), you’ll see a warning.
- Click the Resolution pop-up menu and choose a resolution that reduces the movie file to a size most mail servers support.
- Click “Share.” Once iMovie has completed exporting the movie to email, you’ll see a notification.
- Complete the email that was created, then click “Send.”
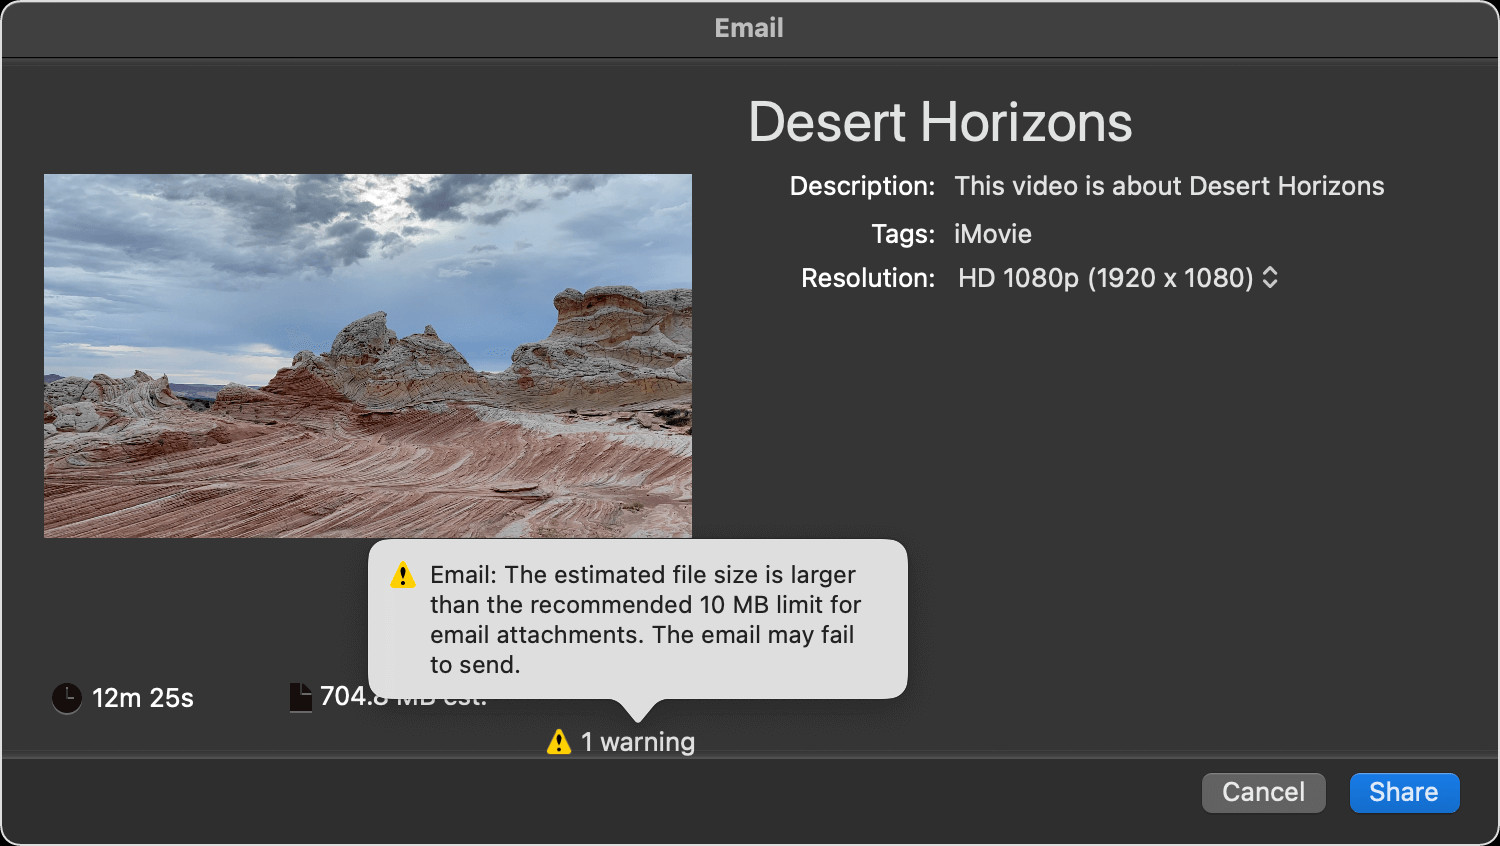 iMovie Email Warning on Mac
Emailing is a convenient way to share smaller projects quickly. However, due to file size limitations, it’s best suited for shorter videos or projects with lower resolutions.
11. How Can I Add My iMovie Project to the Photos Library on Mac?
To add your iMovie project to the Photos library on Mac:
- From the Projects browser, select the iMovie project you want to send, click the More button, and choose “Share Project.” If you’re editing a project, click the Share button.
- Click “File.”
- Click the Resolution pop-up menu and choose a size for your video.
- Choose a location to save the video file, then click “Save.”
- Drag the exported movie file into the Photos app to add the movie to your photo library. If you have iCloud Photos enabled, you can access the video from all Apple devices signed into the same iCloud account.
Adding your iMovie project to the Photos library makes it easily accessible across all your Apple devices via iCloud. This is particularly useful for viewing your creations on different screens or sharing them with family and friends who also use Apple devices.
12. What Are Some Common Issues When Exporting iMovie Projects and How Can I Troubleshoot Them?
Common issues when exporting iMovie projects include:
- Export Failure: This can be due to corrupted media, insufficient storage space, or software glitches. Try restarting iMovie or your device, freeing up storage space, or removing potentially corrupted clips.
- Slow Export Times: This is often caused by high-resolution settings or complex projects. Reduce the resolution, close unnecessary applications, and ensure your device has sufficient processing power.
- Audio Issues: These can result from incorrect audio settings or corrupted audio files. Check your audio settings in iMovie, ensure your audio files are compatible, and try re-importing the audio.
- Video Quality Loss: This can occur when exporting at lower resolutions or using highly compressed formats. Experiment with different export settings to find the best balance between file size and quality.
Troubleshooting these issues often involves a process of elimination. Start with the simplest solutions, such as restarting the application, and then move on to more complex fixes like checking media files and adjusting export settings.
13. What Are the Best Practices for Managing iMovie Project Files to Save Storage Space?
Best practices for managing iMovie project files to save storage space include:
- Deleting Unused Projects: Regularly review your iMovie library and delete projects you no longer need.
- Moving Projects to External Storage: Transfer completed projects to an external hard drive to free up space on your primary device.
- Optimizing Media: Use lower-resolution versions of your media files within iMovie and keep high-resolution originals backed up separately.
- Clearing Render Files: iMovie creates render files to improve playback performance. These can take up significant space, so clear them periodically.
These practices help keep your iMovie library organized and prevent storage issues. According to a study by Seagate, managing digital storage effectively can extend the lifespan of your devices and improve their performance.
14. How Does iCloud Integration Affect Saving and Exporting iMovie Projects?
iCloud integration allows you to access your iMovie projects across all your Apple devices. When you save a project, it’s automatically backed up to iCloud, and you can continue editing it on another device. However, exporting still requires you to manually create a video file, which can then be saved to iCloud Drive or your Photos library for wider access.
iCloud integration simplifies the workflow for users who work on multiple devices. It ensures that your projects are always up-to-date and accessible, regardless of which device you’re using.
15. What Are Some Advanced Tips for Optimizing iMovie Performance for Saving and Exporting?
Advanced tips for optimizing iMovie performance include:
- Use a Fast Storage Drive: Store your iMovie projects and media files on a solid-state drive (SSD) for faster access and processing.
- Increase RAM: Ensure your device has enough RAM to handle large projects. 16GB or more is recommended for 4K editing.
- Update Software: Keep iMovie and your operating system updated to the latest versions for performance improvements and bug fixes.
- Disable Background Processes: Close unnecessary applications and processes to free up system resources for iMovie.
These tips can significantly improve iMovie’s performance, especially when working with complex projects or high-resolution media. According to a report by Crucial, upgrading to an SSD can reduce video editing times by up to 50%.
16. Can Third-Party Apps Help in Saving and Exporting iMovie Projects?
Yes, third-party apps can help in saving and exporting iMovie projects by offering additional features and functionalities. These apps can provide enhanced control over video compression, format conversion, and sharing options. Some popular third-party apps include Handbrake, Compressor, and various video editing tools available on the App Store and Mac App Store.
Using Third-Party Apps on iOS
On iOS, apps like “Video Compressor” or “Cloud Convert” can help reduce file sizes or convert formats not natively supported by iMovie. These are useful when you need to share a large project via platforms with file size limits.
Utilizing Third-Party Apps on Mac
On macOS, apps such as Handbrake or Adobe Media Encoder offer more advanced encoding options. They allow fine-tuning of video and audio settings to optimize the output for specific platforms or devices.
17. How to manage project size in iMovie effectively to facilitate easier saving and exporting?
Managing project size in iMovie is crucial for easier saving and exporting, especially when dealing with large or complex projects. Here are several strategies to help reduce project size effectively:
- Optimize Video Quality:
- Use appropriate resolutions for your source footage. There’s no need to import 4K video if your final output is 1080p.
- Compress large video files before importing them into iMovie using tools like Handbrake.
- Edit Efficiently:
- Trim unnecessary footage.
- Cut out sections that don’t contribute to the story.
- Use transitions and effects sparingly, as these can increase rendering times and project size.
- Manage Audio:
- Use compressed audio formats like AAC.
- Reduce the number of audio tracks.
- Remove silent or redundant audio sections.
- Utilize Proxy Media:
- Create lower-resolution proxy files for editing, especially if you are working with 4K or high-resolution video.
- iMovie supports this by allowing you to work with smaller files during editing and then switch back to the original high-resolution files for final export.
- Clear Render Files Regularly:
- iMovie creates render files to improve playback performance during editing.
- These files can accumulate and take up significant space, so clear them periodically through iMovie’s preferences.
- Archive Completed Projects:
- Move completed projects to an external hard drive or cloud storage to free up space on your primary device.
- This ensures that you can access them later if needed without cluttering your active workspace.
- Review and Delete Unused Assets:
- Regularly review your iMovie library and delete any unused clips, audio files, and other assets that are no longer needed.
By implementing these strategies, you can significantly reduce the size of your iMovie projects, making them easier to save, export, and manage. These practices also help improve iMovie’s performance, particularly when working on older or less powerful devices.
18. How can savewhere.net help me with more tips on iMovie and video editing?
At savewhere.net, we provide a wealth of resources to help you master iMovie and enhance your video editing skills. Our platform offers detailed tutorials, tips, and tricks for optimizing your iMovie projects, managing storage effectively, and achieving professional-quality results. Whether you’re looking to reduce file sizes, improve export times, or explore advanced editing techniques, savewhere.net has you covered.
Comprehensive Guides and Tutorials
We offer step-by-step guides that cover everything from basic iMovie functions to advanced editing techniques. These tutorials are designed to help users of all skill levels, from beginners to experienced video editors.
Tips and Tricks for iMovie
Discover hidden features and clever tricks that can streamline your editing process and improve the quality of your videos. Learn how to optimize your workflow, reduce file sizes, and troubleshoot common issues.
Resource on Efficient File Management
We provide advice on managing your iMovie project files to save storage space and improve performance. Learn how to organize your media assets, clear render files, and archive completed projects.
Saving on Software and Hardware
Stay informed about deals and discounts on software and hardware that can enhance your video editing capabilities. We aim to help you find the best tools at the most affordable prices.
At savewhere.net, our mission is to empower you with the knowledge and resources you need to create stunning videos while managing your budget effectively.
19. How to backup iMovie Projects so I don’t lose all my work?
Backing up your iMovie projects is crucial to prevent data loss due to hardware failure, software issues, or accidental deletion. Here are several effective strategies to ensure your iMovie projects are safe and recoverable:
Using Time Machine (macOS)
Time Machine is Apple’s built-in backup solution for macOS. It automatically backs up your entire system, including iMovie projects, to an external hard drive.
- How to Use:
- Connect an external hard drive to your Mac.
- Go to System Preferences > Time Machine.
- Select your external drive as the backup disk.
- Enable automatic backups.
- Benefits:
- Simple to set up and use.
- Backs up everything on your Mac, including iMovie projects, media files, and system settings.
- Allows you to restore individual files or your entire system.
Copying Projects to an External Hard Drive
Manually copying your iMovie projects to an external hard drive provides an additional layer of security.
- How to Use:
- Connect an external hard drive to your Mac.
- Open Finder and navigate to the “Movies” folder, where iMovie stores its projects.
- Drag and drop your iMovie project folders to the external hard drive.
- Benefits:
- Provides a direct copy of your project files.
- Allows you to store backups offline.
- Can be used in conjunction with Time Machine for added protection.
Using Cloud Storage Services
Cloud storage services like iCloud Drive, Google Drive, Dropbox, and OneDrive offer a convenient way to back up your iMovie projects and access them from anywhere.
- How to Use:
- Sign up for a cloud storage service and install the desktop application.
- Copy your iMovie project folders to the cloud storage folder on your computer.
- The files will automatically sync to the cloud.
- Benefits:
- Accessible from any device with an internet connection.
- Provides automatic backups and version history.
- Offers collaboration features for sharing projects with others.
Archiving iMovie Libraries
Archiving your iMovie libraries involves creating a complete backup of your iMovie library file, which contains all your projects, media files, and settings.
- How to Use:
- Locate your iMovie library file (usually in the “Movies” folder).
- Copy the entire library file to an external hard drive or cloud storage.
- Benefits:
- Creates a comprehensive backup of all your iMovie projects and assets.
- Allows you to restore your entire iMovie environment if needed.
- Provides a snapshot of your iMovie setup at a specific point in time.
Regular Backup Schedule
Regardless of the backup method you choose, it’s essential to establish a regular backup schedule.
- Recommendations:
- Back up your iMovie projects at least once a week, or more frequently if you’re working on critical projects.
- Consider using a combination of backup methods for redundancy (e.g., Time Machine + cloud storage).
- Test your backups periodically to ensure they are working correctly and that you can restore your files if necessary.
By following these backup strategies, you can safeguard your iMovie projects and avoid the frustration and loss of data that can result from unexpected events.
20. What are some money-saving tips for video editing if I’m on a tight budget?
Being on a tight budget doesn’t mean you can’t create high-quality videos. Here are several money-saving tips for video editing:
Utilize Free Video Editing Software
- iMovie: If you’re a Mac user, iMovie comes pre-installed and offers robust editing features for free.
- DaVinci Resolve: Offers a free version that rivals professional software in terms of features, including color correction, audio editing, and more.
- HitFilm Express: A free video editing and visual effects software with plenty of tutorials and a supportive community.
- OpenShot: A free, open-source video editor that’s easy to use, making it great for beginners.
Take Advantage of Free Resources
- Stock Footage and Music: Websites like Pexels, Pixabay, and Unsplash offer free stock footage and images. YouTube Audio Library provides royalty-free music and sound effects.
- Tutorials and Courses: YouTube is a treasure trove of free video editing tutorials. Websites like Skillshare and Coursera often offer free trials or courses.
- Templates and Presets: Look for free templates and presets online to quickly add professional-looking effects and transitions to your videos.
Optimize Your Hardware
- Clean Up Your System: Regularly clean up your computer to ensure it runs efficiently. Delete unnecessary files, uninstall unused software, and defragment your hard drive.
- Upgrade Strategically: If you need to upgrade hardware, prioritize components that will have the biggest impact on performance, like RAM or an SSD.
- Buy Used or Refurbished Equipment: Consider buying used or refurbished hardware to save money. Check reputable sources like Apple’s Certified Refurbished program.
Plan Your Projects Carefully
- Storyboard: Create a storyboard before you start filming to plan your shots and reduce the amount of footage you need to edit.
- Shoot Efficiently: Minimize the number of takes and avoid shooting unnecessary footage.
- Edit Selectively: Be selective about the footage you include in your final video. Cut out any shots that don’t add value.
Collaborate and Share Resources
- Team Up with Others: Collaborate with other video creators to share resources and expertise.
- Barter Services: Offer your video editing skills in exchange for other services you need.
By following these tips, you can create professional-quality videos without breaking the bank. Remember, creativity and resourcefulness can often compensate for a lack of expensive equipment or software.
Remember to visit savewhere.net for more money-saving tips, tricks, and resources to help you make the most of your video editing projects while staying within your budget.
FAQ: Saving and Exporting iMovie Projects
1. Why can’t I directly “save” my iMovie project like other applications?
iMovie automatically saves your project as you work, so there’s no need for a manual save button. However, to create a shareable video file, you need to export it.
2. What’s the difference between saving and exporting in iMovie?
Saving is an automatic process that preserves your project within iMovie, while exporting is a manual process that creates a standalone video file.
3. How do I export my iMovie project on iPhone or iPad?
Tap the Share button, adjust the settings in Options, and choose your export destination (AirDrop, Save Video, Save to Files).
4. What resolution should I choose when exporting my iMovie project for YouTube?
1080p is generally a good choice for sharing to YouTube, balancing quality and file size.
5. How can I reduce the size of my iMovie project to make it easier to share?
Lower the resolution, trim the video, or compress the video using third-party apps.
6. How do I export my iMovie project on Mac?
Select the project, click the Share button, choose File, adjust the resolution, and click Save.
7. What’s the best way to email an iMovie project from my Mac?
Choose the Email option from the Share menu and select a lower resolution to keep the file size small enough to send via email.
8. How can I add my iMovie project to the Photos library on Mac?
Export the project as a file, then drag the exported movie file into the Photos app.
9. What should I do if my iMovie project fails to export?
Restart iMovie or your device, free up storage space, or remove potentially corrupted clips.
10. How can I manage my iMovie project files to save storage space?
Delete unused projects, move projects to external storage, optimize media, and clear render files.
Saving and exporting your iMovie projects doesn’t have to be a daunting task. By following these steps and tips, you can effectively manage your video creations and share them with the world. Remember to visit savewhere.net for more valuable resources and tips on saving money and making the most of your digital projects. Our address is 100 Peachtree St NW, Atlanta, GA 30303, United States, and you can reach us at +1 (404) 656-2000. Start saving and creating today with savewhere.net!