
Are you looking for efficient ways to save your video projects in Filmora and maximize your creative output? At savewhere.net, we provide the insights and strategies you need to optimize your Filmora workflow while keeping your budget in check. Explore our expert tips to master Filmora and unlock financial savings through smart video editing practices. Discover how to save time and money with savewhere.net’s Filmora saving guide.
1. Understanding Filmora’s Saving Options
Filmora offers a variety of saving options to accommodate different needs and platforms. You must understand these options to optimize your video projects while managing your resources effectively.
1.1. What are the Primary Saving Options in Filmora?
Filmora provides four primary saving options:
- Format: Saves your project as a video file playable on computers.
- Device: Saves your project in a format optimized for mobile devices, game consoles, or video players.
- YouTube/Vimeo: Allows you to directly upload your video to YouTube or Vimeo.
- DVD: Burns your project to a DVD or saves it as an ISO image file.
1.2. Why is Choosing the Right Saving Option Important?
Choosing the right saving option is crucial because it affects the quality, compatibility, and size of your video file. Selecting an inappropriate format can lead to compatibility issues, loss of quality, or unnecessarily large file sizes, which can impact storage costs and sharing efficiency.
1.3. How Can Understanding Saving Options Help Me Save Money?
Understanding different saving options can help you save money by:
- Optimizing File Size: Choosing the right format and settings can reduce file size, saving on storage costs.
- Reducing Conversion Needs: Saving in the correct format eliminates the need for additional conversion software, saving on software expenses.
- Efficient Sharing: Selecting the right device-specific format ensures your video plays smoothly on the target device, avoiding the need for re-editing and re-uploading.
2. Saving to Video Files for Computer Playback
Saving your Filmora projects in a format suitable for computer playback is a common requirement. This section explains how to optimize this process.
2.1. What File Formats Can I Use to Save My Project for Computer Playback?
You can save your Filmora project in various formats, including AVI, WMV, MOV, FLV, MP4, and MKV. MP4 is generally recommended due to its wide compatibility and good compression.
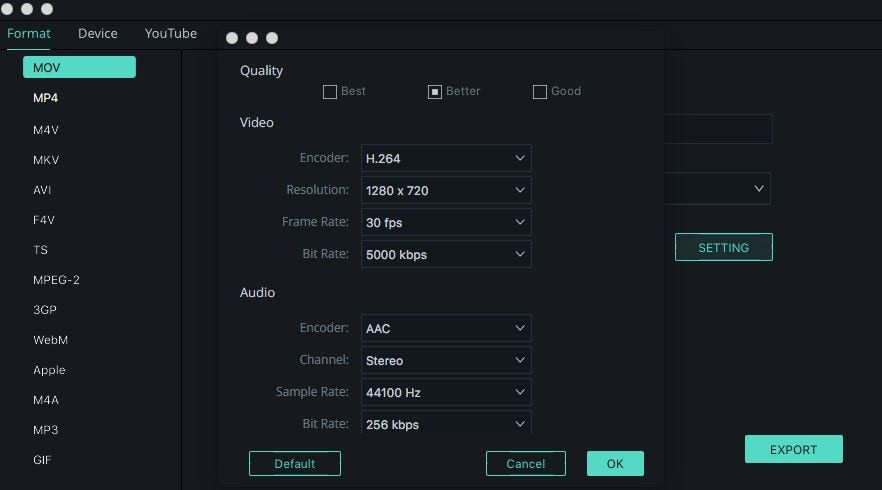
2.2. How Do I Configure the Export Settings for Optimal Quality?
To configure export settings, follow these steps:
- Go to the Format tab and select your desired format.
- Click the Config button to adjust settings such as Codec, Resolution, Frame Rate, and Bit Rate for both Video and Audio.
For high-quality playback, consider these settings:
- Codec: H.264 (for MP4)
- Resolution: 1920×1080 (Full HD) or higher if your source video supports it
- Frame Rate: Same as your source video (24, 25, or 30 fps are common)
- Bit Rate: 10-20 Mbps for HD video
2.3. What is the Importance of Adjusting Codec, Resolution, and Bit Rate?
Adjusting these settings allows you to balance video quality and file size. Lowering the resolution or bit rate reduces file size but can also decrease video quality. Experiment with different settings to find the optimal balance for your needs.
2.4. How Does savewhere.net Help Me Save Money on Video Storage?
savewhere.net provides tips and resources to optimize your video settings, reducing file sizes without compromising quality. This helps you save money on storage costs, whether you use local drives or cloud storage services.
 export to format setting filmora 9
2.5. Why is macOS High Sierra (10.13) or later needed to export video formats?
macOS High Sierra (10.13) or later is required to export certain video formats due to updated codec support and system-level video processing capabilities introduced in these versions. These updates ensure better compatibility and performance for modern video encoding and decoding.
3. Saving Video Files to Devices
Optimizing your videos for specific devices ensures they play smoothly and look their best. This section outlines how to save video files for various devices using Filmora.
3.1. How Do I Save My Filmora Project for Specific Devices Like iPhone or iPad?
To save your Filmora project for a specific device, follow these steps:
- Go to the Device tab in the Export window.
- Choose your device from the drop-down list (e.g., iPhone, iPad, Android Device).
- Filmora will automatically optimize the video settings for the selected device.
3.2. What Device Options Are Available in Filmora?
Filmora supports a wide range of devices, including:
- iPhone
- iPad
- iPod
- Android Devices
- PSP
- Wii
- Creative
3.3. Why Should I Use Device-Specific Saving Options?
Using device-specific saving options ensures that your video is optimized for the screen size, resolution, and codecs supported by the device. This results in better playback quality and reduces the risk of compatibility issues.
3.4. How Can savewhere.net Help Me Save on Data Usage?
savewhere.net offers advice on selecting the best settings for device-specific exports, helping you minimize file sizes without sacrificing visual quality. This can significantly reduce data usage when sharing or streaming videos on mobile devices.
3.5. What are the benefits of saving video files optimized for different devices?
Saving video files optimized for different devices ensures the best possible viewing experience on each device, with appropriate resolution, aspect ratio, and codec support, reducing playback issues and improving overall quality.
4. Uploading Video to YouTube/Vimeo Directly from Filmora
Filmora allows you to upload videos directly to YouTube and Vimeo, streamlining your workflow. This section details how to use this feature effectively.
4.1. How Do I Upload My Video Directly to YouTube or Vimeo from Filmora?
To upload your video directly:
- Go to the YouTube or Vimeo tab in the Export window.
- Click the Sign In button and enter your account credentials.
- Authorize the connection between Filmora and your account.
- Fill in the necessary information, such as title, description, privacy settings, and tags.
- Click Export to upload your video.
4.2. What Information Do I Need to Provide When Uploading?
When uploading, you’ll need to provide:
- Title: A descriptive title for your video.
- Description: A brief summary of your video content.
- Privacy Settings: Options include public, private, or unlisted.
- Tags: Keywords that help viewers find your video.
4.3. How Does Filmora Ensure My Privacy When Uploading?
Filmora uses secure connections to upload your videos and respects your privacy settings. You can choose to make your video public, private, or unlisted, depending on your preference.
4.4. How Does savewhere.net Help Me Optimize My Video for Online Uploads?
savewhere.net provides tips on optimizing your video’s title, description, and tags to improve its visibility on YouTube and Vimeo. We also offer advice on selecting the best video settings for online streaming, helping you save on bandwidth and ensure smooth playback for your viewers.
4.5. What should I do if I need to log in to a different user account?
To log in to a different user account, first click the Sign Out button that appears below the YouTube, Facebook, and Vimeo images, then log in to the new account.
5. Burning to DVD
Burning your Filmora projects to DVD is useful for creating physical copies. This section explains how to burn your videos to DVD effectively.
5.1. How Do I Burn My Filmora Project to DVD?
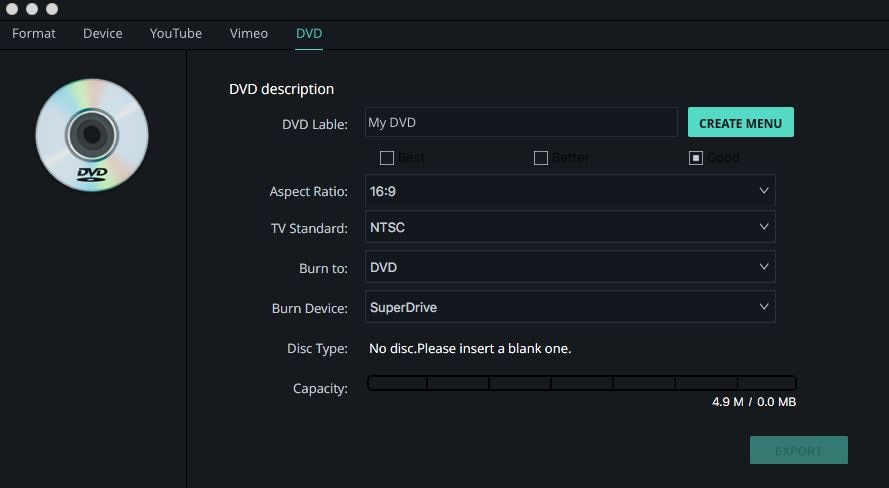
To burn your project to DVD:
- Go to the DVD tab in the Export window.
- Set the DVD parameters, such as DVD label, Aspect Ratio, TV Standard, and Video Quality.
- Choose the DVD Disk Type and Format (DVD Folder, ISO, or DVDMedia).
- Create a menu for your DVD with different templates and customize the music.
- Click Export to burn your video to DVD or save it as an ISO image file.
5.2. What DVD Parameters Should I Consider?
Important DVD parameters include:
- DVD Label: The name that appears on the DVD.
- Aspect Ratio: The screen ratio (e.g., 4:3 or 16:9).
- TV Standard: NTSC or PAL, depending on your region.
- Video Quality: Standard, High, or Best.
- DVD Disk Type: DVD5 or DVD9, depending on the amount of content.
5.3. Can I Create a Custom Menu for My DVD?
Yes, Filmora allows you to create a custom menu for your DVD using various templates and customizable music. This makes your DVD more professional and user-friendly.
5.4. How Does savewhere.net Help Me Save Money on DVD Creation?
savewhere.net offers advice on optimizing your video settings for DVD, helping you fit more content on a single disc without sacrificing quality. We also provide tips on finding affordable DVD media and burning software, reducing your overall DVD creation costs.
 burn to dvd filmora version 9
5.5. What are the available DVD formats for saving video files?
The available DVD formats for saving video files are DVD Folder, ISO, and DVDMedia.
6. Optimizing Filmora for Efficient Saving
Optimizing Filmora can streamline your saving process, saving you time and resources.
6.1. How Can I Optimize My Filmora Workflow for Faster Saving?
To optimize your workflow:
- Use Proxy Files: Create low-resolution proxy files for editing to reduce the load on your computer.
- Close Unnecessary Programs: Close other applications to free up system resources.
- Optimize Media: Ensure your source media is in a compatible format.
- Regularly Save: Save your project frequently to avoid data loss and reduce the need to redo work.
6.2. What Role Does Hardware Play in Saving Speed?
Hardware plays a significant role in saving speed. A faster processor, more RAM, and a dedicated graphics card can significantly reduce the time it takes to save your Filmora projects.
6.3. How Can savewhere.net Help Me Choose the Right Hardware for Filmora?
savewhere.net provides recommendations on selecting the best hardware for video editing, helping you make informed decisions that fit your budget. We offer advice on processors, RAM, graphics cards, and storage solutions that can improve Filmora’s performance and save you time.
6.4. What strategies can improve the efficiency of saving video projects in Filmora?
Strategies to improve efficiency include using proxy files, optimizing media, closing unnecessary programs, and regularly saving the project.
7. Understanding Video Codecs and Their Impact on File Size
Video codecs play a crucial role in determining the size and quality of your video files. Understanding them can help you make informed decisions to save space and maintain quality.
7.1. What is a Video Codec and Why is it Important?
A video codec is a technology used to compress and decompress video data. It’s essential because it allows you to reduce the file size of your videos while maintaining acceptable quality. Different codecs offer different levels of compression and quality.
7.2. What are the Most Common Video Codecs Used in Filmora?
Some of the most common video codecs used in Filmora include:
- H.264: Widely used for its excellent compression and compatibility.
- H.265 (HEVC): Offers better compression than H.264 but requires more processing power.
- VP9: An open-source codec often used for online streaming.
- MPEG-4: A versatile codec suitable for various applications.
7.3. How Do Different Codecs Affect File Size and Quality?
Different codecs use different compression algorithms, which affect the balance between file size and quality. H.265, for example, can achieve the same quality as H.264 with a smaller file size, but it requires more processing power to encode and decode.
7.4. How Can savewhere.net Help Me Choose the Right Codec?
savewhere.net provides detailed comparisons of different video codecs, helping you understand their strengths and weaknesses. We offer recommendations based on your specific needs, whether you prioritize file size, quality, or compatibility.
7.5. How does choosing the right video codec contribute to saving money and resources?
Choosing the right video codec helps optimize file size and quality, saving storage space, reducing bandwidth usage, and improving overall video playback, leading to significant savings.
8. Mastering Filmora’s Export Settings for Optimal Results
Mastering Filmora’s export settings is crucial for achieving the best possible results in terms of video quality and file size.
8.1. What are the Key Export Settings in Filmora?
Key export settings in Filmora include:
- Resolution: The size of the video frame (e.g., 1920×1080 for Full HD).
- Frame Rate: The number of frames per second (fps).
- Bit Rate: The amount of data used to encode the video (higher bit rates result in better quality).
- Codec: The video compression technology used.
- Audio Settings: Codec, sample rate, and bit rate for the audio track.
8.2. How Do I Adjust Resolution and Frame Rate for Different Platforms?
Adjust resolution and frame rate based on the platform:
- YouTube: 1920×1080 (1080p) at 30 fps is standard.
- Instagram: 1080×1080 (square) or 1080×1920 (vertical) at 30 fps.
- Mobile Devices: 720×1280 (720p) at 30 fps.
8.3. What is the Role of Bit Rate in Video Quality?
Bit rate determines the amount of data used to encode each second of video. Higher bit rates result in better video quality but also larger file sizes. It’s a crucial factor to balance.
8.4. How Can savewhere.net Help Me Optimize Export Settings?
savewhere.net provides step-by-step guides on optimizing Filmora’s export settings for various platforms and devices. We offer recommended settings based on your specific needs, helping you achieve the best possible balance between video quality and file size.
8.5. How does optimizing export settings lead to better video quality and reduced file sizes?
Optimizing export settings by adjusting resolution, frame rate, bit rate, and codec helps achieve the best balance between video quality and file size, ensuring efficient storage and smooth playback on different platforms.
9. Leveraging Proxy Files for Smoother Editing and Faster Saving
Proxy files can significantly improve your editing experience, especially when working with high-resolution footage.
9.1. What are Proxy Files and How Do They Work?
Proxy files are low-resolution copies of your original footage. When you edit with proxy files, Filmora uses these smaller files for playback and editing, reducing the load on your computer. When you export your project, Filmora switches back to the original, high-resolution footage.
9.2. How Do I Create and Use Proxy Files in Filmora?
To create and use proxy files:
- Import your high-resolution footage into Filmora.
- Right-click on the clip in the media library and select Create Proxy.
- Filmora will generate a low-resolution proxy file.
- Edit your project as usual. Filmora will automatically use the proxy files for editing.
- When you export your project, Filmora will use the original, high-resolution footage.
9.3. What are the Benefits of Using Proxy Files?
The benefits of using proxy files include:
- Smoother Editing: Reduces lag and stuttering during playback.
- Faster Saving: Exporting is faster because Filmora is working with smaller files during editing.
- Reduced System Load: Lowers the demands on your computer’s processor and memory.
9.4. How Does savewhere.net Help Me Implement Proxy Workflows?
savewhere.net provides detailed tutorials on implementing proxy workflows in Filmora. We offer advice on setting up proxy files and optimizing your editing process for maximum efficiency, saving you time and frustration.
9.5. How do proxy files improve the overall video editing experience in Filmora?
Proxy files improve the editing experience by reducing lag, speeding up the saving process, and lowering the load on computer resources, enabling smoother and more efficient video editing.
10. Exploring Cost-Effective Storage Solutions for Your Filmora Projects
Efficient storage solutions are essential for managing your Filmora projects without breaking the bank.
10.1. What are the Different Storage Options Available for Video Projects?
Different storage options include:
- Internal Hard Drives: Fast and convenient but limited by your computer’s capacity.
- External Hard Drives: Portable and affordable, offering additional storage space.
- Network-Attached Storage (NAS): Centralized storage accessible over your network.
- Cloud Storage: Convenient and scalable, but requires an internet connection.
10.2. What are the Pros and Cons of Each Storage Option?
- Internal Hard Drives:
- Pros: Fast access speeds.
- Cons: Limited capacity, not portable.
- External Hard Drives:
- Pros: Portable, affordable, large capacity.
- Cons: Slower access speeds compared to internal drives.
- Network-Attached Storage (NAS):
- Pros: Centralized storage, accessible over network.
- Cons: Higher initial cost, requires network setup.
- Cloud Storage:
- Pros: Scalable, accessible from anywhere.
- Cons: Requires internet connection, ongoing subscription costs.
10.3. How Do I Choose the Best Storage Solution for My Needs?
Consider these factors when choosing a storage solution:
- Budget: How much are you willing to spend?
- Capacity: How much storage space do you need?
- Portability: Do you need to access your files on the go?
- Accessibility: Do you need to share your files with others?
10.4. How Can savewhere.net Help Me Find Affordable Storage Solutions?
At savewhere.net located at 100 Peachtree St NW, Atlanta, GA 30303, United States, and reachable by phone at +1 (404) 656-2000, we provide reviews and comparisons of different storage solutions, helping you find the best options for your budget and needs. We offer advice on maximizing storage capacity and minimizing costs. Save money effectively by visiting our website at savewhere.net.
10.5. What are the key factors to consider when selecting cost-effective storage solutions for Filmora projects?
Key factors include budget, capacity, portability, and accessibility, which help in choosing the most suitable storage option, whether it’s internal, external, NAS, or cloud storage.
11. Utilizing Keyboard Shortcuts to Save Time in Filmora
Keyboard shortcuts can significantly speed up your editing workflow in Filmora.
11.1. What are the Most Useful Keyboard Shortcuts in Filmora?
Some of the most useful keyboard shortcuts include:
- Ctrl+Z (Cmd+Z on Mac): Undo
- Ctrl+Y (Cmd+Y on Mac): Redo
- Ctrl+C (Cmd+C on Mac): Copy
- Ctrl+X (Cmd+X on Mac): Cut
- Ctrl+V (Cmd+V on Mac): Paste
- Delete: Delete
- Spacebar: Play/Pause
- I: Mark In Point
- O: Mark Out Point
- Ctrl+B (Cmd+B on Mac): Split Clip
11.2. How Can Learning Keyboard Shortcuts Improve My Workflow?
Learning keyboard shortcuts can significantly speed up your editing process by reducing the need to use the mouse. This can save you time and increase your productivity.
11.3. How Can savewhere.net Help Me Learn and Remember Shortcuts?
savewhere.net provides cheat sheets and tutorials on Filmora’s keyboard shortcuts, helping you learn and remember them quickly. We offer tips on integrating shortcuts into your workflow and maximizing your efficiency.
11.4. What impact do keyboard shortcuts have on enhancing the speed and efficiency of video editing in Filmora?
Keyboard shortcuts enhance speed and efficiency by reducing mouse usage, allowing for quicker execution of editing tasks, and improving overall workflow productivity.
12. Archiving Your Filmora Projects for Future Use
Archiving your Filmora projects ensures that you can access and reuse them in the future.
12.1. Why is it Important to Archive Filmora Projects?
Archiving is important because it allows you to:
- Preserve Your Work: Protect your projects from data loss.
- Reuse Assets: Easily access and reuse footage, audio, and other assets.
- Free Up Storage: Move inactive projects to long-term storage.
- Maintain Organization: Keep your active projects organized.
12.2. What Steps Should I Take to Archive a Filmora Project?
To archive a Filmora project:
- Consolidate Media: Gather all the footage, audio, and other assets used in the project.
- Organize Files: Create a folder structure for the project.
- Save Project File: Save the Filmora project file in the project folder.
- Backup: Copy the project folder to an external hard drive or cloud storage.
- Document: Create a text file with notes about the project, such as the purpose, sources, and any special instructions.
12.3. What are the Best Practices for Long-Term Storage?
Best practices for long-term storage include:
- Use Multiple Backups: Create multiple copies of your project and store them in different locations.
- Choose Reliable Storage Media: Use high-quality external hard drives or cloud storage services with redundancy.
- Regularly Check Backups: Periodically check your backups to ensure they are still accessible.
- Keep Software Updated: Ensure you have access to the software needed to open and edit your archived projects.
12.4. How Can savewhere.net Help Me Develop an Archiving Strategy?
savewhere.net offers advice on developing an effective archiving strategy for your Filmora projects. We provide tips on organizing your files, choosing reliable storage media, and implementing backup procedures, helping you protect your valuable work.
12.5. How does proper project archiving ensure long-term access and prevent data loss for Filmora users?
Proper archiving involves consolidating media, organizing files, saving project files, creating backups, and documenting details, ensuring long-term access and preventing data loss, ultimately safeguarding valuable video projects.
13. Utilizing Cloud Services for Collaboration and Saving
Cloud services offer convenient ways to collaborate on Filmora projects and save your work securely.
13.1. What Cloud Services are Compatible with Filmora?
Some cloud services compatible with Filmora include:
- Google Drive: Offers ample storage and collaboration features.
- Dropbox: Popular for file sharing and syncing.
- OneDrive: Integrated with Windows and Microsoft Office.
- pCloud: Provides secure cloud storage with encryption options.
13.2. How Can I Use Cloud Services to Collaborate on Filmora Projects?
To collaborate on Filmora projects using cloud services:
- Store Project Files in the Cloud: Save your Filmora project files and media assets in a shared folder on Google Drive, Dropbox, or OneDrive.
- Share Access: Grant editing access to your collaborators.
- Communicate Changes: Use communication tools like Slack or Microsoft Teams to coordinate changes and updates.
- Version Control: Implement version control to track changes and avoid conflicts.
13.3. What are the Benefits of Using Cloud Services for Saving Filmora Projects?
The benefits of using cloud services include:
- Accessibility: Access your projects from anywhere with an internet connection.
- Collaboration: Easily collaborate with others on the same project.
- Backup: Protect your projects from data loss with automatic backups.
- Scalability: Easily scale your storage space as needed.
13.4. How Does savewhere.net Help Me Choose the Right Cloud Service?
savewhere.net provides reviews and comparisons of different cloud services, helping you choose the best option for your needs and budget. We offer advice on optimizing your cloud storage setup and implementing secure collaboration workflows.
13.5. How do cloud services enhance collaboration and provide secure saving options for Filmora projects?
Cloud services enhance collaboration by enabling shared access and version control, while also providing secure saving through automatic backups and accessibility from any location with an internet connection.
14. Troubleshooting Common Saving Issues in Filmora
Addressing common saving issues in Filmora can save you time and frustration.
14.1. What are Some Common Saving Issues in Filmora?
Common saving issues include:
- Export Errors: Filmora fails to export the project.
- Slow Saving Speed: The saving process takes a very long time.
- Codec Issues: Problems with video or audio codecs.
- File Corruption: The saved file is corrupted and cannot be opened.
- Compatibility Issues: The saved file cannot be played on certain devices.
14.2. How Do I Troubleshoot Export Errors?
To troubleshoot export errors:
- Check System Requirements: Ensure your computer meets Filmora’s system requirements.
- Update Filmora: Make sure you are using the latest version of Filmora.
- Clear Cache: Clear Filmora’s cache files.
- Reduce Complexity: Simplify your project by removing unnecessary effects or transitions.
- Export in Segments: Try exporting your project in smaller segments.
14.3. What Can I Do About Slow Saving Speed?
To address slow saving speed:
- Use Proxy Files: Edit with low-resolution proxy files.
- Close Unnecessary Programs: Free up system resources.
- Optimize Hardware: Upgrade your processor, RAM, or graphics card.
- Choose Faster Codec: Use a codec that requires less processing power, such as H.264.
14.4. How Do I Resolve Codec Issues?
To resolve codec issues:
- Install Missing Codecs: Download and install any missing codecs.
- Convert Media: Convert your media files to a more compatible format.
- Update Filmora: Ensure Filmora has the latest codec support.
14.5. How Does savewhere.net Help Me Troubleshoot Saving Issues?
savewhere.net provides troubleshooting guides and FAQs that address common saving issues in Filmora. We offer step-by-step solutions and advice on resolving these problems, saving you time and frustration.
14.6. What are the most effective troubleshooting steps for resolving common saving issues in Filmora?
Effective steps include checking system requirements, updating Filmora, clearing cache, reducing complexity, exporting in segments, using proxy files, closing unnecessary programs, optimizing hardware, and resolving codec issues.
15. Saving Money on Filmora Licenses and Upgrades
Finding ways to save money on Filmora licenses and upgrades can help you maximize your budget.
15.1. What are the Different Filmora License Options?
Filmora offers several license options:
- Monthly Plan: Pay a monthly fee for access to Filmora.
- Annual Plan: Pay an annual fee for access to Filmora.
- Perpetual License: A one-time purchase that gives you lifetime access to Filmora.
15.2. How Do I Choose the Best License Option for My Needs?
Consider these factors when choosing a license option:
- Usage Frequency: How often do you use Filmora?
- Budget: How much are you willing to spend?
- Long-Term Use: Do you plan to use Filmora for many years?
15.3. Are There Any Discounts or Promotions Available for Filmora?
Yes, Filmora often offers discounts and promotions, especially during holidays or special events. Check the Filmora website or subscribe to their newsletter to stay informed about these offers.
15.4. How Can savewhere.net Help Me Find Discounts on Filmora?
savewhere.net provides information on current discounts and promotions for Filmora. We track the latest deals and offers, helping you save money on your Filmora license.
15.5. What strategies can help users save money on Filmora licenses and upgrades?
Strategies include evaluating usage frequency, considering budget, assessing long-term use, and staying informed about discounts and promotions to choose the most cost-effective license option.
16. Optimizing Your Computer for Better Filmora Performance
Optimizing your computer can significantly improve Filmora’s performance, leading to faster saving times and a smoother editing experience.
16.1. What Hardware Upgrades Can Improve Filmora’s Performance?
Hardware upgrades that can improve Filmora’s performance include:
- Processor: A faster CPU can speed up rendering and encoding.
- RAM: More RAM allows Filmora to handle larger projects and complex effects.
- Graphics Card: A dedicated GPU can accelerate video processing and playback.
- Storage: A fast SSD can reduce loading and saving times.
16.2. What Software Optimizations Can I Perform?
Software optimizations include:
- Update Drivers: Keep your graphics card drivers up to date.
- Defragment Hard Drive: Defragment your hard drive to improve file access speeds.
- Close Unnecessary Programs: Free up system resources by closing other applications.
- Disable Startup Programs: Prevent unnecessary programs from running at startup.
16.3. How Do I Ensure My Computer Meets Filmora’s System Requirements?
Check Filmora’s official website for the latest system requirements. Ensure your computer meets or exceeds these requirements for optimal performance.
16.4. How Can savewhere.net Help Me Optimize My Computer?
savewhere.net provides guides and tutorials on optimizing your computer for video editing. We offer advice on hardware upgrades, software optimizations, and system maintenance, helping you get the most out of Filmora.
16.5. How does computer optimization improve Filmora’s performance and reduce saving times?
Optimizing computer hardware and software by upgrading components, updating drivers, defragmenting the hard drive, and closing unnecessary programs improves Filmora’s performance, resulting in faster saving times and a smoother editing experience.
17. Understanding Filmora’s Auto-Save Feature
Filmora’s auto-save feature is a valuable tool for protecting your work from unexpected data loss.
17.1. How Does Filmora’s Auto-Save Feature Work?
Filmora’s auto-save feature automatically saves your project at regular intervals, preventing data loss in case of a crash or power outage.
17.2. How Do I Configure the Auto-Save Settings?
To configure the auto-save settings:
- Go to File > Preferences.
- Click on the General tab.
- Adjust the Auto Save interval to your desired frequency.
17.3. What are the Benefits of Using Auto-Save?
The benefits of using auto-save include:
- Data Protection: Prevents data loss from crashes or power outages.
- Peace of Mind: Provides peace of mind knowing your work is being saved automatically.
- Time Savings: Reduces the need to manually save your project frequently.
17.4. How Does savewhere.net Emphasize the Importance of Auto-Save?
savewhere.net highlights the importance of using Filmora’s auto-save feature to protect your valuable work. We offer tips on configuring the auto-save settings and recovering projects from auto-save files, ensuring you never lose your progress.
17.5. Why is the auto-save feature crucial for protecting video editing projects in Filmora?
The auto-save feature is crucial because it automatically saves projects at regular intervals, preventing data loss from crashes or power outages, ensuring users never lose their editing progress.
18. Exploring Alternatives to Filmora for Budget-Conscious Users
For budget-conscious users, exploring alternatives to Filmora can provide cost-effective video editing solutions.
18.1. What are Some Affordable Alternatives to Filmora?
Some affordable alternatives to Filmora include:
- DaVinci Resolve (Free Version): Offers professional-grade editing features for free.
- OpenShot: An open-source video editor with a user-friendly interface.
- HitFilm Express: A free video editor with advanced features and effects.
- Shotcut: Another open-source video editor with a wide range of editing tools.
18.2. What Features Do These Alternatives Offer?
These alternatives offer a range of features, including:
- Basic Editing Tools: Cutting, trimming, and merging clips.
- Video Effects: Transitions, filters, and color correction.
- Audio Editing: Adjusting volume, adding music, and sound effects.
- Export Options: Saving videos in various formats and resolutions.
18.3. How Do These Alternatives Compare to Filmora in Terms of Cost and Features?
- DaVinci Resolve (Free Version): Offers more advanced features than Filmora but can be more complex to learn.
- OpenShot: Simpler and more user-friendly than Filmora but has fewer advanced features.
- HitFilm Express: Offers a wide range of effects and features but may require purchasing add-ons.
- Shotcut: Provides a comprehensive set of editing tools and is completely free.
18.4. How Can savewhere.net Help Me Evaluate Video Editing Alternatives?
savewhere.net provides reviews and comparisons of different video editing software, helping you evaluate the best alternatives to Filmora based on your needs and budget. We offer advice on selecting the right software and maximizing its features.
18.5. What are the best budget-friendly alternatives to Filmora and their key features?
Budget-friendly alternatives include DaVinci Resolve (free version), OpenShot, HitFilm Express, and Shotcut, offering features like basic editing tools, video effects, audio editing, and various export options at no cost or with optional add-ons.
19. Staying Updated with Filmora’s Latest Features and Updates
Staying updated with Filmora’s latest features and updates ensures you can take advantage of the newest tools and improvements.
19.1. How Do I Stay Informed About Filmora’s Latest Updates?
To stay informed:
- Subscribe to Filmora’s Newsletter: Receive updates and announcements directly from Filmora.