
Saving an Excel file as a PDF is a common task, but are you doing it the most efficient way? This guide from savewhere.net will provide you with all the information you need. Learn how to convert spreadsheets to PDFs, manage page orientation, and ensure your data is clear and readable, all while saving money and time. Discover smart ways to save your Excel files as PDFs and explore additional tools for better control over your documents.
1. Why Save Excel Files as PDFs?
Excel files are great for data manipulation, but why should you consider saving them as PDFs?
Saving Excel files as PDFs offers several advantages, including enhanced portability and security. According to the U.S. Bureau of Economic Analysis (BEA), businesses that adopt efficient document management systems often see a significant boost in productivity. Here are key reasons to save your Excel files in PDF format:
- Preservation of Formatting: PDFs ensure your data and formatting remain consistent across different devices and operating systems, preventing display issues.
- Enhanced Security: PDFs can be password-protected, restricting unauthorized access and modifications. This is particularly useful when sharing sensitive financial data or business reports.
- Universal Accessibility: PDFs are universally readable, meaning anyone with a PDF viewer (available on virtually any device) can open and view the file without needing Microsoft Excel.
- Smaller File Size: Often, PDFs can be compressed to a smaller size than the original Excel file, making them easier to share via email or store in the cloud.
- Archival Purposes: PDFs are ideal for long-term storage of important documents. Their static format ensures that the content remains unchanged over time, crucial for compliance and record-keeping.
By saving your Excel files as PDFs, you’re not just preserving data; you’re enhancing its usability and security. This makes it easier to share, archive, and present information professionally. For more tips on managing your finances and documents efficiently, visit savewhere.net.
2. Understanding Your Options Before Converting
What aspects of your Excel file should you consider before saving it as a PDF?
Before saving your Excel file as a PDF, it’s crucial to consider several factors to ensure the final document meets your needs. Proper preparation can save you time and prevent potential formatting issues. Here are the key elements to think about:
- Page Orientation: Decide whether you need the PDF in portrait (vertical) or landscape (horizontal) mode. Landscape is often better for wide spreadsheets, while portrait is suitable for documents with more rows than columns.
- Content Selection: Determine if you want to include the entire workbook, specific sheets, or just a selected range of cells. This choice depends on the information you need to present in the PDF.
- Gridlines: Decide whether to include gridlines in the PDF. Gridlines can make the data easier to read, especially in complex spreadsheets, but may not be necessary for cleaner, presentation-style documents.
- Scaling: Adjust the scaling to ensure that all data fits within the page margins. This prevents text from being cut off and maintains the readability of your document.
- Headers and Footers: Customize headers and footers to include relevant information such as page numbers, dates, or company logos. This adds a professional touch and helps in document organization.
- Print Area: Set the print area to focus on specific parts of the worksheet. This is useful when you only need to convert a portion of the data to PDF.
- Comments and Annotations: Consider whether you want to include any comments or annotations in the PDF. These can provide additional context or explanations but may not be appropriate for all types of documents.
Taking these considerations into account before converting your Excel file to PDF will help you create a polished, professional document that accurately reflects your data and is easy to share and archive. For additional tips and resources on financial management, explore savewhere.net.
3. Setting Up Your Excel File for PDF Conversion
How can you optimize your Excel file’s layout for a seamless PDF conversion?
Optimizing your Excel file’s layout is crucial for a seamless PDF conversion. Proper setup ensures that your data is presented clearly and professionally. Here’s a step-by-step guide to help you configure your Excel file:
-
Open Your Excel Workbook:
- Launch Microsoft Excel and open the workbook you intend to convert to PDF.
-
Adjust Page Orientation:
- Navigate to the Page Layout tab on the Excel ribbon.
- Click the Orientation button.
- Select Landscape for wide spreadsheets or Portrait for documents with more rows.
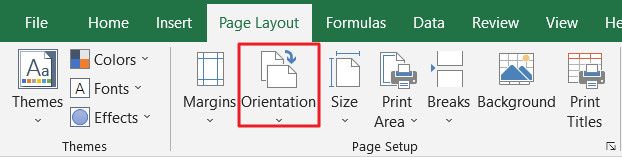 Orientation button with a red box around it in Excel.
 -
Configure Print Area:
- If you want to convert only a specific area, select the cells you wish to include.
- Click the Print Area button in the Page Layout tab.
- Choose Set Print Area.
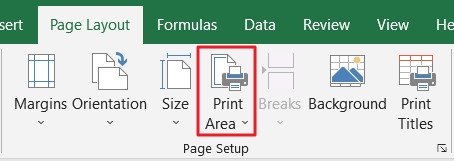 Print Area button in Excel with red box around it.
 -
Set Up Gridlines:
- If you want gridlines to be visible in the PDF, click the Print Titles button in the Page Layout tab.
- In the Sheet tab of the Page Setup dialog box, check the Gridlines box under the Print section.
- Click OK.
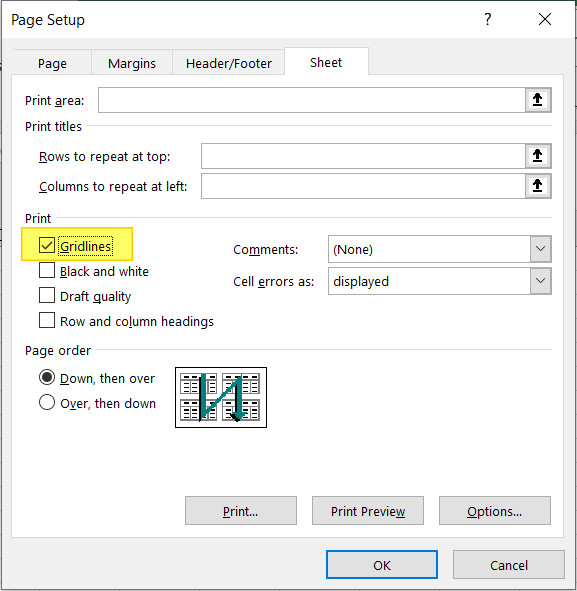 Gridlines checkbox in Page Setup dialog box.
 -
Adjust Scaling:
- In the Page Layout tab, use the Scale to Fit group to adjust the scaling of your document.
- You can set the width and height to ensure the content fits within the page.
- Alternatively, set the scale percentage to reduce or enlarge the content.
-
Customize Headers and Footers:
- Click the Insert tab.
- In the Text group, click Header & Footer.
- Add relevant information such as page numbers, dates, or company logos.
By following these steps, you can ensure that your Excel file is perfectly set up for PDF conversion, resulting in a professional and easy-to-read document. For more helpful tips on managing your finances and documents, visit savewhere.net.
4. Saving an Entire Excel Workbook as a PDF
What’s the quickest way to convert an entire Excel workbook to PDF?
The quickest way to convert an entire Excel workbook to PDF involves a few simple steps. This method ensures that all sheets in your workbook are included in the PDF document, making it easy to share comprehensive data. Here’s how to do it:
-
Open Your Excel Workbook:
- Launch Microsoft Excel and open the workbook you want to convert.
-
Go to the File Tab:
- Click the File tab located in the top-left corner of the Excel window.
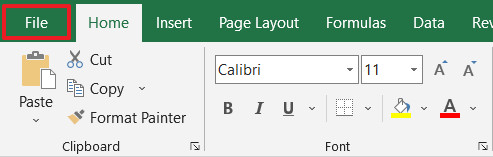 File tab in Excel with a red box around it.
 -
Select Save As:
- In the File menu, click Save As.
-
Choose a Save Location:
- Click Browse to select the folder where you want to save the PDF.
 Browse button in Excel highlighted.
 -
Select PDF as the File Type:
- In the Save As dialog box, click the dropdown menu next to Save as type:.
- Choose PDF (*.pdf) from the list of available file types.
 PDF selected from dropdown menu in Excel Save As dialog box.
 -
Adjust Options (Optional):
- Click the Options… button to customize the PDF output.
- In the Options dialog box, select the Entire workbook radio button to ensure all sheets are included.
- Click OK to save the settings.
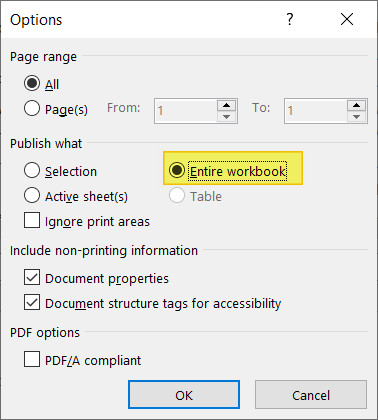 Entire workbook radio button highlighted in Options dialog box.
 -
Save the File:
- Click Save to convert the Excel workbook to a PDF.
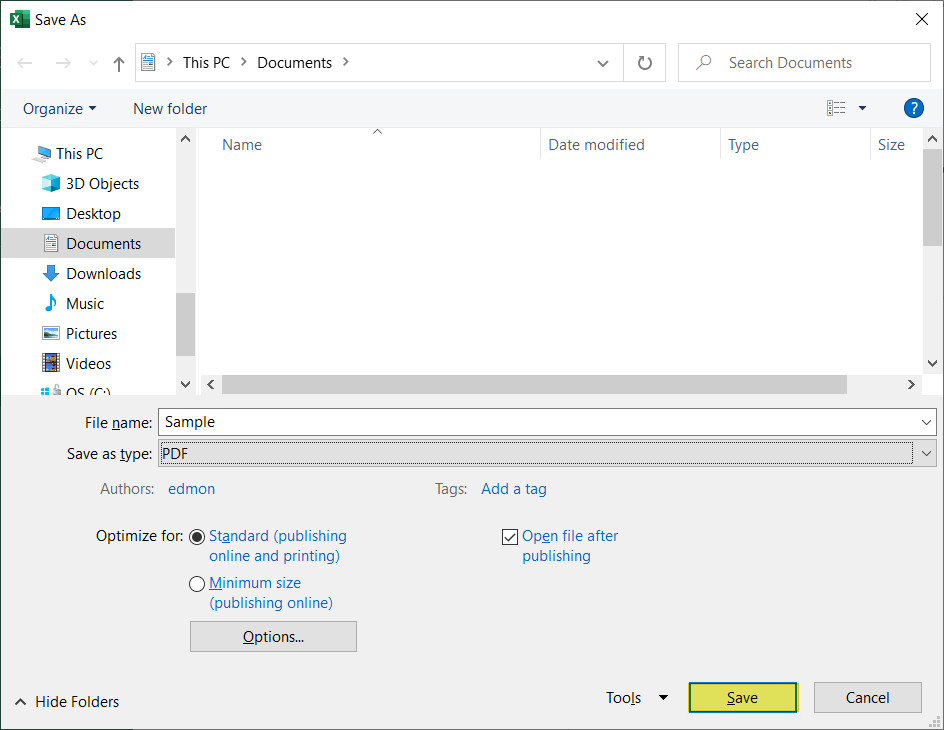 Save button highlighted in Save As dialog box.
By following these steps, you can quickly and easily save an entire Excel workbook as a PDF, ensuring that all your data is preserved in a universally accessible format. For more tips on document management and financial efficiency, be sure to visit savewhere.net.
5. Exporting an Excel Workbook as a PDF
Is exporting an Excel workbook different from saving it as a PDF, and which method should you use?
Exporting an Excel workbook as a PDF is another method to convert your file, and while it’s similar to the “Save As” method, there are subtle differences. Both achieve the same result of creating a PDF from your Excel data, but understanding the nuances can help you choose the method that best fits your needs.
Here’s a step-by-step guide on how to export your Excel workbook as a PDF:
-
Open Your Excel Workbook:
- Launch Microsoft Excel and open the workbook you want to convert.
-
Go to the File Tab:
- Click the File tab located in the top-left corner of the Excel window.
File tab in Excel with a red box around it. -
Select Export:
- In the File menu, click Export.
-
Choose Create PDF/XPS Document:
- Click Create PDF/XPS Document.
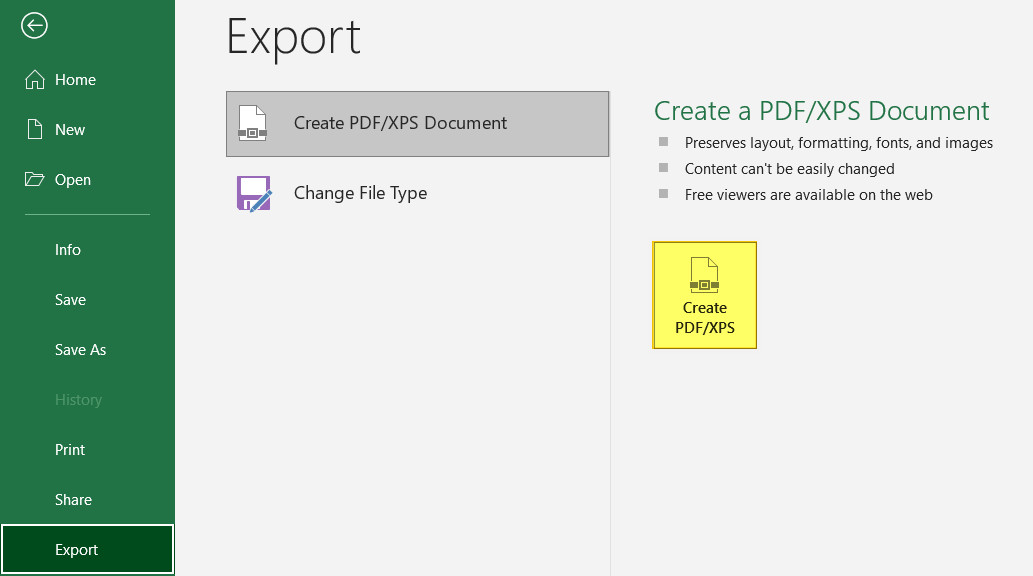 Create PDF XPS button in Microsoft Excel highlighted.
 -
Adjust Options (Optional):
- Click the Options… button to customize the PDF output.
- In the Options dialog box, select the Entire workbook radio button to ensure all sheets are included.
- Click OK to save the settings.
Entire workbook radio button highlighted in Options dialog box. -
Publish the File:
- Click Publish to convert the Excel workbook to a PDF.
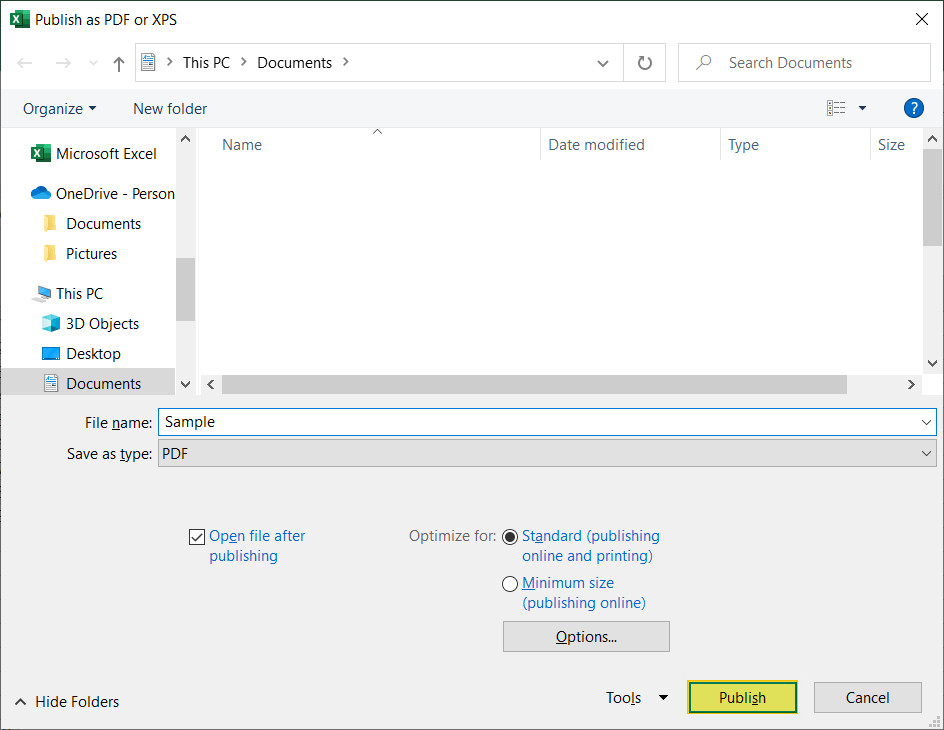 Publish button highlight in Publish as PDF or XPS button dialog box.
Key Differences and When to Use Each Method:
- Save As: This method allows you to save the Excel file in various formats, including PDF. It’s a versatile option when you need to consider different file types.
- Export: This method is specifically designed for creating PDF/XPS documents. It streamlines the process when your primary goal is to convert the file to PDF.
In most cases, the choice between “Save As” and “Export” comes down to personal preference, as both methods yield the same result. However, if you know you only need a PDF, the “Export” option can be slightly faster.
Regardless of the method you choose, converting your Excel workbooks to PDF ensures that your data is easily shareable and accessible. For more tips on managing your documents and finances, remember to visit savewhere.net.
6. Saving a Single Excel Sheet as a PDF
What if you only need one sheet from your Excel workbook as a PDF?
Sometimes you only need to save a single sheet from your Excel workbook as a PDF. This is useful when you want to share specific data without including the entire workbook. Here’s how to do it:
-
Open Your Excel Workbook:
- Launch Microsoft Excel and open the workbook containing the sheet you want to save.
-
Select the Sheet:
- Click on the tab of the sheet you want to save as a PDF. This will make the sheet active.
-
Go to the File Tab:
- Click the File tab located in the top-left corner of the Excel window.
File tab in Excel with a red box around it. -
Select Save As:
- In the File menu, click Save As.
-
Choose a Save Location:
- Click Browse to select the folder where you want to save the PDF.
Browse button in Excel highlighted. -
Select PDF as the File Type:
- In the Save As dialog box, click the dropdown menu next to Save as type:.
- Choose PDF (*.pdf) from the list of available file types.
PDF selected from dropdown menu in Excel Save As dialog box. -
Save the File:
- Click Save to convert the selected Excel sheet to a PDF. Excel will automatically save only the active sheet.
Save button highlighted in Save As dialog box.
By following these steps, you can easily save a single Excel sheet as a PDF, making it simpler to share specific information. For more helpful tips on managing your documents and finances, don’t forget to visit savewhere.net.
7. Saving Multiple Excel Sheets as One PDF
How do you combine several Excel sheets into a single PDF document?
Combining multiple Excel sheets into a single PDF document is a great way to organize and share related information. Here’s how you can do it:
-
Open Your Excel Workbook:
- Launch Microsoft Excel and open the workbook containing the sheets you want to combine.
-
Go to the File Tab:
- Click the File tab located in the top-left corner of the Excel window.
File tab in Excel with a red box around it. -
Select Save As:
- In the File menu, click Save As.
-
Choose a Save Location:
- Click Browse to select the folder where you want to save the PDF.
Browse button in Excel highlighted. -
Select PDF as the File Type:
- In the Save As dialog box, click the dropdown menu next to Save as type:.
- Choose PDF (*.pdf) from the list of available file types.
PDF selected from dropdown menu in Excel Save As dialog box. -
Adjust Options:
- Click the Options… button to customize the PDF output.
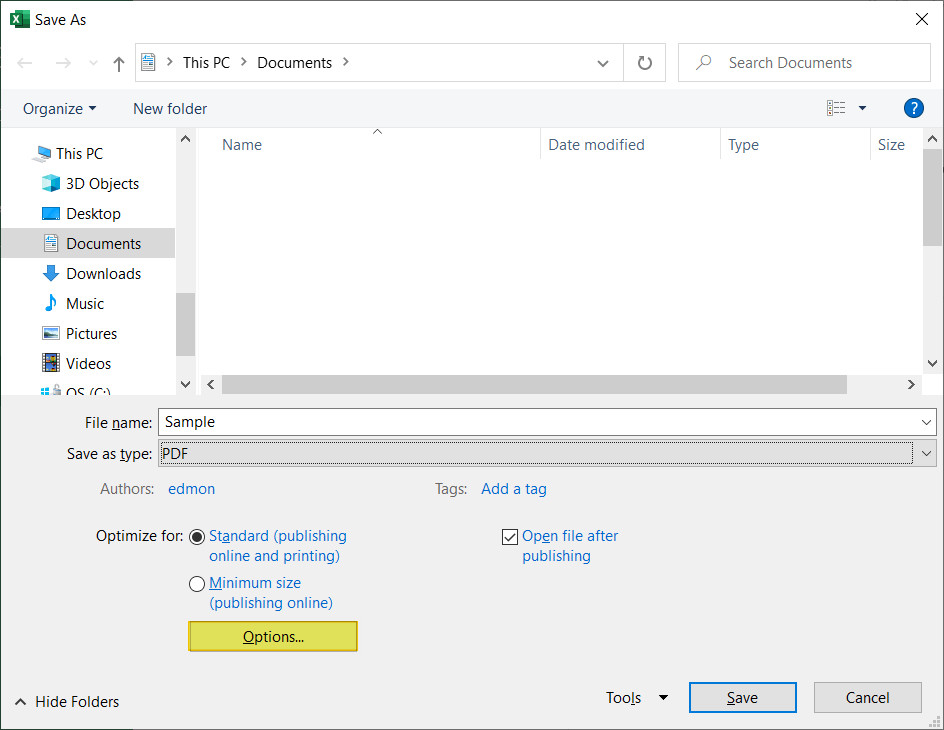 Highlighted options button in Save As dialog box.
 -
Select Page Range:
- In the Options dialog box, click the Page(s) radio button.
- Specify the page range you wish to save. For example, if you want to save sheets 1, 3, and 5, you would typically need to print to PDF multiple times, selecting the relevant sheets each time.
- Alternatively, move or copy the desired sheets to a new workbook and save that workbook as a PDF.
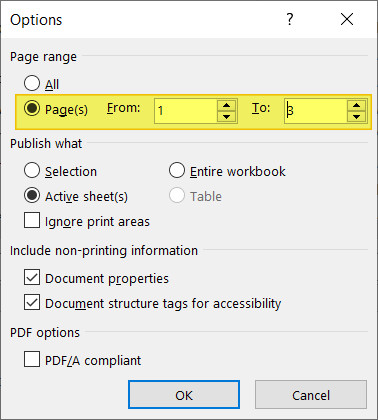 Page range radio button and options in Excel highlighted in Options dialog box.
 -
Save the File:
- Click Save to convert the selected Excel sheets into a single PDF.
Save button highlighted in Save As dialog box.
By following these steps, you can easily combine multiple Excel sheets into one PDF document. For more valuable tips on document management and financial planning, make sure to visit savewhere.net.
8. Saving Specific Areas or Cells as a PDF
Is it possible to save only a selected portion of your Excel sheet as a PDF?
Yes, it is indeed possible to save only a selected portion of your Excel sheet as a PDF. This is particularly useful when you need to share specific data ranges without including the entire sheet. Here’s how to do it:
-
Open Your Excel Workbook:
- Launch Microsoft Excel and open the workbook containing the data you want to save.
-
Select the Cells:
- Using your mouse, select the specific cells or areas you want to save as a PDF.
 Mouse selecting cells in Microsoft Excel.
 -
Go to the Page Layout Tab:
- Click the Page Layout tab on the Excel ribbon.
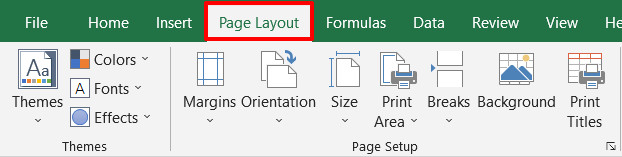 Page Layout tab in Excel with a red box around it.
 -
Set the Print Area:
- Click the Print Area button.
- Select Set Print Area from the dropdown menu. This defines the selected cells as the area to be printed.
Print Area button in Excel with red box around it. -
Go to the File Tab:
- Click the File tab located in the top-left corner of the Excel window.
File tab in Excel with a red box around it. -
Select Save As:
- In the File menu, click Save As.
-
Choose a Save Location:
- Click Browse to select the folder where you want to save the PDF.
Browse button in Excel highlighted. -
Select PDF as the File Type:
- In the Save As dialog box, click the dropdown menu next to Save as type:.
- Choose PDF (*.pdf) from the list of available file types.
PDF selected from dropdown menu in Excel Save As dialog box. -
Save the File:
- Click Save to convert the selected area of your Excel sheet to a PDF.
Save button highlighted in Save As dialog box.
By following these steps, you can easily save specific areas or cells from your Excel sheet as a PDF. This is particularly useful for sharing targeted data. Remember to visit savewhere.net for more tips on efficient document management and financial savings.
9. Addressing Common PDF Conversion Issues
What are common problems encountered when converting Excel to PDF, and how can you fix them?
Converting Excel files to PDF can sometimes present challenges. Being aware of common issues and their solutions can save you time and frustration. Here are some frequent problems and how to address them:
- Formatting Issues:
- Problem: Data appears cut off, misaligned, or doesn’t fit on the page.
- Solution: Adjust the page orientation (portrait or landscape) in the Page Layout tab. Also, modify the scaling options to ensure all content fits within the page margins. Check the print area to ensure it’s correctly set to include all relevant data.
- Missing Gridlines:
- Problem: Gridlines are not visible in the PDF.
- Solution: In the Page Layout tab, click Print Titles. In the Sheet tab of the Page Setup dialog box, ensure the Gridlines box is checked under the Print section.
- Incorrect Sheet Selection:
- Problem: The wrong sheet or only a portion of the workbook is being converted.
- Solution: When saving, go to Options and select Entire workbook if you want all sheets included. If you only want specific sheets, select the appropriate page range or save each sheet individually.
- Poor Image Quality:
- Problem: Images appear blurry or pixelated in the PDF.
- Solution: When saving as a PDF, adjust the image compression settings. Higher quality settings will result in larger file sizes but better image clarity.
- Hyperlinks Not Working:
- Problem: Hyperlinks in the Excel file are not active in the PDF.
- Solution: Ensure that the option to include hyperlinks is enabled when saving to PDF. In the Save As dialog box, click Options and check the box that says “PDF/A compliant”; this usually preserves hyperlinks.
- File Size Too Large:
- Problem: The PDF file size is too large, making it difficult to share via email.
- Solution: Use the PDF optimization tools available in Adobe Acrobat or other PDF editors to compress the file. You can also reduce image resolution and remove unnecessary elements.
- Font Issues:
- Problem: Fonts appear differently in the PDF than in the Excel file.
- Solution: Embed the fonts in the PDF. In the Save As options, there’s usually a setting to embed fonts, ensuring they display correctly on any device.
By addressing these common issues, you can ensure that your Excel to PDF conversions are smooth and produce high-quality, accurate documents. For more tips and resources on efficient document management and financial savings, be sure to visit savewhere.net.
10. Exploring Advanced PDF Tools for Enhanced Control
Are there tools that offer more control over PDF creation and editing from Excel files?
Yes, there are advanced PDF tools that offer enhanced control over PDF creation and editing from Excel files. While Excel provides basic PDF conversion capabilities, dedicated PDF software provides a wider range of features and customization options. Here are some tools to consider:
- Adobe Acrobat Pro:
- Overview: Adobe Acrobat Pro is the industry-standard PDF solution, offering comprehensive tools for creating, editing, and managing PDFs.
- Key Features:
- Advanced editing capabilities: Modify text, images, and objects directly within the PDF.
- PDF optimization: Reduce file size without sacrificing quality.
- Form creation and editing: Create fillable PDF forms for data collection.
- Security features: Add passwords, permissions, and digital signatures.
- Integration with Microsoft Office: Seamlessly convert Excel files to PDF with advanced options.
- PDF Pro:
- Overview: PDF Pro is an all-in-one PDF solution designed for creating, editing, converting, and merging PDFs.
- Key Features:
- Merge multiple Excel files into a single PDF.
- Edit PDFs after conversion.
- Highlight important information and add annotations.
- Convert PDFs to other formats, such as Word, Excel, and images.
- User-friendly interface.
- Nitro PDF Pro:
- Overview: Nitro PDF Pro is a robust alternative to Adobe Acrobat, offering a range of features for PDF creation, editing, and collaboration.
- Key Features:
- PDF creation and conversion: Convert Excel files to PDF with customizable settings.
- Editing tools: Modify text, images, and pages within the PDF.
- Collaboration features: Add comments, markups, and annotations.
- Digital signatures: Securely sign and certify PDF documents.
- Optical Character Recognition (OCR): Convert scanned documents into editable PDFs.
- Foxit PDF Editor:
- Overview: Foxit PDF Editor is a feature-rich PDF solution that provides tools for creating, editing, and securing PDF documents.
- Key Features:
- PDF creation and conversion: Convert Excel files to PDF with advanced options.
- Editing tools: Modify text, images, and objects within the PDF.
- Collaboration features: Add comments, annotations, and stamps.
- Security features: Encrypt PDFs and apply digital signatures.
- Integration with cloud services: Access and save PDFs to cloud storage platforms like Google Drive and OneDrive.
These advanced PDF tools offer greater flexibility and control over your PDF documents, making them ideal for professionals who require more than just basic conversion capabilities. For more tips on managing your documents and finances efficiently, be sure to visit savewhere.net.
FAQ: Saving PDFs from Excel
Have more questions about saving PDFs from Excel? Here are some frequently asked questions:
- Can I password-protect a PDF created from Excel?
- Yes, you can password-protect a PDF created from Excel using advanced PDF tools like Adobe Acrobat Pro or PDF Pro. These tools allow you to add security features to restrict unauthorized access and modifications.
- How can I reduce the file size of a PDF created from Excel?
- You can reduce the file size of a PDF by using PDF optimization tools available in Adobe Acrobat or other PDF editors. These tools compress images, remove unnecessary elements, and optimize the PDF structure.
- Why are my hyperlinks not working in the PDF?
- Ensure that the option to include hyperlinks is enabled when saving to PDF. In the “Save As” dialog box, click “Options” and check the box that says “PDF/A compliant”; this usually preserves hyperlinks.
- How do I ensure that my fonts appear correctly in the PDF?
- Embed the fonts in the PDF. In the “Save As” options, there’s usually a setting to embed fonts, ensuring they display correctly on any device.
- Can I convert a scanned document in Excel to a PDF?
- Yes, but first, you need to use Optical Character Recognition (OCR) software to convert the scanned image into editable text within Excel. Then, you can save the Excel file as a PDF.
- Is it possible to add a digital signature to a PDF created from Excel?
- Yes, you can add a digital signature to a PDF using tools like Adobe Acrobat Pro, Nitro PDF Pro, or Foxit PDF Editor. These tools allow you to securely sign and certify PDF documents.
- How can I merge multiple Excel workbooks into a single PDF?
- You can merge multiple Excel workbooks into a single PDF using PDF Pro or Adobe Acrobat Pro. These tools provide features to combine multiple files into one PDF document.
- What should I do if my data is cut off when converting to PDF?
- Adjust the page orientation (portrait or landscape) in the “Page Layout” tab. Also, modify the scaling options to ensure all content fits within the page margins. Check the print area to ensure it’s correctly set to include all relevant data.
- Can I edit a PDF that was created from Excel?
- Yes, you can edit a PDF using advanced PDF tools like Adobe Acrobat Pro, PDF Pro, or Nitro PDF Pro. These tools allow you to modify text, images, and objects directly within the PDF.
- How do I make sure gridlines show up in my PDF?
- In the “Page Layout” tab, click “Print Titles”. In the “Sheet” tab of the “Page Setup” dialog box, ensure the “Gridlines” box is checked under the “Print” section.
These FAQs should help you troubleshoot common issues and better understand how to save PDFs from Excel effectively. For more financial tips and document management solutions, visit savewhere.net.
Are you ready to take control of your Excel files and convert them into professional-quality PDFs? Visit savewhere.net today to explore more tips, discover exclusive offers, and connect with a community of like-minded individuals in the USA who are dedicated to saving money and managing their finances wisely. Don’t wait—start saving smarter today!
Address: 100 Peachtree St NW, Atlanta, GA 30303, United States. Phone: +1 (404) 656-2000. Website: savewhere.net.