
Saving your Adobe Photoshop designs as JPEGs is essential for sharing your work online, sending drafts to clients, or archiving high-quality versions. savewhere.net is here to guide you through the process, ensuring you master the art of exporting your PSD files into the widely compatible JPEG format, optimizing for both quality and file size. Discover the best methods to preserve your creative vision while saving money. You’ll learn about image optimization, resolution, and color profiles.
1. Understanding the JPEG Image Format: Balancing Quality and Size
Why choose JPEG to save your creations?
JPEG (Joint Photographic Experts Group) strikes a sweet spot between image quality and file size, making it a go-to option for various needs. Its versatility shines through its compatibility with virtually every image viewer and operating system. Whether you’re showcasing your work on a blog, sharing on social media, or emailing to clients, JPEG’s widespread support makes it an ideal choice.
 JPEG Quality and File Size Balance
JPEG employs lossy compression, reducing file sizes while preserving acceptable image quality. However, each save results in a minor data loss. For repeated edits, maintain the original PSD to avoid cumulative quality degradation.
According to research from the U.S. Bureau of Economic Analysis (BEA), image file management directly impacts efficiency. A streamlined process saves time and resources. Understanding the nuances of JPEG is a savvy move in digital design. It’s a win-win for quality and manageability.
1.1. Benefits of Saving as JPEG
What are the key advantages of using JPEG?
JPEG is great for sharing and archiving images. Its universal compatibility ensures that your images can be viewed on almost any device or platform. This widespread support makes it easy to share your work with clients, colleagues, or on social media. JPEG’s lossy compression is a double-edged sword. While it reduces file size, it does compromise image quality to some extent.
1.2. Limitations of JPEG
What are the downsides of the JPEG format?
JPEG is not ideal for images with sharp lines or text, as the compression can cause artifacts and blurring. Also, each time you save a JPEG, you lose some image data, reducing image quality. It is better to keep the original file in a lossless format like PSD.
1.3. JPEG vs. Other Formats
How does JPEG compare to other image formats like PNG and GIF?
JPEG is best for photographs and complex images where slight quality loss isn’t noticeable. PNG is better for graphics with sharp lines, text, or transparency, as it uses lossless compression. GIF is suitable for simple animations and graphics with limited color palettes. The Consumer Financial Protection Bureau (CFPB) emphasizes the importance of understanding your choices to make informed decisions.
2. Step-by-Step Guide: Saving Photoshop Files as JPEG
How do you save a Photoshop file as a JPEG?
Whether you’re optimizing for web use, preparing files for print, or simply need a universally compatible format, Photoshop offers multiple avenues to convert your layered masterpieces. Let’s explore the primary methods for saving your Photoshop files as JPEGs.
2.1. Method 1: Using the ‘Save As’ Technique
What is the most straightforward way to save as JPEG?
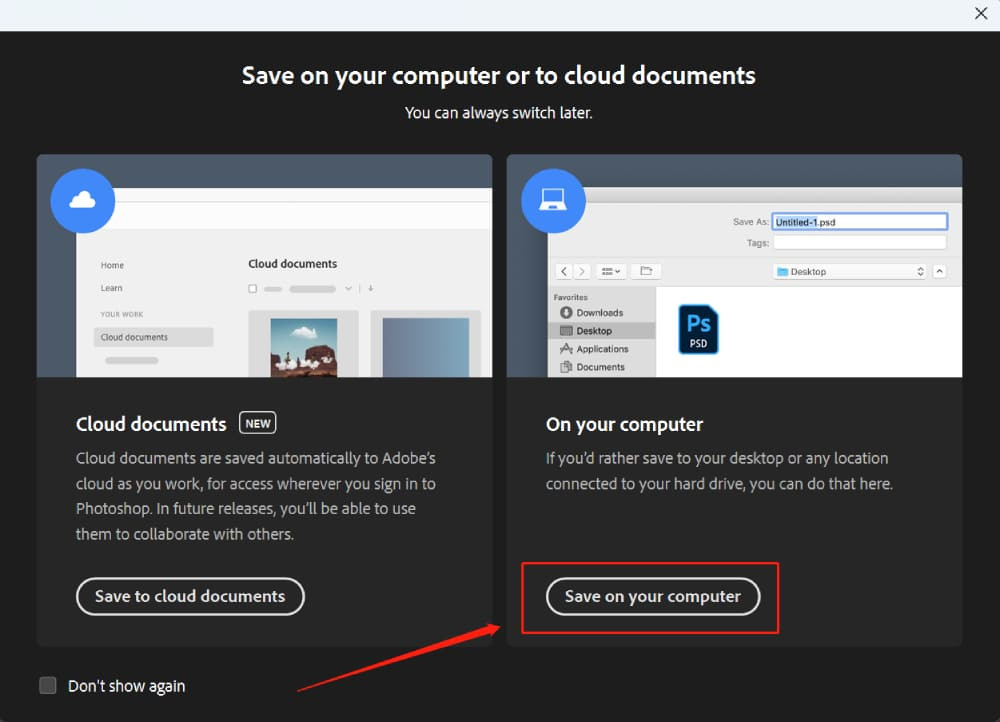
The “Save As” feature is arguably the most direct route to saving your work as a JPEG. After opening your file in Photoshop:
- Navigate to ‘File’ in the top menu, then select ‘Save As’.
- A panel will appear. Choose ‘On Your Computer’.
- In the dialog box, select ‘JPEG’ under ‘Format’.
- Name your file, choose a location, and click ‘Save’.
- The ‘JPEG Options’ box will appear. Adjust the settings and click ‘OK’.
 Save As Option in Photoshop Dialog Box
2.2. Method 2: The ‘Export As’ Option
How does ‘Export As’ give you more control?
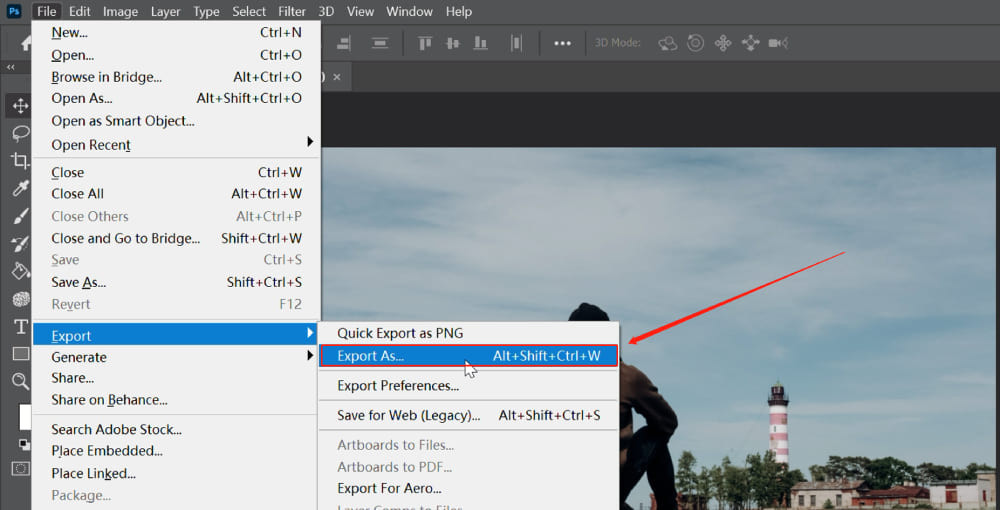
The ‘Export As’ feature offers increased control over your output, making it particularly useful for web graphics. To use it:
- Go to ‘File’, then ‘Export’, and choose ‘Export As’.
- In the dialog box, select ‘JPEG’ as the format.
- Adjust ‘Quality’, ‘Width’, ‘Height’, and ‘Canvas Size’ as needed.
- Ensure ‘Convert to sRGB’ is checked for web or mobile viewing.
 Export As Setting in Photoshop Menu
2.3. Method 3: The ‘Save for Web (Legacy)’ Method
Why do many still prefer ‘Save for Web (Legacy)’?
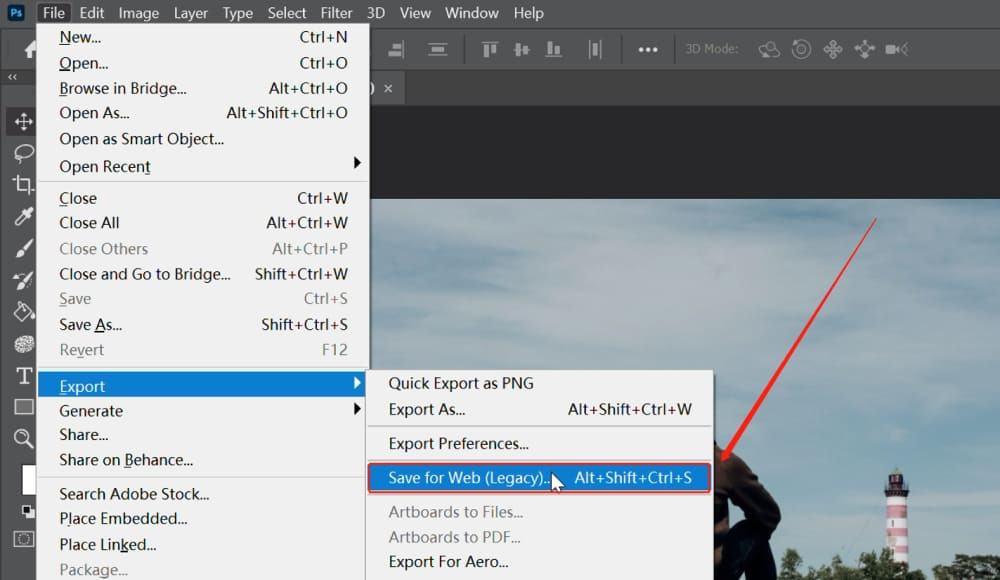
This older feature remains a favorite due to its extensive control over image optimization.
- Select ‘File’, then ‘Export’, and finally ‘Save for Web (Legacy)’.
- Choose ‘JPEG’ as your file format on the right side of the dialog box.
- Adjust parameters like ‘Preset’, ‘JPEG Quality’, ‘Optimized’, and ‘Progressive’.
- Set ‘Preview’ to ‘Internet Standard RGB (No Color Management)’.
- Adjust ‘Metadata’ and ‘Image Size’ as needed.
 Save for Web JPEG Setting Menu
2.4. Method 4: Quick Export as JPEG
What is the fastest way to export as JPEG?
Photoshop’s ‘Quick Export’ option offers a one-click solution.
- Navigate to ‘File’ > ‘Export’ > ‘Quick Export as XXX’.
- To set JPEG as the default, click ‘Edit’ > ‘Preferences’ > ‘Export’.
- In the panel, set ‘Quick Export Format’ to JPEG.
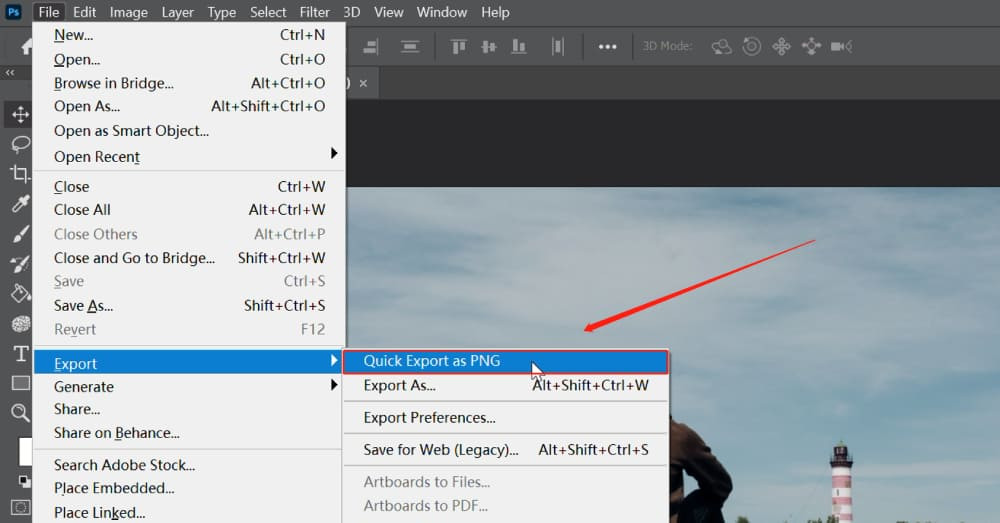 Quick Export Photoshop Settings
3. Diving Deeper: JPEG Options Explained
What do the JPEG options in Photoshop mean?
Understanding the JPEG options in Photoshop is crucial for achieving the desired balance between image quality and file size.
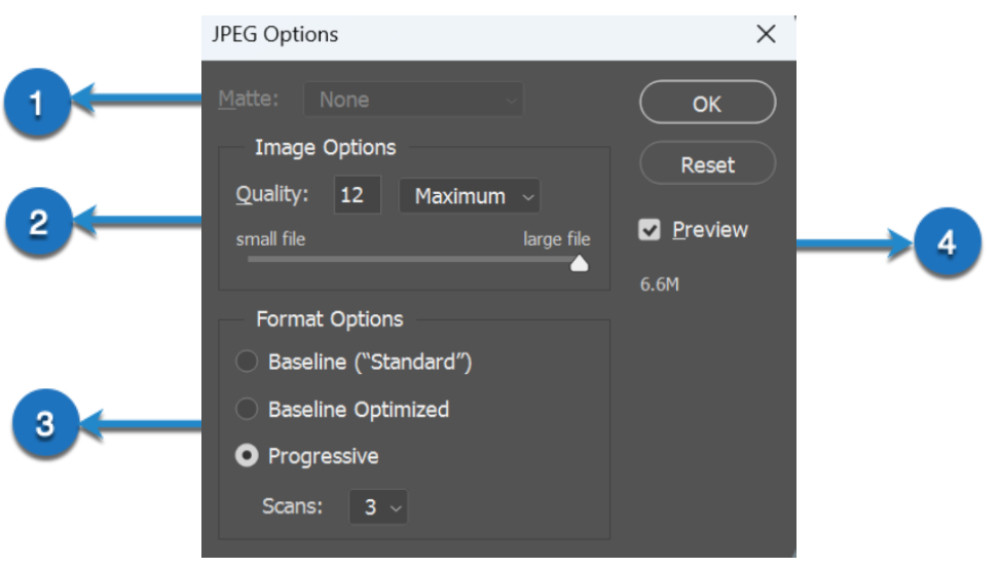
3.1. Matte: Handling Transparency
When is the Matte option relevant?
The ‘Matte’ option fills transparent areas with a specific color when saving your file, as JPEG doesn’t support transparency. It becomes relevant when you’re working with images that contain transparency.
3.2. Image Options: Quality and Format
How do you adjust image quality?
The ‘Image Options’ section lets you adjust the quality and format of your JPEG image. The ‘Quality’ slider ranges from 0 to 12, with 12 offering the highest quality but also the largest file size.
 JPEG Options in Export Menu
3.3. Format Options: Baseline, Optimized, and Progressive
What are the differences between the format options?
Here’s a breakdown of the three formatting types:
- Baseline (“Standard”): Offers the broadest compatibility across devices and platforms.
- Baseline Optimized: Provides a smaller file size without compromising image quality.
- Progressive: Loads JPEGs in successive layers of detail, useful for displaying large images on web pages.
3.4. Preview: Real-Time Changes
How can you see changes in real-time?
The ‘Preview’ checkbox allows you to see the changes made in the ‘JPEG Options’ dialog box in real-time in your Photoshop workspace. This can be helpful to gauge the impact of your settings before you finalize the save process.
4. Optimizing JPEGs: Quality vs. File Size
How can you balance image quality and file size?
Optimizing JPEGs requires careful consideration of several factors. The goal is to strike a balance between visual appeal and file size.
4.1. Understanding Compression
How does JPEG compression work?
JPEG compression is a ‘lossy’ method, which means that some image data is discarded during the compression process. The amount of data lost is determined by the quality setting you choose. The lower the quality, the more data is discarded, and the smaller the file size becomes.
4.2. Choosing the Right Quality Setting
What quality setting should you use?
The ideal quality setting depends on the intended use of the image. For web use, a quality setting of 60-80% is often sufficient. For print, you may want to use a higher quality setting to preserve more detail. Always preview your image at different quality settings to find the best balance between quality and file size.
4.3. Color Profiles: sRGB for Web
Why is sRGB important for web images?
Converting your image to the sRGB color space ensures that the colors will display accurately on most web browsers and devices. This is especially important if your image contains vibrant or saturated colors.
4.4. Resizing Images
How does resizing affect file size and quality?
Reducing the dimensions of your image can significantly reduce the file size. However, it can also affect the image quality. It’s generally best to resize your image to the desired dimensions before saving it as a JPEG.
5. Advanced Tips and Tricks for JPEG Optimization
What are some advanced techniques for optimizing JPEGs?
For professionals looking to fine-tune their workflow, several advanced techniques can further optimize JPEG images.
5.1. Using Photoshop Actions for Batch Processing
How can you automate JPEG optimization?
Photoshop Actions allow you to record a series of steps and apply them to multiple images. This can be a huge time-saver when you need to optimize a large number of JPEGs. Create an action that resizes the image, converts it to sRGB, and saves it as a JPEG with your desired quality setting.
5.2. Third-Party Plugins for JPEG Optimization
Are there any third-party tools for JPEG optimization?
Several third-party plugins offer advanced JPEG optimization features. These plugins often use more sophisticated compression algorithms to reduce file size while preserving image quality. Some popular options include ImageOptim and JPEGmini.
5.3. Progressive JPEGs for Web Use
What are progressive JPEGs and how do they improve the user experience?
Progressive JPEGs load in stages, with a low-resolution version appearing first, followed by progressively higher-resolution versions. This can improve the user experience on websites, as viewers see something quickly instead of waiting for the entire image to load.
5.4. Metadata Considerations
How does metadata affect file size?
Metadata, such as camera settings and copyright information, can add to the file size of your JPEG. While metadata can be useful, it’s often unnecessary for web images. Use Photoshop’s ‘Save for Web (Legacy)’ feature to remove unnecessary metadata.
6. Common Mistakes to Avoid When Saving as JPEG
What are the common pitfalls when saving as JPEG?
Even experienced designers can fall victim to common mistakes when saving JPEGs. Avoiding these pitfalls ensures optimal results.
6.1. Over-Compression
How much compression is too much?
Over-compressing a JPEG can result in noticeable artifacts and a loss of detail. Always preview your image at different quality settings to find the sweet spot. If you see blocky areas or halos around sharp edges, you’re compressing too much.
6.2. Repeatedly Saving JPEGs
Why should you avoid repeatedly saving JPEGs?
Each time you save a JPEG, you lose some image data. Repeatedly saving a JPEG can result in a significant loss of quality. Always work with the original PSD file and save a new JPEG each time you need to export the image.
6.3. Ignoring Color Profiles
What happens if you ignore color profiles?
Ignoring color profiles can result in inaccurate colors on different devices and browsers. Always convert your image to sRGB for web use.
6.4. Resizing Up
Why should you avoid increasing the size of a JPEG?
Enlarging a JPEG can result in a loss of sharpness and detail. If you need to increase the size of an image, it’s best to do so in Photoshop before saving it as a JPEG.
7. Real-World Applications: Saving JPEGs for Different Purposes
How do JPEG settings vary based on the intended use?
The ideal JPEG settings can vary depending on the intended use of the image. Understanding these nuances can help you optimize your images for different scenarios.
7.1. Web Use
What are the best JPEG settings for web images?
For web images, the primary goal is to minimize file size while maintaining acceptable image quality. Use a quality setting of 60-80%, convert to sRGB, and remove unnecessary metadata. Consider using progressive JPEGs to improve the user experience.
7.2. Print Use
What are the optimal JPEG settings for printing?
For print, the goal is to preserve as much detail as possible. Use a higher quality setting (80-100%) and retain the original color profile. Be aware that JPEG is not always the best format for print, as it can introduce artifacts. Consider using a lossless format like TIFF for critical print jobs.
7.3. Email Use
How should you save JPEGs for email attachments?
For email attachments, the goal is to minimize file size to ensure quick delivery and avoid exceeding attachment size limits. Use a quality setting of 50-70% and resize the image to the appropriate dimensions.
7.4. Social Media
What JPEG settings work best for social media platforms?
Social media platforms often compress images, so it’s important to optimize your JPEGs before uploading them. Use a quality setting of 70-80%, convert to sRGB, and resize the image to the platform’s recommended dimensions.
8. Streamlining Your Workflow: Tools and Automation
How can you speed up the process of saving JPEGs?
Speed and efficiency are key in any creative workflow. Several tools and automation techniques can streamline the process of saving JPEGs in Photoshop.
8.1. TourBox: A Creative Powerhouse
How can TourBox enhance your Photoshop workflow?
The TourBox is a versatile device that allows you to create custom shortcuts and macros for Photoshop. By mapping common JPEG saving tasks to TourBox buttons, you can significantly speed up your workflow.
Imagine consolidating the multitude of steps involved in exporting Photoshop files into JPEGs with a single button click. Or better yet, consider the convenience of applying color grading to multiple files at once with just one command.
According to savewhere.net, streamlining tasks leads to better time management, saving both time and money.
8.2. Creating Custom Photoshop Scripts
How can you automate JPEG saving with scripts?
Photoshop supports scripting, allowing you to automate complex tasks. You can create a script that saves a JPEG with your desired settings with just one click. This can be a huge time-saver if you need to save a large number of JPEGs with the same settings.
8.3. Using Batch Processing in Photoshop
How does Photoshop’s batch processing feature work?
Photoshop’s batch processing feature allows you to apply the same action to multiple images. Create an action that saves a JPEG with your desired settings, then use the batch processing feature to apply that action to an entire folder of images.
8.4. Keyboard Shortcuts
What are some useful keyboard shortcuts for saving JPEGs?
Learning a few key keyboard shortcuts can speed up your workflow. Here are some useful shortcuts for saving JPEGs in Photoshop:
- Ctrl + Shift + Alt + S (Save for Web (Legacy)): Opens the ‘Save for Web (Legacy)’ dialog box.
- Ctrl + Shift + S (Save As): Opens the ‘Save As’ dialog box.
- Ctrl + Alt + Shift + E (Merge Visible Layers): Creates a new layer containing all visible layers, useful for creating a flattened version of your image before saving.
9. Troubleshooting Common JPEG Issues
What should you do if you encounter problems when saving JPEGs?
Even with careful attention to detail, you may encounter issues when saving JPEGs. Knowing how to troubleshoot these problems can save you time and frustration.
9.1. Color Shifts
What causes color shifts when saving as JPEG?
Color shifts can occur if you don’t convert your image to sRGB before saving it as a JPEG. Ensure that the ‘Convert to sRGB’ option is checked in the ‘Save for Web (Legacy)’ dialog box.
9.2. Artifacts and Blockiness
What causes artifacts and blockiness in JPEGs?
Artifacts and blockiness are usually caused by over-compression. Try using a higher quality setting when saving your JPEG.
9.3. File Size Too Large
What should you do if your JPEG file size is too large?
If your JPEG file size is too large, try reducing the quality setting or resizing the image. You can also try using a third-party plugin for JPEG optimization.
9.4. Image Not Displaying Correctly on Web
What should you do if your JPEG doesn’t display correctly on the web?
If your JPEG doesn’t display correctly on the web, ensure that it is saved in the sRGB color space. You should also clear your browser cache to ensure that you’re seeing the latest version of the image.
10. Staying Updated: Latest Trends and Updates in JPEG Technology
How can you stay informed about the latest JPEG developments?
The world of image formats is constantly evolving. Staying updated on the latest trends and updates in JPEG technology can help you optimize your workflow and ensure that you’re using the best possible settings.
10.1. Following Industry Blogs and Publications
What are some reliable sources of information about JPEG technology?
Several industry blogs and publications cover the latest developments in JPEG technology. Some popular options include the Adobe Photoshop Blog, the JPEG Committee website, and various photography and design blogs.
10.2. Attending Conferences and Workshops
How can you learn more about JPEG technology in person?
Attending conferences and workshops is a great way to learn more about JPEG technology and network with other professionals. Look for events focused on photography, design, and web development.
10.3. Online Forums and Communities
Where can you discuss JPEG technology with other professionals?
Online forums and communities provide a platform for discussing JPEG technology and asking questions. Some popular options include the Adobe Photoshop Forums, the Stack Overflow website, and various photography and design communities on social media.
10.4. Experimenting with New Features and Tools
How can you stay ahead of the curve in JPEG optimization?
The best way to stay updated on the latest JPEG developments is to experiment with new features and tools. Try out different settings in Photoshop, experiment with third-party plugins, and test new techniques.
We’ve explored different methods, dissected their parameters, and hopefully, provided you with a clearer understanding of the process.
Whether you’re optimizing for the web, preparing for print, or simply sharing your creative work, knowing how to properly save your files is essential.
Remember, the options offered by Photoshop are tools at your disposal. Don’t be afraid to experiment with different settings to find what works best for your specific needs. Visit savewhere.net for more tips and tricks on maximizing your creative output. You can find us at 100 Peachtree St NW, Atlanta, GA 30303, United States or call +1 (404) 656-2000.
FAQ: Saving PSD as JPEG
1. Why is my JPEG blurry after saving from Photoshop?
The image might be over-compressed. Increase the quality setting in the JPEG options.
2. How do I reduce the file size of a JPEG in Photoshop?
Use the “Save for Web (Legacy)” option and adjust the quality slider.
3. Should I use Baseline or Progressive JPEG?
Progressive JPEGs are better for web use as they load faster.
4. What does “Convert to sRGB” mean?
It converts the image to a standard color space for better web compatibility.
5. Can I save a transparent image as JPEG?
No, JPEG does not support transparency. Use PNG instead.
6. How do I maintain the best quality when saving as JPEG?
Use a high-quality setting (80-100) in the JPEG options.
7. What is the best method for saving JPEGs for printing?
Use the “Save As” option with the highest quality setting.
8. Why does my JPEG look different in different browsers?
This is usually due to color management differences. Convert to sRGB.
9. How do I remove metadata from a JPEG in Photoshop?
Use the “Save for Web (Legacy)” option and adjust the metadata settings.
10. Is JPEG the best format for all images?
No, JPEG is best for photos. Use PNG for graphics with text or sharp lines.
By mastering these techniques, you’ll be well-equipped to save Photoshop files as JPEGs, optimizing for various applications and ensuring your creative work shines.