Turning off the screen saver in Windows 11 is a straightforward process that can help you save energy, customize your user experience, and streamline your workflow, and savewhere.net can help you understand the best options for your needs. This guide will walk you through the simple steps to disable your screen saver and offer tips for optimizing your display settings. By understanding these settings, you can ensure your computer works best for you, managing both energy consumption and personal preferences.
1. Why Turn Off Your Screen Saver in Windows 11?
There are several compelling reasons to turn off the screen saver in Windows 11. Here’s a breakdown:
- Energy Savings: Screen savers, despite their name, don’t actually save much energy on modern LCD or LED screens. In fact, they can consume more power than simply letting your monitor go to sleep. Disabling the screen saver and relying on your monitor’s power-saving mode can significantly reduce energy consumption over time.
- Convenience: If you frequently use your computer, a screen saver can become an unnecessary interruption. Turning it off allows you to resume your work instantly without having to dismiss the screen saver each time.
- Modern Display Technology: Screen savers were initially designed to prevent “burn-in” on older CRT monitors. Modern LCD and LED screens are not susceptible to this issue, making screen savers largely obsolete.
- Aesthetic Preference: Some users simply find screen savers distracting or prefer a clean, uncluttered desktop. Disabling the screen saver allows for a more streamlined and personalized computing experience.
- Faster Wake-Up Time: Disabling the screen saver can lead to a slightly faster wake-up time when you return to your computer, as it eliminates the need to load and display the screen saver first.
Turning off your screen saver not only enhances convenience but also contributes to energy efficiency and a more streamlined user experience.
2. Understanding Screen Saver Settings in Windows 11
Before diving into how to disable your screen saver, it’s helpful to understand the available settings in Windows 11. These settings control when and how your screen saver activates, and knowing them can help you customize your computer’s behavior to suit your preferences.
- Screen Saver: This dropdown menu allows you to select a screen saver from the available options, including “Blank,” “3D Text,” “Bubbles,” “Mystify,” and “Ribbons.” Choosing “(None)” will disable the screen saver.
- Settings: This button opens a configuration window specific to the selected screen saver. The options available here vary depending on the screen saver. For example, the “3D Text” screen saver allows you to customize the text, font, size, and rotation speed.
- Preview: Clicking this button displays a full-screen preview of the selected screen saver. This is useful for seeing how the screen saver will look before you apply the settings.
- Wait: This setting determines how long your computer must be idle before the screen saver activates. You can specify the time in minutes.
- On resume, display logon screen: When checked, this option requires you to enter your password to unlock your computer after the screen saver has been active. This adds an extra layer of security.
Understanding these settings helps you tailor your screen saver preferences, whether you decide to disable it for convenience or customize it for aesthetic reasons.
3. Step-by-Step Guide: Turning Off Screen Saver Windows 11
Here’s how to turn off the screen saver in Windows 11. It’s a simple process that can be completed in just a few steps:
- Open Settings: The first step is to open the Settings app. You can do this by pressing the Windows key + I on your keyboard. Alternatively, you can click on the Start button, then click on the Settings icon (which looks like a gear).
 Open Settings in Windows 11 by pressing the Windows key and I.
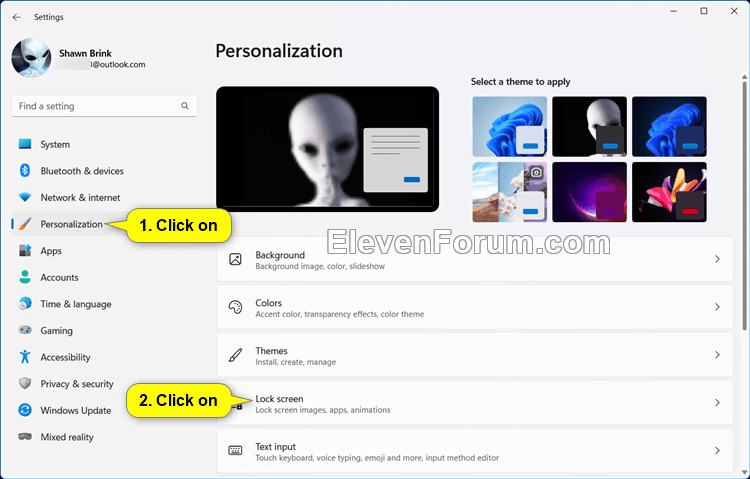
- Navigate to Personalization: In the Settings app, click on “Personalization” in the left sidebar. This section allows you to customize various aspects of your Windows 11 experience, including the background, colors, lock screen, and themes.
- Select Lock Screen: Within the Personalization settings, click on “Lock screen.” This section is where you’ll find the screen saver settings.
 Select Lock Screen in Windows 11 Personalization settings.
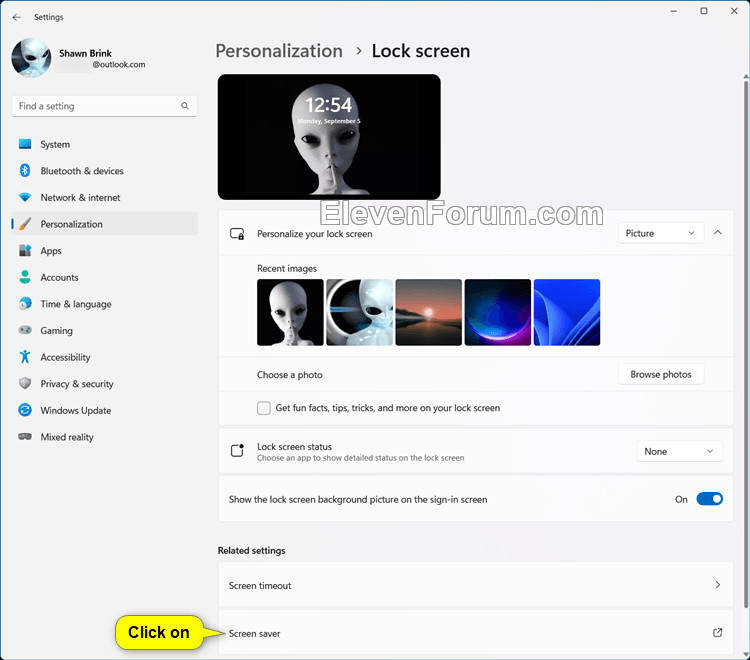
- Access Screen Saver Settings: Scroll down to the “Related settings” section and click on “Screen saver.” This will open the Screen Saver Settings dialog box.
- Disable Screen Saver: In the Screen Saver Settings dialog box, click on the dropdown menu under “Screen saver” and select “(None).” This will disable the screen saver.
- Apply Changes: Click on the “Apply” button to save your changes, then click “OK” to close the dialog box.
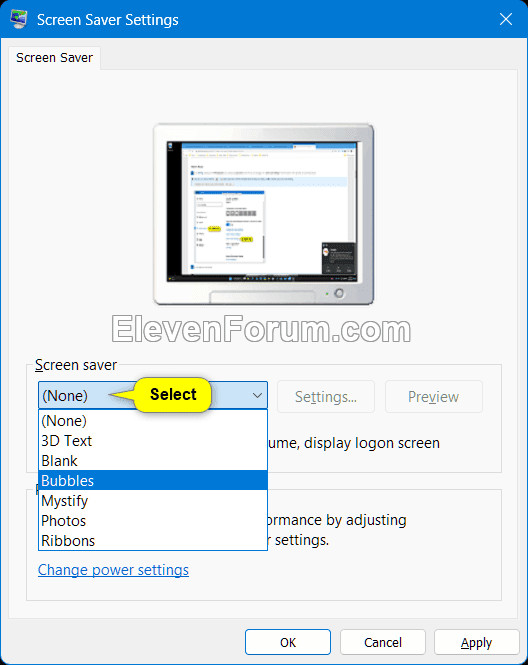 Disable Screen Saver by selecting None.
By following these steps, you’ll successfully disable the screen saver on your Windows 11 computer, ensuring it doesn’t interrupt your work or waste energy unnecessarily.
4. Alternative Methods to Turn Off Screen Saver
In addition to using the Settings app, there are alternative methods to turn off the screen saver in Windows 11. These methods can be useful if you prefer using commands or if you’re troubleshooting issues with the standard method.
4.1. Using the Run Command
The Run command provides a quick way to access specific settings or programs. Here’s how to use it to turn off the screen saver:
-
Open the Run Dialog Box: Press the Windows key + R on your keyboard. This will open the Run dialog box.
-
Enter the Command: Type the following command into the Run dialog box and press Enter:
rundll32 shell32.dll,Control_RunDLL desk.cpl,,1 -
Disable Screen Saver: The Screen Saver Settings dialog box will open. Follow steps 5 and 6 from the previous section to disable the screen saver by selecting “(None)” and applying the changes.
4.2. Using the Registry Editor
The Registry Editor allows you to directly modify Windows settings. Be cautious when using the Registry Editor, as incorrect changes can cause system instability. It’s recommended to back up your registry before making any changes.
-
Open Registry Editor: Press the Windows key, type “regedit,” and press Enter. Click “Yes” if prompted by User Account Control.
-
Navigate to the Correct Key: In the Registry Editor, navigate to the following key:
HKEY_CURRENT_USERControl PanelDesktop -
Modify the SCRNSAVE.EXE Value: In the right pane, look for the “SCRNSAVE.EXE” value. If it exists, right-click on it and select “Delete.” If it doesn’t exist, the screen saver is already disabled.
-
Modify the ScreenSaverIsSecure Value: Look for the “ScreenSaverIsSecure” value. Double-click on it and set the value data to “0” to disable the password requirement on resume.
-
Close Registry Editor: Close the Registry Editor. You may need to restart your computer for the changes to take effect.
4.3. Using Command Prompt
The Command Prompt is a powerful tool for executing commands and making system changes. Here’s how to use it to disable the screen saver:
-
Open Command Prompt: Press the Windows key, type “cmd,” and press Enter.
-
Execute the Command: Type the following command and press Enter:
REG DELETE "HKEY_CURRENT_USERControl PanelDesktop" /v SCRNSAVE.EXE /f -
Disable Password on Resume (Optional): If you also want to disable the password requirement on resume, type the following command and press Enter:
REG ADD "HKEY_CURRENT_USERControl PanelDesktop" /v ScreenSaverIsSecure /t REG_SZ /d 0 /f -
Close Command Prompt: Close the Command Prompt. You may need to restart your computer for the changes to take effect.
These alternative methods provide flexibility in disabling the screen saver, catering to different user preferences and technical scenarios.
5. The Impact of Turning Off Screen Saver on Energy Consumption
Turning off your screen saver can have a notable impact on energy consumption, especially when combined with other power-saving settings. Here’s how:
- Modern Displays and Screen Savers: Older CRT monitors were susceptible to “burn-in,” where static images could permanently damage the screen. Screen savers were designed to prevent this by constantly changing the image displayed. However, modern LCD and LED monitors are not susceptible to burn-in, making screen savers unnecessary for this purpose.
- Energy Consumption of Screen Savers: Many screen savers, especially those with complex animations or graphics, can consume a significant amount of power. In some cases, they may use nearly as much power as when the computer is actively being used.
- Monitor Power-Saving Modes: Modern monitors have built-in power-saving modes that automatically turn off the display after a period of inactivity. These modes consume significantly less power than screen savers.
- Combining Settings for Maximum Savings: For the greatest energy savings, disable the screen saver and rely on your monitor’s power-saving mode. You can configure the power-saving mode in the Power Options settings in Windows 11.
5.1. How to Configure Power Options
To configure power options for maximum energy savings, follow these steps:
- Open Settings: Press the Windows key + I to open the Settings app.
- Navigate to System: Click on “System.”
- Select Power & Battery: Click on “Power & Battery” in the left sidebar.
- Adjust Screen and Sleep Settings: Use the dropdown menus to set how long your computer should wait before turning off the screen and going to sleep. Shorter times will result in greater energy savings.
- Consider Battery Saver Mode: If you’re using a laptop, consider enabling Battery Saver mode when you’re not plugged in. This mode reduces the computer’s performance and screen brightness to conserve battery power.
By disabling the screen saver and properly configuring power options, you can significantly reduce your computer’s energy consumption and lower your electricity bill.
6. Customizing Your Lock Screen in Windows 11
While disabling the screen saver can improve convenience and energy efficiency, customizing your lock screen can enhance your user experience. Windows 11 offers several options for personalizing your lock screen.
6.1. Changing the Background Image
You can change the background image of your lock screen to a picture of your choice, a slideshow of images, or Windows Spotlight, which displays a rotating selection of beautiful images from around the world.
- Open Settings: Press the Windows key + I to open the Settings app.
- Navigate to Personalization: Click on “Personalization” in the left sidebar.
- Select Lock Screen: Click on “Lock screen.”
- Choose a Background: Use the dropdown menu under “Personalize your lock screen” to select “Picture,” “Slideshow,” or “Windows spotlight.”
- Picture: Allows you to choose a single image to display as your lock screen background.
- Slideshow: Displays a slideshow of images from a folder of your choice.
- Windows spotlight: Displays a rotating selection of images from Microsoft’s collection.
6.2. Adding Apps to the Lock Screen
You can choose which apps display status information on the lock screen. This allows you to quickly see important information without unlocking your computer.
- Open Settings: Press the Windows key + I to open the Settings app.
- Navigate to Personalization: Click on “Personalization” in the left sidebar.
- Select Lock Screen: Click on “Lock screen.”
- Choose Apps to Display Status: Scroll down to “Lock screen status” and choose which apps to display detailed or quick status information.
6.3. Screen Timeout Settings
Configure the screen timeout settings to balance energy saving and convenience, extending display life and reducing energy costs effectively.
- Access Power Options: Navigate through Settings > System > Power & Battery.
- Adjust Screen Timeout: Here, you can specify how long your device waits before turning off the screen when idle. Choose times that save power without disrupting your workflow.
These customization options allow you to create a lock screen that is both visually appealing and informative, enhancing your overall Windows 11 experience.
7. Common Issues and Troubleshooting
While turning off the screen saver is usually straightforward, you may encounter some issues. Here are common problems and how to troubleshoot them:
- Screen Saver Still Activates: If the screen saver continues to activate even after you’ve disabled it, ensure that you’ve selected “(None)” in the Screen Saver Settings dialog box and applied the changes. Also, check for any third-party software that may be controlling the screen saver.
- Settings Not Saving: If your changes are not being saved, try restarting your computer. Sometimes, temporary files or processes can interfere with settings being saved correctly.
- Password Required After Inactivity: If you don’t want to be prompted for your password after the screen has been off, make sure the “On resume, display logon screen” option is unchecked in the Screen Saver Settings dialog box.
- Screen Saver Settings Greyed Out: If the screen saver settings are greyed out, it may be due to group policy settings configured by your organization. Contact your IT administrator for assistance.
- Incorrect Registry Settings: If you’ve made changes to the registry and are experiencing issues, double-check that you’ve entered the correct values and that you’re modifying the correct keys. If necessary, restore your registry from a backup.
By addressing these common issues, you can ensure a smooth and trouble-free experience when turning off your screen saver in Windows 11.
8. Screen Savers and Security: What You Need to Know
Screen savers can play a role in computer security, primarily through the “On resume, display logon screen” option. Here’s what you need to know:
- Password Protection: When the “On resume, display logon screen” option is enabled, your computer will require a password to unlock it after the screen saver has been active. This prevents unauthorized access to your computer when you’re away.
- Balancing Security and Convenience: While requiring a password adds an extra layer of security, it can also be inconvenient if you frequently step away from your computer. Consider your personal security needs and usage patterns when deciding whether to enable this option.
- Alternative Security Measures: In addition to screen savers, consider using other security measures, such as strong passwords, multi-factor authentication, and regular software updates.
- Physical Security: Remember that physical security is also important. Be mindful of your surroundings and avoid leaving your computer unattended in public places.
By understanding the security implications of screen savers, you can make informed decisions about how to configure your computer for optimal security and convenience.
9. Advanced Tips for Managing Your Display in Windows 11
Beyond turning off the screen saver, there are several advanced tips for managing your display in Windows 11 to optimize your user experience and save energy.
9.1. Adjusting Display Resolution
Setting the correct display resolution is crucial for ensuring that images and text appear sharp and clear.
- Open Settings: Press the Windows key + I to open the Settings app.
- Navigate to System: Click on “System.”
- Select Display: Click on “Display.”
- Adjust Display Resolution: Use the dropdown menu under “Display resolution” to select the recommended resolution for your monitor.
9.2. Adjusting Display Scaling
Display scaling allows you to adjust the size of text, apps, and other items on your screen. This can be helpful if you have a high-resolution display and find that items are too small to read comfortably.
- Open Settings: Press the Windows key + I to open the Settings app.
- Navigate to System: Click on “System.”
- Select Display: Click on “Display.”
- Adjust Scale: Use the dropdown menu under “Scale” to select a scaling percentage that works best for you.
9.3. Using Night Light
Night light reduces the amount of blue light emitted by your display, which can help reduce eye strain and improve sleep quality.
- Open Settings: Press the Windows key + I to open the Settings app.
- Navigate to System: Click on “System.”
- Select Display: Click on “Display.”
- Turn On Night Light: Toggle the “Night light” switch to turn it on. You can also click on “Night light settings” to customize the color temperature and schedule.
9.4. Multiple Displays
Windows 11 supports multiple displays, allowing you to extend your desktop across multiple monitors for increased productivity.
- Connect Your Displays: Connect your additional monitors to your computer.
- Open Settings: Press the Windows key + I to open the Settings app.
- Navigate to System: Click on “System.”
- Select Display: Click on “Display.”
- Configure Multiple Displays: Use the dropdown menu under “Multiple displays” to choose how to arrange your displays (e.g., “Extend,” “Duplicate,” “Show only on 1,” “Show only on 2”).
By using these advanced tips, you can optimize your display settings for improved productivity, comfort, and energy efficiency.
10. Why Savewhere.net is Your Go-To Resource for Tech Tips
When it comes to managing your technology and saving money, savewhere.net is your ultimate resource. Here’s why you should make us your go-to source for tech tips and financial advice:
- Comprehensive Guides: We offer detailed, step-by-step guides on a wide range of tech topics, including Windows 11 customization, energy-saving tips, and more.
- Expert Advice: Our team of experts provides practical advice and insights to help you make the most of your technology while saving money.
- Up-to-Date Information: We stay on top of the latest trends and updates in the tech world, ensuring that our information is always accurate and relevant.
- User-Friendly Interface: Our website is designed to be easy to navigate, so you can quickly find the information you need.
- Community Support: Join our community of tech enthusiasts and financial savvy individuals to share tips, ask questions, and get support.
- Practical Financial Tips: From daily deals to long-term savings strategies, discover multiple ways to cut costs and boost savings.
- Personalized Recommendations: Tailored advice based on your needs and financial goals makes saving money more achievable and effective.
- Resource Variety: Access to articles, videos, and tools ensures you have all the resources necessary to make informed decisions.
- Constant Updates: Regular updates keep you informed on the latest ways to save money, improving your financial planning.
At savewhere.net, our contact information is readily available to help you with any tech questions or concerns you may have. You can reach us at our address: 100 Peachtree St NW, Atlanta, GA 30303, United States, or call us at +1 (404) 656-2000. For more information, visit our website at savewhere.net.
Address: 100 Peachtree St NW, Atlanta, GA 30303, United States
Phone: +1 (404) 656-2000
Website: savewhere.net
FAQ: Turning Off Screen Saver Windows 11
Here are some frequently asked questions about turning off the screen saver in Windows 11:
1. Does turning off the screen saver save energy?
Yes, turning off the screen saver can save energy, especially when combined with your monitor’s power-saving mode. Modern LCD and LED screens don’t require screen savers to prevent burn-in, so disabling them and relying on power-saving modes can reduce energy consumption.
2. How do I access the screen saver settings in Windows 11?
You can access the screen saver settings by opening the Settings app, navigating to Personalization > Lock screen, and clicking on “Screen saver” under Related settings.
3. What happens if I select “(None)” in the screen saver settings?
Selecting “(None)” in the screen saver settings disables the screen saver. Your screen will simply turn off after the specified period of inactivity, as configured in your power settings.
4. How do I prevent my computer from requiring a password after the screen has been off?
To prevent your computer from requiring a password after the screen has been off, uncheck the “On resume, display logon screen” option in the Screen Saver Settings dialog box.
5. Can I still use a screen saver for security purposes?
Yes, you can use a screen saver for security purposes by enabling the “On resume, display logon screen” option. This will require a password to unlock your computer after the screen saver has been active, preventing unauthorized access.
6. What are the best power settings for saving energy in Windows 11?
The best power settings for saving energy in Windows 11 include disabling the screen saver, setting short screen timeout and sleep times, and enabling Battery Saver mode (if you’re using a laptop).
7. How do I customize my lock screen in Windows 11?
You can customize your lock screen by opening the Settings app, navigating to Personalization > Lock screen, and choosing a background image, slideshow, or Windows Spotlight. You can also choose which apps display status information on the lock screen.
8. Is it safe to make changes to the registry?
Making changes to the registry can be risky if not done carefully. It’s recommended to back up your registry before making any changes, and to only modify settings that you understand.
9. What should I do if the screen saver settings are greyed out?
If the screen saver settings are greyed out, it may be due to group policy settings configured by your organization. Contact your IT administrator for assistance.
10. Where can I find more tech tips and financial advice?
You can find more tech tips and financial advice at savewhere.net. Visit our website for comprehensive guides, expert advice, and a user-friendly interface.
Turning off your screen saver in Windows 11 is a simple yet effective way to save energy, customize your user experience, and streamline your workflow. By following the steps outlined in this guide, you can easily disable your screen saver and optimize your display settings for maximum convenience and efficiency. Remember to visit savewhere.net for more tech tips and financial advice to help you make the most of your technology and your money.