
Are you unsure Where Are Screen Captures Saved on your device and seeking simple ways to manage them to save money? This guide from savewhere.net provides expert tips on finding, customizing, and optimizing your screenshot storage. Discover practical advice tailored for budget-conscious individuals, students, families, and anyone aiming for financial goals in the USA, particularly in high-cost areas like Atlanta.
1. Understanding Screen Capture Basics
1.1. What is a Screen Capture?
A screen capture, often called a screenshot or screen grab, is a digital image of what’s displayed on your computer, tablet, or smartphone screen. It’s a quick and easy way to preserve information, share visuals, or document important details. Screen captures are essential tools for many tasks, like creating tutorials, reporting bugs, or simply saving a memorable image.
1.2. Why are Screen Captures Useful?
Screen captures are beneficial for many reasons:
- Documentation: Capture receipts, bills, or important information for record-keeping.
- Sharing: Easily share what’s on your screen with friends, family, or colleagues.
- Troubleshooting: Capture error messages or issues to get help from tech support.
- Saving Memories: Preserve online content, like social media posts or articles, for future reference.
- Creating Tutorials: Illustrate steps in a guide or tutorial with visual aids.
1.3. Common Uses of Screen Captures for Saving Money
Screen captures can be especially handy for saving money:
- Tracking Deals: Capture online deals and discounts before they expire.
- Comparing Prices: Save screenshots of prices at different stores to ensure you’re getting the best deal.
- Documenting Rebates: Keep records of rebate offers and submissions.
- Proof of Purchase: Use screenshots as proof of purchase for warranties or returns.
- Budgeting: Capture screenshots of your online banking or budgeting apps to monitor spending.
2. Default Save Locations for Screen Captures on Different Devices
2.1. Windows
2.1.1. Default Location
On Windows, screen captures taken using the Print Screen key are copied to the clipboard. To save them, you need to paste them into an image editing program like Paint, and then save the file. However, if you use the Windows key + Print Screen shortcut, the screenshot is automatically saved as a PNG file in the “Screenshots” folder inside your “Pictures” folder.
2.1.2. Finding the Screenshots Folder
To find your Screenshots folder:
- Open File Explorer.
- Click on “Pictures” in the left-hand pane.
- Look for the “Screenshots” folder.
2.1.3. Changing the Default Save Location (Registry Edit)
While Windows doesn’t offer a straightforward option to change the default save location, you can modify the registry:
Caution: Modifying the registry can be risky if not done correctly. Back up your registry before proceeding.
- Press Windows key + R, type
regedit, and press Enter. - Navigate to
HKEY_CURRENT_USERSoftwareMicrosoftWindowsCurrentVersionExplorerUser Shell Folders. - Find the
{B7BEDE81-D94E-468B-AE70-426E6AB694DD}key, which represents the Screenshots folder. - Double-click it and enter the new path you want to use.
- Restart your computer for the changes to take effect.
2.1.4. Using Third-Party Screenshot Tools for Customization
For easier customization, consider using third-party screenshot tools like:
- Greenshot: A free and open-source tool that allows you to select the save location, file format, and more.
- Snagit: A powerful paid tool with advanced editing and organizational features.
- ShareX: Another free and open-source option with extensive customization and sharing options.
These tools provide more flexibility and control over your screen capture settings, making it easier to manage and save your images efficiently.
 Greenshot settings for saving screenshots
2.2. macOS
2.2.1. Default Location
By default, macOS saves screenshots to your desktop. The files are named “Screen Shot [year-month-day at hour.minute.second]” and saved as PNG files.
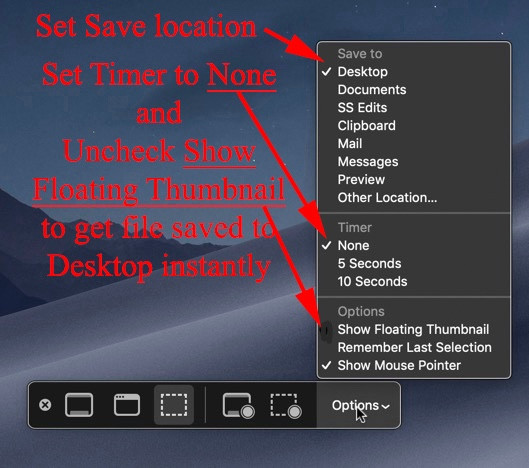
2.2.2. Changing the Default Save Location (Using Screenshot App)
You can easily change the default save location using the Screenshot app:
- Press Command + Shift + 5 to open the Screenshot app.
- Click on “Options” in the toolbar at the bottom.
- Choose a new save location from the list, such as “Documents” or “Mail,” or click “Other Location” to select a custom folder.
2.2.3. Using Terminal Command to Change Default Save Location
For a more advanced approach, you can use the Terminal:
-
Open Terminal (Applications > Utilities > Terminal).
-
Type the following command, replacing
/path/to/your/folderwith the actual path to the folder you want to use:defaults write com.apple.screencapture location /path/to/your/folder -
Then, type
killall SystemUIServerto restart the SystemUIServer and apply the changes.
2.2.4. Organizing Screenshots on macOS with Stacks
macOS offers a handy feature called Stacks, which automatically groups files on your desktop. To use Stacks for your screenshots:
- Right-click on your desktop.
- Select “Use Stacks.”
- Choose “Group Stacks By” and select “Date Added” or “Kind” to organize your screenshots neatly.
2.2.5. Cloud Integration for Saving Screenshots
Consider using cloud services like Dropbox or Google Drive to automatically save and sync your screenshots:
- Dropbox: In Dropbox preferences, you can enable the option to save screenshots directly to your Dropbox account. This makes them accessible from any device and provides an automatic backup.
- Google Drive: Use the Google Drive desktop app to sync a specific folder on your computer (like your Screenshots folder) to Google Drive.
Cloud integration ensures your screenshots are safe, accessible, and easy to share.
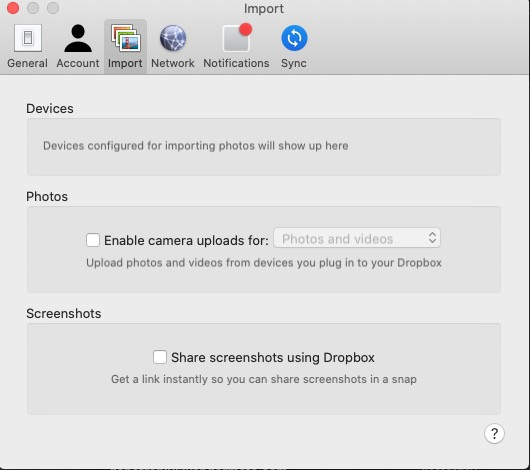 Dropbox preferences for saving screenshots
2.3. iOS (iPhone and iPad)
2.3.1. Default Location
On iOS devices, screenshots are automatically saved to the Photos app in the “Screenshots” album.
2.3.2. Accessing Screenshots
To access your screenshots:
- Open the Photos app.
- Tap on “Albums” at the bottom.
- Scroll down to the “Screenshots” album.
2.3.3. Organizing Screenshots with Smart Albums
The Photos app automatically creates a “Screenshots” album, making it easy to find your captures. You can also create custom albums to further organize your screenshots:
- In the Photos app, tap “Albums.”
- Tap the “+” button to create a new album.
- Give your album a name (e.g., “Receipts,” “Deals”).
- Select the screenshots you want to add to the album.
2.3.4. Using iCloud Photos for Backup and Sync
iCloud Photos automatically backs up and syncs your photos and screenshots across all your Apple devices. To enable iCloud Photos:
- Open the Settings app.
- Tap on your name at the top.
- Tap on “iCloud.”
- Tap on “Photos.”
- Toggle “iCloud Photos” to on.
2.3.5. Sharing Screenshots Directly from iOS
iOS makes it easy to share screenshots directly from the Photos app:
- Open the screenshot you want to share.
- Tap the share icon (a square with an arrow pointing up).
- Choose how you want to share the screenshot (e.g., Messages, Mail, social media).
2.4. Android
2.4.1. Default Location
On most Android devices, screenshots are saved to the “Screenshots” folder in your device’s internal storage.
2.4.2. Accessing Screenshots
To access your screenshots:
- Open the Photos app (or Gallery app on some devices).
- Look for the “Screenshots” folder in the album list.
2.4.3. Using Google Photos for Backup and Sync
Google Photos automatically backs up your photos and screenshots to the cloud. To enable Google Photos backup:
- Open the Google Photos app.
- Tap on your profile picture at the top right.
- Tap “Photos settings.”
- Tap “Backup & sync.”
- Toggle “Backup & sync” to on.
2.4.4. Organizing Screenshots with Folders
You can create folders within the Photos app to organize your screenshots:
- Open the Google Photos app.
- Tap “Library” at the bottom.
- Tap “New folder.”
- Give your folder a name (e.g., “Coupons,” “Bills”).
- Select the screenshots you want to add to the folder.
2.4.5. Customizing Screenshot Save Locations on Android
Some Android devices allow you to customize the screenshot save location in the settings. Here’s how:
- Open the Settings app.
- Search for “Screenshot settings” or “Advanced features.”
- Look for an option to change the default save location.
3. Customizing Screenshot Save Locations
3.1. Benefits of Customizing Save Locations
Customizing where your screenshots are saved offers several advantages:
- Organization: Keep your screenshots separate from other files for easier management.
- Backup: Save screenshots to a cloud-synced folder for automatic backup.
- Accessibility: Choose a location that’s easy to access and remember.
- Workflow: Streamline your workflow by saving screenshots directly to project-specific folders.
3.2. Step-by-Step Guides for Different Operating Systems
See the detailed instructions above for changing screenshot save locations on Windows, macOS, iOS, and Android.
3.3. Using Third-Party Apps for Enhanced Control
Third-party apps like Greenshot, Snagit, and ShareX offer advanced control over screenshot settings, including custom save locations, file formats, and naming conventions.
3.4. Cloud Storage Integration
Integrating cloud storage services like Dropbox and Google Drive can provide automatic backup and easy access to your screenshots from any device.
4. Organizing and Managing Screen Captures
4.1. Importance of Organizing Screenshots
Organizing your screenshots is crucial for maintaining efficiency and avoiding clutter. A well-organized screenshot library makes it easier to find and use your captures when you need them.
4.2. Creating a Folder Structure
Establish a clear folder structure based on your needs. Here are some examples:
- By Project: Create folders for each project you’re working on.
- By Date: Organize screenshots by year, month, or day.
- By Category: Use categories like “Receipts,” “Deals,” “Tutorials,” and “Personal.”
4.3. Naming Conventions for Easy Retrieval
Use descriptive and consistent naming conventions for your screenshots. For example:
Receipt_Walmart_2024-07-26.pngDeal_Amazon_Laptop_2024-07-27.pngTutorial_Step1_2024-07-28.png
Include keywords, dates, and specific details to make it easier to search for your screenshots later.
4.4. Tagging and Metadata
Consider using tagging and metadata to add extra information to your screenshots. This can be done using image editing software or file management tools.
4.5. Deleting Unnecessary Screenshots
Regularly review your screenshot library and delete any unnecessary or outdated captures. This will help you save storage space and keep your library organized.
5. Optimizing Screen Captures for Storage and Sharing
5.1. Understanding File Formats (JPEG, PNG, GIF)
- JPEG: Best for photographs and images with many colors. JPEG files are compressed, which reduces file size but can also result in some loss of quality.
- PNG: Best for screenshots, graphics, and images with text. PNG files are lossless, meaning they retain all the original data and quality.
- GIF: Best for simple animations and images with few colors. GIF files are also lossless but have a limited color palette.
5.2. Choosing the Right File Format for Different Purposes
- Screenshots of Text or Graphics: Use PNG to maintain clarity and avoid compression artifacts.
- Photographs: Use JPEG to reduce file size while maintaining acceptable quality.
- Simple Animations: Use GIF for short, looping animations.
5.3. Compressing Screen Captures for Smaller File Sizes
To reduce the file size of your screenshots without sacrificing too much quality, you can use image compression tools like:
- TinyPNG: A free online tool that compresses PNG and JPEG images.
- ImageOptim: A free macOS app that optimizes images for web use.
- Compressor.io: Another free online tool for compressing various image formats.
5.4. Resizing Screen Captures for Sharing
Resizing your screenshots can make them easier to share and view on different devices. Use image editing software to reduce the dimensions of your screenshots before sharing them.
5.5. Using Cloud Storage for Efficient Sharing
Cloud storage services like Dropbox, Google Drive, and iCloud make it easy to share your screenshots with others. Simply upload your screenshots to the cloud and share a link with your recipients.
6. Troubleshooting Common Issues
6.1. Screenshots Not Saving
If your screenshots are not saving, try the following:
- Check Save Location: Make sure the save location is correctly configured in your screenshot settings.
- Check Storage Space: Ensure you have enough free storage space on your device.
- Restart Device: Restart your computer or mobile device to resolve any temporary issues.
- Update Software: Make sure your operating system and screenshot tools are up to date.
6.2. Screenshots Saving in the Wrong Location
If your screenshots are saving in the wrong location, follow the steps outlined above to change the default save location.
6.3. Screenshots Not Appearing on Desktop (macOS)
If your screenshots are not appearing on the desktop in macOS, try the following:
- Restart Finder: Press Option + Right Click on the Finder icon in the Dock and select “Relaunch.”
- Check Hidden Files: Press Command + Shift + . (period) to show hidden files on your desktop.
- Reset PRAM: Restart your Mac and hold down Command + Option + P + R until you hear the startup chime a second time.
- Check Dropbox Settings: Make sure Dropbox is not intercepting your screenshots.
6.4. Screenshots Blurry or Low Quality
If your screenshots are blurry or low quality, make sure you are using the PNG file format for screenshots of text or graphics. Also, avoid compressing your screenshots too much, as this can reduce their quality.
6.5. Screenshots Not Working After Update
If your screenshots stop working after an update, try the following:
- Restart Device: Restart your computer or mobile device.
- Update Drivers: Update your graphics card drivers.
- Reinstall Screenshot Tools: Reinstall any third-party screenshot tools you are using.
- Check Permissions: Ensure the screenshot app has the necessary permissions to save files.
7. Advanced Tips and Tricks
7.1. Using Keyboard Shortcuts for Quick Captures
Mastering keyboard shortcuts can significantly speed up your screenshot workflow:
- Windows:
- Print Screen: Captures the entire screen to the clipboard.
- Windows key + Print Screen: Saves a screenshot of the entire screen to the Screenshots folder.
- Alt + Print Screen: Captures the active window to the clipboard.
- Windows key + Shift + S: Opens the Snip & Sketch tool for capturing a specific area.
- macOS:
- Command + Shift + 3: Captures the entire screen and saves it to the desktop.
- Command + Shift + 4: Allows you to select an area to capture and save to the desktop.
- Command + Shift + 4 + Spacebar: Captures a specific window and saves it to the desktop.
- Command + Shift + 5: Opens the Screenshot app with options for capturing video or still images.
- iOS:
- Press the Side Button and Volume Up Button simultaneously: Captures the entire screen and saves it to the Photos app.
- Android:
- Press the Power Button and Volume Down Button simultaneously: Captures the entire screen and saves it to the Screenshots folder.
7.2. Capturing Scrolling Screenshots
Scrolling screenshots allow you to capture an entire webpage or document, even if it extends beyond the visible area of your screen. Here are some tools and methods for capturing scrolling screenshots:
- Windows:
- ShareX: A free and open-source tool that supports scrolling screenshots.
- PicPick: A free tool with a scrolling capture feature.
- macOS:
- CleanShot X: A paid tool with advanced scrolling capture capabilities.
- GoFullPage – Full Page Screen Capture (Chrome Extension): A Chrome extension that captures entire webpages.
- iOS:
- Some apps, like Safari, offer built-in scrolling screenshot functionality. After taking a screenshot, tap the thumbnail that appears in the corner of the screen, then select “Full Page.”
- Android:
- Some Android devices offer a built-in scrolling screenshot feature. After taking a screenshot, look for an option to “Scroll capture” or “Extended screenshot.”
7.3. Using Screenshot Tools for Annotations and Editing
Screenshot tools often include features for annotating and editing your captures:
- Greenshot: Allows you to add arrows, text, highlights, and obfuscation to your screenshots.
- Snagit: Offers a wide range of editing tools, including cropping, resizing, adding annotations, and more.
- ShareX: Includes basic editing features like cropping, resizing, and adding annotations.
- Snip & Sketch (Windows): A built-in tool for annotating screenshots with pens, pencils, and highlighters.
- Markup (macOS): A built-in tool for annotating screenshots with shapes, text, and signatures.
7.4. Automating Screenshot Workflow with Scripts and Macros
For advanced users, automating your screenshot workflow with scripts and macros can save time and effort. Here are some ideas:
- Create a script to automatically rename and move screenshots to a specific folder.
- Use a macro to trigger a screenshot, annotate it, and upload it to a cloud storage service with a single keystroke.
- Write a script to automatically compress and resize screenshots for web use.
7.5. OCR (Optical Character Recognition) for Extracting Text from Screenshots
OCR (Optical Character Recognition) technology allows you to extract text from images, including screenshots. This can be useful for copying text from images, converting scanned documents to editable text, and more. Here are some tools that offer OCR functionality:
- Google Drive: Upload a screenshot to Google Drive, right-click on the file, select “Open with Google Docs,” and Google Docs will attempt to extract the text from the image.
- Microsoft OneNote: Insert a screenshot into OneNote, right-click on the image, and select “Copy Text from Picture.”
- Adobe Acrobat: Use the OCR feature in Adobe Acrobat to extract text from PDF files and images.
- Online OCR Tools: There are many free online OCR tools available, such as OnlineOCR.net and NewOCR.com.
8. Real-Life Examples of Using Screen Captures to Save Money
8.1. Tracking Price Changes
- Scenario: Sarah wants to buy a new laptop. She takes screenshots of the laptop’s price at different online retailers and tracks the prices over time.
- How Screen Captures Help: By comparing the screenshots, Sarah can identify the best time to buy the laptop when the price drops to its lowest point.
8.2. Documenting Online Deals and Coupons
- Scenario: John finds an online coupon for 20% off at his favorite clothing store.
- How Screen Captures Help: John takes a screenshot of the coupon code and the terms and conditions. This ensures he has proof of the offer in case the coupon doesn’t work at checkout.
8.3. Keeping Records of Rebates and Promotions
- Scenario: Emily buys a new printer that comes with a mail-in rebate.
- How Screen Captures Help: Emily takes screenshots of the rebate form, the product packaging, and the proof of purchase. This helps her keep track of all the necessary documents and ensures she receives the rebate.
8.4. Comparing Product Features and Specifications
- Scenario: David is deciding between two different models of a smartphone.
- How Screen Captures Help: David takes screenshots of the product specifications and feature lists for both phones. This allows him to easily compare the features side-by-side and make an informed decision.
8.5. Saving Recipes and DIY Instructions
- Scenario: Lisa finds a delicious recipe online but wants to save it for later.
- How Screen Captures Help: Lisa takes a screenshot of the recipe and saves it to her “Recipes” folder. This allows her to quickly access the recipe without having to search for it online every time.
9. Savewhere.net: Your Partner in Smart Saving
At savewhere.net, we understand the importance of managing your finances effectively. Our website is dedicated to providing you with the latest tips, tricks, and resources to help you save money in all aspects of your life. Whether you’re looking for ways to cut costs on groceries, find the best deals on travel, or manage your budget more efficiently, savewhere.net has you covered.
9.1. Explore Our Resources
Visit savewhere.net to explore our extensive collection of articles, guides, and tools designed to help you save money:
- Budgeting Tips: Learn how to create a budget that works for you and track your spending effectively.
- Deals and Discounts: Discover the latest deals and discounts from top retailers and brands.
- Saving Strategies: Find practical tips and strategies for saving money on everyday expenses.
- Financial Tools: Access our free financial calculators and tools to help you manage your money.
9.2. Join Our Community
Connect with other savvy savers in our online community. Share your tips, ask questions, and get inspired to reach your financial goals.
9.3. Contact Us
Have questions or need help with your saving strategies? Contact us at:
- Address: 100 Peachtree St NW, Atlanta, GA 30303, United States
- Phone: +1 (404) 656-2000
- Website: savewhere.net
10. Frequently Asked Questions (FAQ)
10.1. Where do screenshots go by default on Windows?
Screenshots taken with the Windows key + Print Screen shortcut are saved to the “Screenshots” folder inside your “Pictures” folder.
10.2. How do I change where my screenshots are saved on a Mac?
Press Command + Shift + 5 to open the Screenshot app, click on “Options,” and choose a new save location.
10.3. Where are screenshots saved on iPhone?
Screenshots on iPhone are saved to the Photos app in the “Screenshots” album.
10.4. How do I access screenshots on Android?
Open the Photos app (or Gallery app) and look for the “Screenshots” folder.
10.5. Can I customize the screenshot save location on Android?
Some Android devices allow you to customize the screenshot save location in the settings.
10.6. What is the best file format for screenshots?
PNG is the best file format for screenshots of text or graphics, as it preserves quality and avoids compression artifacts.
10.7. How can I compress screenshots to reduce file size?
Use online tools like TinyPNG or Compressor.io to compress your screenshots.
10.8. How do I take a scrolling screenshot?
Use third-party tools like ShareX (Windows), CleanShot X (macOS), or built-in features on some iOS and Android devices.
10.9. What is OCR and how can it help with screenshots?
OCR (Optical Character Recognition) allows you to extract text from images, including screenshots, using tools like Google Drive, Microsoft OneNote, or online OCR services.
10.10. How can savewhere.net help me save money?
Savewhere.net provides tips, tricks, and resources to help you save money on budgeting, deals, and everyday expenses.
Conclusion
Mastering screen captures is more than just knowing how to take them; it’s about managing, organizing, and optimizing them to enhance your productivity and financial savviness. By understanding where your screen captures are saved and how to customize these settings, you can streamline your workflow and ensure you’re always one step ahead.
Remember, whether you’re tracking price changes, documenting online deals, or saving important recipes, screen captures are a powerful tool in your arsenal. And with savewhere.net by your side, you’ll have all the resources and support you need to achieve your financial goals. Visit savewhere.net today to discover more ways to save money and take control of your financial future. Start exploring now and unlock the potential to save more, spend smarter, and live better in the USA, especially in bustling cities like Atlanta.