
Are you struggling to locate your recorded Zoom meetings? You’re not alone. As Zoom becomes an increasingly vital tool for both personal and professional communication, understanding its recording features is essential. One common point of confusion is figuring out Where Do Zoom Recordings Go. Whether you’re trying to revisit an important meeting, share information with colleagues, or simply review a session, knowing where to find your Zoom recordings is crucial.
This article will serve as your definitive guide, clearly explaining where Zoom saves your meeting recordings and providing step-by-step instructions on how to easily access them. We’ll break down the differences between Zoom’s cloud and local recording options, helping you understand which is best for your needs and how to manage your recordings effectively.
Understanding Zoom Recording Locations: Cloud vs. Local
Zoom offers two primary options for saving your recordings: cloud recordings and local recordings. Understanding the distinction between these two is the first step in successfully locating your files.
Zoom Cloud Recordings: Storage and Access
Cloud recordings are stored on Zoom’s servers. Think of it as saving your files to Google Drive or Dropbox, but directly within the Zoom ecosystem. When you choose to record to the cloud, Zoom processes and saves the meeting recording online immediately after the session concludes. For users in the United States, these recordings are typically stored in your account on Zoom.us.
Pros and Cons of Cloud Recordings
Choosing cloud recording offers several advantages:
Pros:
- Saves Local Storage Space: Cloud recording doesn’t consume storage space on your computer, which is particularly beneficial if you frequently record long meetings or have limited hard drive capacity.
- Easy Sharing: Sharing cloud recordings is incredibly simple. Zoom provides shareable links, making it easy to distribute recordings to participants or anyone who needs access.
- Accessibility from Anywhere: You can access your cloud recordings from any device with an internet connection by logging into your Zoom account.
However, there are also some drawbacks to consider:
Cons:
- Subscription Requirement: Cloud recording is typically a feature of paid Zoom subscriptions, such as Pro, Business, or Enterprise plans, often requiring a Cloud Recording add-on. Free Zoom accounts usually do not include cloud recording.
- Storage Limits: Cloud storage is often limited, depending on your subscription plan. You may need to manage your recordings and potentially delete older ones or upgrade to a higher-tier plan with more storage.
- Potential Privacy Concerns: While Zoom has security measures, storing recordings in the cloud might raise privacy concerns for some users or organizations, especially when dealing with sensitive information. Always ensure compliance with your organization’s data security policies.
You can also opt to save your Zoom meetings directly to your computer using local recordings.
Zoom Local Recordings: Stored on Your Computer
Local recordings are Zoom meeting recordings that are saved directly to your computer’s hard drive, typically within your documents folder. This is analogous to saving a document directly to your desktop rather than in a cloud service.
Pros and Cons of Local Recordings
Local recordings offer a different set of advantages and disadvantages:
Pros:
- No Cloud Storage Costs: Local recording is available on all Zoom plans, including the free basic plan. You avoid the extra costs associated with cloud storage subscriptions.
- Enhanced Privacy and Security: For organizations with strict security protocols or concerns about storing data in the cloud, local recording offers greater control over where recordings are stored and who has access.
- Unlimited Storage (Based on Hard Drive): You are only limited by the storage capacity of your computer’s hard drive.
However, local recordings also come with limitations:
Cons:
- Hard Drive Space Consumption: Video files, especially high-definition recordings, can consume significant hard drive space. This can slow down your computer, particularly if you record frequently.
- Difficult Sharing: Sharing large local recording files can be cumbersome. You might need to use file-sharing services or upload them to cloud platforms to share them effectively.
- Device Dependency: Local recordings are tied to the specific computer on which they were recorded. Accessing them from other devices requires transferring the files.
Understanding these pros and cons will help you decide whether cloud or local recording is the better option for your specific needs. Now, let’s dive into how to find your recordings, starting with cloud recordings.
How to Find Your Zoom Cloud Recordings
The simplest way to initially find your Zoom cloud recording is often right in your inbox.
Finding Cloud Recordings via Email Link
Immediately after a cloud recording finishes processing, Zoom automatically sends an email to the meeting host. This email contains a direct link to the recording. The email is sent to the address associated with your Zoom account. This is often the fastest way to access a recent recording.
However, if you need to access an older recording, or you can’t locate the email, there are other methods.
Accessing Cloud Recordings on Zoom Website
You can find a comprehensive list of all your cloud recordings directly on the Zoom website. Here’s how:
Step 1: Navigate to Zoom.us in your web browser and click “Sign In” to log in to your Zoom account.
Step 2: Once logged in, look for the vertical menu bar on the left side of the page. Click on “Recordings”.
Step 3: On the Recordings page, ensure you’ve selected “Cloud Recordings” at the top. This will display a list of all your cloud recordings, typically organized by date and meeting topic.
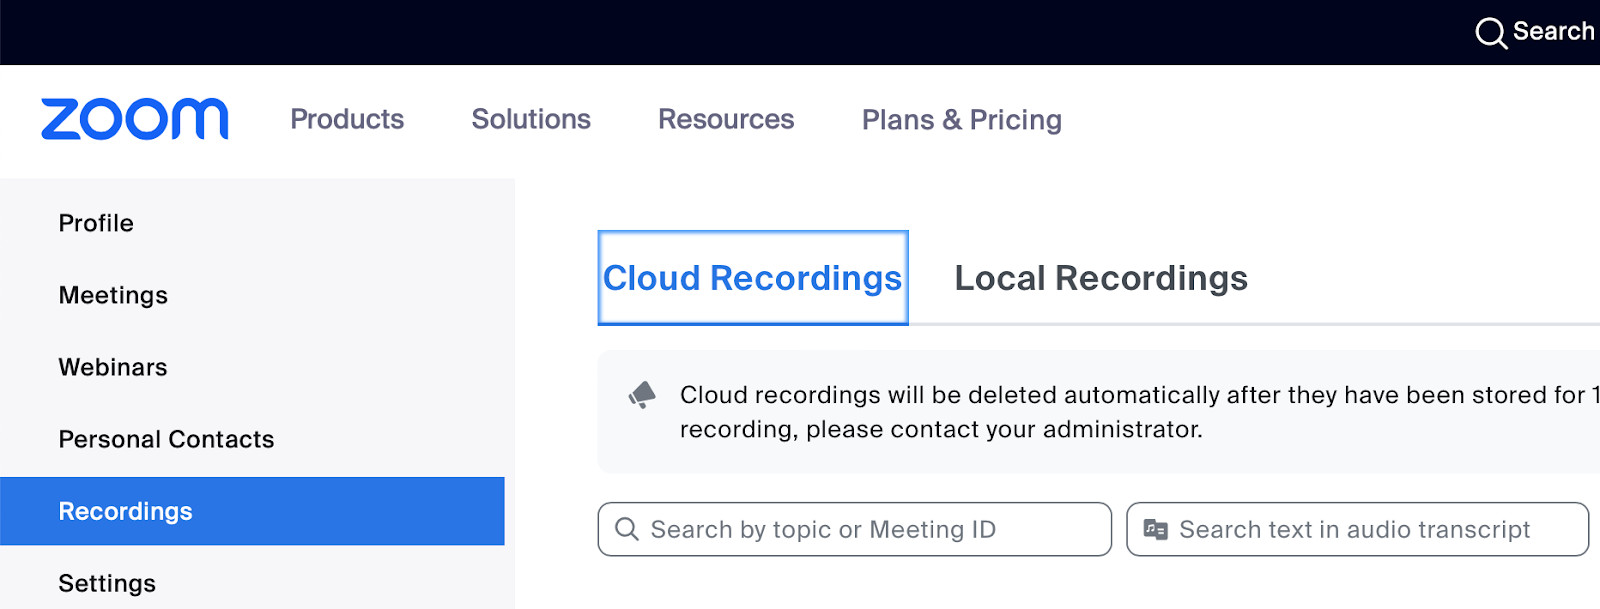 Zoom cloud recordings location
Important Note: Many organizations configure Zoom to automatically delete recordings after a specific period to manage storage and comply with data retention policies. If you’re searching for an older recording on a company Zoom account, it might have been automatically deleted. Check with your Zoom account administrator or IT department if you can’t find older recordings.
Finding Cloud Recordings in the Zoom Desktop App
You can also access your cloud recordings indirectly through the Zoom desktop application. This method provides a quick way to view both cloud and local recordings from within the app.
Here’s how to find cloud recordings via the desktop app:
Step 1: Open the Zoom desktop app on your computer.
Step 2: In the top horizontal menu within the app, click on “Meetings”.
Step 3: On the left-hand side of the Meetings window, click on “Recorded”.
 Where Zoom recordings go on the cloud
Step 4: You’ll see a combined list of both cloud and local recordings. To identify a cloud recording, click on a specific recording. If you see a “View” button, it indicates a cloud recording. If you see an “Open” button, it’s a local recording.
Step 5: To access the cloud recording, find the desired recording from the list and click “View”. This action will open the recording directly in the Zoom Cloud within your web browser, allowing you to watch, download, or share it.
For Account Administrators: Locating Cloud Recordings
Zoom account administrators have slightly different steps to access recordings, enabling them to manage recordings across the entire account.
If you are a Zoom account administrator, follow these steps to view recordings:
Step 1: Go to Zoom.us and sign in to your account as an administrator.
Step 2: In the left-hand menu, click on “Account Management”.
Step 3: Within the Account Management menu, select “Recording Management”.
Step 4: You will see a list of recordings associated with the entire account. Click on the recording you need to access to watch, download, or manage it.
Pro Tip for Hosts: Zoom recordings are always uploaded to the Zoom account of the meeting host. This holds true even if a co-host or participant initiates the recording, or if the host is not present at the start of the meeting. So, even if you join a meeting late, your recording will be waiting for you in your Zoom account when you need it.
How to Find Your Zoom Local Recordings
Finding local recordings involves accessing files directly on your computer. There are several methods to do this, including using the Zoom desktop app, navigating through your computer’s file system, or even using your online Zoom account (with certain software versions).
Using the Zoom App to Find Local Recordings
The Zoom desktop app is a convenient tool for managing local recordings and can directly take you to their location on your computer.
Here’s how to find local recordings using the Zoom app:
Step 1: Open the Zoom app on your computer.
Step 2: Click on “Meetings” in the top horizontal menu.
Step 3: Select “Recorded” on the left side of the Meetings window.
Step 4: Locate the local recording you want to find in the list and click “Open”.
When you select a local recording in the Zoom app, you will see the “File Location” displayed above the “View” button. This is the exact path on your computer where the recording is stored. Clicking “Open” will directly open the folder containing the recording files.
Directly Accessing Local Recording Files on Your Computer (Mac & Windows)
If you prefer to navigate directly to the local recording files without using the Zoom app, you can do so through your computer’s file explorer.
On a Mac:
Step 1: Open Finder by clicking the Finder icon in your dock (usually in the bottom left corner of your screen).
Step 2: In the Finder sidebar on the left, click on “Documents”.
Step 3: Use the Search bar in the top right corner of the Finder window. Type “Zoom” into the search box.
Step 4: You should see a folder named “Zoom” appear in the search results. Click to open this folder.
Step 5: Inside the Zoom folder, you’ll find your local recordings organized into subfolders, typically named with the date and time of the meeting, and the meeting title. Find and open the folder for the recording you need.
On a Windows PC:
Step 1: Click the “Start” button in the bottom left corner of your screen.
Step 2: Click on the “Documents” icon in the vertical menu bar on the left side of the Start Menu.
Step 3: In the File Explorer window that opens, find the “Search” bar in the top right corner and type “Zoom”.
Step 4: A “Zoom” folder should appear in the search results. Click on this folder to open it.
Step 5: Within the Zoom folder, you’ll find your locally saved recordings, organized by date and meeting name. Navigate to the specific recording folder you need.
By default, Zoom saves local recordings in a “Zoom” folder within your Documents folder on the C drive (on Windows) or Documents folder (on Mac). Unless you’ve changed the default settings, this is where you’ll find your files.
Finding Local Recordings Through Your Online Zoom Account
Interestingly, you can also access information about your local recordings through your online Zoom account, provided you are using Zoom version 4.0.25513.0228 or higher. This feature allows you to see the file path of your local recordings even when accessing your account online.
Here’s how to see local recording information in your online account:
Step 1: Go to Zoom.us and log in to your account.
Step 2: In the left-hand vertical menu, click on “Recordings”.
Step 3: Click on “Local Recordings”. Here, you will see a list of your local recordings. Instead of a “View” button, you will see a file path indicating where the recording is stored on your computer. You can click “Open” next to a recording, and Zoom will attempt to open the folder on your computer containing the recording.
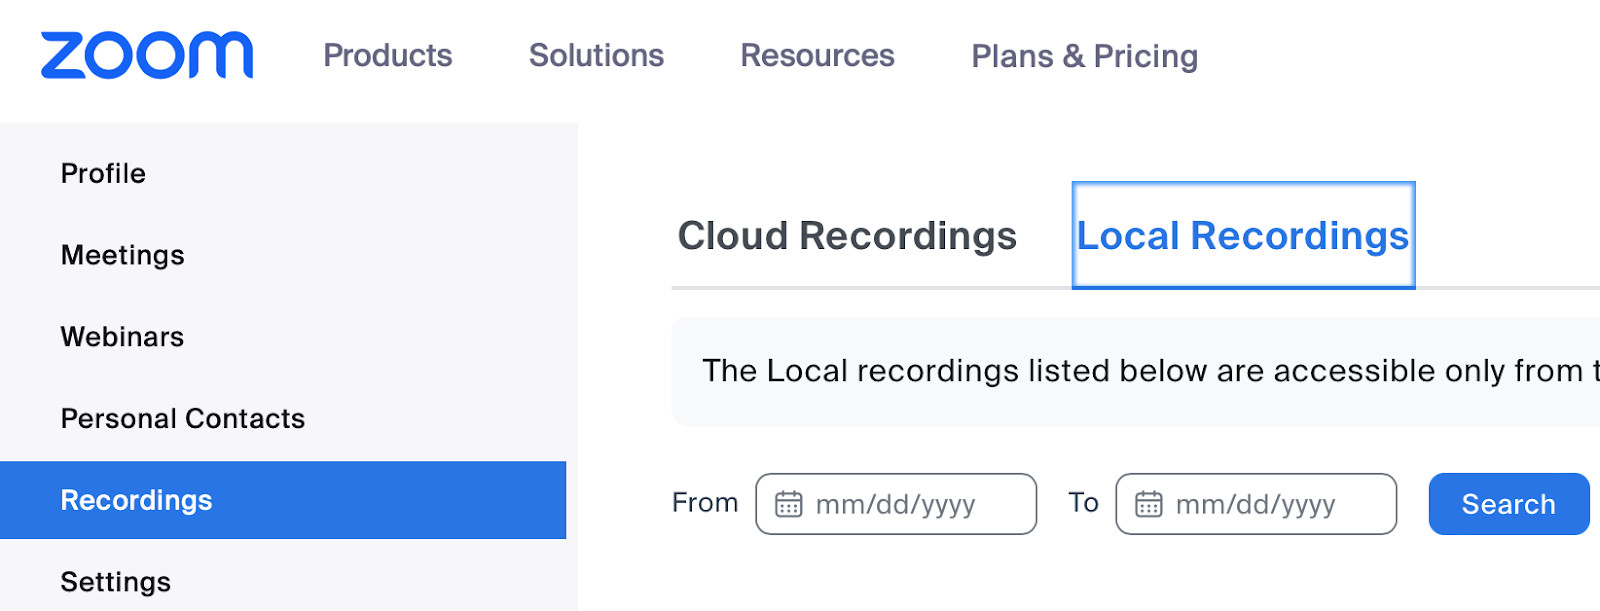 Finding Zoom recordings from your online account
For a more detailed walkthrough of local recording, you can refer to articles specifically focused on how to record videos locally on Zoom.
Zoom Recordings on Mobile: Where Do Phone Recordings Go? (iOS & Android)
When you record a Zoom meeting on your phone, the recording destination is exclusively the Zoom Cloud. Local Zoom recording is currently not supported on mobile devices (iOS and Android). Therefore, any meeting recorded on your phone will always be a cloud recording.
It’s important to remember that cloud recording requires a paid Zoom subscription (Pro, Business, or Enterprise) with the Cloud Recording add-on. Without the necessary subscription, you can participate in or host Zoom meetings on your phone, but you won’t be able to record them.
For users with the appropriate subscription, here’s how to find phone Zoom meeting recordings:
Step 1: Open a web browser on any device (computer, phone, tablet, etc.) and go to Zoom.us. Log in to your Zoom account.
Step 2: In the left-hand vertical menu, click on “Recordings”.
Step 3: Select “Cloud Recordings” to view a list of your recordings. Your phone recordings will be listed here along with any other cloud recordings.
Since phone recordings are always stored in the cloud, you cannot find the recording files directly within the Zoom app on your phone itself. You must access them through the Zoom website.
Changing Your Zoom Recording Settings: Cloud or Local?
Zoom provides flexibility in managing your recording settings, allowing you to choose where your recordings are stored, either by default or for specific meetings.
Setting Automatic Recording Location for All Meetings
You can configure Zoom to automatically record all your meetings, and choose whether they are saved to the cloud or locally. Here’s how to set this default:
Step 1: Log in to your account on Zoom.us.
Step 2: In the left-hand vertical menu, click on “Settings”.
Step 3: Click on the “Recording” tab within the Settings menu.
Step 4: Scroll down until you find the “Automatic Recording” option and toggle it to the “on” position.
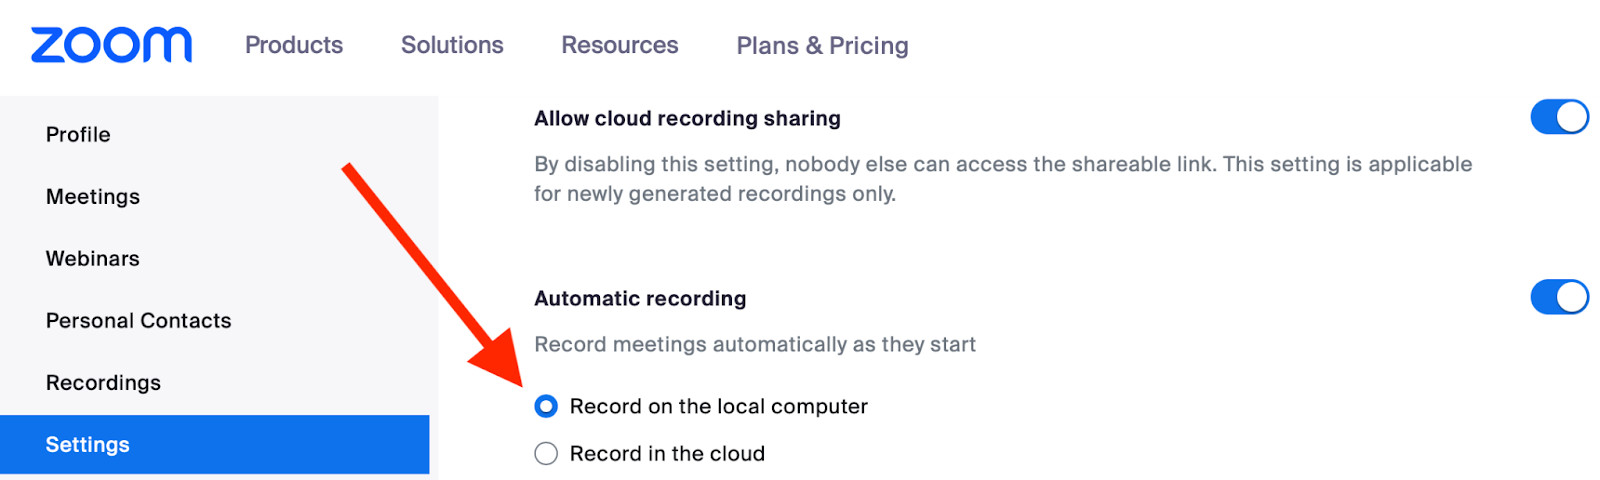 How to setup where your Zoom recordings are stored
Step 5: Below the “Automatic Recording” toggle, you’ll see options to select either “Record on the local computer” or “Record in the cloud”. Choose your preferred default location.
Choosing Recording Location for Individual Meetings
If you don’t want to automatically record every meeting, but want to specify the recording location for individual meetings, you can do this when scheduling.
If you are scheduling a meeting from the desktop app:
Step 1: In the Zoom desktop app, under the “Home” tab, click “Schedule”.
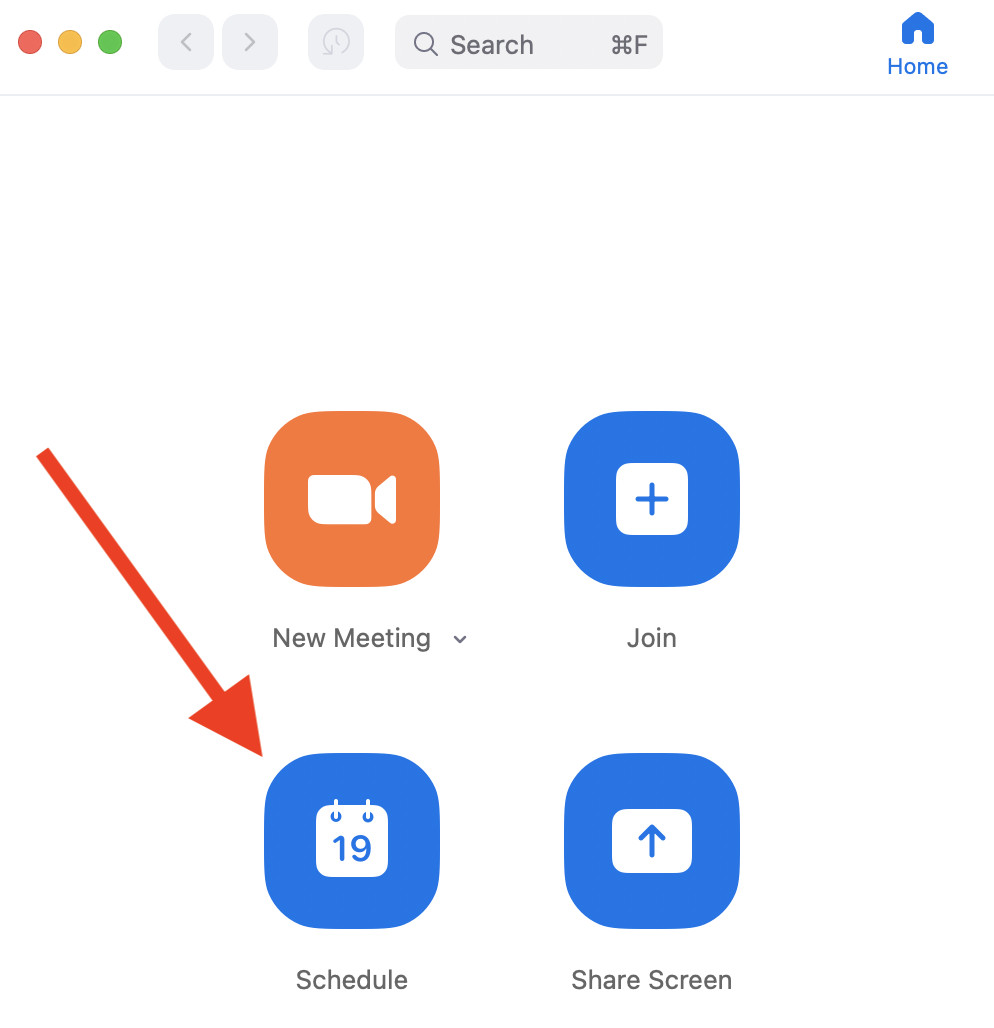 Scheduling Zoom recordings
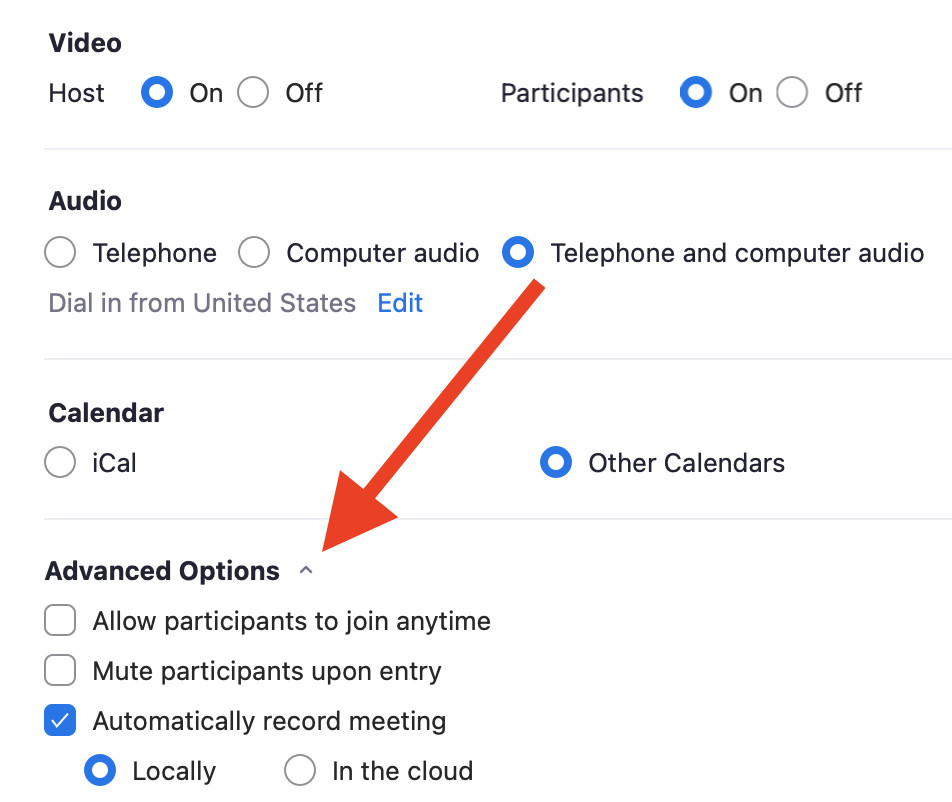
Step 2: In the Schedule Meeting window, click the arrow next to “Advanced Options” to expand them. Check the box next to “Automatically record meeting”.
Step 3: Choose whether you want to record “Locally” or “In the cloud” for this specific meeting.
 Setting up where a Zoom meeting
If you are scheduling a meeting from your online account:
Step 1: Log in to your account on Zoom.us. Under the “Meetings” tab, click “Schedule a Meeting”.
 Scheduling a meeting online on Zoom
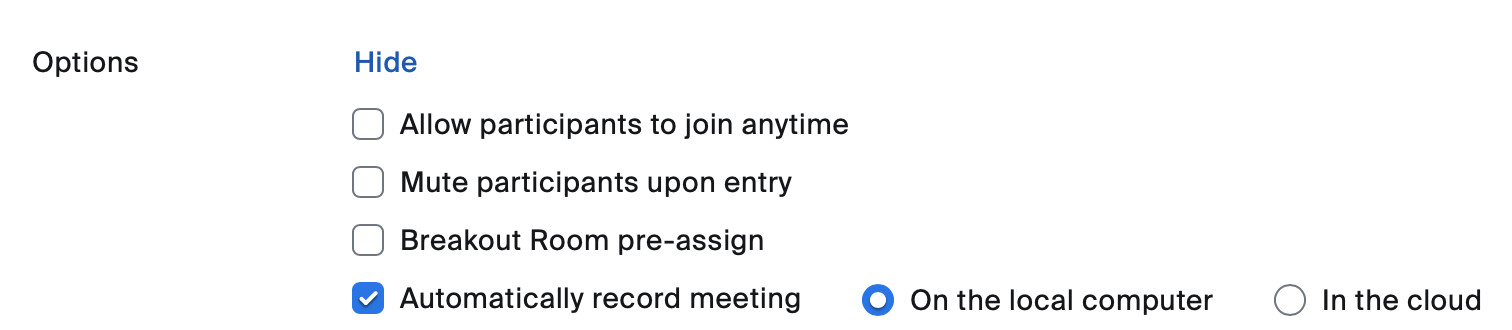
Step 2: Scroll down to the “Options” section and click “Show” to reveal advanced meeting options.
Step 3: Check the box beside “Automatically record meeting” and select your desired recording location (Cloud or Local).
 Automatically recording a Zoom meeting
During an active Zoom meeting, you can also manually start recording and choose the location by clicking the “Record” button. Zoom will then prompt you to select either “Record on this computer” (local) or “Record to the cloud”.
Changing Default Local Recording Folder
Finally, you can customize the folder on your computer where local recordings are saved. To change the default local recording location:
Step 1: Open the Zoom desktop app and click on your profile picture or initials in the top right corner.
Step 2: Select “Settings” from the dropdown menu.
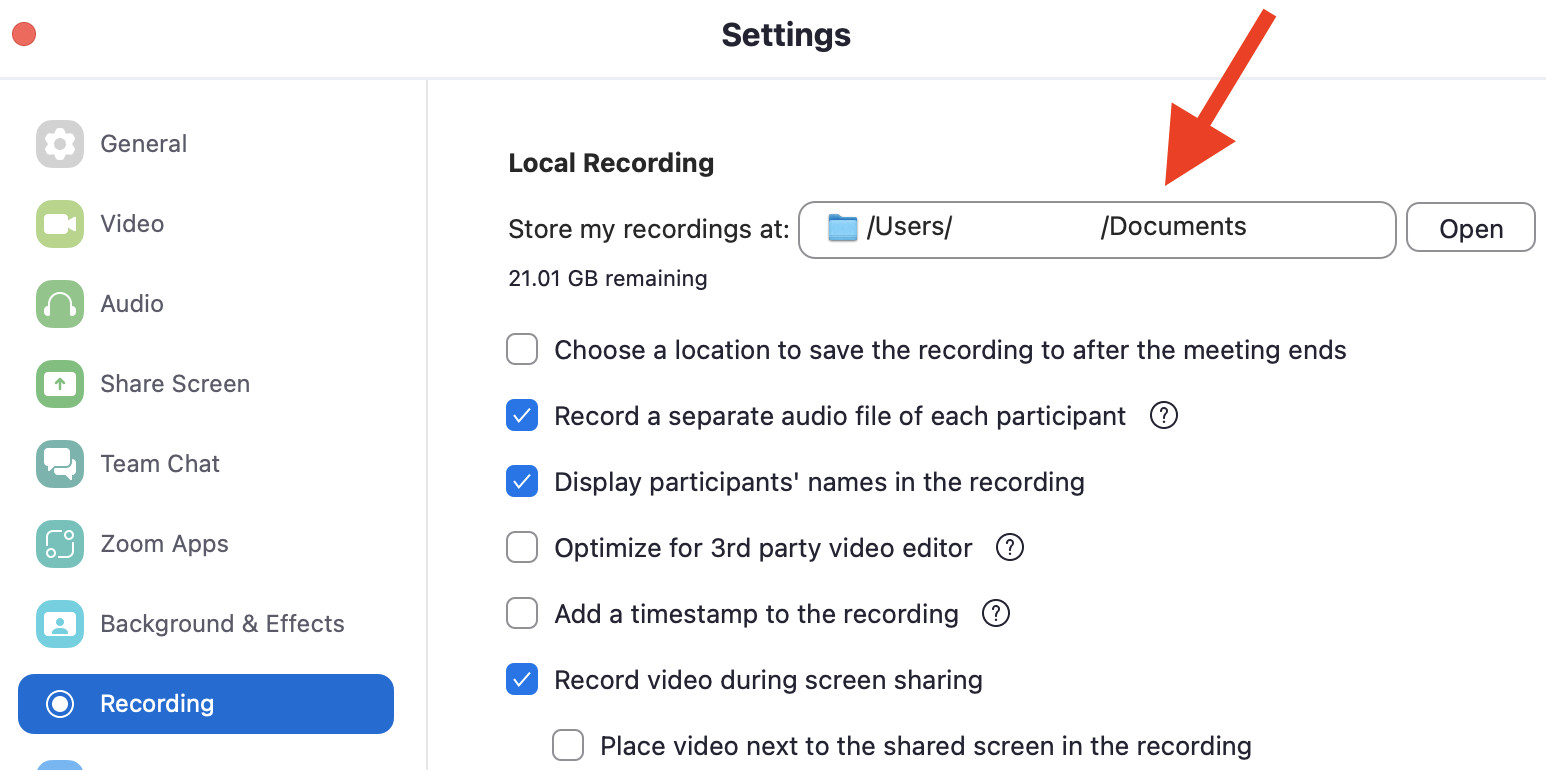
Step 3: In the Settings window, click on “Recording”.
Step 4: At the top of the Recording settings, you’ll see a section labeled “Store my recordings at:” displaying the current file path. Click anywhere within this box.
 Changing where local recordings go on Zoom
Step 5: Click “Choose a new location”. This will open your computer’s file explorer, allowing you to select a new folder where you want your local Zoom recordings to be saved by default.
Zoom Cloud vs. Local Recordings: Which is Right For You?
The choice between Zoom cloud and local recordings depends on your individual needs and priorities.
If budget is a primary concern, local recording is the more economical choice, as it’s available even on the free Zoom plan. However, remember that phone recordings are always cloud-based and require a paid subscription.
Local recording can also be preferable for work meetings, particularly in organizations with strict data security policies that restrict cloud storage of sensitive meeting recordings.
Conversely, if you have a paid Zoom subscription, are recording non-confidential meetings, and want to conserve storage space on your computer while benefiting from easy sharing, cloud recording is the more convenient option.
Recording Quality: Cloud vs. Local and Riverside Alternative
In terms of recording quality, there is typically no significant difference between Zoom’s cloud and local recordings. Both methods rely on internet connectivity during the meeting. Therefore, a poor internet connection can lead to audio or video lag in your recordings, regardless of whether you’re recording to the cloud or locally.
To mitigate internet dependency and ensure high-quality recordings, consider using meeting software that records directly through your device, bypassing internet fluctuations during the recording process. This approach is similar to using your computer’s built-in recording app (like QuickTime on Mac or Game Bar on Windows) to capture a video – the recording is handled locally, minimizing internet-related quality issues.
“Riverside is far better than Zoom for recording interviews.”– Seth Godin, author, entrepreneur and marketing leader.
Riverside stands out as a superior alternative for high-quality meeting recordings.
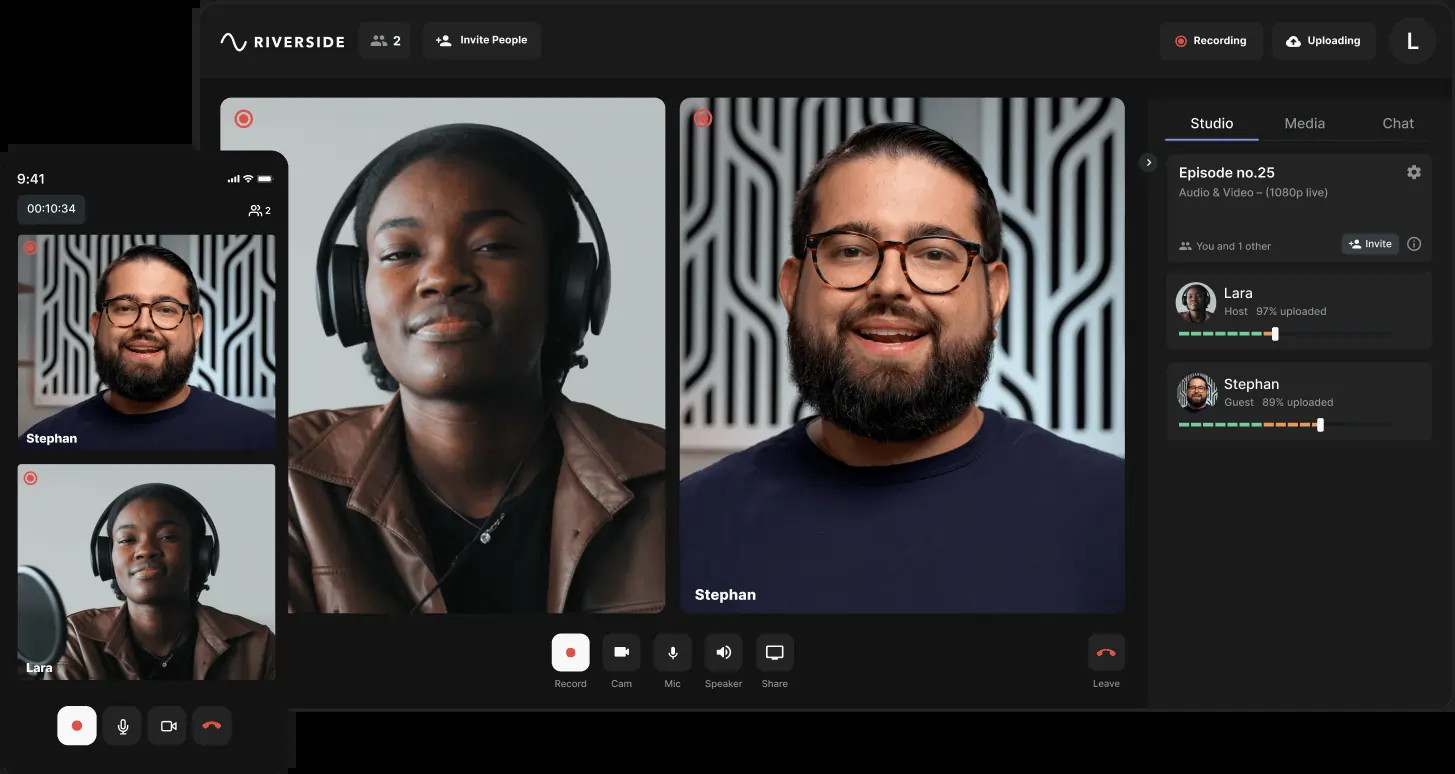 Riverside recording platform for online local recordings
Riverside records videos locally on each participant’s computer, ensuring high-quality, stable recordings that are independent of internet connection strength. It then uploads these recordings to the cloud for easy sharing and collaboration. In contrast, Zoom’s “local” recording still depends on the internet during the recording itself, and cloud recording is subscription-based. Riverside offers true local recording, free from internet-related quality issues.
Here are more compelling reasons to choose Riverside over Zoom for superior meeting recordings:
1. Uncompressed or Lossless Audio: Zoom compresses audio, which can degrade sound quality. Riverside offers uncompressed or lossless compressed audio options, maintaining pristine audio quality while optimizing connection speed.
2. High-Resolution Video: Zoom’s free plan limits video resolution to 360p, and even paid plans require higher tiers for 720p or 1080p for larger meetings. Riverside records up to 720p for free and up to 4K resolution with a $15/month subscription, even for up to 8-person meetings.
3. Mobile Local Recording: Zoom does not support local recording on mobile devices. Riverside’s mobile app enables local recording in up to 720p resolution for free on iOS and Android devices.
4. Text-Based Video Editor: Riverside provides an intuitive text-based video editor that simplifies video editing for anyone, making it easy to create professional-looking content from your recordings.
Experience the difference for yourself. Visit Riverside.fm and click “Get Started” to create your free account and start recording high-quality meetings today.
Start recording with Riverside
Easily record high-quality podcasts & videos remotely
Get Started
FAQs: Frequently Asked Questions About Zoom Recording Locations
Let’s address some common questions about finding your Zoom recordings.
How to Find My Recorded Zoom Meetings?
To find your recorded Zoom meetings, you can either:
- Use the Zoom desktop app: Open the app, select “Meetings”, and then click “Recorded”.
- Access via the Zoom website: Go to Zoom.us, log in to your account, and select “Recordings” from the left menu.
Why Can’t I Find My Zoom Recording? Troubleshooting Tips
If you’re having trouble locating your Zoom recording, consider these common reasons:
- Multiple Accounts: Ensure you are logged into the correct Zoom account, especially if you have multiple accounts.
- Wrong Computer: Local recordings are stored on the computer used to record the meeting. Check the correct device.
- Not the Host: Recordings are saved to the host’s account. If you weren’t the host, you won’t find the recording in your account.
- Subscription Issues: Cloud recordings require a paid subscription. If your subscription lapsed, cloud recordings may not be accessible.
- Incorrect Folder: For local recordings, check the default “Documents/Zoom” folder or the custom folder if you changed the settings.
- Auto-Deletion: Your Zoom administrator may have set up automatic deletion of recordings after a certain period. Check if the recording might have been deleted.
If you’ve checked these points and still can’t find your recording, contact your Zoom account administrator or Zoom support for further assistance.
Where are Zoom Phone Recordings Stored?
Zoom recordings made on a phone are always stored in the Zoom Cloud. To access them, log in to your Zoom account at Zoom.us and navigate to the “Recordings” section. You will not find phone recordings stored directly on your phone.
How to Start Recording Zoom Meetings?
You can initiate recording during a Zoom meeting by clicking the “Record” button in the meeting controls. You can also set up automatic recording for all meetings or individual scheduled meetings through the Zoom app or your online account settings.
For detailed instructions, refer to guides on how to record Zoom meetings.
If you are seeking a higher-quality, more reliable recording solution that minimizes storage consumption, consider Riverside as a superior alternative to Zoom. Explore Riverside today and see the difference.
Never miss another article
Highly curated content, case studies, Riverside updates, and more.
Thank you! Your submission has been received!
Oops! Something went wrong while submitting the form.
 [Kendall Breitman
leads Riverside’s community. She has over ten years of experience in television and video production for places like NBC and Bloomberg News. You’ll find Kendall on our webinar, where she shares her expert insights on content production, branding, and more.](/authors/kendall)
Share this post: