Are you wondering where your Zoom meeting recordings are stored and how to access them? Zoom meeting recordings can be stored either on the Zoom Cloud or directly on the host’s computer, offering different advantages. Savewhere.net is here to guide you through understanding these options so you can efficiently manage and share your recordings, maximizing your savings. In this guide, we will explore how to find your Zoom recordings, how to change your recording settings, and compare the pros and cons of cloud versus local storage. Discover practical tips and resources for optimizing your financial management by checking out savewhere.net today.
1. Understanding Zoom Recording Destinations
Zoom recordings can be saved to two primary locations: the Zoom Cloud or the host’s local computer. Each option offers distinct benefits and drawbacks that cater to different user needs. Savewhere.net is committed to helping you make informed decisions about your digital resources.
1.1 Zoom Cloud Recordings Explained
Zoom Cloud recordings are stored on Zoom’s online servers, meaning your recordings are accessible from anywhere with an internet connection. When you choose to record to the cloud, Zoom’s servers handle the storage, relieving you of the need to manage large video files on your device.
Pros of Zoom Cloud Recordings:
- Storage Space Savings: Cloud recording frees up valuable storage space on your computer, preventing slowdowns and maintaining optimal performance.
- Easy Sharing: Share recordings with colleagues, clients, or friends by simply sending a link. This simplifies collaboration and information dissemination.
Cons of Zoom Cloud Recordings:
- Subscription Requirement: Access to cloud recording requires a Zoom Pro, Business, or Enterprise subscription, adding to your monthly expenses.
- Limited Storage: Unless you upgrade to an Enterprise plan, your storage capacity is limited. You might need to purchase additional storage, incurring further costs.
1.2 Zoom Local Recordings Explained
Zoom local recordings are saved directly to your computer’s documents folder. This means you have complete control over the storage and security of your recordings.
Pros of Zoom Local Recordings:
- No Extra Costs: Local recordings don’t require a paid Zoom subscription, making it a cost-effective option.
- Enhanced Security: Some organizations prefer local storage for security reasons, preventing sensitive data from being stored in the cloud.
Cons of Zoom Local Recordings:
- Hard Drive Space Consumption: Video files can take up significant hard drive space, potentially slowing down your computer.
- Difficult Sharing: Sharing large video files can be cumbersome, often requiring file compression or third-party services.
2. How to Locate Your Zoom Cloud Recordings
Finding your Zoom cloud recordings is straightforward, whether you prefer using email notifications, accessing your online account, or utilizing the desktop app.
2.1 Checking Your Email for Cloud Recordings
The easiest way to find a Zoom Cloud recording is to check your email. Zoom sends an email with a direct link to the recording as soon as it has finished uploading. The message will be sent to the email associated with your Zoom account. This is a quick and convenient way to access your recordings.
2.2 Accessing Cloud Recordings via Your Online Account
Here’s how to access your Zoom Cloud recordings directly through your online account:
Step 1: Go to Zoom.us and log in to your account.
Step 2: On the left vertical menu bar, click Recordings.
Step 3: Click Cloud Recordings to see a list of your recordings.
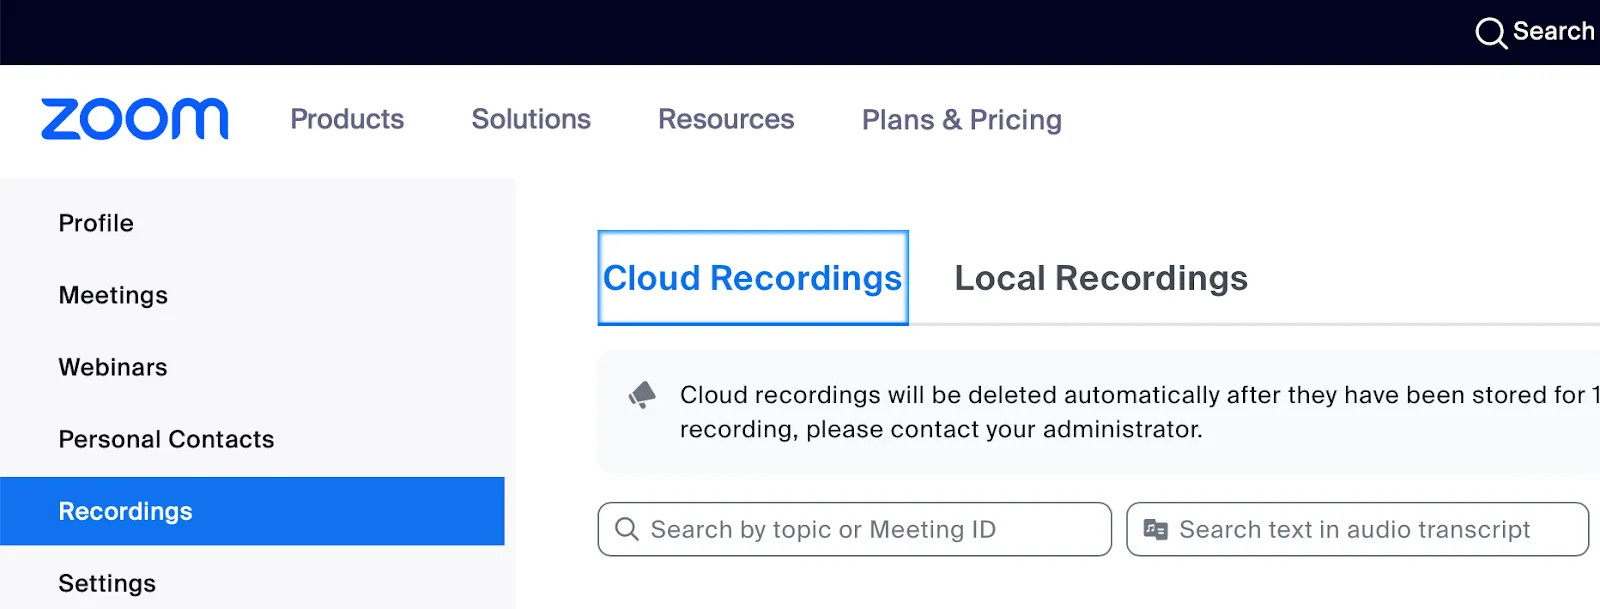 Zoom cloud recordings location
Tip: Be aware that many companies automatically delete recordings after a set number of days. If you cannot find an older recording, it may have been removed.
2.3 Finding Cloud Recordings Through the Desktop App
You can also access your Zoom Cloud recordings indirectly through your Zoom desktop app. Here’s how:
Step 1: Open the Zoom app on your computer.
Step 2: Click Meetings on the top horizontal menu.
Step 3: Click Recorded on the left.
 Where Zoom recordings go on the cloud
Step 4: You’ll see a list of all your recordings—cloud and local. Click on a recording. If you see View, it’s a cloud recording. If you see Open, it’s a local recording.
Step 5: Find your desired cloud recording, then click View. This will take you to the recording in the Zoom Cloud, where you can watch or share it.
2.4 Accessing Cloud Recordings as an Account Administrator
If you’re a Zoom account administrator, follow these steps to view recordings:
Step 1: Go to Zoom.us and log in to your account.
Step 2: Click on Account Management.
Step 3: Click on Recording Management.
Step 4: You’ll see a list of recordings. Click on the one you want to watch or share.
Pro Tip: Zoom recordings are uploaded to the meeting host’s Zoom account, even if a co-host or participant starts the recording. This ensures your recordings are always accessible in your account.
3. Locating Your Zoom Local Recordings
Finding your Zoom local recordings can be done through the Zoom desktop app, directly on your computer, or via your online Zoom account. Each method offers a convenient way to access your locally stored recordings.
3.1 Using the Zoom App to Find Local Recordings
Your Zoom desktop app is responsible for managing local recordings. By default, it saves them in a Zoom folder under the Documents folder on the C drive of the computer that recorded the meeting. Here’s how to use the app to find them:
Step 1: Open the Zoom app on your computer.
Step 2: Click Meetings on the top horizontal menu.
Step 3: Click Recorded on the left.
Step 4: Find your desired local recording and click Open.
When you click on a local recording in the Zoom app, the File Location is displayed above the View button, showing exactly where the recording is stored on your computer.
3.2 Going Directly to the Recording on Your Computer
If you prefer to go directly to the locally recorded file on your computer, follow these steps:
On a Mac:
Step 1: Click on Finder in the bottom left corner of your screen.
Step 2: Click Documents in the vertical menu on the left.
Step 3: Click Search at the top right, and type “Zoom” into the search box.
Step 4: You should see a folder labeled “Zoom”. Click on it.
Step 5: Unless you’ve adjusted your storage settings, this is where you’ll find a list of your local recordings, organized by date and title. Simply click on the one you want.
On a Windows PC:
Step 1: Click Start in the bottom left corner of your screen.
Step 2: Click the Documents icon in the vertical menu bar on the left.
Step 3: In the Search bar at the top right, type “Zoom.”
Step 4: Click on the Zoom folder that appears, then choose the recording you want.
3.3 Finding Local Recordings Using Your Online Account
Just as the Zoom desktop app can take you to a cloud recording, your online account can take you to a local recording if you’ve kept up with your Zoom updates. To see your local recordings in the Zoom Cloud, you’ll need Zoom version 4.0.25513.0228 or higher.
Here’s how to do it:
Step 1: Go to Zoom.us and log in to your account.
Step 2: On the left vertical menu bar, click Recordings.
Step 3: Click Local Recordings. Here you can see the file path to the recording on your computer, but no need to find the recording on your own; clicking Open will take you to it.
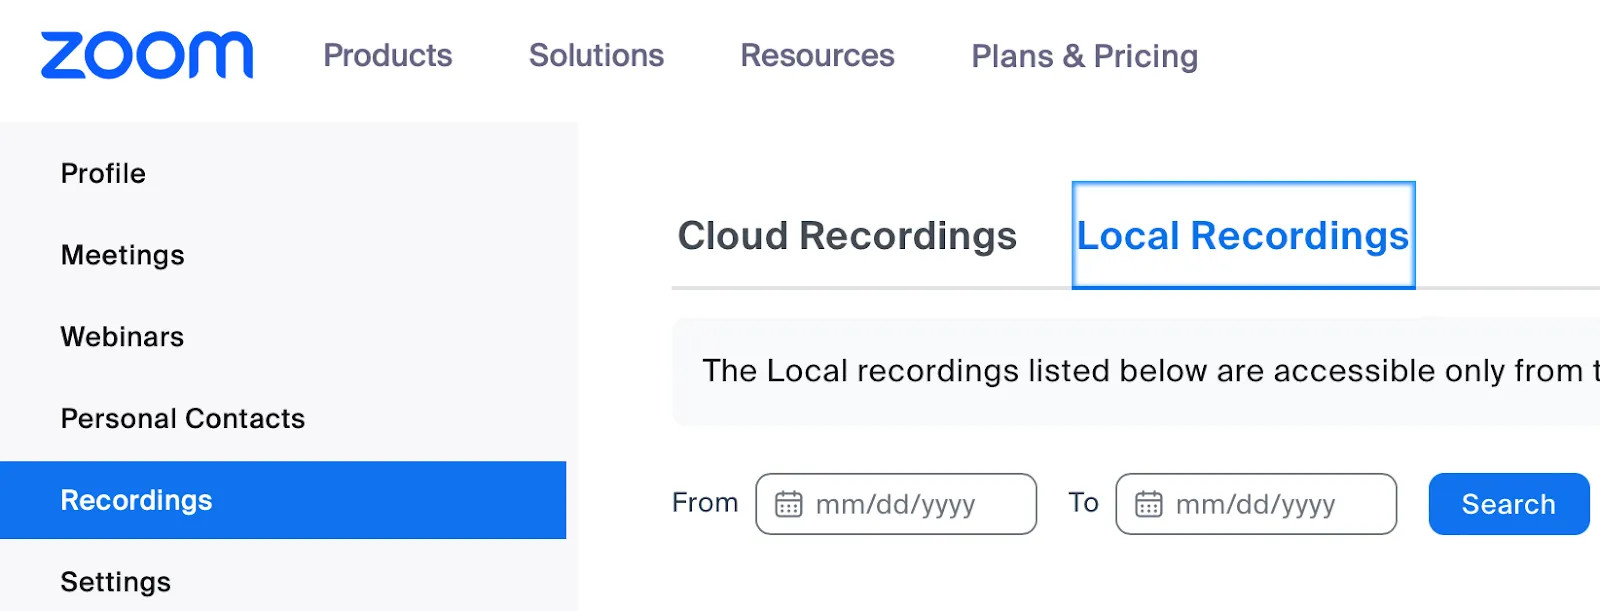 Finding Zoom recordings from your online account
4. Zoom Recordings on Mobile Devices (iOS & Android)
When you record a Zoom meeting on your phone, it goes straight to the Zoom Cloud. Local Zoom recording is not currently possible on a mobile device, so phone recordings are always cloud recordings.
4.1 Cloud Recording Requirement for Mobile Devices
Remember that without a Pro, Business, or Enterprise subscription and the Cloud Recording add-on plan, you cannot record to the cloud. You can join or host a Zoom meeting on a phone, but you cannot record it.
4.2 Finding Phone Zoom Meeting Recordings
For those who have the right subscription, here’s how to find a phone Zoom meeting recording. These steps are the same on any device with internet access—computer, phone, iPad, Tablet, etc.
Step 1: Go to Zoom.us and log in to your account.
Step 2: On the left vertical menu bar, click Recordings.
Step 3: Click Cloud Recordings to see a list of your recordings.
Since phone recordings are never stored locally, you cannot find the recording in the Zoom app on your phone. You’ll need to go to the website above.
5. Customizing Zoom Recording Settings
Changing your Zoom recording settings can help you optimize storage and automatically record meetings to your preferred location.
5.1 Setting Automatic Recording for All Meetings
You can set all of your Zoom meetings to record automatically either to the Cloud or locally. Here’s how to do that:
Step 1: Log in to your account on Zoom.us.
Step 2: On the left vertical menu bar, click Settings.
Step 3: Click Recording.
Step 4: Scroll down to Automatic Recording and toggle it on.
 How to setup where your Zoom recordings are stored
Step 5: Select either Record on the local computer or Record in the cloud.
5.2 Setting Automatic Recording for Individual Meetings
If you don’t want to record every meeting, you can set individual meetings to record automatically. You can do this by following the usual steps to schedule a meeting from your online account or the desktop Zoom app.
If you’re scheduling a meeting from the desktop app:
Step 1: Under the Home tab, click Schedule.
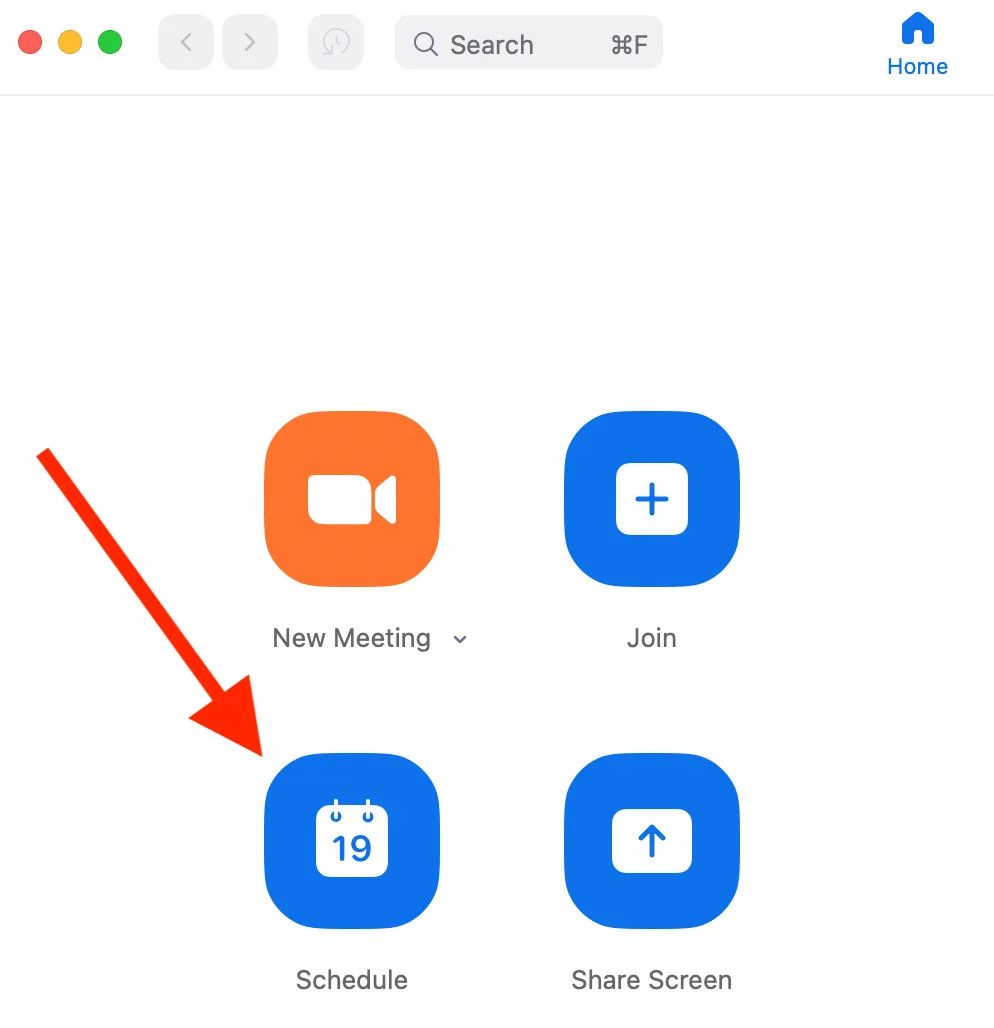 Scheduling Zoom recordings
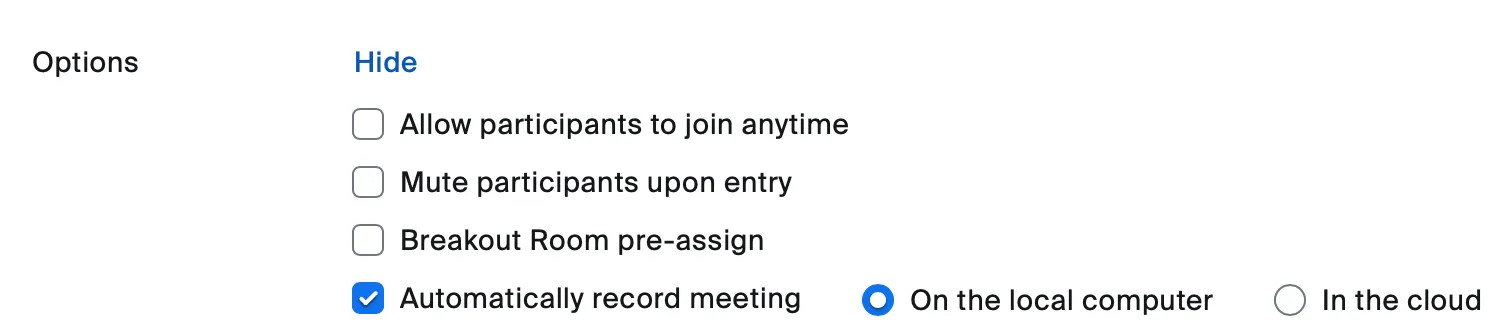
Step 2: Click the arrow beside Advanced Options and check the box beside Automatically record meeting.
Step 3: Choose Locally or In the cloud.
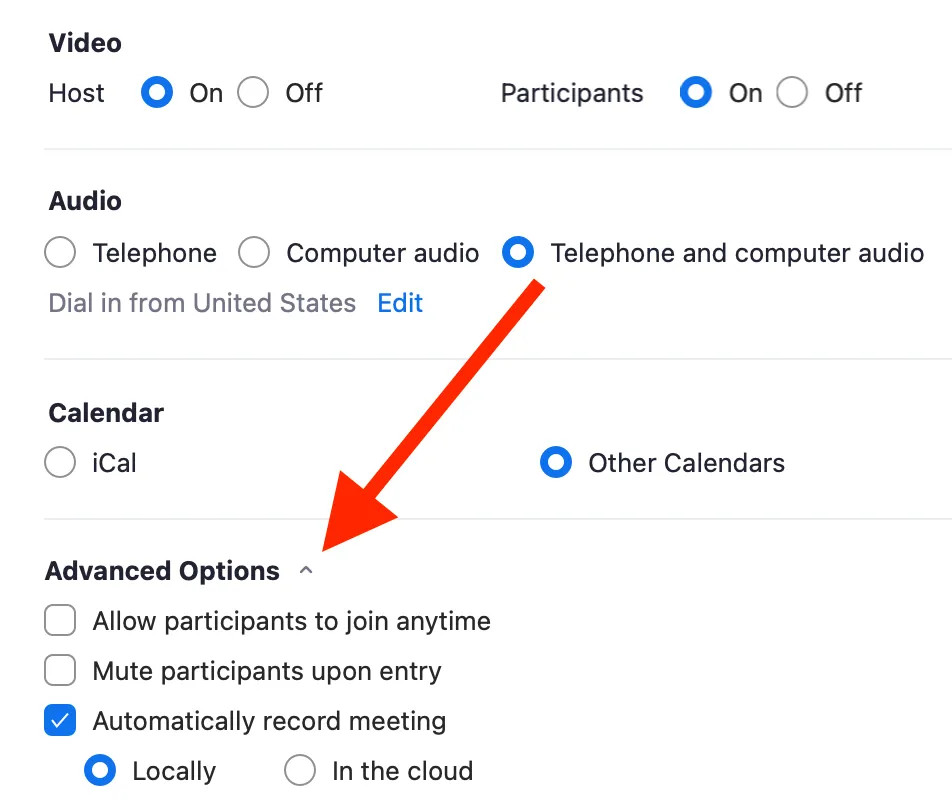 Setting up where a Zoom meeting
If you’re scheduling a meeting from your online account:
Step 1: Under the Meetings tab, click Schedule a Meeting.
 Scheduling a meeting online on Zoom
Step 2: Scroll down to Options and click Show.
Step 3: Check the box beside Automatically record meeting and choose your desired location.
 Automatically recording a Zoom meeting
You can also choose where a Zoom recording will go directly from an active Zoom meeting. When you click Record during a meeting, Zoom will prompt you to choose Record on this computer or Record to the cloud.
5.3 Changing the Default Location for Local Recordings
Lastly, you can choose where local recordings go on your computer. To do that:
Step 1: From the Zoom desktop app, click on your profile picture (or initials) in the top right corner.
Step 2: Click Settings.
Step 3: Click Recording.
Step 4: You’ll see a box at the top of the screen that says “Store my recordings at:” and contains a file path. Click anywhere inside the box.
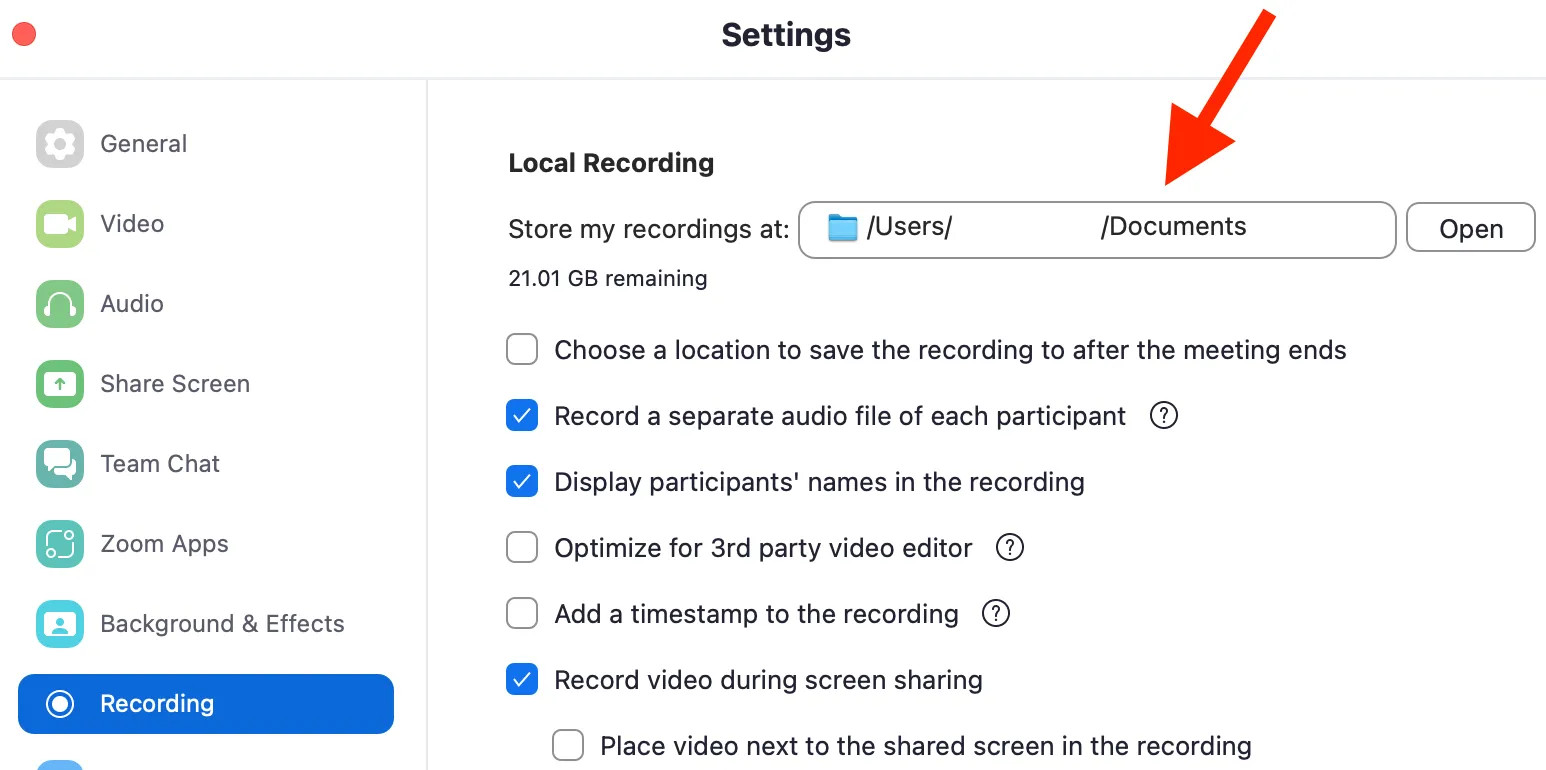 Changing where local recordings go on Zoom
Step 5: Click Choose a new location. This will open a menu with your computer folders. Just click the folder you want to house your local Zoom recordings.
6. Zoom Cloud vs. Local Recordings: Making the Right Choice
Deciding between Zoom cloud and local recordings depends on your budget, security needs, and storage capacity. Understanding the trade-offs will help you make the best choice for your circumstances.
6.1 Budget Considerations
If you’re on a tight budget, local recording is the more economical choice. Cloud recording requires a paid Zoom subscription, which can add up over time. However, remember that you can’t record locally on a phone, so if you need to record a Zoom meeting on your phone, you’ll have to pay for a subscription. According to the U.S. Bureau of Economic Analysis (BEA), the average American household spends approximately $150 per month on subscription services. Choosing local recording can help you reduce these costs.
6.2 Security Requirements
Local recording may be best if you’ll be recording work meetings. Many companies don’t want you to record meetings to the cloud for security reasons. Storing recordings locally ensures that sensitive information remains within your control.
6.3 Storage Capacity
If you have the money for a subscription, are recording non-sensitive meetings, and want to save space on your computer, go with cloud recording. Cloud storage frees up your hard drive and makes sharing recordings easier.
6.4 Zoom Cloud vs Local Recording Quality
You won’t see a big difference in recording quality between Zoom’s cloud and local recording. Zoom captures both over the internet, so if you have a poor internet connection, you may end up with audio or video lag in your recording.
You can avoid that by using online meeting software that simply records directly through your device instead of over the internet. Think of this like capturing a video of yourself using your computer’s native recording app (QuickTime for Mac and Game Bar for Windows). Your computer is doing the recording—the internet is not involved. In a similar way, some software can use your computer to record a meeting taking place over the internet.
7. Exploring Alternatives for High-Quality Recordings
While Zoom offers both cloud and local recording options, alternative software solutions like Riverside provide superior recording quality and enhanced features.
7.1 Introducing Riverside for High-Quality Recordings
“Riverside is far better than Zoom for recording interviews.” – Seth Godin, author, entrepreneur, and marketing leader.
Riverside uses your computer to record videos and stores them online, where sharing them with others is easy. Conversely, Zoom uses the internet to record videos and, unless you pay for a subscription, stores them on your computer where they take up space, and it’s difficult to share them with others.
Both Riverside and Zoom refer to this as local recording. But for Zoom, it’s actually local storing; for Riverside, it’s true local recording. And the best part? Local recording with Riverside is completely free.
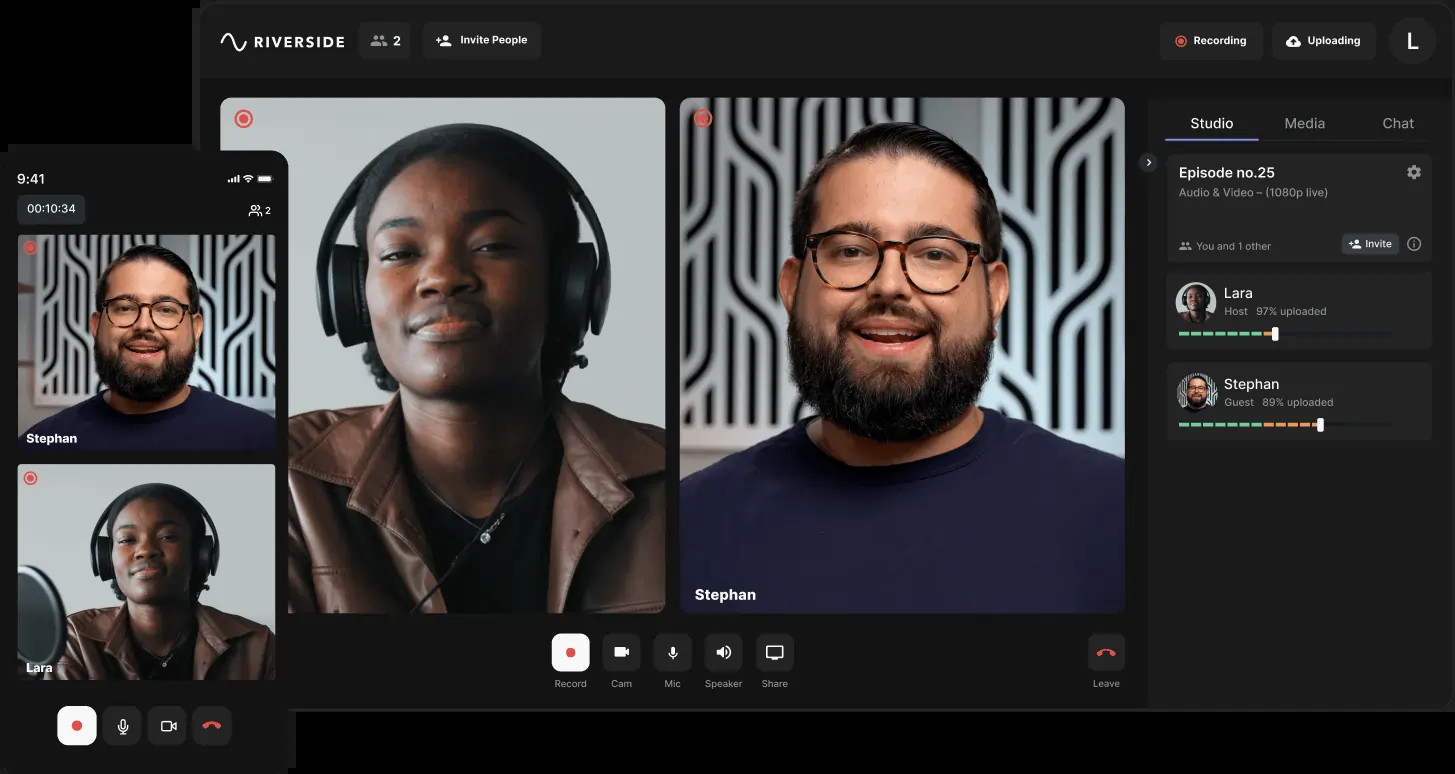 Riverside recording platform for online local recordings
7.2 Key Advantages of Riverside Over Zoom
Here are a few more reasons we recommend Riverside over Zoom for high-quality meeting recordings:
1. Audio Quality: Zoom compresses audio (removes parts of the track) to increase connection speed during meetings. That can make recordings sound distorted. Riverside offers either uncompressed audio or lossless compressed audio, which increases connection speed while maintaining audio quality.
2. Video Resolution: Unless you pay for a subscription, Zoom records in 360p video resolution. You get 720p resolution with a subscription, but only for 2-person meetings. 1080p resolution requires a Business or Enterprise subscription, which starts at $199.90/month. Riverside records up to 8-person meetings in up to 720p resolution without a subscription and in up to 4K resolution for a $15/month subscription.
3. Mobile Recording: You cannot record locally using Zoom on your phone. With Riverside’s mobile app for iOS or Android, you can record locally in up to 720p resolution for free.
4. Advanced Editing: Riverside has a text-based video editor that makes it easy for anyone to turn their recordings into professional content.
To try it for yourself, just go to Riverside.fm and click Get Started to set up your free account and record your first meeting.
Start recording with Riverside
Easily record high-quality podcasts & videos remotely
Get Started
8. Practical Tips for Saving Money on Digital Tools
Beyond optimizing your Zoom recording settings, Savewhere.net offers numerous strategies for saving money on digital tools and subscriptions.
8.1 Evaluating Subscription Costs
Regularly evaluate your subscription services to identify unnecessary expenses. Consumer Financial Protection Bureau (CFPB) data shows that the average household spends over $200 per month on various subscriptions. Cutting back on unused subscriptions can lead to significant savings.
8.2 Seeking Discounted Rates
Look for discounted rates for students, educators, or non-profit organizations. Many software companies offer special pricing for these groups, helping you save money on essential tools.
8.3 Utilizing Free Alternatives
Explore free alternatives to paid software. Open-source software and freemium models can provide similar functionality without the cost. Savewhere.net provides resources and recommendations for free and low-cost tools.
8.4 Bundling Services
Consider bundling services to save money. Many companies offer discounted rates when you purchase multiple services together, such as internet, phone, and streaming services.
9. The AIDA Framework: Attracting and Engaging Users
To effectively engage users and encourage them to explore Savewhere.net, we use the AIDA framework:
- Attention: Capture the user’s attention with informative and engaging content about Zoom recording locations.
- Interest: Build interest by highlighting the benefits of optimizing recording settings and exploring alternative solutions.
- Desire: Create a desire by showcasing the cost savings and convenience offered by Savewhere.net.
- Action: Prompt users to take action by visiting Savewhere.net to discover more tips, find exclusive deals, and connect with a community of like-minded individuals.
10. FAQs on Where Zoom Recordings Go
10.1 How do I find recorded Zoom meetings?
You can find recorded Zoom meetings by opening your desktop Zoom app, choosing Meetings from the menu bar at the top, and clicking Recorded. You can also access your recordings by going to Zoom.us, signing in to your Zoom account, and choosing Recordings from the menu on the left.
10.2 Why can’t I find my recorded Zoom meeting?
There are several reasons why you may be having trouble finding your recorded Zoom meeting:
- You have more than one Zoom account and you’re logged in to the wrong one.
- You’re on the wrong computer. Local recordings are stored on the computer that recorded the meeting.
- You weren’t the host of the recorded Zoom meeting.
- You didn’t renew your Zoom subscription. The cloud recordings you made with a subscription will not be available with a free account.
- You’re looking in the wrong folder on your computer. By default, local recordings are saved in your Documents folder.
- Your Zoom account administrator has set recordings to auto-delete after a certain number of days, and your recording has been deleted.
Be sure you’re subscribed and logged in, or contact your account admin.
10.3 Where do Zoom recordings go on my phone?
When you record a Zoom meeting on your phone, it’s uploaded to the Zoom Cloud. Log in to your account at Zoom.us to access it. You won’t find the recording on your phone.
10.4 How can I record Zoom meetings?
You can record Zoom meetings by clicking Record from an active meeting. You can also set all meetings or an individual meeting to auto-record ahead of time through the Zoom app or your online Zoom account. Check out our recent article for a step-by-step guide to recording Zoom meetings. But if you’re looking for a Zoom alternative that captures higher-quality recordings and takes up less space in your Documents folder, check out Riverside. Once you try it, there’ll be no going back. See for yourself.
11. Conclusion: Save Smart with Savewhere.net
Understanding where your Zoom recordings are saved and how to manage your recording settings can help you optimize your digital resources and save money. Whether you choose cloud recording for convenience or local recording for cost savings, Savewhere.net is here to guide you. Discover more tips, find exclusive deals, and connect with a community of like-minded individuals at Savewhere.net today.
By following these tips and exploring the resources available at Savewhere.net, you can take control of your finances and achieve your financial goals. Start your journey to financial freedom today by visiting Savewhere.net.
[Address: 100 Peachtree St NW, Atlanta, GA 30303, United States. Phone: +1 (404) 656-2000. Website: savewhere.net.]
12. Call to Action: Discover More Savings Opportunities
Ready to take control of your finances and start saving money today? Visit savewhere.net to discover more tips, find exclusive deals, and connect with a community of like-minded individuals.
Explore our resources and start your journey to financial freedom. Don’t wait—start saving today!
Never miss another article
Highly curated content, case studies, Riverside updates, and more.
Thank you! Your submission has been received!
Oops! Something went wrong while submitting the form.