Losing your iPhone can be a stressful experience. Fortunately, Apple offers a robust feature called “Find My” that can significantly increase your chances of locating a misplaced or lost device. Setting up Find My is a proactive step every iPhone user should take. This guide will walk you through the process of enabling Find My on your iPhone and other Apple devices, ensuring you’re prepared should the unexpected happen.
Setting Up Find My on Your iPhone: Step-by-Step
Enabling Find My on your iPhone is straightforward and only takes a few minutes. Follow these simple steps to activate this crucial feature:
-
Open the Settings App: Locate and tap the “Settings” app icon on your iPhone home screen. It’s usually represented by a gray gear icon.
-
Access Your Apple ID Profile: At the top of the Settings menu, tap on your name. This will take you to your Apple ID profile.
-
Navigate to Find My: Within your Apple ID settings, scroll down and tap on the “Find My” option.
-
Enable Share My Location (Optional): On the Find My screen, you’ll see “Share My Location.” Turning this on allows friends and family members to see your location, which can be helpful for coordination or safety. This step is optional and depends on your personal preferences.
-
Turn On Find My iPhone: Tap on “Find My iPhone” (or “Find My [device]” depending on your iOS version). Then, toggle the switch next to “Find My iPhone” to the “on” position (it will turn green).
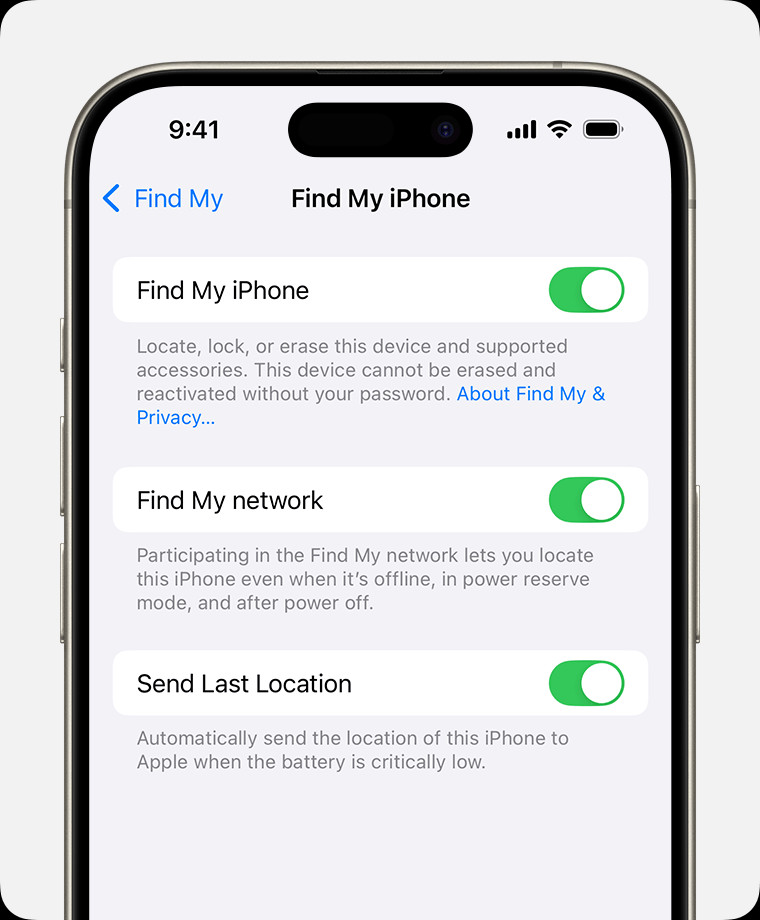 iPhone Find My Settings Screen
Alt text: Find My iPhone settings screen on iOS 18, showing the Find My iPhone toggle switch in the on position.
-
Enable Find My network: Ensure the “Find My network” toggle is also turned on. This feature leverages a vast network of encrypted and anonymous Apple devices to help locate your iPhone, even when it’s offline. This greatly expands the reach of Find My and increases the likelihood of finding your device.
-
Activate Send Last Location: For added security, turn on “Send Last Location.” This setting automatically sends your iPhone’s last known location to Apple’s servers when the battery is critically low. This can be invaluable if your iPhone powers off before you can locate it.
Understanding Location Services for Find My
For Find My to effectively locate your iPhone on a map, Location Services must be enabled. Here’s how to ensure Location Services are active:
-
Go to Privacy & Security Settings: From the main Settings menu, scroll down and tap on “Privacy & Security”.
-
Access Location Services: Tap on “Location Services” at the top of the Privacy & Security menu.
-
Turn On Location Services: Make sure the “Location Services” toggle at the top of the screen is turned on (green). If it’s off, toggle it to the “on” position.
With Location Services enabled and Find My set up, your iPhone is now ready to be located if it ever goes missing.
Setting Up Find My for AirPods, Apple Watch, and Beats
If you use AirPods, Apple Watch, or compatible Beats headphones paired with your iPhone, Find My can automatically extend its protection to these devices as well. As long as Find My iPhone is enabled, your paired accessories are usually automatically added to Find My.
To maximize the findability of AirPods Pro or AirPods Max, ensure the Find My network is enabled for them specifically:
- Open Bluetooth Settings: On your iPhone, open the Settings app and tap on “Bluetooth.”
- Find Your AirPods: Locate your AirPods in the list of Bluetooth devices and tap the “More Info” button (ⓘ) next to them.
- Check Find My network: Scroll down and verify that “Find My network” is toggled on.
For Apple Watch with cellular or Wi-Fi capabilities, Find My network can also be enabled:
- Open Settings on Apple Watch: On your Apple Watch, open the Settings app (gear icon).
- Access Your Name: Tap on your name at the top of the Settings menu.
- Find Your Apple Watch: Scroll down until you see your listed Apple Watch. Tap on your watch’s name.
- Enable Find My Watch Network: Tap on “Find My Watch” and ensure “Find My network” is turned on.
Adding AirTags and Other Items to Find My
Beyond Apple devices, you can also use Find My to track everyday items by attaching AirTags or compatible third-party findable accessories. The setup process for these devices is generally straightforward and guided by the Find My app when you attempt to add a new item.
Similarly, Apple Pencil Pro and iPhone Wallet (MagSafe) can also be added to Find My for enhanced tracking capabilities. Refer to Apple’s support documentation for specific instructions on setting up these accessories with Find My.
Setting Up Find My on Your Mac
The Find My feature isn’t limited to iPhones and iPads; you can also enable it on your Mac computer:
-
Open System Settings: Click on the Apple menu () in the top-left corner of your screen and select “System Settings.”
-
Access Apple ID Settings: Click on your name at the top of the System Settings window.
-
Go to iCloud Settings: Click on “iCloud” in the Apple ID sidebar.
-
View All iCloud Features: Click the “Show More Apps…” or “See More Apps…” button to see all iCloud features.
-
Enable Find My Mac: Scroll down in the list of iCloud features and locate “Find My Mac.” Toggle the switch next to it to turn it on.
Alt text: Find My Mac settings screen on macOS Sequoia, showing the Find My Mac toggle switch enabled.
-
Allow Location Access: You might be prompted to “Allow Find My Mac to Use Your Location.” Click “Allow” to grant location access, which is essential for the feature to work.
Just like on iPhone, ensure Location Services are enabled on your Mac for Find My to function correctly. You can verify this in System Settings under “Privacy & Security” > “Location Services.”
Conclusion: Peace of Mind with Find My
Setting up Find My across your Apple ecosystem is a simple yet incredibly valuable step to protect your devices and belongings. By following these instructions, you’ll gain peace of mind knowing that you have a powerful tool at your disposal to locate your iPhone, iPad, Mac, and accessories should they ever be misplaced or lost. Take a few minutes today to enable Find My – it’s an investment in security and convenience that you’ll appreciate should you ever need it.