Saving files as PDFs is crucial for maintaining document integrity and sharing compatibility. At savewhere.net, we understand the need for seamless file management. This guide will walk you through various methods to “save as PDF” across different platforms and programs, helping you optimize your financial documents and more.
1. Why Save as PDF? Unveiling the Benefits
Saving a file as a PDF (Portable Document Format) offers numerous advantages, making it a standard practice for document sharing and archiving. PDFs preserve formatting, ensure cross-platform compatibility, and enhance security. Let’s explore the key benefits of using PDFs:
- Preserved Formatting: PDFs maintain the original formatting of your document, regardless of the device or operating system on which it is viewed. This is crucial for ensuring that your documents appear as intended, whether you are sharing a financial report or a beautifully designed presentation.
- Cross-Platform Compatibility: PDFs can be opened on virtually any device, including Windows, macOS, iOS, Android, and Linux. This universal compatibility makes PDFs ideal for sharing documents with a wide audience.
- Enhanced Security: PDFs offer security features such as password protection and the ability to restrict printing or copying. This is particularly useful for sensitive financial documents that require an extra layer of security. According to the Consumer Financial Protection Bureau (CFPB), safeguarding personal financial information is essential to prevent fraud and identity theft.
- Smaller File Size: PDFs can be optimized to reduce file size without sacrificing quality. This is beneficial for emailing documents or storing them in the cloud, especially when dealing with large financial reports or portfolios.
- Archiving: The ISO 19005-1 standard (PDF/A) ensures that PDFs can be archived for long-term preservation. This standard guarantees that the document will look the same when opened in the future, making it ideal for important financial records.
By saving your documents as PDFs, you ensure that they remain accessible, secure, and visually consistent, regardless of who views them or when. This makes PDFs an indispensable tool for personal and professional use.
2. How to Save as PDF in Microsoft Office Suite
Microsoft Office is a staple in many workplaces and homes. Here’s how to save as PDF in its various applications:
2.1. Access
Microsoft Access doesn’t directly “save as PDF” in the same way as other Office apps. Instead, you export your table or report to PDF. Here’s how:
-
Open the Table or Report: Start by opening the specific table or report you wish to convert to PDF within Microsoft Access.
-
Navigate to External Data Tab: Go to the “External Data” tab located in the ribbon menu.
-
Select PDF or XPS: In the “Export” group, choose the “PDF or XPS” option.
 Export PDF or XPS
 -
File Name and Type:
- In the “File Name” field, either type a name for your PDF document or select an existing name to overwrite.
- From the “Save as type” list, ensure that “PDF (*.pdf)” is selected.
-
Choose Quality:
- For high print quality, select “Standard (publishing online and printing)”.
- If file size is more critical, opt for “Minimum size (publishing online)”.
-
Set Options: Click on “Options” to configure settings like the page range to be printed, whether to include markup, and other output preferences. Select “OK” after adjusting.
-
Publish: Finally, click “Publish” to create your PDF document.
2.2. Excel
Converting your Excel spreadsheets to PDF format is a straightforward process, ensuring your data is easily shareable and retains its formatting. Here’s how to do it:
-
Open Your Excel File: Begin by opening the Excel file you want to save as a PDF.
-
Navigate to the File Tab: Click on the “File” tab located in the top-left corner of the Excel window.
-
Select Save As: In the File menu, choose “Save As”. If you are using Excel 2013 or later, you may need to select a location and folder first to see the “Save As” dialog box.
-
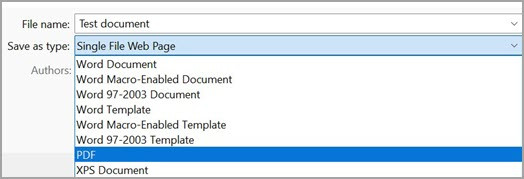
Name Your File: In the “File Name” box, enter a name for your PDF file. If the file already has a name, you can keep it or change it as needed.
-
Choose PDF as the Save Type:
- Click on the “Save as type” dropdown menu.
- Select “PDF (*.pdf)” from the list of available file formats.
-
Optional Settings:
-
Open file after publishing: Check this box if you want the PDF file to automatically open once it has been saved.
-
Quality:
- “Standard (publishing online and printing)”: Use this option for high print quality.
- “Minimum size (publishing online)”: Select this option if file size is more important than print quality.
-
-
Adjust Options: Click on the “Options” button to customize your PDF further.
- In the Options dialog box, you can set the page range to be printed, choose whether markup should be included, and adjust output options.
- For more detailed information on the Options dialog box in Excel, refer to More about PDF options.
- Click “OK” when you have finished adjusting the options.
-
Save Your PDF: Click the “Save” button to save your Excel file as a PDF.
2.3. OneNote
Saving your OneNote notebooks as PDFs allows you to easily share and preserve your notes. Here’s a step-by-step guide:
- Open OneNote: Launch the OneNote application and open the notebook you wish to save as a PDF.
- Go to the File Tab: Click on the “File” tab located in the top-left corner of the OneNote window.
- Select Export: In the File menu, choose “Export”.
- Choose Export Current: Under the “Export Current” section, select which part of the notebook you want to save as a PDF. You can choose from options like “Page,” “Section,” or “Notebook,” depending on your needs.
- Select PDF Format: Under the “Select Format” section, choose “PDF (*.pdf)” as the export format. Then, click the “Export” button.
- Name and Save: In the “Save As” dialog box, enter a name for your notebook in the “File Name” field. Then, click “Save” to save your OneNote notebook as a PDF.
2.4. PowerPoint
Converting your PowerPoint presentations to PDF format ensures they can be easily shared and viewed without compatibility issues. Here’s how to save your PowerPoint as a PDF:
-
Open Your PowerPoint Presentation: Launch PowerPoint and open the presentation you want to save as a PDF.
-
Navigate to the File Tab: Click on the “File” tab located in the top-left corner of the PowerPoint window.
-
Select Save As: In the File menu, choose “Save As”. If you are using PowerPoint 2013 or later, you might need to select a location and folder first to see the “Save As” dialog box.
-
Name Your File: In the “File Name” box, enter a name for your PDF file. If the file already has a name, you can keep it or change it as needed.
-
Choose PDF as the Save Type:
- Click on the “Save as type” dropdown menu.
- Select “PDF (*.pdf)” from the list of available file formats.
-
Optional Settings:
-
Open file after publishing: Check this box if you want the PDF file to automatically open once it has been saved.
-
Quality:
- “Standard (publishing online and printing)”: Use this option for high print quality.
- “Minimum size (publishing online)”: Select this option if file size is more important than print quality.
-
-
Adjust Options: Click on the “Options” button to customize your PDF further.
- In the Options dialog box, you can set the page range to be printed, choose whether markup should be included, and adjust output options.
- Click “OK” when you have finished adjusting the options.
-
Save Your PDF: Click the “Save” button to save your PowerPoint presentation as a PDF.
2.5. Project
Saving your Microsoft Project files as PDFs is essential for sharing project plans with stakeholders who may not have Project installed. Here’s how:
- Open Your Project File: Launch Microsoft Project and open the project file you want to save as a PDF.
- Navigate to the File Tab: Click on the “File” tab located in the top-left corner of the Project window.
- Select Save As: In the File menu, choose “Save As”. If you are using Project 2013 or later, you might need to select a location and folder first to see the “Save As” dialog box.
- Name Your File: In the “File Name” box, enter a name for your PDF file. If the file already has a name, you can keep it or change it as needed.
- Choose PDF as the Save Type:
- Click on the “Save as type” dropdown menu.
- Select “PDF Files (*.pdf)” or “XPS Files (*.xps)” from the list of available file formats.
- Click Save: After selecting the file type, click the “Save” button.
- Document Export Options: The “Document Export Options” dialog box will appear. Here, you can configure additional settings for your PDF export.
- Publish Range: Choose the range of the project to be included in the PDF. Options include “Complete Project,” “Selected Rows,” or “Custom Range.”
- Include Non-printing Information: Check this box if you want to include non-printing information such as notes and objects.
- ISO 19500-1 compliance (PDF only): Select this option if you need the PDF to comply with the ISO 19500-1 standard, which ensures long-term archiving.
- Click OK: Once you have configured the export options, click “OK” to save your project file as a PDF.
2.6. Publisher
Saving your Microsoft Publisher publications as PDFs allows you to easily share and print them without compatibility issues. Here’s a detailed guide:
- Open Your Publisher File: Launch Microsoft Publisher and open the publication you want to save as a PDF.
- Navigate to the File Tab: Click on the “File” tab located in the top-left corner of the Publisher window.
- Select Save As: In the File menu, choose “Save As”. If you are using Publisher 2013 or later, you might need to select a location and folder first to see the “Save As” dialog box.
- Name Your File: In the “File Name” box, enter a name for your PDF file. If the file already has a name, you can keep it or change it as needed.
- Choose PDF as the Save Type:
- Click on the “Save as type” dropdown menu.
- Select “PDF (*.pdf)” from the list of available file formats.
- Adjust Optimization Options: If you want to change how the document is optimized, click the “Change” button (or “Options” in Publisher 2013 or 2016).
- Picture Resolution: Adjust the resolution of the images in your publication. Higher resolution results in better quality but larger file sizes.
- Non-printing Information: Choose whether to include non-printing information in the PDF.
- Click “Print Options” to adjust printing settings for the document.
- Click “OK” when you have finished adjusting the options.
- Optional Settings: Check the “Open file after publishing” box if you want the PDF file to automatically open once it has been saved.
- Save Your PDF: Click the “Save” button to save your Publisher publication as a PDF.
2.7. Visio
Saving your Visio diagrams as PDFs ensures they can be easily shared and viewed while preserving their visual integrity. Here’s how:
-
Open Your Visio File: Launch Microsoft Visio and open the diagram you want to save as a PDF.
-
Navigate to the File Tab: Click on the “File” tab located in the top-left corner of the Visio window.
-
Select Save As: In the File menu, choose “Save As”. If you are using Visio 2013 or later, you might need to select a location and folder first to see the “Save As” dialog box.
-
Name Your File: In the “File Name” box, enter a name for your PDF file. If the file already has a name, you can keep it or change it as needed.
-
Choose PDF as the Save Type:
- Click on the “Save as type” dropdown menu.
- Select “PDF (*.pdf)” from the list of available file formats.
-
Optional Settings:
-
Automatically view file after saving: Check this box if you want the PDF file to automatically open once it has been saved.
-
Quality:
- “Standard (publishing online and printing)”: Use this option for high print quality.
- “Minimum size (publishing online)”: Select this option if file size is more important than print quality.
-
-
Adjust Options: Click on the “Options” button to customize your PDF further.
- In the Options dialog box, you can set the page range to be printed, choose whether markup should be included, and adjust output options.
- Click “OK” when you have finished adjusting the options.
-
Save Your PDF: Click the “Save” button to save your Visio diagram as a PDF.
2.8. Word
Converting your Word documents to PDF format is essential for maintaining formatting and ensuring compatibility across different devices. Here’s how to do it:
-
Open Your Word Document: Start by opening the Word document you want to save as a PDF.
-
Navigate to the File Tab: Click on the “File” tab located in the top-left corner of the Word window.
-
Select Save As or Save a Copy:
- If the file has been previously saved, choose “File” > “Save a Copy.”
- If the file is new and unsaved, choose “File” > “Save As.”
-
Choose a Save Location: Click “Browse” to select the location on your computer where you want to save the PDF file.
-
Select PDF as the Save Type: In the “Save as type” dropdown menu, choose “PDF (*.pdf).”
Export PDF or XPS -
Adjust Options (Optional): For more advanced settings, click “More Options” and then “Options” to customize your PDF.
- Page Range: Choose an option under “Page range” to save only specific pages of your document.
- Publish What: Under “Publish what,” select “Document showing markup” to include tracked changes in the PDF. Otherwise, ensure “Document” is selected.
- Create Bookmarks: Check “Create bookmarks using” and choose “Headings” or “Word Bookmarks” to create bookmarks in the PDF file.
- Include Document Properties: Ensure “Document properties” is selected to include document properties in the PDF.
- Accessibility: Select “Document structure tags for accessibility” to make the document easier for screen-reading software.
- ISO 19005-1 compliant (PDF/A): This option saves the PDF document as version 1.7 PDF, which is an archiving standard. PDF/A ensures the document will look the same when opened on different computers in the future.
- Bitmap text when fonts may not be embedded: If fonts can’t be embedded into the document, the PDF uses bitmap images of the text to ensure the PDF looks the same as the original document. If this option isn’t selected and the file uses a font that can’t be embedded, the PDF reader might substitute another font.
- Encrypt the document with a password: Select this option to restrict access so only people with the password can open the PDF. When you select “OK,” Word opens the “Encrypt PDF Document” box, where you can type and re-enter a password.
-
Save Your PDF: Click the “Save” button to save your Word document as a PDF.
3. Saving as PDF on Mac
3.1. Using Microsoft Office for Mac
If you’re using Microsoft Office on a Mac, here’s how to save your files as PDFs:
- Open Your File: Launch the Microsoft Office application (e.g., Word, Excel, PowerPoint) and open the file you want to save as a PDF.
- Go to File > Save As: Click on “File” in the top menu, then select “Save As.”
- Select File Format: At the bottom of the “Save As” window, find and select “File Format.”
- Choose PDF: From the dropdown list of available file formats, choose “PDF.”
- Name and Export: Give your file a name (if it doesn’t already have one), choose where you want to save it, and then click “Export.”
3.2. General Mac Instructions
Virtually any application on macOS that can print can also save as a PDF. This is a system-level feature.
- Open Your Document: Open the file you wish to convert to PDF with its associated application (e.g., TextEdit, Safari, Preview).
- Go to File > Print: Click on “File” in the top menu, then select “Print.” Alternatively, you can use the keyboard shortcut
Cmd + P. - PDF Dropdown: In the Print dialog box, look for a “PDF” dropdown menu, usually located in the bottom-left corner.
- Save as PDF: Click on the “PDF” dropdown menu and select “Save as PDF.”
- Name and Save: A new dialog box will appear, prompting you to name your file, choose a save location, and add any relevant tags. Once you’ve done this, click “Save.”
4. How to Save as PDF Online
4.1. Using Online Conversion Tools
There are numerous online tools available that allow you to convert various file types to PDF without needing to install any software. These tools are particularly useful for quick, one-off conversions. Here are a few popular options:
- Smallpdf: Smallpdf is a comprehensive online tool that supports a wide range of file formats, including Word, Excel, PowerPoint, and images. It offers a simple, drag-and-drop interface, making it easy to upload and convert your files to PDF.
- iLovePDF: iLovePDF is another popular online converter that provides a variety of PDF-related tools, including convert-to-PDF, merge, split, compress, and more. It supports batch processing, allowing you to convert multiple files at once.
- Zamzar: Zamzar is a versatile online file converter that supports over 1200 different file formats. To convert a file to PDF, simply upload it to the Zamzar website, select “PDF” as the output format, and click “Convert.”
4.2. Google Docs
Google Docs is a free, web-based word processor that allows you to create, edit, and save documents online. You can easily save a Google Docs document as a PDF.
-
Open Your Document: Open your document in Google Docs.
-
Go to File > Download > PDF Document (.pdf):
- Click on “File” in the top menu.
- Hover over “Download.”
- Select “PDF Document (.pdf).”
-
Choose a Save Location: Your document will be downloaded as a PDF file, and you can choose where to save it on your computer.
5. How to Save as PDF on Mobile Devices
5.1. iOS Devices
On iOS devices like iPhones and iPads, saving a document, webpage, or email as a PDF is straightforward using the built-in print function.
- Open the Document/Webpage/Email: Start by opening the item you want to save as a PDF.
- Access the Share Sheet: Tap the “Share” icon. This icon usually looks like a square with an arrow pointing upwards. In some apps, you may need to tap “…” to find the Share option.
- Select Print: Scroll through the options in the Share Sheet until you find “Print.” Tap “Print.”
- Use Pinch Gesture to Preview: In the Print Options screen, you’ll see a preview of your document. Use a pinch gesture (zoom in) on the preview. This action converts the preview into a PDF.
- Save to Files or Share: After the pinch gesture, the PDF version of your document will open. You can now save it to your “Files” app or share it via email, messages, or other apps.
5.2. Android Devices
Saving as a PDF on Android devices is generally supported through the print function.
- Open the File: Open the document, image, webpage, or email you want to save as a PDF.
- Access the Print Option:
- Tap the three dots (menu icon) in the upper right-hand corner.
- Look for and tap “Print.”
- Select “Save as PDF”: In the print options, tap the dropdown menu at the top (which usually displays a printer name). Choose “Save as PDF.”
- Save the File: Tap the “Save” button (usually a PDF icon). Choose a location on your device and tap “Save.”
5.3. Using Microsoft Office Apps on Mobile
Microsoft Office apps on mobile devices, such as Word, Excel, and PowerPoint, also offer a direct way to export files as PDFs.
- Open the File: Open the document you wish to convert to PDF in the Microsoft Office app.
- Tap the File Button: Tap the “File” button, usually located at the top-left corner of the screen.
- Choose Export: In the File menu, select “Export.”
- Select PDF: Choose “PDF” as the export format.
- Save the File: Name the file and choose where to save it on your device.
6. Troubleshooting Common PDF Conversion Issues
Converting files to PDF is generally a smooth process, but sometimes you might encounter issues. Here are some common problems and how to troubleshoot them:
- Formatting Issues:
- Problem: Fonts, layouts, or images appear distorted or misplaced in the PDF.
- Solution:
- Embed Fonts: Ensure that all fonts are embedded in the original document before converting to PDF. This prevents font substitution issues.
- Check Compatibility: Use the “Standard (publishing online and printing)” option in Microsoft Office applications for high print quality.
- Adjust Margins: Verify that the margins are correctly set in the original document to avoid content being cut off in the PDF.
- File Size Issues:
- Problem: The PDF file is too large.
- Solution:
- Compress Images: Reduce the resolution of images in the original document.
- Use “Minimum size (publishing online)” Option: This option optimizes the PDF for online viewing, reducing the file size.
- Online Compression Tools: Use online PDF compression tools like Smallpdf or iLovePDF to further reduce the file size.
- Password Protection Issues:
- Problem: Forgetting the password for a password-protected PDF.
- Solution:
- Password Recovery Tools: If you have access to a password recovery tool or a PDF password remover, you might be able to regain access. However, be cautious about using third-party tools for security reasons.
- Recreate the PDF: The most straightforward solution is often to recreate the PDF from the original document without password protection.
- Hyperlink Issues:
- Problem: Hyperlinks are not working in the PDF.
- Solution:
- Verify Hyperlinks: Ensure that the hyperlinks are correctly formatted in the original document.
- Check Conversion Settings: In some applications, there might be an option to include hyperlinks during the PDF conversion process. Make sure this option is enabled.
By addressing these common issues, you can ensure that your PDF conversions are successful and that the resulting files meet your needs.
7. Optimizing PDFs for Financial Documents
When dealing with financial documents, optimizing your PDFs is crucial to maintain data integrity, ensure security, and reduce file size for easy sharing. Here are several key strategies to optimize PDFs specifically for financial documents:
- Password Protection: Add password protection to prevent unauthorized access to sensitive financial information. Use strong, unique passwords and consider using PDF encryption features available in programs like Adobe Acrobat.
- Restrict Permissions: Set permissions to prevent printing, copying, or editing of the PDF. This can protect your financial data from being altered or distributed without your consent.
- Reduce File Size:
- Compress Images: Financial documents often contain scanned images or charts. Compress these images to reduce the overall file size without significantly impacting quality.
- Remove Unnecessary Elements: Eliminate any unnecessary elements, such as comments or annotations, before finalizing the PDF.
- Use PDF Optimization Tools: Utilize PDF optimization tools to further reduce file size while maintaining readability.
- Ensure Accessibility:
- Add Document Structure Tags: Include document structure tags to make the PDF accessible to screen readers. This is important for compliance with accessibility standards and for users with disabilities.
- Set Document Language: Specify the document language in the PDF metadata to ensure proper rendering of text and improve accessibility.
- Verify Data Integrity: Before finalizing the PDF, double-check all financial figures, dates, and other critical data to ensure accuracy.
- Compliance with Standards: Ensure that your PDFs comply with relevant industry standards, such as PDF/A for long-term archiving. This is especially important for financial records that need to be preserved for regulatory or historical purposes.
- Secure Sharing Practices: When sharing financial PDFs via email or cloud storage, use secure methods such as encrypted email or password-protected cloud folders.
8. The Importance of Secure File Sharing
In today’s digital age, the importance of secure file sharing cannot be overstated, especially when dealing with sensitive information. Whether it’s personal financial documents, confidential business reports, or private medical records, ensuring that your data is protected during transit and storage is crucial.
-
Encryption: Encryption is the process of converting readable data into an unreadable format, which can only be deciphered with a decryption key. There are two main types of encryption:
- In-transit encryption: Protects data while it’s being transferred over the internet.
- At-rest encryption: Protects data while it’s stored on a device or in the cloud.
-
Secure File Sharing Platforms: Several secure file sharing platforms offer end-to-end encryption, ensuring that only the sender and recipient can access the files. Some popular options include:
- Citrix ShareFile: A secure file sharing and collaboration platform designed for business use.
- Tresorit: An end-to-end encrypted file sharing service that prioritizes privacy and security.
- Nextcloud: An open-source file sharing platform that allows you to maintain control over your data.
-
Virtual Private Networks (VPNs): A VPN creates a secure, encrypted connection between your device and the internet. This can protect your data from being intercepted by hackers or eavesdroppers, especially when using public Wi-Fi networks.
-
Two-Factor Authentication (2FA): 2FA adds an extra layer of security to your online accounts by requiring a second verification method, such as a code sent to your phone, in addition to your password.
-
Regularly Update Software: Keep your operating system, web browser, and security software up to date. Software updates often include security patches that address newly discovered vulnerabilities.
9. Savewhere.net: Your Partner in Financial Savings and Security
At savewhere.net, we understand the importance of managing your finances effectively and securely. Our platform provides resources, tips, and tools to help you save money and protect your financial information. Here’s how savewhere.net can assist you:
- Financial Management Tools: Access a variety of financial management tools, including budget templates, expense trackers, and investment calculators, to help you stay on top of your finances.
- Tips for Saving Money: Discover practical tips and strategies for saving money in various areas of your life, such as shopping, dining, travel, and entertainment.
- Secure File Sharing Practices: Learn about secure file sharing practices, including encryption, password protection, and secure file sharing platforms, to protect your financial documents from unauthorized access.
- Latest Updates on Financial Security: Stay informed about the latest threats to financial security, such as phishing scams, identity theft, and data breaches, and learn how to protect yourself from these risks.
Address: 100 Peachtree St NW, Atlanta, GA 30303, United States.
Phone: +1 (404) 656-2000.
Website: savewhere.net.
10. FAQs About Saving as PDF
-
Can I edit a PDF after saving it?
Yes, but you’ll need a PDF editor like Adobe Acrobat. Some free online tools offer limited editing capabilities.
-
Is it safe to convert sensitive documents to PDF online?
It depends on the tool. Use reputable services with secure connections (HTTPS) and read their privacy policies.
-
How can I reduce the size of a PDF file?
Use online PDF compression tools or the “Reduce File Size” option in Adobe Acrobat.
-
Why does my PDF look different from the original document?
This can happen if fonts are not embedded. Ensure fonts are embedded when saving to PDF.
-
Can I save a webpage directly as a PDF?
Yes, most browsers have a “Print to PDF” option.
-
What is PDF/A, and why is it important?
PDF/A is an ISO standard for archiving electronic documents, ensuring they can be opened in the future. It’s important for long-term preservation.
-
How do I password-protect a PDF?
Use a PDF editor like Adobe Acrobat or online tools to add password protection.
-
Are there free PDF converters available?
Yes, many free online PDF converters are available, such as Smallpdf and iLovePDF.
-
Can I convert a scanned document to PDF?
Yes, you can use a scanner to create a PDF from a physical document. Scanning apps on your phone can also do this.
-
How do I ensure my PDF is accessible to people with disabilities?
Add document structure tags and set the document language to ensure accessibility.
By following this comprehensive guide and utilizing the resources available at savewhere.net, you can confidently manage your documents and ensure your financial information is both accessible and secure.