
Saving a Google Slide as a JPEG is a fantastic way to share your presentations, reuse slides, and make them accessible across various platforms, and savewhere.net is here to show you how. By converting your slides into image format, you gain flexibility and portability, ensuring your visual content is easily viewable and shareable. Ready to unlock this handy skill? Let’s explore the simple steps.
1. Why Convert Google Slides to JPEG Images?
Converting your Google Slides into JPEG images offers several advantages. Understanding these benefits will highlight why knowing How To Save A Google Slide As A Jpeg is a valuable skill.
1.1 Enhanced Sharing Capabilities
Sharing individual slides as images simplifies distribution through email, social media, and messaging apps. It removes the need for recipients to have Google Slides installed, making your content universally accessible. Sharing visuals as images can significantly broaden your reach.
1.2 Broad Device Compatibility
JPEG images can be viewed on virtually any device, regardless of operating system or installed software. This widespread compatibility ensures that your presentation content is accessible to anyone, anywhere. JPEGs offer unmatched versatility in accessibility.
1.3 Improved Embedding Options
JPEGs are ideal for embedding in documents, websites, and other platforms that support image uploads. This makes it easy to incorporate your slides into various contexts without compatibility issues. Embedding images provides seamless integration.
1.4 Reduced File Size
In many cases, saving a slide as a JPEG can result in a smaller file size compared to the original presentation file. This is particularly useful when sending slides via email or uploading them to websites with file size restrictions. Smaller files enhance efficiency.
1.5 Editing Flexibility
Saving slides as JPEGs allows for further editing and manipulation using image editing software. You can enhance visuals, add annotations, or customize the slide to fit specific needs. Editing provides creative control.
2. Step-by-Step Guide: Saving a Google Slide as a JPEG
Saving a Google Slide as a JPEG is a straightforward process. Follow these detailed steps to convert your slides into high-quality images:
2.1 Open Your Google Slides Presentation
Start by opening the Google Slides presentation that contains the slide you want to save as a JPEG. Make sure you have the correct presentation open. This first step is crucial for the rest of the process.
2.2 Select the Desired Slide
Navigate to the specific slide you wish to convert. Ensure that the slide is visually appealing and contains the information you want to share as an image. Choosing the right slide is important.
2.3 Access the “File” Menu
Click on the “File” menu located in the upper left corner of the Google Slides interface. This menu provides access to various options, including downloading the slide. The “File” menu is the gateway to exporting.
2.4 Choose “Download”
From the “File” menu, select “Download.” This will open a submenu with various file format options. The download submenu offers multiple formats.
2.5 Select “JPEG Image (.jpg, current slide)”
In the “Download” submenu, choose “JPEG image (.jpg, current slide).” This option will save the current slide as a JPEG file. Ensure you select the correct file format for your needs.
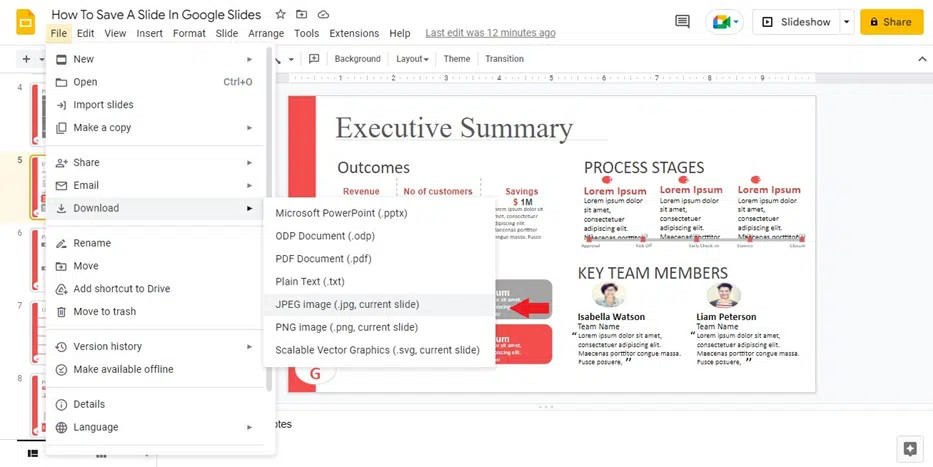 Download a Google Slide as a picture
2.6 Save the File
A dialog box will appear, prompting you to choose a location to save the JPEG image. Select your desired folder and rename the file if necessary. Saving the file in an easily accessible location is recommended.
2.7 Verify the Saved Image
Navigate to the folder where you saved the JPEG image and open it to verify that the slide has been successfully converted and the image quality is satisfactory. Checking the image ensures the process was successful.
3. Alternative Methods to Save Google Slides as JPEG
Besides the standard method, here are a couple of alternative approaches to saving your Google Slides as JPEGs:
3.1 Using Google Keep
- Open Your Google Slides Presentation: As before, begin by opening your presentation in Google Slides.
- Select the Slide: Choose the slide you wish to save as a JPEG.
- Right-Click on the Slide: Right-click anywhere on the slide and select “Save to Keep.”
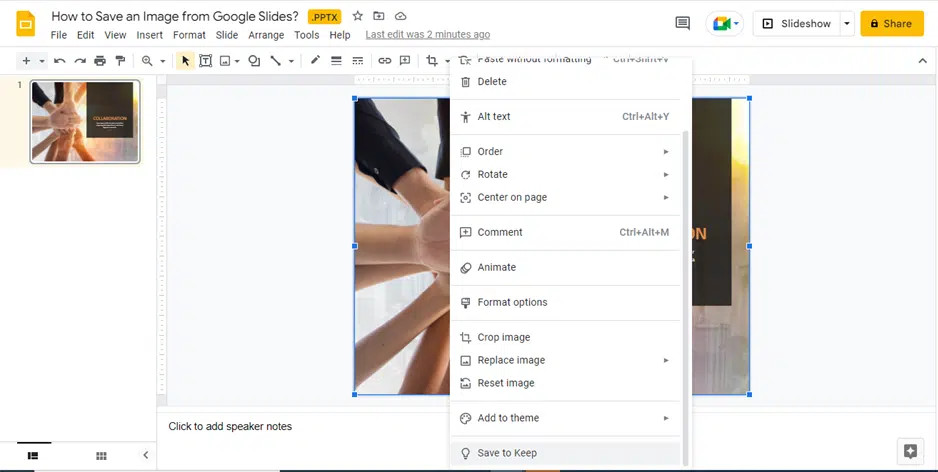 How to Save a Slide as an Image on Google Slides
 - Open Google Keep: Open Google Keep, either in a new tab or through the sidebar.
- Find the Saved Slide: Your slide will appear as a note in Google Keep.
- Right-Click the Image: Right-click on the image within the Keep note.
- Save Image As: Select “Save Image As” and choose a location to save the JPEG file.
3.2 Taking a Screenshot
- Open the Google Slides Presentation: Open your presentation and go to the slide you want to save.
- Maximize the Slide: Make sure the slide is displayed as large as possible on your screen.
- Take a Screenshot: Use your computer’s screenshot function (Print Screen on Windows, Command+Shift+3 on macOS) to capture the slide.
- Crop the Image: Open the screenshot in an image editing program (like Paint on Windows or Preview on macOS) and crop the image to include only the slide.
- Save as JPEG: Save the cropped image as a JPEG file in your desired location.
4. Optimizing Your Google Slides for JPEG Conversion
To achieve the best results when saving Google Slides as JPEGs, consider these optimization tips:
4.1 Use High-Resolution Images
When creating your slides, use high-resolution images to ensure that the final JPEG output maintains clarity and detail. High-quality visuals translate to better image output.
4.2 Choose Appropriate Fonts
Select fonts that are easy to read and render well when converted to JPEG format. Avoid overly decorative or complex fonts that may appear distorted in the image. Font choice impacts readability.
4.3 Simplify Complex Graphics
If your slides contain complex graphics or animations, consider simplifying them to ensure they translate well to a static image format. Simplification enhances clarity.
4.4 Check Color Contrast
Ensure that there is sufficient color contrast between text and background elements to maintain readability in the JPEG image. Good contrast is crucial for accessibility.
4.5 Remove Unnecessary Elements
Remove any unnecessary elements or clutter from the slide to focus attention on the key information and improve the overall visual appeal of the JPEG. Clean design improves focus.
5. Addressing Common Issues
While saving Google Slides as JPEGs is generally simple, you might encounter a few common issues. Here’s how to troubleshoot them:
5.1 Low Image Quality
Issue: The JPEG image appears blurry or pixelated.
Solution:
- Use high-resolution images in your original slide.
- Check the compression settings in your image editing software if you’re using it to further edit the JPEG.
- Try saving the slide as a PNG for a lossless format, then convert the PNG to a JPEG.
5.2 Incorrect Slide Dimensions
Issue: The JPEG image is not the correct size or aspect ratio.
Solution:
- Ensure that the slide dimensions in Google Slides are set correctly before downloading.
- Crop the image in an image editing program to the desired dimensions.
5.3 Missing Elements
Issue: Some elements from the slide are missing in the JPEG image.
Solution:
- Make sure all elements are fully visible within the slide area.
- If using the screenshot method, ensure the entire slide is captured in the screenshot.
5.4 Color Distortion
Issue: The colors in the JPEG image appear different from the original slide.
Solution:
- Check your monitor’s color settings to ensure they are calibrated correctly.
- Use a color management profile in your image editing software to maintain color accuracy.
5.5 File Size Issues
Issue: The JPEG file size is too large.
Solution:
- Use an image compression tool to reduce the file size without significantly sacrificing quality.
- Adjust the quality settings when saving the JPEG to find a balance between file size and image quality.
6. Practical Applications of Saving Google Slides as JPEGs
Understanding how to save Google Slides as JPEGs opens up a range of practical applications. Here are a few scenarios where this skill can be particularly useful:
6.1 Creating Social Media Content
Saving slides as JPEGs allows you to easily share key messages, quotes, or data visualizations on social media platforms. Visual content is highly engaging and can attract more attention. Social media thrives on visuals.
6.2 Embedding in Blog Posts
Incorporating slides as images in blog posts can enhance the visual appeal of your content and illustrate key points more effectively. Images break up text and keep readers engaged. Blog posts benefit from visuals.
6.3 Sharing via Email
Sending individual slides as JPEGs in email is a convenient way to share specific information without requiring recipients to open an entire presentation. Quick sharing enhances communication.
6.4 Printing Handouts
Saving slides as JPEGs allows you to easily print them as handouts for presentations or meetings. Printed materials support engagement.
6.5 Creating Infographics
Combining multiple slides as JPEGs into a single infographic can present complex information in a visually appealing and easily digestible format. Infographics simplify information.
7. Enhancing Your Presentations with savewhere.net
At savewhere.net, we understand the importance of effective communication and visual presentation. We offer a range of resources and tools to help you create engaging and impactful presentations. Here’s how savewhere.net can enhance your presentation skills:
7.1 Budget-Friendly Tips
We provide budget-friendly tips for creating visually appealing presentations without breaking the bank. Learn how to use free resources and tools to enhance your slides. Saving money is always a plus.
7.2 Design Templates
Access a variety of professionally designed presentation templates that can be customized to fit your specific needs. Templates save time and effort.
7.3 Visual Aids
Discover resources for finding high-quality images, icons, and other visual aids to enhance your slides. Visuals enhance engagement.
7.4 Expert Advice
Benefit from expert advice on presentation design, delivery, and engagement techniques. Expert advice improves performance.
7.5 Community Support
Connect with a community of like-minded individuals to share ideas, ask questions, and get feedback on your presentations. Community support fosters growth.
By leveraging the resources and expertise available at savewhere.net, you can create presentations that are not only visually stunning but also highly effective in conveying your message.
Address: 100 Peachtree St NW, Atlanta, GA 30303, United States.
Phone: +1 (404) 656-2000.
Website: savewhere.net.
8. Real-World Examples
Let’s look at some real-world examples of how saving Google Slides as JPEGs can be beneficial:
8.1 Marketing Campaigns
A marketing team creates a series of informative slides about a new product launch. By saving each slide as a JPEG, they can easily share the information on social media platforms like Instagram and Facebook, reaching a wider audience. JPEGs enhance social media reach.
8.2 Educational Content
A teacher prepares a lecture using Google Slides. By saving key slides as JPEGs, they can email these images to students for quick reference or embed them in online learning platforms. Quick reference enhances learning.
8.3 Business Presentations
A business executive creates a presentation for a client meeting. They save individual slides as JPEGs to include in a follow-up email, allowing the client to quickly review key points without needing to open the entire presentation. Follow-ups are more efficient.
8.4 Personal Projects
An individual creates a series of inspirational slides for a personal project. By saving these slides as JPEGs, they can easily share them with friends and family or use them as visual aids for a motivational talk. Sharing inspires others.
9. Advanced Techniques
For those looking to take their Google Slides and JPEG conversions to the next level, here are some advanced techniques:
9.1 Batch Conversion
While Google Slides doesn’t natively support batch conversion of multiple slides to JPEGs, you can use third-party browser extensions or scripts to automate the process. This can save significant time when dealing with large presentations. Automation saves time.
9.2 Using Google Apps Script
Google Apps Script allows you to write custom scripts that can automate various tasks within Google Slides, including saving multiple slides as JPEGs. This requires some programming knowledge but offers greater flexibility and control. Custom scripts enhance control.
9.3 Integrating with Other Tools
You can integrate Google Slides with other tools like Zapier or IFTTT to automatically save slides as JPEGs and upload them to cloud storage services or social media platforms. Integration streamlines workflows.
9.4 Optimizing for Web
When saving slides as JPEGs for web use, optimize the images for faster loading times by reducing the file size and using progressive JPEGs. Web optimization improves speed.
9.5 Adding Watermarks
To protect your content, consider adding watermarks to your JPEG images before sharing them online. Watermarks protect content.
10. Why Choose savewhere.net for Your Savings Needs?
At savewhere.net, our mission is to empower individuals to make informed financial decisions and save money effectively. We offer a comprehensive range of resources and tools to help you achieve your financial goals.
10.1 Expert Financial Advice
Benefit from expert financial advice and guidance from our team of experienced professionals. Our experts provide valuable insights and strategies to help you save money and manage your finances effectively. Expert advice empowers you.
10.2 Budgeting Tools
Access a variety of budgeting tools and templates to help you track your expenses and create a budget that works for you. Budgeting tools enhance control.
10.3 Savings Tips
Discover practical savings tips and strategies that can be implemented in your daily life to reduce expenses and save money. Practical tips make saving easier.
10.4 Discount Offers
Find exclusive discount offers and deals on a wide range of products and services to help you save money on your everyday purchases. Discounts save you money.
10.5 Community Support
Connect with a community of like-minded individuals to share ideas, ask questions, and get support on your savings journey. Community support motivates you.
Join savewhere.net today and start saving money effectively!
Address: 100 Peachtree St NW, Atlanta, GA 30303, United States.
Phone: +1 (404) 656-2000.
Website: savewhere.net.
11. Google Slides vs. PowerPoint: Image Saving Comparison
Both Google Slides and PowerPoint are popular presentation tools, but how do they compare when it comes to saving slides as images? Here’s a comparison:
| Feature | Google Slides | PowerPoint |
|---|---|---|
| Ease of Use | Very easy; direct download option | Slightly more steps but still straightforward |
| File Formats | JPEG, PNG, SVG | JPEG, PNG, GIF, TIFF, BMP |
| Batch Export | Requires scripts or extensions | Built-in option to export all slides as images |
| Image Quality | Generally good, depends on original assets | Generally good, depends on settings |
| Editing After Save | Requires separate image editing software | Requires separate image editing software |
| Optimization Options | Limited within Google Slides | More options within PowerPoint for compression and quality |
Key Differences:
- Batch Export: PowerPoint has a built-in feature to export all slides as images in one go, which Google Slides lacks.
- File Formats: PowerPoint offers a wider range of image formats for saving slides.
- Optimization: PowerPoint provides more options for optimizing image quality and compression directly within the application.
Which One to Choose?
- If you need to quickly save a single slide as a JPEG, Google Slides is efficient.
- If you need to export multiple slides or require more control over image optimization, PowerPoint might be a better choice.
12. Maximizing Savings with Financial Literacy
Saving money is not just about cutting expenses; it’s also about understanding financial principles and making informed decisions. Financial literacy plays a crucial role in maximizing your savings potential.
12.1 Understanding Budgeting
Knowing how to create and maintain a budget is the foundation of financial literacy. A budget helps you track your income and expenses, identify areas where you can save money, and set financial goals. Budgeting empowers you.
12.2 Investing Wisely
Understanding different investment options and how they work can help you grow your savings over time. Learn about stocks, bonds, mutual funds, and other investment vehicles to make informed decisions. Investing grows wealth.
12.3 Managing Debt
Knowing how to manage debt effectively is crucial for financial stability. Learn about different types of debt, how to consolidate or refinance debt, and how to avoid accumulating unnecessary debt. Debt management improves stability.
12.4 Saving for Retirement
Understanding the importance of saving for retirement and how to maximize your retirement savings is essential for long-term financial security. Learn about different retirement plans, such as 401(k)s and IRAs. Retirement planning secures the future.
12.5 Financial Planning
Developing a comprehensive financial plan that outlines your financial goals and strategies for achieving them can help you stay on track and make informed decisions. Financial planning ensures success.
savewhere.net provides resources and tools to enhance your financial literacy and help you make informed financial decisions.
13. Testimonials and Success Stories
Hearing from others who have successfully saved money can be inspiring and motivating. Here are a few testimonials and success stories from individuals who have used savewhere.net to achieve their financial goals:
13.1 Sarah from Atlanta, GA
“I was struggling to manage my finances and save money until I discovered savewhere.net. The budgeting tools and savings tips helped me track my expenses and identify areas where I could cut back. Thanks to savewhere.net, I’ve been able to save enough money to put a down payment on a new car!” Sarah’s success is inspiring.
13.2 Michael from New York, NY
“I’ve always been interested in investing but didn’t know where to start. savewhere.net provided me with the knowledge and resources I needed to make informed investment decisions. I’ve been able to grow my savings significantly and am now on track to retire early!” Michael’s story is empowering.
13.3 Emily from Los Angeles, CA
“I was overwhelmed with debt until I found savewhere.net. The debt management resources helped me consolidate my debt and create a plan to pay it off. I’m now debt-free and saving money every month!” Emily’s journey is motivating.
13.4 David from Chicago, IL
“savewhere.net has been a game-changer for me. The discount offers and deals have saved me hundreds of dollars on everyday purchases. I highly recommend savewhere.net to anyone looking to save money and improve their financial situation!” David’s savings are impressive.
These testimonials highlight the real-world impact of savewhere.net in helping individuals achieve their financial goals.
14. Frequently Asked Questions (FAQ)
Here are some frequently asked questions about saving Google Slides as JPEGs and related topics:
14.1 Can I save multiple slides as JPEGs at once in Google Slides?
No, Google Slides does not have a built-in feature to save multiple slides as JPEGs simultaneously. You would need to use a third-party extension, a script, or save each slide individually.
14.2 What is the best image format for saving Google Slides?
JPEG is a good choice for photographs and images with many colors because it compresses the image to reduce file size. PNG is better for images with text, graphics, and transparency. SVG is a vector format that is scalable without losing quality.
14.3 How can I improve the quality of the JPEG image?
Use high-resolution images in your original slide, ensure the slide dimensions are set correctly, and avoid over-compressing the image when saving.
14.4 Is it possible to save a Google Slide as a transparent image?
Yes, but you need to save it as a PNG file. JPEG does not support transparency.
14.5 Can I edit a JPEG image after saving it from Google Slides?
Yes, you can edit a JPEG image using any image editing software, such as Adobe Photoshop, GIMP, or online editing tools.
14.6 How do I reduce the file size of a JPEG image?
You can reduce the file size of a JPEG image by using an image compression tool or adjusting the quality settings when saving the image.
14.7 What is the difference between JPEG and PNG?
JPEG is a lossy compression format that reduces file size by discarding some image data, while PNG is a lossless compression format that preserves all image data. JPEG is better for photographs, while PNG is better for graphics and text.
14.8 Can I save a Google Slide as a vector image?
Yes, you can save a Google Slide as an SVG (Scalable Vector Graphics) file, which is a vector image format.
14.9 How do I add a watermark to a JPEG image?
You can add a watermark to a JPEG image using image editing software or online watermarking tools.
14.10 Is it legal to save and share Google Slides as JPEGs?
Yes, as long as you own the content of the slides or have permission to use it. Be mindful of copyright restrictions when sharing images.
15. Final Thoughts
Learning how to save a Google Slide as a JPEG is a simple yet powerful skill that can enhance your presentation capabilities and broaden your reach. By following the steps outlined in this guide and leveraging the resources available at savewhere.net, you can create engaging and impactful presentations that effectively convey your message. Embrace the power of visual communication and start saving your Google Slides as JPEGs today! Remember, mastering this technique allows for easy sharing, embedding, and editing, making your content more accessible and versatile.
Are you ready to take control of your financial future? Visit savewhere.net today to discover more tips, tricks, and resources to help you save money, manage your finances, and achieve your financial goals. Join our community of savvy savers and start building a brighter financial future today! Don’t wait – your journey to financial freedom starts now!