Achieving a luminous, glowing complexion is a sought-after makeup goal, and mastering the art of highlighter application is key to unlocking this radiant look. Highlighter is a transformative makeup product that can instantly brighten your face and accentuate your best features. However, knowing exactly where to place highlighter for maximum impact can be a mystery for many. If you’re new to the world of highlighting or seeking to perfect your technique, this guide is for you. We’ll explore expert tips and easy-to-follow tricks to help you master the glowing art of highlighter and elevate your makeup routine. Let’s illuminate your beauty knowledge!
Understanding Makeup Highlighter
Makeup highlighter is a cosmetic product meticulously designed to amplify your skin’s natural radiance. It works by catching and reflecting light on the high points of your face, creating the illusion of luminosity and dimension. Think of it as bottled light, designed to mimic the way your skin naturally glows when light hits it. By strategically applying highlighter, you can create a more youthful, vibrant, and healthy-looking complexion. Whether you desire a subtle, soft sheen or a more dramatic, eye-catching glow, highlighter is an indispensable tool in any makeup enthusiast’s kit.
For those wondering about the best way to use highlighter or precisely where to apply it, understanding your facial structure and the desired makeup effect is crucial. Whether you’re preparing for a casual day out, a professional setting, or a glamorous evening event, incorporating highlighter into your makeup application can instantly refine and enhance your overall appearance.
The Versatile Uses of Makeup Highlighter
Makeup highlighter is more than just a shimmer product; it’s a versatile tool with multiple benefits that can transform your makeup look. Its primary function is to mimic natural light reflection, bringing brightness and dimension to the face. Let’s explore the various ways highlighter can enhance your beauty:
Accentuating Your Best Features
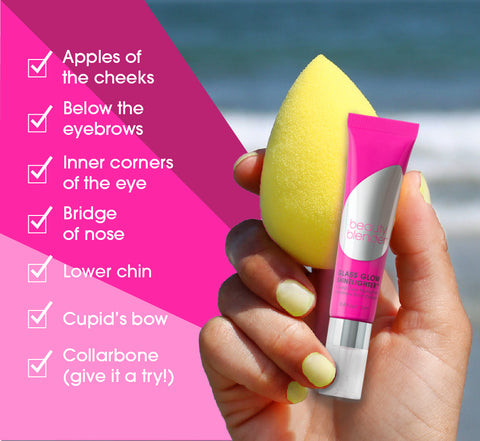
Highlighter’s strategic placement draws attention to the areas of your face that naturally catch light. These key areas include the cheekbones, brow bones, the bridge of the nose, and the cupid’s bow. Learning how to expertly apply both contour and highlighter in conjunction is a powerful technique for sculpting and balancing your facial features, ultimately enhancing your inherent beauty. Contour creates shadows to add depth, while highlighter brings light forward, creating a beautifully sculpted effect.
Promoting a Youthful and Fresh Glow
One of the most celebrated benefits of highlighter is its remarkable ability to impart a youthful and revitalized appearance to the skin. It adds a dewy, luminous finish to your makeup, making your skin look fresh, hydrated, and vibrant. This effect is particularly beneficial for creating a healthy glow, perfect for both everyday wear and more special occasions where you want to look your best.
Creating Balance in Your Makeup
Highlighter and contour are often considered a dynamic duo in makeup artistry. They work harmoniously to create a balanced and sculpted makeup look. Highlighter brightens the areas you wish to emphasize and bring forward, while contouring adds subtle shadows to minimize or redefine other areas. This interplay of light and shadow results in a beautifully defined and balanced facial structure, enhancing your natural contours.
Adding Radiance for Any Occasion
Highlighter is the quintessential product for achieving that coveted “lit-from-within” glow. It’s exceptionally effective for creating a radiant look that translates beautifully in photos, making it ideal for events, photoshoots, or any time you want to enhance your natural luminosity. Even for a casual day, a touch of highlighter can elevate your look from simple to stunning.
Enhancing Makeup Versatility Beyond the Face
The versatility of makeup highlighter extends beyond just the face. It can be used to add a touch of captivating shimmer to other areas like your collarbones, shoulders, or even as a subtle shimmer on your eyelids. This adaptability makes highlighter a truly multi-purpose product, seamlessly transitioning your look from daytime sophistication to evening glamour with a simple touch.
If you’re new to incorporating highlighter into your routine, understanding how to use highlighter makeup and, crucially, Where To Apply Highlighter is essential to achieving the best results. With a little practice and experimentation, you’ll quickly realize just how dramatically transformative this seemingly simple step can be in your overall beauty routine.
Precisely Where to Apply Highlighter Makeup
Knowing the prime locations for highlighter application is the secret to unlocking that flawless, radiant glow you desire. Makeup highlighter is expertly formulated to amplify your natural beauty by reflecting light from the highest points of your face, resulting in a luminous and beautifully sculpted effect. If you’re curious about how to apply blush and highlighter together for a seamless finish, or simply where to place your highlighter for maximum impact, this detailed guide will help you master face highlighter placement and elevate your makeup artistry.
Cheekbones: The Classic Highlight
The cheekbones are undeniably the most popular and universally flattering location for highlighter application. To enhance and lift your face, gently sweep a small amount of face highlighter along the tops of your cheekbones, positioning it just above your blush. This placement is where even the best highlighter truly excels, catching the light to add a youthful, sculpted, and dewy glow to your complexion. Applying it here instantly creates dimension and makes your cheekbones appear more prominent.
Brow Bones: Opening Up the Eyes
Apply a subtle touch of highlighter just beneath your eyebrows, precisely along the brow bone. This strategic placement serves a dual purpose: it not only beautifully defines the shape of your brows but also visually opens up your eyes, making them appear larger, brighter, and more awake. A touch of shimmer here can make a significant difference in your overall eye makeup look, adding a refreshed and polished touch.
Bridge of the Nose: Sculpting and Defining
Highlighting the bridge of your nose is a technique that can effectively elongate the appearance of your face and create a more refined, sculpted aesthetic. For a natural-looking glow, opt for a lightweight face highlighter and apply a thin, delicate line down the center of your nose. This subtle highlight can slim the nose and add a touch of elegance to your overall makeup.
Cupid’s Bow: Plumping the Lips
A dab of highlighter applied to the cupid’s bow—the distinctive V-shaped area just above the center of your upper lip—is a simple yet incredibly effective trick to make your lips appear naturally fuller and more defined. This highlight catches the light and creates the illusion of volume, enhancing your lip shape and adding dimension to your entire makeup look. It’s a favorite secret among makeup artists for creating a subtly glamorous pout.
Inner Corners of the Eyes: Brightening and Awakening
Brightening the inner corners of your eyes with a touch of makeup highlighter is a transformative trick to instantly make you look refreshed, wide awake, and more alert. This technique is particularly beneficial for combating signs of fatigue or dullness and is especially helpful for creating a bright, youthful appearance, even after a long day or a less-than-restful night. A small amount of shimmer in the inner corners can truly brighten your entire face.
Chin: Balancing Facial Luminosity
Dabbing a small amount of highlighter on the very center of your chin is a subtle yet effective way to add balance and symmetry to your overall highlighted face. This touch of glow ties your entire makeup look together, creating a harmonious and radiantly finished appearance. It prevents the highlight from being concentrated only on the upper parts of the face, ensuring a balanced and cohesive glow.
Collarbones and Shoulders: Adding Shimmer to the Décolletage
Highlighter’s versatility extends beyond just the face—it’s also an ideal product for adding a captivating touch of shimmer to your collarbones and shoulders. This application is particularly perfect for special occasions, evenings out, or anytime you’re wearing off-shoulder outfits or clothing that exposes the décolletage. A dusting of highlighter on these areas enhances your skin’s natural beauty and adds a touch of glamour to your overall look.
By thoroughly understanding where to use highlighter makeup and actively experimenting with these different placements, you can skillfully enhance your natural features and consistently achieve a radiant, professional-quality makeup finish every single time you apply it.
 where to put highlighter
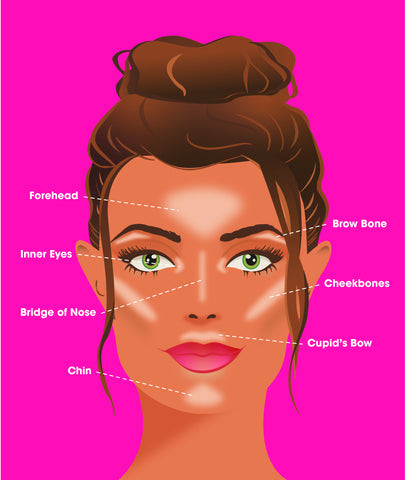
Guide showing where to apply highlighter on the face, highlighting cheekbones, brow bone, nose bridge, cupid’s bow, inner corner of the eye, and chin.
Step-by-Step Guide: How to Apply Highlighter on Your Face
Highlighter is a makeup essential that possesses the remarkable ability to completely transform your overall look. It works wonders by adding both brightness and definition to your features, bringing them to life. Whether you’re a complete makeup novice just starting out or a seasoned enthusiast aiming to perfect your radiant glow, understanding precisely how to apply highlighter is absolutely key to achieving professional-looking results. Here’s a comprehensive step-by-step guide to help you maximize the potential of your makeup highlighter and achieve a flawless, luminous finish.
Step 1: Prepare Your Skin for Smooth Highlighter Application
A meticulously prepped base is absolutely crucial for achieving a flawless highlighter application. Begin your makeup routine with a thoroughly cleansed and well-moisturized face. Follow this crucial step by applying a primer to create a perfectly smooth canvas for your makeup. Proper skin preparation is not just about creating a smooth surface; it significantly helps the highlighter blend seamlessly into your skin and dramatically enhances its staying power throughout the day or night.
Step 2: Pinpoint Where to Apply Your Highlighter
Strategic placement is everything when it comes to highlighter. Applying highlighter to the right areas of your face can make all the difference between a subtle glow and a striking, sculpted look. Focus your application on the naturally high points of your face—the areas where light naturally reflects. These key areas include:
- Cheekbones: Highlight the very tops of your cheekbones to create a lifted and beautifully radiant look.
- Brow Bones: Apply a small, precise amount of highlighter just under your eyebrows to effectively define and brighten your eyes.
- Bridge of the Nose: Add a delicate, thin line of highlighter down the center of your nose to achieve a sculpted and refined effect.
- Cupid’s Bow: Highlight the area right above your upper lip to create the appealing illusion of naturally fuller lips.
- Inner Corners of the Eyes: Brighten your entire eye area by carefully dabbing highlighter on the inner corners of your eyes.
- Chin: Add a subtle, balancing glow to the very center of your chin to harmonize your overall makeup look.
Step 3: Select and Use the Right Tools for Application
The makeup tools you choose to use can greatly influence both the ease and precision of your highlighter application. Using the right tools can make the process smoother, more controlled, and ultimately contribute to a more professional finish. Consider these essential tool options:
- Makeup Sponges: A slightly damp makeup sponge is an excellent choice for ensuring seamless blending of cream or liquid highlighters, resulting in a very natural and diffused glow.
- Makeup Brushes: For powder highlighters, opt for a fan brush or a tapered brush. These brush types are specifically designed for targeted and controlled application, allowing you to precisely place and blend powder highlighter for a soft, airbrushed effect.
Step 4: Master the Art of Blending for a Natural Finish
Blending is unequivocally the most critical step to achieving a flawless and natural-looking glow with highlighter. After carefully applying highlighter to your desired areas, take the time to gently blend the edges meticulously. This blending action is essential to avoid any harsh, visible lines of demarcation. The goal is to create a seamless transition between your highlighter and the rest of your makeup, ensuring it looks like a natural part of your skin rather than a separate layer.
Step 5: Set Your Glow for Longevity
To ensure your radiant highlighter lasts throughout the day or evening, it’s crucial to set your glow. You can effectively set your highlighter by using a setting spray or by lightly dusting translucent powder over the highlighted areas. This important step effectively locks in your makeup look, prevents fading or smudging, and ensures your luminous glow remains vibrant and fresh-looking for hours.
Mastering the art of how to use highlighter effectively is fundamentally about understanding your unique facial features and then experimenting with different application techniques to find what works best for you. By consistently following these detailed tips and practicing regularly, you can effortlessly achieve a radiant and healthy-looking glow that beautifully enhances your natural beauty and elevates your entire makeup game to the next level.
 how to apply highlighter
Makeup artist applying highlighter to cheek with a brush, demonstrating proper highlighter application technique.
Common Mistakes to Avoid When Using Highlighter
While highlighter is a potent tool for creating a radiant and glowing complexion, it’s surprisingly easy to make common mistakes that can inadvertently take your look from luminous to unfortunately overdone. To ensure you’re making the most of your highlighter makeup and consistently creating a flawless finish, it’s crucial to be aware of and actively avoid these common pitfalls.
Mistake 1: Applying Too Much Highlighter
One of the most prevalent mistakes people make when using highlighter is simply applying too much product. While the goal is to glow, using an excessive amount can easily cross the line and make your skin appear greasy or artificially shiny rather than naturally glowing. The best approach is to always start with a small, controlled amount of highlighter and then build up the intensity gradually. This method allows you to achieve a beautifully natural, radiant finish without overdoing it.
Mistake 2: Selecting the Wrong Highlighter Shade
Choosing the incorrect shade of highlighter for your specific skin tone can quickly lead to an unnatural and unflattering look. It’s important to carefully consider your skin’s undertones and avoid highlighters that are overly frosty, too glittery, or mismatched to your complexion. The ideal highlighter shade should seamlessly complement your skin, enhancing your natural radiance rather than clashing with it.
Mistake 3: Neglecting Proper Blending
Highlighter is intended to mimic a natural, healthy glow, not appear as a stark, unblended streak of shimmer on your face. Failing to blend your highlighter properly is a common mistake that can leave noticeable and unflattering lines on your skin. To avoid this, always use a makeup sponge, a brush, or even your fingertips to gently and thoroughly soften the edges of the highlighter. This blending action is essential for creating a smooth, diffused finish that looks like it’s naturally emanating from within your skin.
Mistake 4: Applying Highlighter to Incorrect Areas
Knowing precisely where to put highlighter makeup is absolutely crucial for achieving a flattering and harmonious look. Avoid the common mistake of placing highlighter in areas that do not naturally catch light, such as the center of your cheeks or forehead. These areas can often emphasize texture or pores rather than enhance your features. Stick to the high points of your face for the most flattering and effective application.
Mistake 5: Skipping Essential Skin Preparation
Applying highlighter directly onto dry, unprepared skin is a recipe for a patchy and uneven application. Always prioritize prepping your skin properly before applying any makeup, especially highlighter. Start with a good moisturizer and follow with a primer to create a smooth, hydrated base. This prepared canvas allows the highlighter to glide on effortlessly, blend seamlessly, and adhere better to the skin, resulting in a much more polished and long-lasting finish.
Mistake 6: Ignoring Your Overall Makeup Look
Highlighter should always complement and enhance your entire makeup look, not compete with it. Avoid the mistake of pairing an intensely glittery or blinding highlighter with heavy contouring or bold eyeshadow. This combination can easily overwhelm your features and make your overall look appear overdone and unbalanced. For a more refined and balanced effect, opt for a highlighter that is more subtle and sophisticated. Choose one that enhances your features without overpowering them, ensuring your makeup looks cohesive and harmonious.
Mistake 7: Forgetting to Set Your Makeup
Highlighter, like other cream or liquid-based makeup products, is prone to fading or smudging throughout the day if it’s not properly set. Forgetting to set your highlighter is a common mistake that can compromise the longevity and vibrancy of your glow. To prevent this, always use a setting spray or a light dusting of translucent powder to effectively lock in your highlighted look. Setting your makeup ensures that your radiant glow stays fresh, vibrant, and in place for hours, maintaining your flawless finish from morning until night.
Highlighter is ultimately designed to enhance your features and add a touch of radiance, not to overpower your entire makeup look. By consciously avoiding these common mistakes and consistently focusing on proper application techniques, you can confidently achieve a radiant, natural-looking glow that beautifully highlights your best features and elevates your overall makeup artistry. Practice and ongoing experimentation are key to finding the perfect balance of highlighter for your unique skin type, tone, and personal style preferences.
Frequently Asked Questions About Highlighter Application
Should highlighter be applied before or after blush?
The general rule of thumb is to apply highlighter after blush. This strategic layering ensures that the highlighter effectively enhances the high points of your face and stands out prominently, adding a natural and luminous glow precisely where you want it. Applying highlighter after blush also allows for seamless blending of both products, resulting in a polished and harmonious makeup finish. This technique is particularly effective for defining your cheekbones while beautifully complementing your overall makeup look.
Where is the best place to apply highlighter on mature skin?
For mature skin, the key to highlighter application is to use it sparingly and strategically to avoid inadvertently emphasizing fine lines, wrinkles, or skin texture. Focus your highlighter application on areas that naturally reflect light and tend to remain smoother with age, such as the very tops of the cheekbones, the brow bones (under the arch), and the bridge of the nose. For mature skin, it’s generally best to avoid using highlighter on areas that have more texture or visible pores. Opt for creamy or liquid highlighter formulas, as these tend to blend more seamlessly into mature skin and provide a more hydrating and youthful-looking glow compared to powder highlighters, which can sometimes settle into lines.
Is it better to apply highlighter before or after foundation?
Highlighter is typically applied after foundation. Applying foundation first creates an even base and allows the highlighter to blend smoothly and sit beautifully on top of your base makeup. This placement ensures maximum luminosity and helps the highlighter stand out effectively. However, for those seeking a more subtle, all-over dewy glow, you can also experiment with mixing a liquid highlighter directly into your foundation before applying it to your face. This technique provides an overall radiant complexion rather than concentrated highlights.
What is the most effective way to apply highlighter for the best results?
The most effective way to apply highlighter to achieve the best results is to concentrate your application on the high points of your face. These key areas include the cheekbones, brow bones, bridge of the nose, and cupid’s bow. For precise application and seamless blending, use a damp makeup sponge for cream or liquid highlighters, or a fan brush or tapered brush for powder highlighters. Regardless of the tool or formula you choose, always remember to blend thoroughly to eliminate any harsh lines and ensure a natural, diffused glow.
How do I choose the best highlighter to achieve a gorgeous glow?
To choose the best highlighter for a truly gorgeous glow, consider both your skin tone and your personal texture preferences. For a natural-looking radiance, select a highlighter shade that complements your skin’s undertones—warm, cool, or neutral. It’s also beneficial to look for top-rated highlighter makeup products that are known for their blendability and seamless finish. Reading reviews and trying testers (if possible) can help you find a highlighter that not only provides the desired level of glow but also works well with your skin type and makeup style.
What is the primary purpose of highlighter in makeup?
The primary purpose of highlighter in makeup is to enhance your face by strategically reflecting light off the high points. This reflection creates a multitude of desirable effects: it adds brightness, promotes a youthful and radiant appearance, and sculpts and defines your features. By adding dimension to areas like your cheekbones, brow bones, and nose, highlighter makes these features stand out and appear more prominent. Furthermore, highlighter works in perfect synergy with contouring techniques by brightening specific areas and creating balance in your overall makeup look.
What type of highlighter is best for achieving a natural-looking glow?
The best type of highlighter for achieving a truly natural glow is one that enhances your skin’s inherent radiance without appearing overly shimmery, glittery, or artificial. Look for lightweight, buildable formulas that offer a subtle sheen rather than intense sparkle. Cream or liquid highlighters are generally excellent choices for creating a dewy, fresh, and skin-like finish. Finely milled powder highlighters can also work beautifully for a soft, diffused glow, provided they are not too glittery and blend seamlessly into the skin. The key is to find a formula and shade that melts into your skin and looks like a natural part of your complexion, just amplified with a healthy luminosity.